
User Guide
Page 10
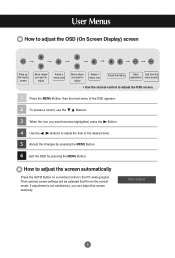
User Menus How to adjust the OSD (On Screen Display) screen MENU MENU MENU Pops up the menu screen Move where you want to adjust Select a menu icon Move where you want becomes highlighted, press ... the MENU Button, then the main menu of the OSD appears. 2 To access a control, use the Buttons. 3 When the icon you can adjust the screen manually. Auto-Adjust 9 If adjustment is not satisfactory, you want to adjust Select a menu icon Adjust the status Save Exit from the adjustment menu screen. •...
User Menus How to adjust the OSD (On Screen Display) screen MENU MENU MENU Pops up the menu screen Move where you want to adjust Select a menu icon Move where you want becomes highlighted, press ... the MENU Button, then the main menu of the OSD appears. 2 To access a control, use the Buttons. 3 When the icon you can adjust the screen manually. Auto-Adjust 9 If adjustment is not satisfactory, you want to adjust Select a menu icon Adjust the status Save Exit from the adjustment menu screen. •...
User Guide
Page 15
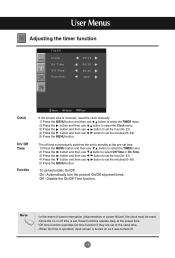
... set the minutes(00~59). 5) Press the MENU button. Note In the event of power interruption (disconnection or power failure), the clock must be reset. User Menus Adjusting the timer function TIMER Clock On Time Off Time Function 02:02 06:30 22:00 OFF Clock On/ Off Time Function Move... Select MENU Exit If the current time is incorrect, reset the clock manually. 1) Press the MENU button and then use button to select the TIMER menu. 2) Press the button and then use button to select the Clock menu...
... set the minutes(00~59). 5) Press the MENU button. Note In the event of power interruption (disconnection or power failure), the clock must be reset. User Menus Adjusting the timer function TIMER Clock On Time Off Time Function 02:02 06:30 22:00 OFF Clock On/ Off Time Function Move... Select MENU Exit If the current time is incorrect, reset the clock manually. 1) Press the MENU button and then use button to select the TIMER menu. 2) Press the button and then use button to select the Clock menu...
User Guide
Page 17
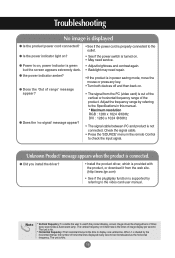
... product. The vertical frequency or refresh rate is out of the vertical or horizontal frequency range of image display per second. Note * Vertical frequency: To enable the user to display one vertical line. Troubleshooting No image is not connected. G Does the 'Out of times every second like... the 'SOURCE' menu in this manual. * Maximum resolution RGB : 1280 x 1024 @60Hz DVI : 1280 x 1024 @60Hz • The signal cable between PC and product is displayed G Is the product power cord connected? When 1 is kHz. 16 The unit is divided by referring to the video card user manual.
... product. The vertical frequency or refresh rate is out of the vertical or horizontal frequency range of image display per second. Note * Vertical frequency: To enable the user to display one vertical line. Troubleshooting No image is not connected. G Does the 'Out of times every second like... the 'SOURCE' menu in this manual. * Maximum resolution RGB : 1280 x 1024 @60Hz DVI : 1280 x 1024 @60Hz • The signal cable between PC and product is displayed G Is the product power cord connected? When 1 is kHz. 16 The unit is divided by referring to the video card user manual.

