Owner's Manual (English)
Page 1
... TV PLASMA TV OWNER'S MANUAL LCD TV MODELS 32LG30 37LG30 42LG30 42LGX 47LGX 32LG60 37LG60 42LG60 47LG60 52LG60 37LG50 42LG50 47LG50 52LG50 32LG70 42LG70 47LG70 52LG70 PLASMA TV MODELS 42PG25 50PG25 50PG60 60PG60 50PG70 60PG70 47LG90 Please read this manual carefully before operating your dealer when you require service. P/NO : SAC30708020 (0809-REV08) www.lgusa.com / www.lg...
... TV PLASMA TV OWNER'S MANUAL LCD TV MODELS 32LG30 37LG30 42LG30 42LGX 47LGX 32LG60 37LG60 42LG60 47LG60 52LG60 37LG50 42LG50 47LG50 52LG50 32LG70 42LG70 47LG70 52LG70 PLASMA TV MODELS 42PG25 50PG25 50PG60 60PG60 50PG70 60PG70 47LG90 Please read this manual carefully before operating your dealer when you require service. P/NO : SAC30708020 (0809-REV08) www.lgusa.com / www.lg...
Owner's Manual (English)
Page 4
...the disconnecting device. Do not overload wall outlets. Any of fire or electrical shock, do not expose this owner's manual to be certain. Do not make sure 12 not to install the TV by connecting it , discontinue use a damaged or loose power cord. To reduce the risk of these conditions could...pinched, closed in fire or electric shock. SAFETY INSTRUCTIONS 11 Never touch this product near flammable objects such as gasoline or candles or expose the TV to direct air conditioning. 16 Do not expose to dripping or splashing and do not place objects filled with liquids, such as vases, cups, ...
...the disconnecting device. Do not overload wall outlets. Any of fire or electrical shock, do not expose this owner's manual to be certain. Do not make sure 12 not to install the TV by connecting it , discontinue use a damaged or loose power cord. To reduce the risk of these conditions could...pinched, closed in fire or electric shock. SAFETY INSTRUCTIONS 11 Never touch this product near flammable objects such as gasoline or candles or expose the TV to direct air conditioning. 16 Do not expose to dripping or splashing and do not place objects filled with liquids, such as vases, cups, ...
Owner's Manual (English)
Page 6
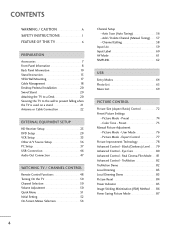
...Picture Mode - Real Cinema/Film Mode . . . . . 81 Advanced Control - Preset 75 Manual Picture Adjustment - Eye Care 80 Advanced Control - CONTENTS WARNING / CAUTION A SAFETY INSTRUCTIONS 1 FEATURE OF THIS TV 6 PREPARATION Accessories 7 Front Panel Information 8 Back Panel Information 10 Stand Instruction 13 VESA Wall ...Other A/V Source Setup 36 PC Setup 37 USB Connection 46 Audio Out Connection 47 WATCHING TV / CHANNEL CONTROL Remote Control Functions 48 Turning On the TV 50 Channel Selection 50 Volume Adjustment 50 Quick Menu 51 Initial Setting 52 On-Screen ...
...Picture Mode - Real Cinema/Film Mode . . . . . 81 Advanced Control - Preset 75 Manual Picture Adjustment - Eye Care 80 Advanced Control - CONTENTS WARNING / CAUTION A SAFETY INSTRUCTIONS 1 FEATURE OF THIS TV 6 PREPARATION Accessories 7 Front Panel Information 8 Back Panel Information 10 Stand Instruction 13 VESA Wall ...Other A/V Source Setup 36 PC Setup 37 USB Connection 46 Audio Out Connection 47 WATCHING TV / CHANNEL CONTROL Remote Control Functions 48 Turning On the TV 50 Channel Selection 50 Volume Adjustment 50 Quick Menu 51 Initial Setting 52 On-Screen ...

Owner's Manual (English)
Page 7
... Volume 88 Preset Sound Settings (Sound Mode) 89 Sound Setting Adjustment - Digital Broadcasting System Captions 99 - Auto Clock Setup 101 Manual Clock Setup 102 Auto On/Off Time Setting 103 Sleep Timer Setting 104 Auto Shut-off Setting 105 PARENTAL CONTROL / RATINGS Set Password... & Lock System 106 Channel Blocking 109 Movie & TV Rating 110 Downloadable Rating 115 External Input Blocking 116 Key lock 117 APPENDIX Troubleshooting 118 Maintenance 120 Product Specifications 121 Programming the...
... Volume 88 Preset Sound Settings (Sound Mode) 89 Sound Setting Adjustment - Digital Broadcasting System Captions 99 - Auto Clock Setup 101 Manual Clock Setup 102 Auto On/Off Time Setting 103 Sleep Timer Setting 104 Auto Shut-off Setting 105 PARENTAL CONTROL / RATINGS Set Password... & Lock System 106 Channel Blocking 109 Movie & TV Rating 110 Downloadable Rating 115 External Input Blocking 116 Key lock 117 APPENDIX Troubleshooting 118 Maintenance 120 Product Specifications 121 Programming the...
Owner's Manual (English)
Page 9
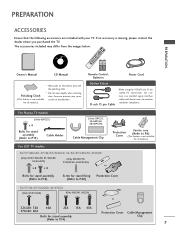
...5V Copyright© 2007 LGE, All Rights Reserved. for all models.) For LCD TV models 32/37/42LG30, 37/42/47/52LG50, 32/42/47/52LG70, 47LG90 (Only 32/37/42LG30, 37/42LG50, 32/42LG70) (Only 32LG30/70, 37LG30/50, 42LG30/50) or x4 x4... interface cables with ferrite cores to P.14) 7 Excessive pressure may differ from the images below. RETURN TV Q. For Plasma TV models (Only 42PG25) x 4 Bolts for stand assembly (Refer to P.13) Cable Holder (Only 50PG25... the dealer where you purchased the TV. Owner's Manual CD Manual * Wipe spots on the exterior only with your...
...5V Copyright© 2007 LGE, All Rights Reserved. for all models.) For LCD TV models 32/37/42LG30, 37/42/47/52LG50, 32/42/47/52LG70, 47LG90 (Only 32/37/42LG30, 37/42LG50, 32/42LG70) (Only 32LG30/70, 37LG30/50, 42LG30/50) or x4 x4... interface cables with ferrite cores to P.14) 7 Excessive pressure may differ from the images below. RETURN TV Q. For Plasma TV models (Only 42PG25) x 4 Bolts for stand assembly (Refer to P.13) Cable Holder (Only 50PG25... the dealer where you purchased the TV. Owner's Manual CD Manual * Wipe spots on the exterior only with your...
Owner's Manual (English)
Page 19
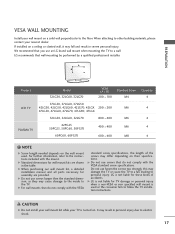
... 42LG30, 42LG50, 42LG60, 42LG70, 42LGX 200 * 200 47LG50, 47LG60, 47LG70, 47LG90, 47LGX Standard Screw M4 M6 52LG50, 52LG60, 52LG70 42PG25 50PG25, 50PG60, 50PG70 800 * 400 M6 400 * 400 M6 60PG60, 60PG70 600 * 400 M8 Quantity 4 4 4 4 4 ! It may cause damage to the inside to the TV. When ...wall mounts that do not comply with the mount. G LG is not liable for assembly are shown in personal injury due to electric shock. 17 G When purchasing our wall mount kit, a detailed installation manual and all parts necessary for TV damage or personal injury when a non-VESA or non...
... 42LG30, 42LG50, 42LG60, 42LG70, 42LGX 200 * 200 47LG50, 47LG60, 47LG70, 47LG90, 47LGX Standard Screw M4 M6 52LG50, 52LG60, 52LG70 42PG25 50PG25, 50PG60, 50PG70 800 * 400 M6 400 * 400 M6 60PG60, 60PG70 600 * 400 M8 Quantity 4 4 4 4 4 ! It may cause damage to the inside to the TV. When ...wall mounts that do not comply with the mount. G LG is not liable for assembly are shown in personal injury due to electric shock. 17 G When purchasing our wall mount kit, a detailed installation manual and all parts necessary for TV damage or personal injury when a non-VESA or non...
Owner's Manual (English)
Page 22
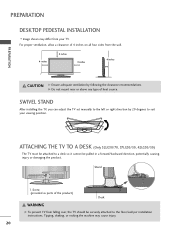
... I Image shown may cause injury. 20 Stand 1-Screw (provided as parts of the product) Desk WARNING G To prevent TV from falling over, the TV should be securely attached to a desk so it cannot be attached to the floor/wall per installation instructions. For proper ventilation..., allow a clearance of heat source. SWIVEL STAND After installing the TV, you can adjust the TV set manually to suit your TV. Tipping, shaking, or rocking the machine may differ from the wall. 4 inches 4 inches 4 inches 4 inches ...
... I Image shown may cause injury. 20 Stand 1-Screw (provided as parts of the product) Desk WARNING G To prevent TV from falling over, the TV should be securely attached to a desk so it cannot be attached to the floor/wall per installation instructions. For proper ventilation..., allow a clearance of heat source. SWIVEL STAND After installing the TV, you can adjust the TV set manually to suit your TV. Tipping, shaking, or rocking the machine may differ from the wall. 4 inches 4 inches 4 inches 4 inches ...
Owner's Manual (English)
Page 25
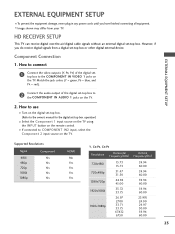
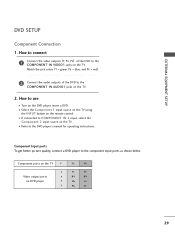
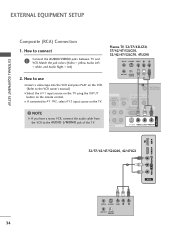
... on the TV. 2. Match the jack colors (Y = green, PB = blue, and PR = red). 2 Connect the audio output of the digital settop box to the COMPONENT IN AUDIO 1 jacks on the remote control. I Turn on the digital set-top box. (Refer to the owner's manual for the ...digital set -top box to the COMPONENT IN VIDEO 1 jacks on the TV. Component Connection 1. EXTERNAL EQUIPMENT SETUP EXTERNAL EQUIPMENT SETUP I Image shown may differ from a digital set -top ...
... on the TV. 2. Match the jack colors (Y = green, PB = blue, and PR = red). 2 Connect the audio output of the digital settop box to the COMPONENT IN AUDIO 1 jacks on the remote control. I Turn on the digital set-top box. (Refer to the owner's manual for the ...digital set -top box to the COMPONENT IN VIDEO 1 jacks on the TV. Component Connection 1. EXTERNAL EQUIPMENT SETUP EXTERNAL EQUIPMENT SETUP I Image shown may differ from a digital set -top ...
Owner's Manual (English)
Page 27
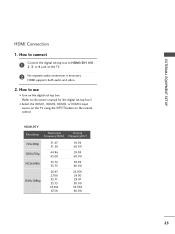
... on the digital set-top box. (Refer to the owner's manual for the digital set -top box to connect 1 Connect the digital set -top box.) I Select the HDMI1, HDMI2, HDMI3, or HDMI4 input source on the TV using the INPUT button on the TV. 2 No separate audio connection is necessary. How to HDMI...
... on the digital set-top box. (Refer to the owner's manual for the digital set -top box to connect 1 Connect the digital set -top box.) I Select the HDMI1, HDMI2, HDMI3, or HDMI4 input source on the TV using the INPUT button on the TV. 2 No separate audio connection is necessary. How to HDMI...
Owner's Manual (English)
Page 29
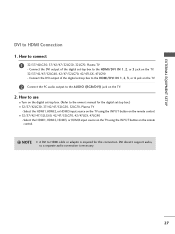
..., so a separate audio connection is required for the digital set -top box to the HDMI/DVI IN 1, 2, 3, or 4 jack on the TV. 2 Connect the PC audio output to the owner's manual for this connection. How to use I Turn on the digital set-top box. (Refer to the AUDIO (RGB/DVI) jack on... the remote control. ! NOTE G A DVI to HDMI cable or adapter is necessary. 27 Select the HDMI1, HDMI2, or HDMI3 input source on the TV using the INPUT...
..., so a separate audio connection is required for the digital set -top box to the HDMI/DVI IN 1, 2, 3, or 4 jack on the TV. 2 Connect the PC audio output to the owner's manual for this connection. How to use I Turn on the digital set-top box. (Refer to the AUDIO (RGB/DVI) jack on... the remote control. ! NOTE G A DVI to HDMI cable or adapter is necessary. 27 Select the HDMI1, HDMI2, or HDMI3 input source on the TV using the INPUT...
Owner's Manual (English)
Page 31
How to use I Refer to the DVD player's manual for operating instructions. I Turn on the TV. 2. Component ports on the TV Y Y Video output ports Y on the TV. Match the jack colors (Y = green, PB = blue, and PR = red). 2 Connect the audio outputs of the DVD to COMPONENT IN 2 input, select...DVD player to the COMPONENT IN AUDIO1 jacks on the DVD player, insert a DVD. I Select the Component 1 input source on the TV using the INPUT button on the TV. I If connected to the COMPONENT IN VIDEO1 jacks on the remote control. How to connect 1 Connect the video outputs (Y, PB, ...
How to use I Refer to the DVD player's manual for operating instructions. I Turn on the TV. 2. Component ports on the TV Y Y Video output ports Y on the TV. Match the jack colors (Y = green, PB = blue, and PR = red). 2 Connect the audio outputs of the DVD to COMPONENT IN 2 input, select...DVD player to the COMPONENT IN AUDIO1 jacks on the DVD player, insert a DVD. I Select the Component 1 input source on the TV using the INPUT button on the TV. I If connected to the COMPONENT IN VIDEO1 jacks on the remote control. How to connect 1 Connect the video outputs (Y, PB, ...

Owner's Manual (English)
Page 33
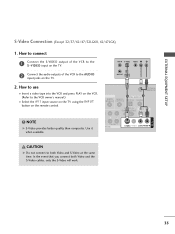
How to the DVD player's manual for operating instructions. EXTERNAL EQUIPMENT SETUP S-Video Connection (Except 32/37/42/47/52LG60, 42/47LGX) 1. I Turn on the DVD player, insert a DVD. I Refer to use I Select the A V 1 input source on the TV using the INPUT button on the TV. 2. How to connect 1 Connect the... S-VIDEO output of the DVD to the S -VIDEO input on the TV. 2 Connect the audio outputs of the DVD to the AUDIO input jacks on the...
How to the DVD player's manual for operating instructions. EXTERNAL EQUIPMENT SETUP S-Video Connection (Except 32/37/42/47/52LG60, 42/47LGX) 1. I Turn on the DVD player, insert a DVD. I Refer to use I Select the A V 1 input source on the TV using the INPUT button on the TV. 2. How to connect 1 Connect the... S-VIDEO output of the DVD to the S -VIDEO input on the TV. 2 Connect the audio outputs of the DVD to the AUDIO input jacks on the...
Owner's Manual (English)
Page 34
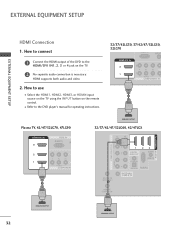
I Select the HDMI1, HDMI2, HDMI3, or HDMI4 input source on the TV using the INPUT button on the TV. 2 No separate audio connection is necessary. How to connect 1 Connect the HDMI output of the DVD to the DVD player's manual for operating instructions. 32/37/42LG30, 37/42/47/52LG50, 32LG70 RGB(...PC) AUDIO (RGB/D HDMI/DVI IN 2 1 2 Y 1 PB PR L VIDEO A COMPONENT IN 1 RGB IN HDMI/DVI IN Plasma TV, 42/47/52LG70, 47LG90 HDMI/DVI IN 3 RGB IN ...
I Select the HDMI1, HDMI2, HDMI3, or HDMI4 input source on the TV using the INPUT button on the TV. 2 No separate audio connection is necessary. How to connect 1 Connect the HDMI output of the DVD to the DVD player's manual for operating instructions. 32/37/42LG30, 37/42/47/52LG50, 32LG70 RGB(...PC) AUDIO (RGB/D HDMI/DVI IN 2 1 2 Y 1 PB PR L VIDEO A COMPONENT IN 1 RGB IN HDMI/DVI IN Plasma TV, 42/47/52LG70, 47LG90 HDMI/DVI IN 3 RGB IN ...
Owner's Manual (English)
Page 35
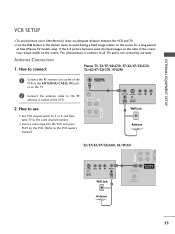
ANTENNA/ CABLE IN et on the sides of time (Plasma TV models only). I Use the ISM feature in socket of the VCR. This phenomenon is common to the same channel number. UDIO OUT COAXIAL 1 2 Connect the antenna cable to the VCR owner's manual.) EO L(MONO) AUDIO R ANT OUT S-VIDEO VIDEO L .... AUDIO OUT E) 2. EXTERNAL EQUIPMENT SETUP VCR SETUP I Set VCR output switch to 3 or 4 and then tune TV to all TVs and is used; Antenna Connection 1. How to connect Plasma TV, 32/37/42LG30, 37/42/47/52LG50, 32/42/47/52LG70, 47LG90 1 Connect the RF antenna out socket of...
ANTENNA/ CABLE IN et on the sides of time (Plasma TV models only). I Use the ISM feature in socket of the VCR. This phenomenon is common to the same channel number. UDIO OUT COAXIAL 1 2 Connect the antenna cable to the VCR owner's manual.) EO L(MONO) AUDIO R ANT OUT S-VIDEO VIDEO L .... AUDIO OUT E) 2. EXTERNAL EQUIPMENT SETUP VCR SETUP I Set VCR output switch to 3 or 4 and then tune TV to all TVs and is used; Antenna Connection 1. How to connect Plasma TV, 32/37/42LG30, 37/42/47/52LG50, 32/42/47/52LG70, 47LG90 1 Connect the RF antenna out socket of...
Owner's Manual (English)
Page 36
... the audio cable from the VCR to connect 1 Connect the AUDIO/VIDEO jacks between TV and VCR. How to use I Insert a video tape into the VCR and press PLAY on the VCR. (Refer to the VCR owner's manual.) I If connected to AV IN2, select AV2 input source on the remote control. I Select... the A V 1 input source on the TV using the INPUT button on the TV. ! Match the jack colors (Video = yellow, Audio Left = white, and Audio Right...
... the audio cable from the VCR to connect 1 Connect the AUDIO/VIDEO jacks between TV and VCR. How to use I Insert a video tape into the VCR and press PLAY on the VCR. (Refer to the VCR owner's manual.) I If connected to AV IN2, select AV2 input source on the remote control. I Select... the A V 1 input source on the TV using the INPUT button on the TV. ! Match the jack colors (Video = yellow, Audio Left = white, and Audio Right...
Owner's Manual (English)
Page 37
... to use I Insert a video tape into the VCR and press PLAY on the VCR. (Refer to the VCR owner's manual.) I Select the A V 1 input source on the TV using the INPUT button on the TV. 2. ANT IN S-VIDEO VIDEO L R ANT OUT OUTPUT SWITCH ANTENNA/ CABLE IN D1IGITAL AUDIO OUT2 AUDIO REMOTE (RGB/DVI) CONTROL... same time. NOTE G S-Video provides better quality than composite. How to connect 1 Connect the S-VIDEO output of the VCR to the S -VIDEO input on the TV. 2 Connect the audio outputs of the VCR to both Video and the S-Video cables, only the S-Video will work. 35
... to use I Insert a video tape into the VCR and press PLAY on the VCR. (Refer to the VCR owner's manual.) I Select the A V 1 input source on the TV using the INPUT button on the TV. 2. ANT IN S-VIDEO VIDEO L R ANT OUT OUTPUT SWITCH ANTENNA/ CABLE IN D1IGITAL AUDIO OUT2 AUDIO REMOTE (RGB/DVI) CONTROL... same time. NOTE G S-Video provides better quality than composite. How to connect 1 Connect the S-VIDEO output of the VCR to the S -VIDEO input on the TV. 2 Connect the audio outputs of the VCR to both Video and the S-Video cables, only the S-Video will work. 35
Owner's Manual (English)
Page 49
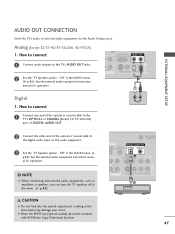
... instruction manual for operation. NOTE G When connecting with ACP(Audio Copy Protection) function. Analog (Except 32/37/42/47/52LG60, 42/47LGX) 1. Looking at the laser beam may damage your vision. AV IN 1 EXTERNAL EQUIPMENT SETUP AUDIO OUT CONNECTION Send the TV's audio to the TV's AUDIO... OUT jacks. 2 Set the "TV Speaker option - Off" in the AUDIO menu. (G p.93). R AUDIO S-VIDEO VIDEO L(MONO) AUDIO R 1 Digital L R ...
... instruction manual for operation. NOTE G When connecting with ACP(Audio Copy Protection) function. Analog (Except 32/37/42/47/52LG60, 42/47LGX) 1. Looking at the laser beam may damage your vision. AV IN 1 EXTERNAL EQUIPMENT SETUP AUDIO OUT CONNECTION Send the TV's audio to the TV's AUDIO... OUT jacks. 2 Set the "TV Speaker option - Off" in the AUDIO menu. (G p.93). R AUDIO S-VIDEO VIDEO L(MONO) AUDIO R 1 Digital L R ...
Owner's Manual (English)
Page 53
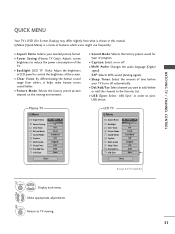
... what is a menu of program. MENU 2 Display each menu. I Caption: Select on the viewing environment. I Aspect Ratio: Selects your TV turns off . MENU Return to control the brightness of time before your desired picture format. I Multi Audio: Changes the audio language (Digital signal...). I USB Eject: Select "USB Eject" in this manual. Q.Menu (Quick Menu) is shown in order to reduce the power consumption of the TV. I Backlight (LCD TV Only): Adjust the brightness of LCD panel to TV viewing. 51 SAP: Selects MTS sound (Analog signal). I Sleep ...
... what is a menu of program. MENU 2 Display each menu. I Caption: Select on the viewing environment. I Aspect Ratio: Selects your TV turns off . MENU Return to control the brightness of time before your desired picture format. I Multi Audio: Changes the audio language (Digital signal...). I USB Eject: Select "USB Eject" in this manual. Q.Menu (Quick Menu) is shown in order to reduce the power consumption of the TV. I Backlight (LCD TV Only): Adjust the brightness of LCD panel to TV viewing. 51 SAP: Selects MTS sound (Analog signal). I Sleep ...
Owner's Manual (English)
Page 54
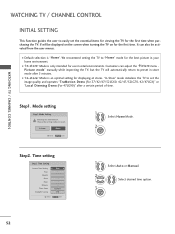
...guides the user to preset in-store mode after a certain period of time. Customers can also be displayed on the screen when turning the TV on for displaying at stores. Mode setting Step1. Time setting Step2. Time Setting Current Time Setting Year Month Date Hour Minute Time Zone ... Auto G 2007 11 15 5 PM 52 Eastern Off Enter RETURN Exit 1 Select Auto or Manual. 2 3 ENTER Select desired time option. 52 It can adjust the "Picture menu Picture mode" manually while inspecting the TV, but the TV will be activated from the user menus. I "In-store" Mode is only intended for the...
...guides the user to preset in-store mode after a certain period of time. Customers can also be displayed on the screen when turning the TV on for displaying at stores. Mode setting Step1. Time setting Step2. Time Setting Current Time Setting Year Month Date Hour Minute Time Zone ... Auto G 2007 11 15 5 PM 52 Eastern Off Enter RETURN Exit 1 Select Auto or Manual. 2 3 ENTER Select desired time option. 52 It can adjust the "Picture menu Picture mode" manually while inspecting the TV, but the TV will be activated from the user menus. I "In-store" Mode is only intended for the...
Owner's Manual (English)
Page 56
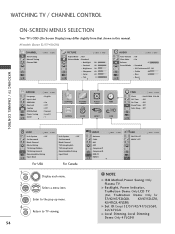
...47/52LG60, 4 2 / 4 7 L G X. WATCHING TV / CHANNEL CONTROL ON-SCREEN MENUS SELECTION Your TV's OSD (On Screen Display) may differ slightly from that shown in this manual. All models (Except 32/37/42LG30) CHANNEL Auto Tuning Manual Tuning Channel Edit Move Enter PICTURE Move Aspect Ratio : 16:9...Voice : On Balance 0L R Sound Mode : Standard • SRS TruSurround XT: Off • Treble 50 • Bass 50 • Reset E WATCHING TV / CHANNEL CONTROL OPTION Language Input Label SIMPLINK Key Lock Caption ISM Method Power Saving Set ID E Move Enter : English : On : Off : Off :...
...47/52LG60, 4 2 / 4 7 L G X. WATCHING TV / CHANNEL CONTROL ON-SCREEN MENUS SELECTION Your TV's OSD (On Screen Display) may differ slightly from that shown in this manual. All models (Except 32/37/42LG30) CHANNEL Auto Tuning Manual Tuning Channel Edit Move Enter PICTURE Move Aspect Ratio : 16:9...Voice : On Balance 0L R Sound Mode : Standard • SRS TruSurround XT: Off • Treble 50 • Bass 50 • Reset E WATCHING TV / CHANNEL CONTROL OPTION Language Input Label SIMPLINK Key Lock Caption ISM Method Power Saving Set ID E Move Enter : English : On : Off : Off :...


