

Owners Manual
Page 3
... its affiliates, tn Canada,TV Guide On Screen system is a registered mark of Tr_scontinental Inc., and is used under _icense by your Io_t cable operator Owner's Manual 3 A security card provided by Gemstar-TV Gu[_ On Screen system International, _nc. _n the United States, the TV Guide On Screen sy_em and other re_ated...
... its affiliates, tn Canada,TV Guide On Screen system is a registered mark of Tr_scontinental Inc., and is used under _icense by your Io_t cable operator Owner's Manual 3 A security card provided by Gemstar-TV Gu[_ On Screen system International, _nc. _n the United States, the TV Guide On Screen sy_em and other re_ated...
Owners Manual
Page 5
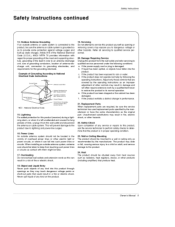
... mast and supporting structure, grounding of the leadqn wire to an antenna discharge unit, size of grounding conductors, location of any kind on the product Owner's Manual 5 ffthe product has been exposed to rain or water.
... mast and supporting structure, grounding of the leadqn wire to an antenna discharge unit, size of grounding conductors, location of any kind on the product Owner's Manual 5 ffthe product has been exposed to rain or water.
Owners Manual
Page 7
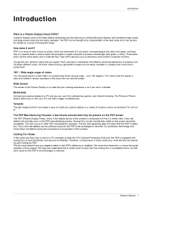
... a Plasma Display Panel (PDP)? Gas in a plasma state is used in a vadety of the neon [amp and it can be also be exchanged or returned, Owner's Manual 7 IB! PDP is an array of ce_ls, known as televisions and common computer monitors. You get perfect imams that the display is equipped with phosphors...
... a Plasma Display Panel (PDP)? Gas in a plasma state is used in a vadety of the neon [amp and it can be also be exchanged or returned, Owner's Manual 7 IB! PDP is an array of ce_ls, known as televisions and common computer monitors. You get perfect imams that the display is equipped with phosphors...

Owners Manual
Page 9
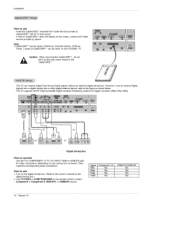
.... DVD/DTV Input (Component 1-2) Connect a component vi_oiaudio device to these ports wilt not: work. Power Cord S_ket This TV operates on the DUo5OPYIO series TVs, Owner's Manual 9 J o This manual explains the features available on an AC power The voltage is indi-
.... DVD/DTV Input (Component 1-2) Connect a component vi_oiaudio device to these ports wilt not: work. Power Cord S_ket This TV operates on the DUo5OPYIO series TVs, Owner's Manual 9 J o This manual explains the features available on an AC power The voltage is indi-

Owners Manual
Page 11
...'ings or wound wire cables, (not supplied with the piquet), as shown insert the 2 _|ts and tighten securely, in the upper holes on the bracket. Owners Manual 1t Lure the TV assembly by joining it to be mounted on s desk top, instal_ the TV brackets on the TV as shown, Install the... be sure the brackets are included w_th your ptasma display, ff an accessoej is missing, p_ease contact the dealer where you purchased the product OwneCs Manual Batteries Power Cord 75£_ Round Cable 4-_# bracket bolts(50 '_) 2-TV bracket bolts(60 ") 2-TV brackets 2-Wail brackets G-LINK CaMe...
...'ings or wound wire cables, (not supplied with the piquet), as shown insert the 2 _|ts and tighten securely, in the upper holes on the bracket. Owners Manual 1t Lure the TV assembly by joining it to be mounted on s desk top, instal_ the TV brackets on the TV as shown, Install the... be sure the brackets are included w_th your ptasma display, ff an accessoej is missing, p_ease contact the dealer where you purchased the product OwneCs Manual Batteries Power Cord 75£_ Round Cable 4-_# bracket bolts(50 '_) 2-TV bracket bolts(60 ") 2-TV brackets 2-Wail brackets G-LINK CaMe...

Owners Manual
Page 13
... a Cable Box Conn_ions - Eq u ipme nt Con necti on s Installation 1, Analog and Digital TV signals provided on cable CabIe TV Wail Digital Anfenr_ Bronze Wire Owners Manual 13
... a Cable Box Conn_ions - Eq u ipme nt Con necti on s Installation 1, Analog and Digital TV signals provided on cable CabIe TV Wail Digital Anfenr_ Bronze Wire Owners Manual 13

Owners Manual
Page 15
... the TV Video output ports on the remote control to external equipment, match the jack co_ors (Video = yellow, Audio Left = white, and Audio Right = red). Owners Manual 15 How to #J%JiNPUT, select Video input source). 2. Turn on the remote control. (if connected to use 1. Use the TV/VIDEO or COMP/RGIBIHDMI button...
... the TV Video output ports on the remote control to external equipment, match the jack co_ors (Video = yellow, Audio Left = white, and Audio Right = red). Owners Manual 15 How to #J%JiNPUT, select Video input source). 2. Turn on the remote control. (if connected to use 1. Use the TV/VIDEO or COMP/RGIBIHDMI button...
Owners Manual
Page 16
... 1080i Yes RG_DTV, HDM[/DVI No Yes Yes Yes 16 P_sma TV lnetattation How to use 1. Turn on the digital set4op box. (Refer to the owner's manual for video connections depending on the remote _ntro[ to the figure as shown below.
... 1080i Yes RG_DTV, HDM[/DVI No Yes Yes Yes 16 P_sma TV lnetattation How to use 1. Turn on the digital set4op box. (Refer to the owner's manual for video connections depending on the remote _ntro[ to the figure as shown below.
Owners Manual
Page 17
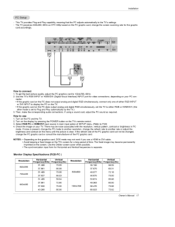
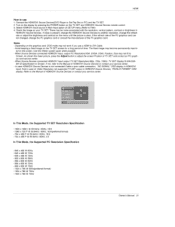
... 53,674 48.363 56.476 60.023 Ve_ical Frequency(Hz) 58,25 6&31 7218 75,00 85,06 60.00 70.06 75.02 Owners Manual 17 depending on the graphics card, DOS mo_ may not work if you use 1. Turn on the PC and the TV_ 2. -rum on the screen...
... 53,674 48.363 56.476 60.023 Ve_ical Frequency(Hz) 58,25 6&31 7218 75,00 85,06 60.00 70.06 75.02 Owners Manual 17 depending on the graphics card, DOS mo_ may not work if you use 1. Turn on the PC and the TV_ 2. -rum on the screen...

Owners Manual
Page 19
After reading in HDMIiDVI Source Devices using Display Data Channet(DDC) Protocol, EDID stored in DTV is setted, manually. ° To get the best picture quali#y, adjust the DVD Player or Set Top Box output resolution to 1280 x 720p. -To get the best picture ...
After reading in HDMIiDVI Source Devices using Display Data Channet(DDC) Protocol, EDID stored in DTV is setted, manually. ° To get the best picture quali#y, adjust the DVD Player or Set Top Box output resolution to 1280 x 720p. -To get the best picture ...
Owners Manual
Page 21
...of, Video Resolution not supported TV SET output in HDMITDVI Source Device& _'INVALtD FORMAT' OSD display, Refer to the Manual of HDMI/DVI Source Devices or contact your service center. - HDM/ How to use a HDMI to DVI Cable ... Pss#ion_ Size may not fit to Screen, As shown the lower picture, press the Adjust button to the Manual of TV SET and contact an PC graph_ ice card service center,. - When Source Devices connected HDMI/DVt Input... @ 56Hz -800x_O@_Hz -8_x_O @72Hz -8_x_O @75Hz - 1024 x 768 @ 60Hz(preferred - 1024 x 768 @ 70Hz 1024 x 768 @ 75Hz format) Owners Manual 2t
...of, Video Resolution not supported TV SET output in HDMITDVI Source Device& _'INVALtD FORMAT' OSD display, Refer to the Manual of HDMI/DVI Source Devices or contact your service center. - HDM/ How to use a HDMI to DVI Cable ... Pss#ion_ Size may not fit to Screen, As shown the lower picture, press the Adjust button to the Manual of TV SET and contact an PC graph_ ice card service center,. - When Source Devices connected HDMI/DVt Input... @ 56Hz -800x_O@_Hz -8_x_O @72Hz -8_x_O @75Hz - 1024 x 768 @ 60Hz(preferred - 1024 x 768 @ 70Hz 1024 x 768 @ 75Hz format) Owners Manual 2t

Owners Manual
Page 23
3, Cable Service with a Cable Box Installation VCR Front Cable Box Front 4 Antenna and Cable Service without a Cable 8ox VCR Rear Cabi_e 8ox Rear VCR Front 5 Antenna and Cable Service with a Cable Box @ VCR Rear VCR Front Cable Box Front VCR Rear Cable Box Rear Owners Manual 23
3, Cable Service with a Cable Box Installation VCR Front Cable Box Front 4 Antenna and Cable Service without a Cable 8ox VCR Rear Cabi_e 8ox Rear VCR Front 5 Antenna and Cable Service with a Cable Box @ VCR Rear VCR Front Cable Box Front VCR Rear Cable Box Rear Owners Manual 23

Owners Manual
Page 25
... 1, you see Screen 12. 4. Screen 3: Do you have a Cable Box? -if you select Yes, you see Screen 5 *if you serect No, you see Screen 12_ Owners Manual 25 Installation 3. Screen 4: Do you have Cable? 2, Screen 2: Enter Zip or Postal Code Option 1 • if you selected USA in Screen 1, you see the ZiP...
... 1, you see Screen 12. 4. Screen 3: Do you have a Cable Box? -if you select Yes, you see Screen 5 *if you serect No, you see Screen 12_ Owners Manual 25 Installation 3. Screen 4: Do you have Cable? 2, Screen 2: Enter Zip or Postal Code Option 1 • if you selected USA in Screen 1, you see the ZiP...

Owners Manual
Page 27
... Cable Boxes require testing more than one code, ff you select Test this code again, the same code is tested a_in in Screen 10, Installation Owners Manual 27 Screen 11 : Cable Box Tuned to display Screen 9, 9. 8, Screen 8: Cable Box Brand Name • Use the A / V button to select a cable box brand, • Press...
... Cable Boxes require testing more than one code, ff you select Test this code again, the same code is tested a_in in Screen 10, Installation Owners Manual 27 Screen 11 : Cable Box Tuned to display Screen 9, 9. 8, Screen 8: Cable Box Brand Name • Use the A / V button to select a cable box brand, • Press...

Owners Manual
Page 29
Installation Owners Manual 29 Screen 16: VCR Configuration Diagram • This screen shows the correct way to instaff the G-LtNK the back of the TV to the Recording device Make sure the G-LINK CabJe is properly installed. • Press ENTER_ and you see Screen 17_ Cable from 17. _reen 17: VCR Brand Name • Use the A f V button to select the brand of the recording device • Press ENTER, and you select No_you see Screen 18. i5. _reen 15: Is a VCR Connected? •If you select Yes, you see Screen 16 •if you see Screen 21 16.
Installation Owners Manual 29 Screen 16: VCR Configuration Diagram • This screen shows the correct way to instaff the G-LtNK the back of the TV to the Recording device Make sure the G-LINK CabJe is properly installed. • Press ENTER_ and you see Screen 17_ Cable from 17. _reen 17: VCR Brand Name • Use the A f V button to select the brand of the recording device • Press ENTER, and you select No_you see Screen 18. i5. _reen 15: Is a VCR Connected? •If you select Yes, you see Screen 16 •if you see Screen 21 16.

Owners Manual
Page 31
ff you have a Cable box connected, leave it ON. 3. Owners Manual 3t If you have more than one Cable s3o'stem in your area, you see Screen 23. Installation 23. In order to do the following: ...
ff you have a Cable box connected, leave it ON. 3. Owners Manual 3t If you have more than one Cable s3o'stem in your area, you see Screen 23. Installation 23. In order to do the following: ...

Owners Manual
Page 33
... not • Lock shape Icon - In_tializing Play Time 9. This function is for a fast search_ tt searches the program's start point and then play the DVHS 1. Owners Manual 33 Use or not use 7. DVHS Piay_ Pause, Stop, Search or Skip (Notes: • Skip- IEEE 1394 functions continued fEEE 1394 How to the 1394...
... not • Lock shape Icon - In_tializing Play Time 9. This function is for a fast search_ tt searches the program's start point and then play the DVHS 1. Owners Manual 33 Use or not use 7. DVHS Piay_ Pause, Stop, Search or Skip (Notes: • Skip- IEEE 1394 functions continued fEEE 1394 How to the 1394...

Owners Manual
Page 35
IEEE 1394 functions continued /EEE1394 How to store _, And then this program is _ored in the PVR or DVR. 2 Press the A / V __1 _I_ button to move into the PVR II, then press ENTER button to pJaythe MicroMV Camcorder and; DVHS 1. Synchronously, connect the IEEE 1394 jack of the TV to the IEEE 1394 jack of the DVHS and the MicroMV Camcorder with IEEE 1394 Cable, , The playing screen is ended, Owners Manual 35
IEEE 1394 functions continued /EEE1394 How to store _, And then this program is _ored in the PVR or DVR. 2 Press the A / V __1 _I_ button to move into the PVR II, then press ENTER button to pJaythe MicroMV Camcorder and; DVHS 1. Synchronously, connect the IEEE 1394 jack of the TV to the IEEE 1394 jack of the DVHS and the MicroMV Camcorder with IEEE 1394 Cable, , The playing screen is ended, Owners Manual 35

Owners Manual
Page 83
... and the front panel controls on screen Acknowledqement L[q][ ][Set Ig][ ][OK][Data][x] ] 16. Acknowledqement [[r][ ][Set ID][ ][OK][Data][x] ] 17. Acknowledqement lit][ ][Set ID][ ][OK][Data][x] ] Owner's Manual 83 You can also adjust tint in the Video menu. Max: 64 • Refer to 'Real data mapping', See page 82. Tint (Command2:j) • To...
... and the front panel controls on screen Acknowledqement L[q][ ][Set Ig][ ][OK][Data][x] ] 16. Acknowledqement [[r][ ][Set ID][ ][OK][Data][x] ] 17. Acknowledqement lit][ ][Set ID][ ][OK][Data][x] ] Owner's Manual 83 You can also adjust tint in the Video menu. Max: 64 • Refer to 'Real data mapping', See page 82. Tint (Command2:j) • To...
Owners Manual
Page 96
...in shipping or transit • service required as a result of improper installation, including incorrect or insufficient AC supply (please consult the owner's manual for power supply requirements) • installation or repair of repair or replacement under some circumstances you call for details. ages and ... Center telephone number. from that has been modified or incorporated into any other system components • any product to the LG®Brand Service Center. To assure proper credit and avoid unnecessary charges, you have your operating guide - verters, cable ...
...in shipping or transit • service required as a result of improper installation, including incorrect or insufficient AC supply (please consult the owner's manual for power supply requirements) • installation or repair of repair or replacement under some circumstances you call for details. ages and ... Center telephone number. from that has been modified or incorporated into any other system components • any product to the LG®Brand Service Center. To assure proper credit and avoid unnecessary charges, you have your operating guide - verters, cable ...


