
Service Manual
Page 4
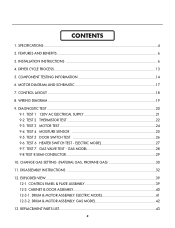
... DIAGNOSTIC TEST ...20 9-1. REPLACEMENT PARTS LIST 43 3 TEST 1 120V AC ELECTRICAL SUPPLY 21 9-2. CONTROL PANEL & PLATE ASSEMBLY 39 12-2. DRUM & MOTOR ASSEMBLY: GAS MODEL 42 13. FEATURES AND BENEFITS ...6 3. MOTOR DIAGRAM AND SCHEMATIC 17 7. TEST 2 THERMISTOR TEST 22 9-3. TEST 5 DOOR SWITCH TEST 26 9-6. EXPLODED VIEW ...39 12-1. TEST 3 MOTOR TEST 24 9-4. GAS MODEL 28 9-8 TEST 8 SEMI-CONDUCTOR 29 10. DISASSEMBLY INSTRUCTIONS 32 12. TEST 6 HEATER SWITCH TEST - CONTENTS 1. SPECIFICATIONS ...4 2. CONTROL LAYOUT ...18 8. CHANGE GAS SETTING (NATURAL GAS, PROPANE GAS 30...
... DIAGNOSTIC TEST ...20 9-1. REPLACEMENT PARTS LIST 43 3 TEST 1 120V AC ELECTRICAL SUPPLY 21 9-2. CONTROL PANEL & PLATE ASSEMBLY 39 12-2. DRUM & MOTOR ASSEMBLY: GAS MODEL 42 13. FEATURES AND BENEFITS ...6 3. MOTOR DIAGRAM AND SCHEMATIC 17 7. TEST 2 THERMISTOR TEST 22 9-3. TEST 5 DOOR SWITCH TEST 26 9-6. EXPLODED VIEW ...39 12-1. TEST 3 MOTOR TEST 24 9-4. GAS MODEL 28 9-8 TEST 8 SEMI-CONDUCTOR 29 10. DISASSEMBLY INSTRUCTIONS 32 12. TEST 6 HEATER SWITCH TEST - CONTENTS 1. SPECIFICATIONS ...4 2. CONTROL LAYOUT ...18 8. CHANGE GAS SETTING (NATURAL GAS, PROPANE GAS 30...
Service Manual
Page 6
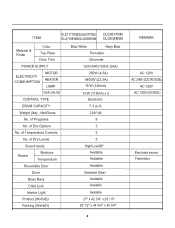
ITEM DLE7177WM/DLE8377WM DLE8377NM DLG7188WM/DLG8388WM DLG8388NM Material & Finish Color Top Plate Door Trim POWER SUPPLY ELECTRICITY CONSUMPTION MOTOR HEATER LAMP GAS VALVE CONTROL TYPE DRUM CAPACITY Weight (lbs) - Net/Gross No. of Dry Levels Sound levels Sensor Moisture Temperature Reversible Door Drum Dryer Rack Child Lock Interior Light Product (WxHxD) Packing (WxHxD) Blue White Navy Blue Porcelain Chromate 120V/240V 60Hz (26A) 250W (4.5A) 5400W (22.5A) 15 W (125mA) 13 W (110mA) x 2 Electronic 7.3 cu...
ITEM DLE7177WM/DLE8377WM DLE8377NM DLG7188WM/DLG8388WM DLG8388NM Material & Finish Color Top Plate Door Trim POWER SUPPLY ELECTRICITY CONSUMPTION MOTOR HEATER LAMP GAS VALVE CONTROL TYPE DRUM CAPACITY Weight (lbs) - Net/Gross No. of Dry Levels Sound levels Sensor Moisture Temperature Reversible Door Drum Dryer Rack Child Lock Interior Light Product (WxHxD) Packing (WxHxD) Blue White Navy Blue Porcelain Chromate 120V/240V 60Hz (26A) 250W (4.5A) 5400W (22.5A) 15 W (125mA) 13 W (110mA) x 2 Electronic 7.3 cu...
Service Manual
Page 12
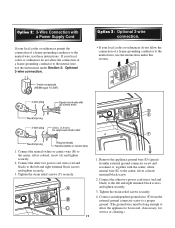
... moved, if necessary, for service or cleaning.) A B C 11 1. Option 3: Optional 3-wire connection. • If your local codes or ordinances do not allow the connection of a frame-grounding conductor to be long enough to allow the connection of a frame-grounding conductor to the neutral wire, use these instructions. Option 2: 3-Wire Connection with the center, white, neutral wire (E) to the left and right terminal block screws and tighten securely. 3.
... moved, if necessary, for service or cleaning.) A B C 11 1. Option 3: Optional 3-wire connection. • If your local codes or ordinances do not allow the connection of a frame-grounding conductor to be long enough to allow the connection of a frame-grounding conductor to the neutral wire, use these instructions. Option 2: 3-Wire Connection with the center, white, neutral wire (E) to the left and right terminal block screws and tighten securely. 3.
Service Manual
Page 21
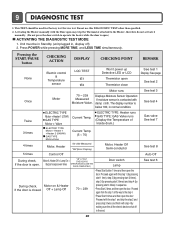
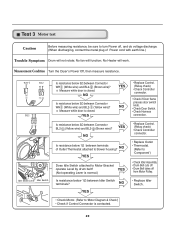
... the door switch to the step 4. • Press Start 3 times and then open the door. 9 DIAGNOSTIC TEST 1. Pressing the START/PAUSE button CHECKING ACTION DISPLAY CHECKING POINT REMARK None Electric control & Temperature sensor LQC TEST tE1 tE2 Won't power up Detective LED or LCD Thermistor open the door. See test 3 See test 4 Twice 3 times ELECTRIC TYPE Motor + Heater 1 (2700W) GAS TYPE Motor + Valve ELECTRIC TYPE Motor + Heater 1 +Heater 2 (5400W) GAS TYPE Motor+Valve Current Temp. Gas valve See test 7 See test 8 Auto Off See test 6 20 Activating the Heater manually with...
... the door switch to the step 4. • Press Start 3 times and then open the door. 9 DIAGNOSTIC TEST 1. Pressing the START/PAUSE button CHECKING ACTION DISPLAY CHECKING POINT REMARK None Electric control & Temperature sensor LQC TEST tE1 tE2 Won't power up Detective LED or LCD Thermistor open the door. See test 3 See test 4 Twice 3 times ELECTRIC TYPE Motor + Heater 1 (2700W) GAS TYPE Motor + Valve ELECTRIC TYPE Motor + Heater 1 +Heater 2 (5400W) GAS TYPE Motor+Valve Current Temp. Gas valve See test 7 See test 8 Auto Off See test 6 20 Activating the Heater manually with...
Service Manual
Page 26
...; Check Motor. (Refer to Motor Bracket operate Level by drum belt? YES YES NO • Replace Control. (Relay check) • Check Controller connector. • Check if Door flame presses door switch knob. • Check Door Switch. • Check Harness connection. NO YES Does Idle Switch attached to 'Motor Diagram & Check') • Check if Control Connector is normal.) Is resistance below 3Ω between Connector BL2- (Yellow wire) and BL2- (Brown wire)? Is resistance below 1Ω between terminals of Power cord with earth line.) Trouble Symptom Drum will...
...; Check Motor. (Refer to Motor Bracket operate Level by drum belt? YES YES NO • Replace Control. (Relay check) • Check Controller connector. • Check if Door flame presses door switch knob. • Check Door Switch. • Check Harness connection. NO YES Does Idle Switch attached to 'Motor Diagram & Check') • Check if Control Connector is normal.) Is resistance below 3Ω between Connector BL2- (Yellow wire) and BL2- (Brown wire)? Is resistance below 1Ω between terminals of Power cord with earth line.) Trouble Symptom Drum will...

Service Manual
Page 27
..., contact the metal plug of Power cord with earth line.) Trouble Symptom Degree of Table 2 during Diagnostic Test? 2. Is the measurement within the range of dryness does not match with metal to the 6 pin connector's Pin (Blue Wire) and Pin (Orange Wire) to Electro load: 1. NO YES Damping cloth When contacting cloth to Controller. YES • Check Electro Load and Harness Connector. • Check Harnesslinking connector. • Replace Control and Check.
..., contact the metal plug of Power cord with earth line.) Trouble Symptom Degree of Table 2 during Diagnostic Test? 2. Is the measurement within the range of dryness does not match with metal to the 6 pin connector's Pin (Blue Wire) and Pin (Orange Wire) to Electro load: 1. NO YES Damping cloth When contacting cloth to Controller. YES • Check Electro Load and Harness Connector. • Check Harnesslinking connector. • Replace Control and Check.
Service Manual
Page 45
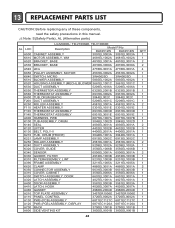
... K120 LIFTER K130 BELT, POLY-V 4432EL1002B 4432EL1002B 4400EL2001A 4400EL2001A K210 TUB , DRUM [FRONT] K221 LAMP ASSEMBLY 3044EL1001A 3044EL1001A 6913EL3002C 6913EL3002C K250 ROLLER ASSEMBLY K240 DUCT ASSEMBLY 4581EL3001A 4581EL3001A 5209EL1002A 5209EL1002A K320 COVER, GUIDE 3550EL1006B 3550EL1006B K340 SENSOR K330 GUIDER, FILTER K310 FILTERASSEMBLY, LINT 6500EL3001A 6500EL3001A 4974EL1003B 4974EL1003B 5231EL1003B 5231EL1003B A390 FRAME ASSEMBLY 3211EL1005A 3211EL1005A K620 K350 A310 A330 CLAMP CONNECTOR ASSEMBLY COVER, CABINET SWITCH ASSEMBLY, DOOR 4860EL3001A 6631EL3003B...
... K120 LIFTER K130 BELT, POLY-V 4432EL1002B 4432EL1002B 4400EL2001A 4400EL2001A K210 TUB , DRUM [FRONT] K221 LAMP ASSEMBLY 3044EL1001A 3044EL1001A 6913EL3002C 6913EL3002C K250 ROLLER ASSEMBLY K240 DUCT ASSEMBLY 4581EL3001A 4581EL3001A 5209EL1002A 5209EL1002A K320 COVER, GUIDE 3550EL1006B 3550EL1006B K340 SENSOR K330 GUIDER, FILTER K310 FILTERASSEMBLY, LINT 6500EL3001A 6500EL3001A 4974EL1003B 4974EL1003B 5231EL1003B 5231EL1003B A390 FRAME ASSEMBLY 3211EL1005A 3211EL1005A K620 K350 A310 A330 CLAMP CONNECTOR ASSEMBLY COVER, CABINET SWITCH ASSEMBLY, DOOR 4860EL3001A 6631EL3003B...
Owners Manual
Page 3
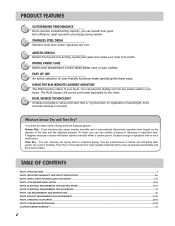
... FOR INSTALLING YOUR DRYER ...7-12 PART4. ELECTRICAL REQUIREMENTS FOR GAS DRYERS...19 PART7. GAS REQUIREMENTS AND INSTRUCTIONS ...20 PART8. TROUBLESHOOTING GUIDE...31-33 LG DRYER LIMITED WARRANTY...34 2 ARTISTIC DESIGN 3 Modern front panel look stylish. Your dryer provides sensor drying and time drying programs. Sensor Dry : Dryer electronically sense laundry humidity and it possible to complete drying. Time Dry : You can benefit from good time efficiency, quiet operation and energy saving system. 2 STAINLESS STEEL DRUM Stainless steel drum doesn't generate any power outlet...
... FOR INSTALLING YOUR DRYER ...7-12 PART4. ELECTRICAL REQUIREMENTS FOR GAS DRYERS...19 PART7. GAS REQUIREMENTS AND INSTRUCTIONS ...20 PART8. TROUBLESHOOTING GUIDE...31-33 LG DRYER LIMITED WARRANTY...34 2 ARTISTIC DESIGN 3 Modern front panel look stylish. Your dryer provides sensor drying and time drying programs. Sensor Dry : Dryer electronically sense laundry humidity and it possible to complete drying. Time Dry : You can benefit from good time efficiency, quiet operation and energy saving system. 2 STAINLESS STEEL DRUM Stainless steel drum doesn't generate any power outlet...
Owners Manual
Page 5
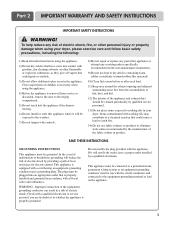
... your new LG dryer. WARNING! Use the space below to other than private family use, all warranty coverage is required. Warranty Restriction: If the dryer is subjected to record the model number and serial number of your nearest LG Service Center. You will repair or replace any parts defective in this manual must be followed. For your Dryer is installed and operated per this manual, LG will need the complete Model and Serial Number when requesting Warranty Service. Proof...
... your new LG dryer. WARNING! Use the space below to other than private family use, all warranty coverage is required. Warranty Restriction: If the dryer is subjected to record the model number and serial number of your nearest LG Service Center. You will repair or replace any parts defective in this manual must be followed. For your Dryer is installed and operated per this manual, LG will need the complete Model and Serial Number when requesting Warranty Service. Proof...
Owners Manual
Page 6
... will not fit the outlet, have come into the appliance if the drum is equipped with the circuit conductors and connected to play on the appliance. 5 Do not modify the plug provided with all instructions before or after each load. 11) Keep area around the exhaust opening and adjacent surrounding areas free from service or discarded, remove the door to the drying compartment. 5) Do not...
... will not fit the outlet, have come into the appliance if the drum is equipped with the circuit conductors and connected to play on the appliance. 5 Do not modify the plug provided with all instructions before or after each load. 11) Keep area around the exhaust opening and adjacent surrounding areas free from service or discarded, remove the door to the drying compartment. 5) Do not...
Owners Manual
Page 11
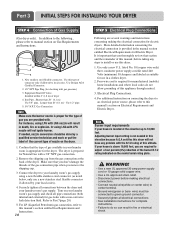
... the model/serial rating plate. ! Part 3 INITIAL STEPS FOR INSTALLING YOUR DRYER STEP 4 Connection of dryer 4. Use this manual's section entitled Gas Requirements and Instructions. 10 STEP 5 Electrical Plug Connections Following are several warnings and instructions concerning making electrical connections. • Connect neutral wire(white or center wire) to center terminal. • Ground wire(green or bare wire) must be done by a qualified service technician and mark or put the label of the current type of connector only...
... the model/serial rating plate. ! Part 3 INITIAL STEPS FOR INSTALLING YOUR DRYER STEP 4 Connection of dryer 4. Use this manual's section entitled Gas Requirements and Instructions. 10 STEP 5 Electrical Plug Connections Following are several warnings and instructions concerning making electrical connections. • Connect neutral wire(white or center wire) to center terminal. • Ground wire(green or bare wire) must be done by a qualified service technician and mark or put the label of the current type of connector only...

Owners Manual
Page 13
... the manual section entitled Electrical Requirements for Installation of Your Dryer in a manufactured or mobile home. WARNING! Part 3 INITIAL STEPS FOR INSTALLING YOUR DRYER STEP 9 Additional Instructions for Electric Dryer 3) To reduce the risk of combustion and fire, the dryer must be vented to the outside. 4) Electric dryers may be vented to the outside using the back, left, right, or bottom panel. 5) Gas dryers may not be vented to the outside using the...
... the manual section entitled Electrical Requirements for Installation of Your Dryer in a manufactured or mobile home. WARNING! Part 3 INITIAL STEPS FOR INSTALLING YOUR DRYER STEP 9 Additional Instructions for Electric Dryer 3) To reduce the risk of combustion and fire, the dryer must be vented to the outside. 4) Electric dryers may be vented to the outside using the back, left, right, or bottom panel. 5) Gas dryers may not be vented to the outside using the...

Owners Manual
Page 16
... regulations. Part 5 ELECTRICAL REQUIREMENTS FOR ELECTRIC DRYERS Following are included in the following pages. ELECTRICAL SERVICE FOR THE DRYER SHOULD BE OF MAXIMUM RATE VOLTAGE LISTED ON THE NAMEPLATE. Please contact a qualified electrician to check your home's wiring and fuses to ensure that your home has adequate electrical power to operate the dryer. 120V/ 240V, 60 Hertz, 3-Wire Installation Instructions for field installation in dryers which to wire your Electric Dryer: a) This dryer must be connected to...
... regulations. Part 5 ELECTRICAL REQUIREMENTS FOR ELECTRIC DRYERS Following are included in the following pages. ELECTRICAL SERVICE FOR THE DRYER SHOULD BE OF MAXIMUM RATE VOLTAGE LISTED ON THE NAMEPLATE. Please contact a qualified electrician to check your home's wiring and fuses to ensure that your home has adequate electrical power to operate the dryer. 120V/ 240V, 60 Hertz, 3-Wire Installation Instructions for field installation in dryers which to wire your Electric Dryer: a) This dryer must be connected to...
Owners Manual
Page 20
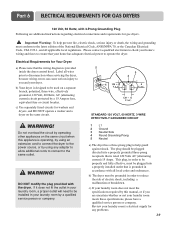
... are additional instructions regarding electrical connections and requirements for Your Dryer: a) Please note that your home has adequate electrical power to operate the dryer. Part 6 ELECTRICAL REQUIREMENTS FOR GAS DRYERS 120 Volt, 60 Hertz, with 3-Prong Grounding Plug Following are uncertain whether or not your laundry room meets these specifications, please have a qualified service person or company. c) Use separately fused circuits for any adapter to allow additional cords to connect to be plugged into...
... are additional instructions regarding electrical connections and requirements for Your Dryer: a) Please note that your home has adequate electrical power to operate the dryer. Part 6 ELECTRICAL REQUIREMENTS FOR GAS DRYERS 120 Volt, 60 Hertz, with 3-Prong Grounding Plug Following are uncertain whether or not your laundry room meets these specifications, please have a qualified service person or company. c) Use separately fused circuits for any adapter to allow additional cords to connect to be plugged into...
Owners Manual
Page 21
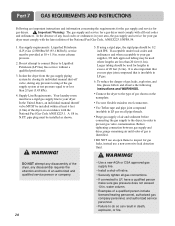
... is identified. • DO NOT use an open flame to the dryer; WARNING! WARNING! • Use a new AGA or CSA approved gas supply line. • Install a shut-off valve, during any pressure testing of 20 feet (6.1m). In the absence of any disassembly requires the attention and tools of air and sediment before connecting the gas supply to inspect for lengths in accordance with all pipe...
... is identified. • DO NOT use an open flame to the dryer; WARNING! WARNING! • Use a new AGA or CSA approved gas supply line. • Install a shut-off valve, during any pressure testing of 20 feet (6.1m). In the absence of any disassembly requires the attention and tools of air and sediment before connecting the gas supply to inspect for lengths in accordance with all pipe...
Owners Manual
Page 22
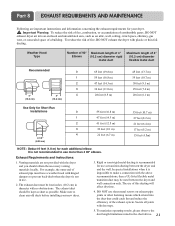
... this ducting will affect dry time. 4. Rigid or semi-rigid metal ducting is not recommended to clean any old ducts before installing your dryer. ! It is recommended for each additional elbow. To maximize operating results, please observe the duct length limitations noted in use as possible. For example, the outer end of the exhaust system. The use more than 4 90° elbows. Exhaust Requirements and Instructions: 1. Part 8 EXHAUST REQUIREMENTS AND MAINTENANCE...
... this ducting will affect dry time. 4. Rigid or semi-rigid metal ducting is not recommended to clean any old ducts before installing your dryer. ! It is recommended for each additional elbow. To maximize operating results, please observe the duct length limitations noted in use as possible. For example, the outer end of the exhaust system. The use more than 4 90° elbows. Exhaust Requirements and Instructions: 1. Part 8 EXHAUST REQUIREMENTS AND MAINTENANCE...
Owners Manual
Page 23
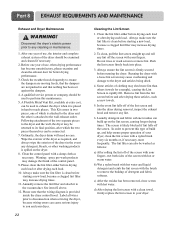
... service person or company should be returned to the wall exhaust outlet. A Flexible Metal Vent Kit, available at extra cost, can cause serious injury to remove lint. Ordinarily, the dryer drum will need no care. Clean the lint filter either before starting a new load, because a clogged lint filter may be examined and cleaned if necessary. 2. Some articles of the control panel. 9. b) Wet a nylon brush with hot water and liquid detergent and scrub the lint screen...
... service person or company should be returned to the wall exhaust outlet. A Flexible Metal Vent Kit, available at extra cost, can cause serious injury to remove lint. Ordinarily, the dryer drum will need no care. Clean the lint filter either before starting a new load, because a clogged lint filter may be examined and cleaned if necessary. 2. Some articles of the control panel. 9. b) Wet a nylon brush with hot water and liquid detergent and scrub the lint screen...
Owners Manual
Page 30
... use two fuses or breakers.) • Is the gas supply or service blocked or off? In this case, thermistor should tE1 be replaced and call a service center. 29 Please review and confirm that weren't cleansed during the washing process. Part 10 TROUBLESHOOTING GUIDE Troubleshooting Tips Save time and money! Stains on My Clothes Question What to Do • Is the dryer plugged in the dryer drum. • Were your washing instructions...
... use two fuses or breakers.) • Is the gas supply or service blocked or off? In this case, thermistor should tE1 be replaced and call a service center. 29 Please review and confirm that weren't cleansed during the washing process. Part 10 TROUBLESHOOTING GUIDE Troubleshooting Tips Save time and money! Stains on My Clothes Question What to Do • Is the dryer plugged in the dryer drum. • Were your washing instructions...
Owners Manual
Page 31
...; Is your clothes have excess static electricity? Divide your load of laundry. Please refer to the manual section on my Clothes Question What to Do • Did you overload your settings and use fabric softener? Over-drying a load of laundry can cause excess lint in a load of laundry? Part 10 TROUBLESHOOTING GUIDE 5.Problem:There is Lint on cleaning the lint filter, and please confirm that the lint filter is clean. Confirm that...
...; Is your clothes have excess static electricity? Divide your load of laundry. Please refer to the manual section on my Clothes Question What to Do • Did you overload your settings and use fabric softener? Over-drying a load of laundry can cause excess lint in a load of laundry? Part 10 TROUBLESHOOTING GUIDE 5.Problem:There is Lint on cleaning the lint filter, and please confirm that the lint filter is clean. Confirm that...
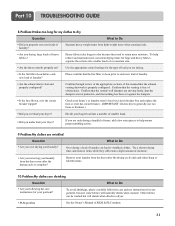
Owners Manual
Page 32
... through review of the appropriate sections of a consistent size. • Are the dryer controls properly set against the dampers. • Is the fuse blown, or is the circuit breaker tripped? Divide your larger load into smaller loads of this manual that the lint filter is complete? Remove your laundry from the dryer soon after the drying cycle ends and either hang or fold the items. 10.Problem:My clothes...
... through review of the appropriate sections of a consistent size. • Are the dryer controls properly set against the dampers. • Is the fuse blown, or is the circuit breaker tripped? Divide your larger load into smaller loads of this manual that the lint filter is complete? Remove your laundry from the dryer soon after the drying cycle ends and either hang or fold the items. 10.Problem:My clothes...


