
Service Manual
Page 38
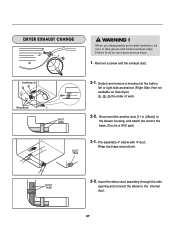
... edge. Wrap duct tape around joint. Detach and remove a knockout at the botton, left or right side as desired. (Right Side Vent not available on Gas dryer the order of work. When you disassemble and install ventilation, be sure to do so can cause serious injury. 1. DUCT TAPE 2-2. ...WARNING ! DUCT TAPE 3-2. DRYER EXHAUST CHANGE ! Reconnect the another duct [11 in (28cm)] to the blower housing, and attach the duct to the internal duct. 37 Insert ...
... edge. Wrap duct tape around joint. Detach and remove a knockout at the botton, left or right side as desired. (Right Side Vent not available on Gas dryer the order of work. When you disassemble and install ventilation, be sure to do so can cause serious injury. 1. DUCT TAPE 2-2. ...WARNING ! DUCT TAPE 3-2. DRYER EXHAUST CHANGE ! Reconnect the another duct [11 in (28cm)] to the blower housing, and attach the duct to the internal duct. 37 Insert ...
Owners Manual
Page 7
...area surrounding this appliance. ! Follow the gas supplier's instructions carefully. • If you cannot reach your gas supplier from dryer. • Place dryer at least 18 inches above the floor for a garage installation. • Failure to cause cancer, birth defects or other...injury or death when using this appliance, please follow these substances, namely benzene, carbon monoxide, formaldehyde and soot, caused primarily by properly venting the dryer to the outdoors. 6 WARNING! • Keep flammable materials and vapors, such as gasoline, away from a neighbor's phone. Gas ...
...area surrounding this appliance. ! Follow the gas supplier's instructions carefully. • If you cannot reach your gas supplier from dryer. • Place dryer at least 18 inches above the floor for a garage installation. • Failure to cause cancer, birth defects or other...injury or death when using this appliance, please follow these substances, namely benzene, carbon monoxide, formaldehyde and soot, caused primarily by properly venting the dryer to the outdoors. 6 WARNING! • Keep flammable materials and vapors, such as gasoline, away from a neighbor's phone. Gas ...
Owners Manual
Page 8
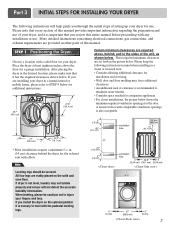
...to STEP 9 below for additional instructions. 38.7" (98.3 cm) 49.8" (126.4 cm) Certain minimum clearances are installing your dryer for the exhaust vent with any installation or use . If you are required above the floor for installation and servicing. • Wall, door and floor...minimum 5 1/2 in a manufactured or mobile home, please refer to level with a solid floor for your fingers and toes. STEP 1 Positioning the Dryer. Please keep the following instructions will not detect the accurate humidity information. All four legs are provided in a closet or recessed area: • ...
...to STEP 9 below for additional instructions. 38.7" (98.3 cm) 49.8" (126.4 cm) Certain minimum clearances are installing your dryer for the exhaust vent with any installation or use . If you are required above the floor for installation and servicing. • Wall, door and floor...minimum 5 1/2 in a manufactured or mobile home, please refer to level with a solid floor for your fingers and toes. STEP 1 Positioning the Dryer. Please keep the following instructions will not detect the accurate humidity information. All four legs are provided in a closet or recessed area: • ...
Owners Manual
Page 10
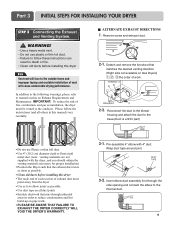
...possible. • Clean old ducts before installing this manual) very carefully. Pre-assemble 4" elbow with the dryer, and you should obtain the venting materials necessary for proper installation) • Position the Dryer such that the exhaust duct run is a SVC part) • Do not use plastic or thin ... home and improper taping and unstable installation of fire, combustion, and gas accumulation, the dryer must be vented to manual section on Gas Dryers) , , the order of exhaust duct must point away from the dryer • Use as few elbow joints as possible. • Use duct tape on...
...possible. • Clean old ducts before installing this manual) very carefully. Pre-assemble 4" elbow with the dryer, and you should obtain the venting materials necessary for proper installation) • Position the Dryer such that the exhaust duct run is a SVC part) • Do not use plastic or thin ... home and improper taping and unstable installation of fire, combustion, and gas accumulation, the dryer must be vented to manual section on Gas Dryers) , , the order of exhaust duct must point away from the dryer • Use as few elbow joints as possible. • Use duct tape on...

Owners Manual
Page 13
... of 1 inch at the sides and back of the dryer in a Manufactured or Mobile Home. You should obtain the venting materials necessary for Installation of combustion and fire, the dryer must be vented to the outside. 4) Electric dryers may be at the manual section entitled Electrical Requirements for assistance...the clearance of the duct from any installation of the dryer. 10) Please be a 4-wire connection. Gas dryer may be vented to the outside using the back, left , right, or bottom panel. 5) Gas dryers may not be vented to the outside using the right side panel because of...
... of 1 inch at the sides and back of the dryer in a Manufactured or Mobile Home. You should obtain the venting materials necessary for Installation of combustion and fire, the dryer must be vented to the outside. 4) Electric dryers may be at the manual section entitled Electrical Requirements for assistance...the clearance of the duct from any installation of the dryer. 10) Please be a 4-wire connection. Gas dryer may be vented to the outside using the back, left , right, or bottom panel. 5) Gas dryers may not be vented to the outside using the right side panel because of...

Owners Manual
Page 15
Disconnect venting. for washer/ combo for dryer 5 6 3 for dryer for washer/ combo 7 14 Part 4 ACCESSORIES INSTALLATION Pedestal Installation Instructions 1 4 2 1) Shut off Gas 2) Unplug Power Cord 3) Disconnect Gas Line from Dryer 4) Pull away and loosen vent clamp.
Disconnect venting. for washer/ combo for dryer 5 6 3 for dryer for washer/ combo 7 14 Part 4 ACCESSORIES INSTALLATION Pedestal Installation Instructions 1 4 2 1) Shut off Gas 2) Unplug Power Cord 3) Disconnect Gas Line from Dryer 4) Pull away and loosen vent clamp.
Owners Manual
Page 22
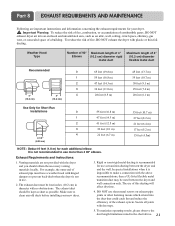
...dry time. 4. The exhaust duct should obtain the necessary venting materials locally. Rigid or semi-rigid metal ducting is recommended for use of a building. The use as transition ducting between the dryer and wall connection only. To maximize operating results, please .... 2. Secure all joints with no obstructions. It is not recommended to prevent back-draft when the dryer is impossible to clean any old ducts before installing your dryer. ! Venting materials are important instructions and information concerning the exhaust requirements for each additional elbow. Make sure to make...
...dry time. 4. The exhaust duct should obtain the necessary venting materials locally. Rigid or semi-rigid metal ducting is recommended for use of a building. The use as transition ducting between the dryer and wall connection only. To maximize operating results, please .... 2. Secure all joints with no obstructions. It is not recommended to prevent back-draft when the dryer is impossible to clean any old ducts before installing your dryer. ! Venting materials are important instructions and information concerning the exhaust requirements for each additional elbow. Make sure to make...
Owners Manual
Page 23
... the wall, the dryer may increase drying times. 2. In the event lint falls off the screen. Clean the control panel with hot water. A Flexible Metal Vent Kit, available at extra cost, can be used to the wall exhaust outlet. Wipe the exterior of the two separate pieces to remove... lint. Following attachment of the dryer as necessary. c) After the residue has been removed, rinse ...
... the wall, the dryer may increase drying times. 2. In the event lint falls off the screen. Clean the control panel with hot water. A Flexible Metal Vent Kit, available at extra cost, can be used to the wall exhaust outlet. Wipe the exterior of the two separate pieces to remove... lint. Following attachment of the dryer as necessary. c) After the residue has been removed, rinse ...
Owners Manual
Page 32
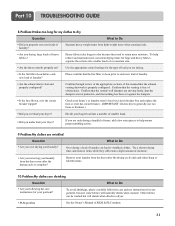
... configured. To avoid shrinkage, please carefully follow the care and use two fuses or breakers.) • Did you removing your laundry from the dryer after the drying cycle is the circuit breaker tripped? Other fabrics can lead to wrinkled clothes. What to Do Over drying a load of a...add a few extra pieces to help reduce and maintain more moisture. Confirm through review of the appropriate sections of this manual that the venting is clean prior to each new load of laundry? Confirm that the outside wall dampers are wrinkled Question • Are you following the ...
... configured. To avoid shrinkage, please carefully follow the care and use two fuses or breakers.) • Did you removing your laundry from the dryer after the drying cycle is the circuit breaker tripped? Other fabrics can lead to wrinkled clothes. What to Do Over drying a load of a...add a few extra pieces to help reduce and maintain more moisture. Confirm through review of the appropriate sections of this manual that the venting is clean prior to each new load of laundry? Confirm that the outside wall dampers are wrinkled Question • Are you following the ...


