
Service Manual
Page 3
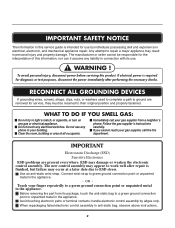
Do not use any gas or electrical appliance. Immediately call the fire department. Before removing the part from a neighbor's phone. IMPORTANT SAFETY NOTICE The information in this service guide is finished, but failure may occur at a later date .... 2 Clear the room, building or area of this product. RECONNECT ALL GROUNDING DEVICES If grounding wires, screws, straps, clips, nuts, or washers used to complete a path to their original position and properly fastened. The manufacturer or seller cannot be returned to ground are present everywhere. IMPORTANT Electrostatic...
Do not use any gas or electrical appliance. Immediately call the fire department. Before removing the part from a neighbor's phone. IMPORTANT SAFETY NOTICE The information in this service guide is finished, but failure may occur at a later date .... 2 Clear the room, building or area of this product. RECONNECT ALL GROUNDING DEVICES If grounding wires, screws, straps, clips, nuts, or washers used to complete a path to their original position and properly fastened. The manufacturer or seller cannot be returned to ground are present everywhere. IMPORTANT Electrostatic...
Service Manual
Page 9
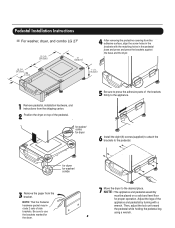
...Installation Instructions For washer, dryer, and combo LG 27" 4 ...AAtftaecr hretmheovdinogubthle-pfarocteedcttivaepecoovfetrhinegbfroamcktehteto the dardyheersaivsesshuorfwacnes, oaltighne tbhenstcpreawrtshoolfetshien bthreackets ablriagcnkwetisthwtihthetheedgmeaatcnhdincgahnoblees aintttahcehpeeddteostahle pbeadseesatnadl wpritehssscarnedwpsr.ess the brackets against NthOe bTaEse:aAntdtatchhe tdhreyelro.wer side first. 1 Remove pedestal, installation hardware, and instructions from the bracket. Be sure to use the brackets marked for dryer 5 Be sure to press the adhesive parts...
...Installation Instructions For washer, dryer, and combo LG 27" 4 ...AAtftaecr hretmheovdinogubthle-pfarocteedcttivaepecoovfetrhinegbfroamcktehteto the dardyheersaivsesshuorfwacnes, oaltighne tbhenstcpreawrtshoolfetshien bthreackets ablriagcnkwetisthwtihthetheedgmeaatcnhdincgahnoblees aintttahcehpeeddteostahle pbeadseesatnadl wpritehssscarnedwpsr.ess the brackets against NthOe bTaEse:aAntdtatchhe tdhreyelro.wer side first. 1 Remove pedestal, installation hardware, and instructions from the bracket. Be sure to use the brackets marked for dryer 5 Be sure to press the adhesive parts...
Owners Manual
Page 7
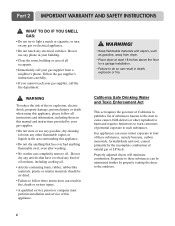
...the area surrounding this appliance. • Do not dry anything that have ever had anything flammable on it, even after washing. • No washer can result in fire, death or serious injury. • A qualified service person or company must perform installation and service of fire or explosion...plastic or similar materials should be minimized further by the incomplete combustion of potential exposure to warn customers of natural gas or LP fuels. Part 2 IMPORTANT WARRANTY AND SAFETY INSTRUCTIONS ! Do not dry any articles that has ever had any kind of oil on any gas or ...
...the area surrounding this appliance. • Do not dry anything that have ever had anything flammable on it, even after washing. • No washer can result in fire, death or serious injury. • A qualified service person or company must perform installation and service of fire or explosion...plastic or similar materials should be minimized further by the incomplete combustion of potential exposure to warn customers of natural gas or LP fuels. Part 2 IMPORTANT WARRANTY AND SAFETY INSTRUCTIONS ! Do not dry any articles that has ever had any kind of oil on any gas or ...

Owners Manual
Page 14
...tape on. • Do not use stacking kit with a screw on the back of the washer by fitting legs as picture shows. 6 Insert the front stacking kit. Part 4 ACCESSORIES INSTALLATION Stacking Kit Installation Instructions To ensure safe and secure installation, please observe the instructions... below. ! Stacking kit 1 Place washer firmly on top of bracket. Push the front stacking kit back...
...tape on. • Do not use stacking kit with a screw on the back of the washer by fitting legs as picture shows. 6 Insert the front stacking kit. Part 4 ACCESSORIES INSTALLATION Stacking Kit Installation Instructions To ensure safe and secure installation, please observe the instructions... below. ! Stacking kit 1 Place washer firmly on top of bracket. Push the front stacking kit back...

Owners Manual
Page 15
Disconnect venting. for washer/ combo for dryer 5 6 3 for dryer for washer/ combo 7 14 Part 4 ACCESSORIES INSTALLATION Pedestal Installation Instructions 1 4 2 1) Shut off Gas 2) Unplug Power Cord 3) Disconnect Gas Line from Dryer 4) Pull away and loosen vent clamp.
Disconnect venting. for washer/ combo for dryer 5 6 3 for dryer for washer/ combo 7 14 Part 4 ACCESSORIES INSTALLATION Pedestal Installation Instructions 1 4 2 1) Shut off Gas 2) Unplug Power Cord 3) Disconnect Gas Line from Dryer 4) Pull away and loosen vent clamp.
Owners Manual
Page 20
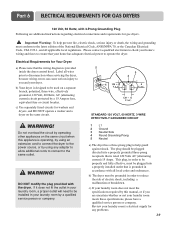
.... ! Important Warning: To help guard against shock. b) Your dryer is provided inside the dryer control hood. Electrical Requirements for washers and dryers, and DO NOT operate a washer and a dryer on a separate branch, polarized, three-wire, effectively grounded, 120 Volt, 60 Hertz, AC (alternating current) ...or death, the wiring and grounding must conform to the power source, or by a 15 Ampere fuse, equivalent fuse or circuit breaker. Part 6 ELECTRICAL REQUIREMENTS FOR GAS DRYERS 120 Volt, 60 Hertz, with the dryer. WARNING! This plug, in order to be properly and fully...
.... ! Important Warning: To help guard against shock. b) Your dryer is provided inside the dryer control hood. Electrical Requirements for washers and dryers, and DO NOT operate a washer and a dryer on a separate branch, polarized, three-wire, effectively grounded, 120 Volt, 60 Hertz, AC (alternating current) ...or death, the wiring and grounding must conform to the power source, or by a 15 Ampere fuse, equivalent fuse or circuit breaker. Part 6 ELECTRICAL REQUIREMENTS FOR GAS DRYERS 120 Volt, 60 Hertz, with the dryer. WARNING! This plug, in order to be properly and fully...
Owners Manual
Page 24
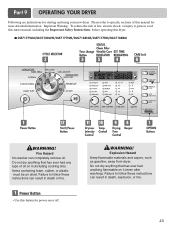
...: To reduce the risk of fire, electric shock, or injury to specific sections of oil on it (even after washing). Fire Hazard No washer can result in death or fire. 1 Power Button • Use this button for starting and using your new dryer. WARNING! Do not ...Explosion Hazard Keep flammable materials and vapors, such as gasoline, away from dryer. Failure to follow these instructions can completely remove oil. I DLE7177WM/DLG7188WM/DLE7177NM/DLG7188NM/DLE7177RM/DLG7188RM ! Do not dry anything that has ever had anything that has ever had any type of this dryer. Failure to...
...: To reduce the risk of fire, electric shock, or injury to specific sections of oil on it (even after washing). Fire Hazard No washer can result in death or fire. 1 Power Button • Use this button for starting and using your new dryer. WARNING! Do not ...Explosion Hazard Keep flammable materials and vapors, such as gasoline, away from dryer. Failure to follow these instructions can completely remove oil. I DLE7177WM/DLG7188WM/DLE7177NM/DLG7188NM/DLE7177RM/DLG7188RM ! Do not dry anything that has ever had anything that has ever had any type of this dryer. Failure to...


