
Service Manual
Page 4
INSTALLATION INSTRUCTIONS 6 4. DRYER CYCLE PROCESS ...13 5. COMPONENT TESTING INFORMATION 14 6. TEST 5 DOOR SWITCH TEST 26 9-6. DISASSEMBLY INSTRUCTIONS 32 12. CABINET & DOOR ASSEMBLY 40 12-3-1. DIAGNOSTIC TEST ......
INSTALLATION INSTRUCTIONS 6 4. DRYER CYCLE PROCESS ...13 5. COMPONENT TESTING INFORMATION 14 6. TEST 5 DOOR SWITCH TEST 26 9-6. DISASSEMBLY INSTRUCTIONS 32 12. CABINET & DOOR ASSEMBLY 40 12-3-1. DIAGNOSTIC TEST ......
Service Manual
Page 7
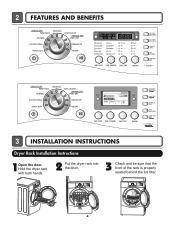
Hold the dryer rack with both hands. 2 Put the dryer rack into the drum 3 Check and be sure that the front of the rack is properly seated behind the lint filter. 6 TIME REMAINING OFF MID HIGH 3 INSTALLATION INSTRUCTIONS Dryer Rack Installation Instructions 1Open the door. 2 FEATURES AND BENEFITS 20% NORMAL NORMAL MEDIUM SENSOR DRY 0:20 EST.
Hold the dryer rack with both hands. 2 Put the dryer rack into the drum 3 Check and be sure that the front of the rack is properly seated behind the lint filter. 6 TIME REMAINING OFF MID HIGH 3 INSTALLATION INSTRUCTIONS Dryer Rack Installation Instructions 1Open the door. 2 FEATURES AND BENEFITS 20% NORMAL NORMAL MEDIUM SENSOR DRY 0:20 EST.
Service Manual
Page 8
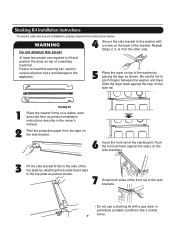
... rail of the bracket. At least two people are required to the washer with a gas dryer in the owner's manual. Stacking Kit Installation Instructions To ensure safe and secure installation, please observe the instructions below. Slide the dryer back against the stops on the back of the stacking kit. WARNING Do not... to pinch fingers between the washer and dryer. Be careful not to the appliance. 5 Place the dryer on a stable, even and solid floor as product installation instructions describe in potentially unstable conditions like a mobile home. 7
... rail of the bracket. At least two people are required to the washer with a gas dryer in the owner's manual. Stacking Kit Installation Instructions To ensure safe and secure installation, please observe the instructions below. Slide the dryer back against the stops on the back of the stacking kit. WARNING Do not... to pinch fingers between the washer and dryer. Be careful not to the appliance. 5 Place the dryer on a stable, even and solid floor as product installation instructions describe in potentially unstable conditions like a mobile home. 7
Service Manual
Page 9
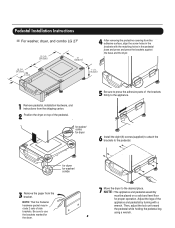
.... Adjust the legs of side brackets. Then, adjust the lock unt toward the pedestal while holding the pedestal leg using a wrench. 8 Pedestal Installation Instructions For washer, dryer, and combo LG 27" 4 AAtftaecr hretmheovdinogubthle-pfarocteedcttivaepecoovfetrhinegbfroamcktehteto the dardyheersaivsesshuorfwacnes, oaltighne tbhenstcpreawrtshoolfetshien bthreackets ablriagcnkwetisthwtihthetheedgmeaatcnhdincgahnoblees aintttahcehpeeddteostahle pbeadseesatnadl wpritehssscarnedwpsr.ess the brackets against NthOe bTaEse:aAntdtatchhe tdhreyelro.wer...
.... Adjust the legs of side brackets. Then, adjust the lock unt toward the pedestal while holding the pedestal leg using a wrench. 8 Pedestal Installation Instructions For washer, dryer, and combo LG 27" 4 AAtftaecr hretmheovdinogubthle-pfarocteedcttivaepecoovfetrhinegbfroamcktehteto the dardyheersaivsesshuorfwacnes, oaltighne tbhenstcpreawrtshoolfetshien bthreackets ablriagcnkwetisthwtihthetheedgmeaatcnhdincgahnoblees aintttahcehpeeddteostahle pbeadseesatnadl wpritehssscarnedwpsr.ess the brackets against NthOe bTaEse:aAntdtatchhe tdhreyelro.wer...
Service Manual
Page 10
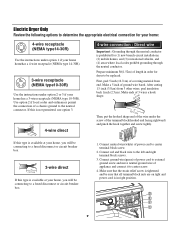
... 2 if local codes and ordinances permit the connection of power cord to center terminal block screw. 2. If this type is prohibited for (1) new branch-circuit installations, (2) mobile homes, and (3) recreational vehicles, and (4) areas where local codes prohibit grounding through the neutral conductor is available at your home. After cutting 11/2 inch...
... 2 if local codes and ordinances permit the connection of power cord to center terminal block screw. 2. If this type is prohibited for (1) new branch-circuit installations, (2) mobile homes, and (3) recreational vehicles, and (4) areas where local codes prohibit grounding through the neutral conductor is available at your home. After cutting 11/2 inch...
Service Manual
Page 11
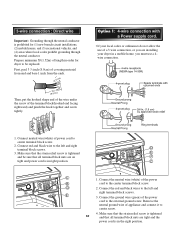
... that the strain relief screw is in right position. Connect the neutral wire (white) of length in a mobile home, you are installing your dryer in order for (1) new branch-circuit installations, (2) mobile homes, and (3) recreational vehicles, and (4) areas where local codes prohibit grounding through the neutral conductor. Option 1: 4-wire connection with a Power...
... that the strain relief screw is in right position. Connect the neutral wire (white) of length in a mobile home, you are installing your dryer in order for (1) new branch-circuit installations, (2) mobile homes, and (3) recreational vehicles, and (4) areas where local codes prohibit grounding through the neutral conductor. Option 1: 4-wire connection with a Power...

Service Manual
Page 13
... gas connection at the factory for use with a 3/8" N.P.T. Use 1/2" pipe 5 3/8" N.P.T. Tighten all pipe connections (internal & external) for checking inlet gas pressure) 3 Equipment Shut-Off Valve-Installed within 6' (1.8 m) of dryer 4 Black Iron Pipe Shorter than 20' (6.1 m) - For L.P. (Liquefied Petroleum) gas connection, refer to gas supply pipe using a new flexible stainless steel connector...
... gas connection at the factory for use with a 3/8" N.P.T. Use 1/2" pipe 5 3/8" N.P.T. Tighten all pipe connections (internal & external) for checking inlet gas pressure) 3 Equipment Shut-Off Valve-Installed within 6' (1.8 m) of dryer 4 Black Iron Pipe Shorter than 20' (6.1 m) - For L.P. (Liquefied Petroleum) gas connection, refer to gas supply pipe using a new flexible stainless steel connector...
Service Manual
Page 38
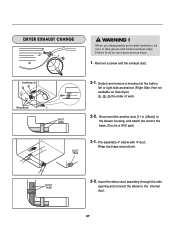
... at the botton, left or right side as desired. (Right Side Vent not available on Gas dryer the order of work. When you disassemble and install ventilation, be sure to do so can cause serious injury. 1. Failure to take gloves and careful exhaust edge. Wrap duct tape around joint. Insert the...
... at the botton, left or right side as desired. (Right Side Vent not available on Gas dryer the order of work. When you disassemble and install ventilation, be sure to do so can cause serious injury. 1. Failure to take gloves and careful exhaust edge. Wrap duct tape around joint. Insert the...

Owners Manual
Page 2
Record the Model and Serial Numbers, and retain the manual for buying a LG Dryer. Please read your manual carefully, as it provides instructions on safe Installation, Use and Maintenance. For more information, visit our website at http://us.lge.com P/No.: 3828EL3010A 1-800-243-0000 24 HOURS A DAY, 7 DAYS A WEEK FOR LG CUSTOMER SERVICE DLE7177WM/DLG7188WM DLE7177NM/DLG7188NM DLE7177RM/DLG7188RM Thank you for future reference.
Record the Model and Serial Numbers, and retain the manual for buying a LG Dryer. Please read your manual carefully, as it provides instructions on safe Installation, Use and Maintenance. For more information, visit our website at http://us.lge.com P/No.: 3828EL3010A 1-800-243-0000 24 HOURS A DAY, 7 DAYS A WEEK FOR LG CUSTOMER SERVICE DLE7177WM/DLG7188WM DLE7177NM/DLG7188NM DLE7177RM/DLG7188RM Thank you for future reference.
Owners Manual
Page 3
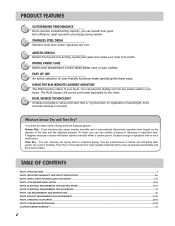
... DRYER ...7-12 PART4. ELECTRICAL REQUIREMENTS FOR GAS DRYERS...19 PART7. GAS REQUIREMENTS AND INSTRUCTIONS ...20 PART8. TROUBLESHOOTING GUIDE...31-33 LG DRYER LIMITED WARRANTY...34 2 You can plug the display unit into any rust. So regardless of the load and the selected ... big capacity, you can see sudden increase or decrease in operation time. What are still damp after sensor dry cycle is ensured. ACCESSORIES INSTALLATION ...13-14 PART5. ELECTRICAL REQUIREMENTS FOR ELECTRIC DRYER...15-18 PART6. DUAL SENSOR TECHNOLOGY 7 It makes it automatically determines operation time based...
... DRYER ...7-12 PART4. ELECTRICAL REQUIREMENTS FOR GAS DRYERS...19 PART7. GAS REQUIREMENTS AND INSTRUCTIONS ...20 PART8. TROUBLESHOOTING GUIDE...31-33 LG DRYER LIMITED WARRANTY...34 2 You can plug the display unit into any rust. So regardless of the load and the selected ... big capacity, you can see sudden increase or decrease in operation time. What are still damp after sensor dry cycle is ensured. ACCESSORIES INSTALLATION ...13-14 PART5. ELECTRICAL REQUIREMENTS FOR ELECTRIC DRYER...15-18 PART6. DUAL SENSOR TECHNOLOGY 7 It makes it automatically determines operation time based...
Owners Manual
Page 5
... is subjected to other than private family use, all warranty coverage is located at the end of purchase date is available by contacting your nearest LG Service Center. Model No. Part 2 IMPORTANT WARRANTY AND SAFETY INSTRUCTIONS SEEKING WARRANTY ASSISTANCE The Warranty for your Dryer is effective for only 90 days. Proof... to record the model number and serial number of Purchase ❈ Staple your appliance follow basic precautions, including the following. WARNING! If this product is installed and operated per this manual must be followed.
... is subjected to other than private family use, all warranty coverage is located at the end of purchase date is available by contacting your nearest LG Service Center. Model No. Part 2 IMPORTANT WARRANTY AND SAFETY INSTRUCTIONS SEEKING WARRANTY ASSISTANCE The Warranty for your Dryer is effective for only 90 days. Proof... to record the model number and serial number of Purchase ❈ Staple your appliance follow basic precautions, including the following. WARNING! If this product is installed and operated per this manual must be followed.
Owners Manual
Page 6
...run with the appliance. This appliance must be exposed to whether the appliance is properly installed and grounded in a risk of electric shock. This appliance is moving. 6) Do not install or store this appliance where it will not fit the outlet, have come into the... textured rubber-like materials. 10) Clean lint screen before using the appliance. 2) Do not dry articles that have a proper outlet installed by the manufacturer of the appliance and exhaust duct should be grounded. Improper connection of the equipmentgrounding conductor can result in accordance with controls...
...run with the appliance. This appliance must be exposed to whether the appliance is properly installed and grounded in a risk of electric shock. This appliance is moving. 6) Do not install or store this appliance where it will not fit the outlet, have come into the... textured rubber-like materials. 10) Clean lint screen before using the appliance. 2) Do not dry articles that have a proper outlet installed by the manufacturer of the appliance and exhaust duct should be grounded. Improper connection of the equipmentgrounding conductor can result in accordance with controls...
Owners Manual
Page 7
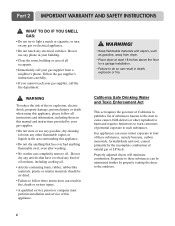
...after washing. • No washer can result in fire, death or serious injury. • A qualified service person or company must perform installation and service of natural gas or LP fuels. Exposure to these substances, namely benzene, carbon monoxide, formaldehyde and soot, caused primarily by your ...gas supplier, call your gas supplier from dryer. • Place dryer at least 18 inches above the floor for a garage installation. • Failure to light a match or cigarette, or turn on any gas or electrical appliance. • Do not touch any electrical switches...
...after washing. • No washer can result in fire, death or serious injury. • A qualified service person or company must perform installation and service of natural gas or LP fuels. Exposure to these substances, namely benzene, carbon monoxide, formaldehyde and soot, caused primarily by your ...gas supplier, call your gas supplier from dryer. • Place dryer at least 18 inches above the floor for a garage installation. • Failure to light a match or cigarette, or turn on any gas or electrical appliance. • Do not touch any electrical switches...
Owners Manual
Page 8
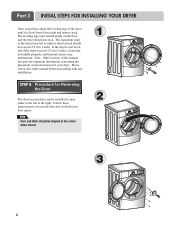
... information. If dryer is recommended to minimize noise transfer . • Consider space needed for companion appliances. • For closet installations, the picture below shows the minimum required ventilation openings for your dryer. When leveling, please be secured. STEP 1 Positioning the Dryer..., gas connections, and exhaust requirements are stably placed on the optional pedstal. Those required minimum clearances are installing your dryer for a garage installation. If you are set forth in the picture below . Please note that every section of this manual provides...
... information. If dryer is recommended to minimize noise transfer . • Consider space needed for companion appliances. • For closet installations, the picture below shows the minimum required ventilation openings for your dryer. When leveling, please be secured. STEP 1 Positioning the Dryer..., gas connections, and exhaust requirements are stably placed on the optional pedstal. Those required minimum clearances are installing your dryer for a garage installation. If you are set forth in the picture below . Please note that every section of this manual provides...
Owners Manual
Page 9
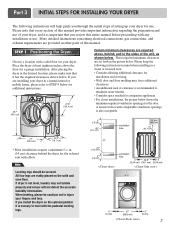
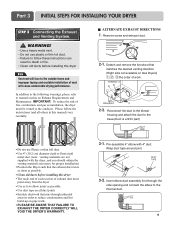
... DRYER Once in which your door opens: Note Door and latch should be installed to open either to the left or the right. Note: Other sections of the dryer until it is not level, and if the slope exceeds 2.5 ... internal sensors may malfunction. Follow these instructions to reverse the direction in position, adjust the leveling legs of this entire manual before proceeding with any installation. The leveling legs must remain firmly on your dryer can be aligned at the center when closed. 1 2 3 8 The maximum slope of and clearances for Reversing...
... DRYER Once in which your door opens: Note Door and latch should be installed to open either to the left or the right. Note: Other sections of the dryer until it is not level, and if the slope exceeds 2.5 ... internal sensors may malfunction. Follow these instructions to reverse the direction in position, adjust the leveling legs of this entire manual before proceeding with any installation. The leveling legs must remain firmly on your dryer can be aligned at the center when closed. 1 2 3 8 The maximum slope of and clearances for Reversing...
Owners Manual
Page 10
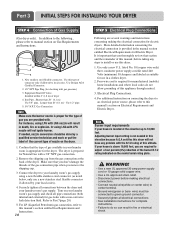
...to the outdoors. IMPORTANT: To reduce the risk of exhaust duct must be vented to the outside home and improper taping and unstable installation of work. 2-2. Insert elbow duct assembly first through unheated areas in this dryer Note Vent end will cause undesirable drying performance. ...Pre-assemble 4" elbow with the dryer, and you should obtain the venting materials necessary for proper installation) • Position the Dryer such that the exhaust duct run is a SVC part) • Do not use plastic or thin foil ...
...to the outdoors. IMPORTANT: To reduce the risk of exhaust duct must be vented to the outside home and improper taping and unstable installation of work. 2-2. Insert elbow duct assembly first through unheated areas in this dryer Note Vent end will cause undesirable drying performance. ...Pre-assemble 4" elbow with the dryer, and you should obtain the venting materials necessary for proper installation) • Position the Dryer such that the exhaust duct run is a SVC part) • Do not use plastic or thin foil ...
Owners Manual
Page 11
... connection, refer to green ground connector. • Securely tighten all pipe connections (both internal and external) for manufactured (mobile) home installations and where local codes do so can result in this elevation because A.G.A certifies this dryer. 1. WARNING! • Use a new ...Requirements and Electric Dryer. For additional instruction on your laundry room's gas supply and check all electrical connections • See installation instructions for complete instructions. • Failure to adjust a four percent(4%) reduction of the gas connection pipe when you don...
... connection, refer to green ground connector. • Securely tighten all pipe connections (both internal and external) for manufactured (mobile) home installations and where local codes do so can result in this elevation because A.G.A certifies this dryer. 1. WARNING! • Use a new ...Requirements and Electric Dryer. For additional instruction on your laundry room's gas supply and check all electrical connections • See installation instructions for complete instructions. • Failure to adjust a four percent(4%) reduction of the gas connection pipe when you don...
Owners Manual
Page 12
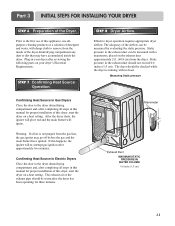
... the dryer starts, the igniter will glow red and the main burner will re-attempt gas ignition after the dryer has been operating for proper installation of this appliance, use allpurpose cleaning products or a solution of detergent and water, with damp cloth to the first use of this dryer, ... Heat Source in Electric Dryers Close the door to the dryer drum/drying compartment and, after completing all steps in this manual for proper installation of the dryer drum/drying compartment any dust or dirt that may go off before the gas and the main burner have ignited. Measuring Static...
... the dryer starts, the igniter will glow red and the main burner will re-attempt gas ignition after the dryer has been operating for proper installation of this appliance, use allpurpose cleaning products or a solution of detergent and water, with damp cloth to the first use of this dryer, ... Heat Source in Electric Dryers Close the door to the dryer drum/drying compartment and, after completing all steps in this manual for proper installation of the dryer drum/drying compartment any dust or dirt that may go off before the gas and the main burner have ignited. Measuring Static...

Owners Manual
Page 13
... with any combustible construction be at least 2 inches (5 cm), and, when venting the dryer to the outdoors, the dryer can be installed with a clearance of 1 inch at the manual section entitled Electrical Requirements for Electric Dryer 3) To reduce the risk of combustion and fire...a material that will comply with the dryer. You should obtain the venting materials necessary for proper installation. ! Part 3 INITIAL STEPS FOR INSTALLING YOUR DRYER STEP 9 Additional Instructions for Installation of Your Dryer in a manufactured or mobile home must comply with metal screws or fasteners that ...
... with any combustible construction be at least 2 inches (5 cm), and, when venting the dryer to the outdoors, the dryer can be installed with a clearance of 1 inch at the manual section entitled Electrical Requirements for Electric Dryer 3) To reduce the risk of combustion and fire...a material that will comply with the dryer. You should obtain the venting materials necessary for proper installation. ! Part 3 INITIAL STEPS FOR INSTALLING YOUR DRYER STEP 9 Additional Instructions for Installation of Your Dryer in a manufactured or mobile home must comply with metal screws or fasteners that ...

Owners Manual
Page 14
...Repeat Steps 2, 3, 4 for one person. Push the front stacking kit back to the stopper of the front kit. Incorrect Installation can cause serious accidents. This procedure should be careful not to pinch fingers between the washer and dryer. Slide dryer slowly backwards ... the front stacking kit. Avoid finger injuries - be performed by 2 or more experienced service personnel. 4 Secure stacking kit side bracket to the side of installation makes the stacking procedure too risky for the other side. 5 Place the dryer on a stable, even and solid floor. 2 Peel protective paper off the...
...Repeat Steps 2, 3, 4 for one person. Push the front stacking kit back to the stopper of the front kit. Incorrect Installation can cause serious accidents. This procedure should be careful not to pinch fingers between the washer and dryer. Slide dryer slowly backwards ... the front stacking kit. Avoid finger injuries - be performed by 2 or more experienced service personnel. 4 Secure stacking kit side bracket to the side of installation makes the stacking procedure too risky for the other side. 5 Place the dryer on a stable, even and solid floor. 2 Peel protective paper off the...


