
Service Manual
Page 3
... assume any gas or electrical appliance. Avoid touching electronic parts or terminal contacts; RECONNECT ALL GROUNDING DEVICES If grounding wires, screws, straps, clips, nuts, or washers used to complete a path to ground are present everywhere. Do not touch any phone in your finger repeatedly to their original position and properly fastened...
... assume any gas or electrical appliance. Avoid touching electronic parts or terminal contacts; RECONNECT ALL GROUNDING DEVICES If grounding wires, screws, straps, clips, nuts, or washers used to complete a path to ground are present everywhere. Do not touch any phone in your finger repeatedly to their original position and properly fastened...
Service Manual
Page 8
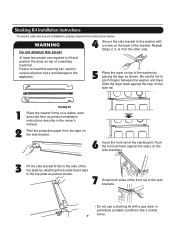
...conditions like a mobile home. 7 At least two people are required to lift and position the dryer on the back of the washer by attaching the double-faced tape to the washer with a gas dryer in the owner's manual. Stacking Kit Installation Instructions To ensure safe and secure installation, please observe the ...as shown. Repeat Steps 2, 3, & 4 for the other side. Push the front rail back against the stop on the side rail. 1 2 Stacking kit Place the washer firmly on a stable, even and solid floor as picture shown. 7 Screw both sides of the front rail to pinch fingers between the...
...conditions like a mobile home. 7 At least two people are required to lift and position the dryer on the back of the washer by attaching the double-faced tape to the washer with a gas dryer in the owner's manual. Stacking Kit Installation Instructions To ensure safe and secure installation, please observe the ...as shown. Repeat Steps 2, 3, & 4 for the other side. Push the front rail back against the stop on the side rail. 1 2 Stacking kit Place the washer firmly on a stable, even and solid floor as picture shown. 7 Screw both sides of the front rail to pinch fingers between the...
Service Manual
Page 9
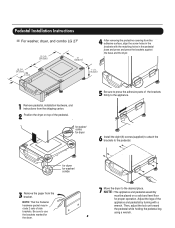
...the pedestal while holding the pedestal leg using a wrench. 8 Pedestal Installation Instructions For washer, dryer, and combo LG 27" 4 AAtftaecr hretmheovdinogubthle-pfarocteedcttivaepecoovfetrhinegbfroamcktehteto the dardyheersaivsesshuorfwacnes, oaltighne tbhenstcpreawrtshoolfetshien bthreackets ablriagcnkwetisthwtihthetheedgmeaatcnhdincgahnoblees aintttahcehpeeddteostahle pbeadseesatnadl wpritehssscarnedwpsr..... for the dryer. 7 Move the dryer to use the brackets marked for dryer . for washer/ combo 3 Remove the paper from the shipping carton. 2 Position the dryer on a solid and...
...the pedestal while holding the pedestal leg using a wrench. 8 Pedestal Installation Instructions For washer, dryer, and combo LG 27" 4 AAtftaecr hretmheovdinogubthle-pfarocteedcttivaepecoovfetrhinegbfroamcktehteto the dardyheersaivsesshuorfwacnes, oaltighne tbhenstcpreawrtshoolfetshien bthreackets ablriagcnkwetisthwtihthetheedgmeaatcnhdincgahnoblees aintttahcehpeeddteostahle pbeadseesatnadl wpritehssscarnedwpsr..... for the dryer. 7 Move the dryer to use the brackets marked for dryer . for washer/ combo 3 Remove the paper from the shipping carton. 2 Position the dryer on a solid and...
Service Manual
Page 39
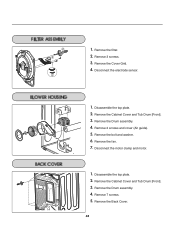
Remove the Drum assembly. 4. Remove 3 screws. 3. Remove the Drum assembly. 4. Remove the fan. 7. Remove 7 screws. 5. Disconnect the electrode sensor. 1. Disassemble the top plate. 2. Disassemble the top plate. 2. Remove the Back Cover. 38 Remove the filter. 2. Remove the Cabinet Cover and Tub Drum [Front]. 3. Remove the bolt and washer. 6. Remove the Cabinet Cover and Tub Drum [Front]. 3. Disconnect the motor clamp and motor. 1. Remove the Cover Grid. 4. 1. Remove 2 screws and cover (Air guide). 5.
Remove the Drum assembly. 4. Remove 3 screws. 3. Remove the Drum assembly. 4. Remove the fan. 7. Remove 7 screws. 5. Disconnect the electrode sensor. 1. Disassemble the top plate. 2. Disassemble the top plate. 2. Remove the Back Cover. 38 Remove the filter. 2. Remove the Cabinet Cover and Tub Drum [Front]. 3. Remove the bolt and washer. 6. Remove the Cabinet Cover and Tub Drum [Front]. 3. Disconnect the motor clamp and motor. 1. Remove the Cover Grid. 4. 1. Remove 2 screws and cover (Air guide). 5.
Owners Manual
Page 7
... or other flammable vapors or liquids in your building. • Clear the room, building or area of oil on it, even after washing. • No washer can result in death, explosion or fire. Do not use any gasoline, dry-cleaning solvents any kind of all instructions and information, including those in...
... or other flammable vapors or liquids in your building. • Clear the room, building or area of oil on it, even after washing. • No washer can result in death, explosion or fire. Do not use any gasoline, dry-cleaning solvents any kind of all instructions and information, including those in...

Owners Manual
Page 14
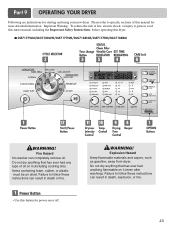
...cause serious accidents. Repeat Steps 2, 3, 4 for one person. Avoid finger injuries - Push the front stacking kit back to the stopper of the washer by fitting legs as picture shows. 6 Insert the front stacking kit. The weight of the dryer and the height of the front kit. Stacking... on the surface of top plate by 2 or more experienced service personnel. 4 Secure stacking kit side bracket to pinch fingers between the washer and dryer. be performed by attaching the doublesided tape to apply doublesided tape on the back of bracket. WARNING! This procedure should be ...
...cause serious accidents. Repeat Steps 2, 3, 4 for one person. Avoid finger injuries - Push the front stacking kit back to the stopper of the washer by fitting legs as picture shows. 6 Insert the front stacking kit. The weight of the dryer and the height of the front kit. Stacking... on the surface of top plate by 2 or more experienced service personnel. 4 Secure stacking kit side bracket to pinch fingers between the washer and dryer. be performed by attaching the doublesided tape to apply doublesided tape on the back of bracket. WARNING! This procedure should be ...

Owners Manual
Page 15
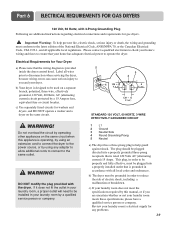
for washer/ combo for dryer 5 6 3 for dryer for washer/ combo 7 14 Disconnect venting. Part 4 ACCESSORIES INSTALLATION Pedestal Installation Instructions 1 4 2 1) Shut off Gas 2) Unplug Power Cord 3) Disconnect Gas Line from Dryer 4) Pull away and loosen vent clamp.
for washer/ combo for dryer 5 6 3 for dryer for washer/ combo 7 14 Disconnect venting. Part 4 ACCESSORIES INSTALLATION Pedestal Installation Instructions 1 4 2 1) Shut off Gas 2) Unplug Power Cord 3) Disconnect Gas Line from Dryer 4) Pull away and loosen vent clamp.
Owners Manual
Page 20
... when servicing the dryer, because wiring errors can cause serious injury to you are additional instructions regarding electrical connections and requirements for washers and dryers, and DO NOT operate a washer and a dryer on the same circuit when this appliance is operating, by using any problems. 19 WARNING! b) Your dryer is designed to...
... when servicing the dryer, because wiring errors can cause serious injury to you are additional instructions regarding electrical connections and requirements for washers and dryers, and DO NOT operate a washer and a dryer on the same circuit when this appliance is operating, by using any problems. 19 WARNING! b) Your dryer is designed to...
Owners Manual
Page 24
WARNING! Failure to specific sections of oil on it (even after washing). Fire Hazard No washer can result in death, explosion, or fire. 23 Please refer to follow these instructions can completely remove oil. Explosion Hazard Keep...containing foam, rubber, or plastic must be air dried. WARNING! Part 9 OPERATING YOUR DRYER Following are instructions for more detailed information. I DLE7177WM/DLG7188WM/DLE7177NM/DLG7188NM/DLE7177RM/DLG7188RM ! Important Warning: To reduce the risk of fire, electric shock, or injury to follow these instructions can result in death...
WARNING! Failure to specific sections of oil on it (even after washing). Fire Hazard No washer can result in death, explosion, or fire. 23 Please refer to follow these instructions can completely remove oil. Explosion Hazard Keep...containing foam, rubber, or plastic must be air dried. WARNING! Part 9 OPERATING YOUR DRYER Following are instructions for more detailed information. I DLE7177WM/DLG7188WM/DLE7177NM/DLG7188NM/DLE7177RM/DLG7188RM ! Important Warning: To reduce the risk of fire, electric shock, or injury to follow these instructions can result in death...


