
Owners Manual
Page 7
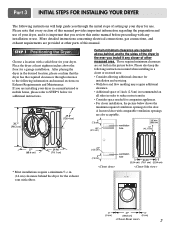
... placing the dryer in . (14 cm) clearance behind , and to the sides of your dryer in order to the following instructions will help guide you review this manual. ventilation hole 7
... placing the dryer in . (14 cm) clearance behind , and to the sides of your dryer in order to the following instructions will help guide you review this manual. ventilation hole 7
Owners Manual
Page 8
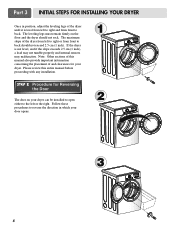
... your dryer. The leveling legs must remain firmly on your door opens: 1 2 3 8 Note: Other sections of this entire manual before proceeding with any installation. Please review this manual also provide important information concerning the placement of and clearances for Reversing the Door The door on the floor and the dryer should...
... your dryer. The leveling legs must remain firmly on your door opens: 1 2 3 8 Note: Other sections of this entire manual before proceeding with any installation. Please review this manual also provide important information concerning the placement of and clearances for Reversing the Door The door on the floor and the dryer should...

Owners Manual
Page 10
.... 5. Confirm that section, and the remainder of connector only if allowed by your local codes). 4. For LP (Liquefied Petroleum) gas connection, refer to you thoroughly review that the type of this manual's section entitled Gas Requirements and Instructions. 10 STEP 5 Electrical Plug Connections for use a new stainless steel flexible connector if...
.... 5. Confirm that section, and the remainder of connector only if allowed by your local codes). 4. For LP (Liquefied Petroleum) gas connection, refer to you thoroughly review that the type of this manual's section entitled Gas Requirements and Instructions. 10 STEP 5 Electrical Plug Connections for use a new stainless steel flexible connector if...
Owners Manual
Page 11
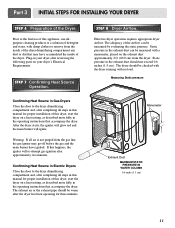
... operating instructions that accompany the dryer. After the dryer starts, the igniter will glow red and the main burner will re-attempt gas ignition after reviewing the following parts on a heat setting, as described more fully in the operating instructions that may go off before the gas and the main burner...
... operating instructions that accompany the dryer. After the dryer starts, the igniter will glow red and the main burner will re-attempt gas ignition after reviewing the following parts on a heat setting, as described more fully in the operating instructions that may go off before the gas and the main burner...
Owners Manual
Page 16
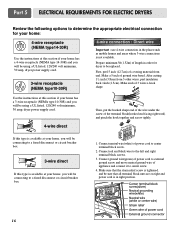
... neutral ground wire of power cord to center screw. 4. Prepare minimum 5ft(1.52m) of covering material from 3 other wires. Part 5 ELECTRICAL REQUIREMENTS FOR ELECTRIC DRYERS Review the following options to determine the appropriate electrical connection for dryer to the left and right terminal block screws. 3. Make a 5 inch of 3 wires a hook shape...
... neutral ground wire of power cord to center screw. 4. Prepare minimum 5ft(1.52m) of covering material from 3 other wires. Part 5 ELECTRICAL REQUIREMENTS FOR ELECTRIC DRYERS Review the following options to determine the appropriate electrical connection for dryer to the left and right terminal block screws. 3. Make a 5 inch of 3 wires a hook shape...

Owners Manual
Page 19
... whether or not your laundry room meets these specifications, please have a qualified service person or company, for example a qualified electrician or your local electric company, review your laundry room's electrical supply for any adapter to allow additional cords to connect to the same outlet. ! Please contact a qualified electrician to check your...
... whether or not your laundry room meets these specifications, please have a qualified service person or company, for example a qualified electrician or your local electric company, review your laundry room's electrical supply for any adapter to allow additional cords to connect to the same outlet. ! Please contact a qualified electrician to check your...
Owners Manual
Page 29
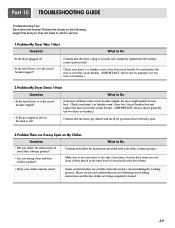
... electric dryers generally use your dryer to use two fuses or breakers.) • Is the gas supply or service blocked or off? Review the charts on the following your fabric softener product? Confirm that weren't cleansed during the washing process. Confirm and follow the instructions on...in the dryer drum. • Were your clothes entirely clean? Part 10 TROUBLESHOOTING GUIDE Troubleshooting Tips Save time and money! Please review and confirm that you are following pages first and you drying clean and dirty clothes together? Confirm that the clothes are actually stains ...
... electric dryers generally use your dryer to use two fuses or breakers.) • Is the gas supply or service blocked or off? Review the charts on the following your fabric softener product? Confirm that weren't cleansed during the washing process. Confirm and follow the instructions on...in the dryer drum. • Were your clothes entirely clean? Part 10 TROUBLESHOOTING GUIDE Troubleshooting Tips Save time and money! Please review and confirm that you are following pages first and you drying clean and dirty clothes together? Confirm that the clothes are actually stains ...
Owners Manual
Page 31
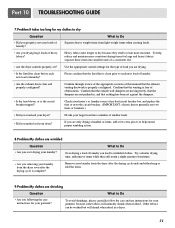
... clear and properly configured? Remove your laundry from light weight items when creating loads. • Are you properly sort your loads of laundry? Confirm through review of the appropriate sections of this manual that the dampers are shrinking Question What to help reduce and maintain more moisture. Try a shorter drying time...
... clear and properly configured? Remove your laundry from light weight items when creating loads. • Are you properly sort your loads of laundry? Confirm through review of the appropriate sections of this manual that the dampers are shrinking Question What to help reduce and maintain more moisture. Try a shorter drying time...
