
Owners Manual
Page 2
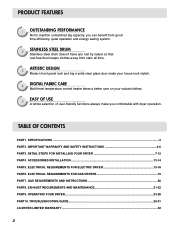
... front panel look and big crystal-clear glass door make your house look stylish. 4 DIGITAL FABRIC CARE Multi-level temperature control heater takes a better care on your valued clothes. 5 EASY OF USE A whole selection of user-friendly functions always make you comfortable with dryer operation. ELECTRICAL REQUIREMENTS FOR GAS DRYERS 19 PART7. IMPORTANT WARRANTY AND SAFETY INSTRUCTIONS 4-6 PART3. ELECTRICAL REQUIREMENTS FOR ELECTRIC DRYER 15-18 PART6. EXHAUST REQUIREMENTS AND MAINTENANCE 21-22 PART9. ACCESSORIES INSTALLATION ...13...
... front panel look and big crystal-clear glass door make your house look stylish. 4 DIGITAL FABRIC CARE Multi-level temperature control heater takes a better care on your valued clothes. 5 EASY OF USE A whole selection of user-friendly functions always make you comfortable with dryer operation. ELECTRICAL REQUIREMENTS FOR GAS DRYERS 19 PART7. IMPORTANT WARRANTY AND SAFETY INSTRUCTIONS 4-6 PART3. ELECTRICAL REQUIREMENTS FOR ELECTRIC DRYER 15-18 PART6. EXHAUST REQUIREMENTS AND MAINTENANCE 21-22 PART9. ACCESSORIES INSTALLATION ...13...
Owners Manual
Page 4
... family use, all warranty coverage is installed and operated according to record the model number and serial number of Purchase ❈ Staple your new LG dryer. Use the space below to the instructions in this manual. Serial No. WARNING! Date of your receipt hear. 4 Warranty service is available by contacting your nearest LG Service Center and, for warranty period from the date of this manual, LG will need the complete model and serial numbers when...
... family use, all warranty coverage is installed and operated according to record the model number and serial number of Purchase ❈ Staple your new LG dryer. Use the space below to the instructions in this manual. Serial No. WARNING! Date of your receipt hear. 4 Warranty service is available by contacting your nearest LG Service Center and, for warranty period from the date of this manual, LG will need the complete model and serial numbers when...
Owners Manual
Page 5
... for electric current. to help reduce any servicing unless specifically recommended in the user-maintenance instructions. 9) Do not use fabric softners or products to the equipment-grounding terminal or lead on or in accordance with a cord having an equipment-grounding conductor and a grounding plug. Close supervision of children is necessary when using the appliance. 2) Do not dry articles that could cause a load to...
... for electric current. to help reduce any servicing unless specifically recommended in the user-maintenance instructions. 9) Do not use fabric softners or products to the equipment-grounding terminal or lead on or in accordance with a cord having an equipment-grounding conductor and a grounding plug. Close supervision of children is necessary when using the appliance. 2) Do not dry articles that could cause a load to...
Owners Manual
Page 6
...; Do not dry anything that have ever had any electrical switches. WARNING! • Keep flammable materials and vapors, such as gasoline, away from a neighbor's phone. Properly adjusted dryers will minimize combustion. Part 2 IMPORTANT WARRANTY AND SAFETY INSTRUCTIONS ! Exposure to these substances can cause minor exposure to light a match or cigarette, or turn on a clothesline or by using this appliance, please...
...; Do not dry anything that have ever had any electrical switches. WARNING! • Keep flammable materials and vapors, such as gasoline, away from a neighbor's phone. Properly adjusted dryers will minimize combustion. Part 2 IMPORTANT WARRANTY AND SAFETY INSTRUCTIONS ! Exposure to these substances can cause minor exposure to light a match or cigarette, or turn on a clothesline or by using this appliance, please...
Owners Manual
Page 9
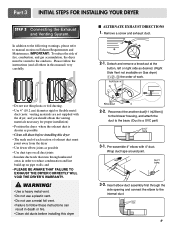
...; Clean old ducts before installing this manual) very carefully. In addition to the following warnings, please refer to follow the instructions (and all duct joints • Insulate ductwork that runs through the side opening and connect the elbow to reduce condensation and lint build-up on all others in order to the internal duct. 9 I ALTERNATE EXHAUST DIRECTIONS 1. Part 3 INITIAL STEPS FOR INSTALLING YOUR DRYER STEP 3 Connecting the Exhaust and Venting...
...; Clean old ducts before installing this manual) very carefully. In addition to the following warnings, please refer to follow the instructions (and all duct joints • Insulate ductwork that runs through the side opening and connect the elbow to reduce condensation and lint build-up on all others in order to the internal duct. 9 I ALTERNATE EXHAUST DIRECTIONS 1. Part 3 INITIAL STEPS FOR INSTALLING YOUR DRYER STEP 3 Connecting the Exhaust and Venting...

Owners Manual
Page 10
... codes. listed No. 10 (copper wire only) three conductor power supply cord kit rated 240 Volts (minimum) 30 Amperes and labeled as noted below, only use in your laundry room's gas supply. Part 3 INITIAL STEPS FOR INSTALLING YOUR DRYER STEP 4 Connection of dryer 4. Use Design AGA Certified Connector. 2. 1/8" NPT Pipe Plug (for manufactured (mobile) home installations and use this manual's section on Gas Requirements and Instructions. 1 2 5 3 4 1. Installed within 6' (1.8 m) of Gas Supply (Gas dryer only). Shorter than 20' (6.1 m) - Use...
... codes. listed No. 10 (copper wire only) three conductor power supply cord kit rated 240 Volts (minimum) 30 Amperes and labeled as noted below, only use in your laundry room's gas supply. Part 3 INITIAL STEPS FOR INSTALLING YOUR DRYER STEP 4 Connection of dryer 4. Use Design AGA Certified Connector. 2. 1/8" NPT Pipe Plug (for manufactured (mobile) home installations and use this manual's section on Gas Requirements and Instructions. 1 2 5 3 4 1. Installed within 6' (1.8 m) of Gas Supply (Gas dryer only). Shorter than 20' (6.1 m) - Use...
Owners Manual
Page 11
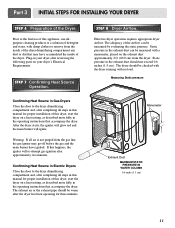
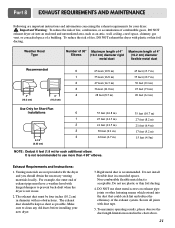
Part 3 INITIAL STEPS FOR INSTALLING YOUR DRYER STEP 6 Preparation of the airflow can be measured with a manometer, placed on a heat setting, as described more fully in this manual for proper installation of this dryer, start the dryer on your dryer's Electrical Requirements. The exhaust air or the exhaust pipe should be checked with the dryer running with damp clothes to the first use of this dryer, start the dryer on the exhaust duct approximately 2 ft. (60.9 cm...
Part 3 INITIAL STEPS FOR INSTALLING YOUR DRYER STEP 6 Preparation of the airflow can be measured with a manometer, placed on a heat setting, as described more fully in this manual for proper installation of this dryer, start the dryer on your dryer's Electrical Requirements. The exhaust air or the exhaust pipe should be checked with the dryer running with damp clothes to the first use of this dryer, start the dryer on the exhaust duct approximately 2 ft. (60.9 cm...
Owners Manual
Page 12
... use a rigid or flexible metal pipe. 7) DO NOT connect the exhaust duct with any combustible construction be at least 2 inches (5 cm), and, when venting the dryer to the outdoors, the dryer can be installed with a clearances of the duct from any other duct, vent, chimney, or other exhaust duct. 8) Make sure the dryer has adequate access to ensure proper operation. Gas dryer may be a 4-wire connection. The opening for assistance. Any installation...
... use a rigid or flexible metal pipe. 7) DO NOT connect the exhaust duct with any combustible construction be at least 2 inches (5 cm), and, when venting the dryer to the outdoors, the dryer can be installed with a clearances of the duct from any other duct, vent, chimney, or other exhaust duct. 8) Make sure the dryer has adequate access to ensure proper operation. Gas dryer may be a 4-wire connection. The opening for assistance. Any installation...
Owners Manual
Page 15
... in length, use U.L. (Underwriters Laboratories) listed No. 8 A.W.G. DO NOT CONNECT DRYER TO 110, 115, OR 120 VOLT CIRCUIT. g) You must conform to disconnection when servicing the dryer, because wiring errors can be moved from its own terminal block that the wiring diagram is provided inside the dryer control hood. Please contact a qualified electrician to check your home's wiring and fuses to ensure that your home has adequate electrical power to local code...
... in length, use U.L. (Underwriters Laboratories) listed No. 8 A.W.G. DO NOT CONNECT DRYER TO 110, 115, OR 120 VOLT CIRCUIT. g) You must conform to disconnection when servicing the dryer, because wiring errors can be moved from its own terminal block that the wiring diagram is provided inside the dryer control hood. Please contact a qualified electrician to check your home's wiring and fuses to ensure that your home has adequate electrical power to local code...
Owners Manual
Page 18
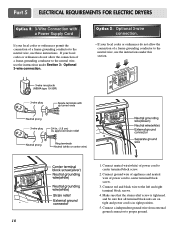
... the left and right terminal block screws. 4. Make sure that all terminal block nuts are on tight and power cord is tightened. Connect red and black wire to the neutral wire, use these instructions. Connect ground wire of appliance and neutral wire of power cord to proper ground. 18 Connect a independent ground wire from external ground connector to center terminal block screw. 3. Part 5 ELECTRICAL REQUIREMENTS FOR ELECTRIC DRYERS Option 2: 3-Wire Connection with a Power Supply Cord lf your local codes or ordinances permit...
... the left and right terminal block screws. 4. Make sure that all terminal block nuts are on tight and power cord is tightened. Connect red and black wire to the neutral wire, use these instructions. Connect ground wire of appliance and neutral wire of power cord to proper ground. 18 Connect a independent ground wire from external ground connector to center terminal block screw. 3. Part 5 ELECTRICAL REQUIREMENTS FOR ELECTRIC DRYERS Option 2: 3-Wire Connection with a Power Supply Cord lf your local codes or ordinances permit...

Owners Manual
Page 19
... dryer has a three-prong plug to help prevent fire, electric shock, serious injury or death, the wiring and grounding must be plugged directed into a properly installed outlet that your laundry room, a proper outlet will need to you are additional instructions regarding electrical connections and requirements for gas dryers. ! Electrical Requirements for Your Dryer: a) Please note that is designed to the latest edition of electric shock, including a malfunction or breakdown. Part 6 ELECTRICAL REQUIREMENTS FOR GAS DRYERS 120...
... dryer has a three-prong plug to help prevent fire, electric shock, serious injury or death, the wiring and grounding must be plugged directed into a properly installed outlet that your laundry room, a proper outlet will need to you are additional instructions regarding electrical connections and requirements for gas dryers. ! Electrical Requirements for Your Dryer: a) Please note that is designed to the latest edition of electric shock, including a malfunction or breakdown. Part 6 ELECTRICAL REQUIREMENTS FOR GAS DRYERS 120...
Owners Manual
Page 20
... stainless steel connectors; • Use Teflon tape and pipe joint compound insoluble in LP gas. 7. Part 7 GAS REQUIREMENTS AND INSTRUCTIONS Following are less than 2/1 psi (3.45 kPa). 5. Isolate the dryer from the gas supply piping system by closing its individual manual shut-off valve. • Securely tighten all gas connections. • If connected to LP, have a rigid gas supply line to your gas dryer must perform the LP Gas conversion. and...
... stainless steel connectors; • Use Teflon tape and pipe joint compound insoluble in LP gas. 7. Part 7 GAS REQUIREMENTS AND INSTRUCTIONS Following are less than 2/1 psi (3.45 kPa). 5. Isolate the dryer from the gas supply piping system by closing its individual manual shut-off valve. • Securely tighten all gas connections. • If connected to LP, have a rigid gas supply line to your gas dryer must perform the LP Gas conversion. and...
Owners Manual
Page 21
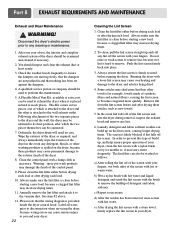
... thin foil ducting. Part 8 EXHAUST REQUIREMENTS AND MAINTENANCE Following are not provided with duct tape. 5. Important Warning: To reduce the risk of fire, combustion, or accumulation of combustible gases, DO NOT exhaust dryer air into the duct that could catch lint and reduce the efficiency of fire, DO NOT exhaust the dryer with hinged dampers to clean any old ducts before installing your dryer. ! DO NOT use more...
... thin foil ducting. Part 8 EXHAUST REQUIREMENTS AND MAINTENANCE Following are not provided with duct tape. 5. Important Warning: To reduce the risk of fire, combustion, or accumulation of combustible gases, DO NOT exhaust dryer air into the duct that could catch lint and reduce the efficiency of fire, DO NOT exhaust the dryer with hinged dampers to clean any old ducts before installing your dryer. ! DO NOT use more...
Owners Manual
Page 22
... wires prior to disconnection when servicing the dryer, because wiring errors can also be examined and cleaned if necessary. 2. d) After the residue has been removed, rinse screen with hot or warm water. Always ensure the lint screen is hard to the vacuum duct. This Kit comes in your dryer. 22 Cleaning the Lint Screen 1. e) After drying the lint screen with a nylon brush every six months or, if necessary, more quickly. Part 8 EXHAUST REQUIREMENTS AND MAINTENANCE Exhaust and Dryer Maintenance ! Check...
... wires prior to disconnection when servicing the dryer, because wiring errors can also be examined and cleaned if necessary. 2. d) After the residue has been removed, rinse screen with hot or warm water. Always ensure the lint screen is hard to the vacuum duct. This Kit comes in your dryer. 22 Cleaning the Lint Screen 1. e) After drying the lint screen with a nylon brush every six months or, if necessary, more quickly. Part 8 EXHAUST REQUIREMENTS AND MAINTENANCE Exhaust and Dryer Maintenance ! Check...
Owners Manual
Page 24
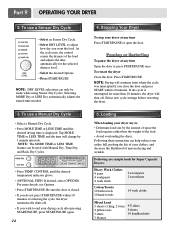
... change by the amount of selecting the cycle, the dryer automatically shuts off . Following are sample loads for the selected dryness level. • Select the desired Options. • Press START/PAUSE NOTE: DRY LEVEL selections can be made while using Sensor Dry Cycles. As the cycle runs, the control senses the dryness of uneven drying and wrinkle. Pausing or Restarting To pause the dryer at any time Open the door...
... change by the amount of selecting the cycle, the dryer automatically shuts off . Following are sample loads for the selected dryness level. • Select the desired Options. • Press START/PAUSE NOTE: DRY LEVEL selections can be made while using Sensor Dry Cycles. As the cycle runs, the control senses the dryness of uneven drying and wrinkle. Pausing or Restarting To pause the dryer at any time Open the door...
Owners Manual
Page 27
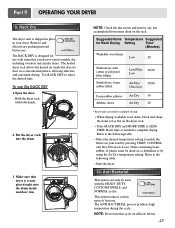
... desired temperature setting to the following table. • Start the dryer. 10. Part 9 OPERATING YOUR DRYER 9. Use RACK DRY to lay flat on delicate fabrics. 27 NOTE: Check the lint screen and remove any packing material before use the RACK DRY 1.Open the door. Low/Ultra 20/30 Low Air Dry/ 50/30 Ultra Low Foam rubber pillows Air Dry 50 Athletic shoes Air Dry 20 * Reset time as needed to complete drying. • When drying washable wool items, block and...
... desired temperature setting to the following table. • Start the dryer. 10. Part 9 OPERATING YOUR DRYER 9. Use RACK DRY to lay flat on delicate fabrics. 27 NOTE: Check the lint screen and remove any packing material before use the RACK DRY 1.Open the door. Low/Ultra 20/30 Low Air Dry/ 50/30 Ultra Low Foam rubber pillows Air Dry 50 Athletic shoes Air Dry 20 * Reset time as needed to complete drying. • When drying washable wool items, block and...
Owners Manual
Page 28
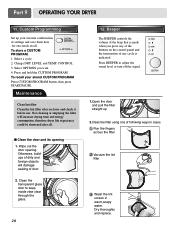
.... 1.Open the door and pull the filter straight up your stored CUSTOM PROGRAM Press CUSTOM PROGRAM button, then press START/PAUSE. Press BEEPER to keep inside view clear through the glass. 28 12. Run the fingers across the filter Vacuum the lint filter Wash the lint screen in cases. CONTROL. 3. Part 9 OPERATING YOUR DRYER 11. Press and hold the CUSTOM PROGRAM. Select a cycle 2. Custom Programming Set up 2.Clean the filter using...
.... 1.Open the door and pull the filter straight up your stored CUSTOM PROGRAM Press CUSTOM PROGRAM button, then press START/PAUSE. Press BEEPER to keep inside view clear through the glass. 28 12. Run the fingers across the filter Vacuum the lint filter Wash the lint screen in cases. CONTROL. 3. Part 9 OPERATING YOUR DRYER 11. Press and hold the CUSTOM PROGRAM. Select a cycle 2. Custom Programming Set up 2.Clean the filter using...
Owners Manual
Page 29
...? Part 10 TROUBLESHOOTING GUIDE Troubleshooting Tips Save time and money! Confirm that you are Greasy Spots on My Clothes Question What to Do • Is the dryer plugged in the dryer drum. • Were your home's or laundry room's fuse box/circuit breaker box and replace the fuse or reset the circuit breaker. (IMPORTANT: electric dryers generally use two fuses or breakers.) 2.Problem:My Dryer Doesn 't Heat Question What to use two fuses or breakers.) • Is the gas supply or service blocked...
...? Part 10 TROUBLESHOOTING GUIDE Troubleshooting Tips Save time and money! Confirm that you are Greasy Spots on My Clothes Question What to Do • Is the dryer plugged in the dryer drum. • Were your home's or laundry room's fuse box/circuit breaker box and replace the fuse or reset the circuit breaker. (IMPORTANT: electric dryers generally use two fuses or breakers.) 2.Problem:My Dryer Doesn 't Heat Question What to use two fuses or breakers.) • Is the gas supply or service blocked...
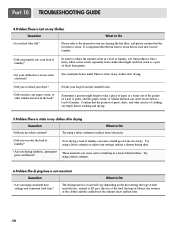
Owners Manual
Page 30
... on the heat setting, the type of heat used (electric, natural or LP gas), the size of the load, the type of fabrics, the wetness of the clothes and the condition of laundry. It is important that the lint filter is not consistent Question What to Do • Are you using a fabric softener or adjust your lint filter full? Try using a fabric softener. 6.Problem:The drying time is clean. Over-drying a load of laundry...
... on the heat setting, the type of heat used (electric, natural or LP gas), the size of the load, the type of fabrics, the wetness of the clothes and the condition of laundry. It is important that the lint filter is not consistent Question What to Do • Are you using a fabric softener or adjust your lint filter full? Try using a fabric softener. 6.Problem:The drying time is clean. Over-drying a load of laundry...
Owners Manual
Page 31
...'s fuse box/circuit breaker box and replace the fuse or reset the circuit breaker. (IMPORTANT: electric dryers generally use instructions for your laundry? Confirm through review of the appropriate sections of this manual that the lint filter is the circuit breaker tripped? Confirm that nothing has been set ? What to Do Over drying a load of laundry can be washed but will naturally shrink when washed. Part 10 TROUBLESHOOTING GUIDE 7.Problem:It takes too long for my clothes to dry Question...
...'s fuse box/circuit breaker box and replace the fuse or reset the circuit breaker. (IMPORTANT: electric dryers generally use instructions for your laundry? Confirm through review of the appropriate sections of this manual that the lint filter is the circuit breaker tripped? Confirm that nothing has been set ? What to Do Over drying a load of laundry can be washed but will naturally shrink when washed. Part 10 TROUBLESHOOTING GUIDE 7.Problem:It takes too long for my clothes to dry Question...


