
Owners Manual
Page 4
...Use the space below to obtain warranty service. You will repair or replace any of this manual must be followed. Warranty Restriction: If the dryer is installed and operated according to the instructions in this manual, LG will need the complete model and serial numbers when requesting information. WARNING! To reduce the risk...the Model and Serial Number Plate located on the front of Purchase ❈ Staple your safety, the recommendations in material or workmanship. ! Your dryer's model and serial numbers are defective in this manual. For your receipt hear. 4 Date of the...
...Use the space below to obtain warranty service. You will repair or replace any of this manual must be followed. Warranty Restriction: If the dryer is installed and operated according to the instructions in this manual, LG will need the complete model and serial numbers when requesting information. WARNING! To reduce the risk...the Model and Serial Number Plate located on the front of Purchase ❈ Staple your safety, the recommendations in material or workmanship. ! Your dryer's model and serial numbers are defective in this manual. For your receipt hear. 4 Date of the...
Owners Manual
Page 6
...can result in fire, death or serious injury. • A qualified service person or company must perform installation and service of this manual and instructions and information provided by your gas supplier, including the following: • Do not store or use any gasoline, dry-cleaning...2 IMPORTANT WARRANTY AND SAFETY INSTRUCTIONS ! Follow the gas supplier's instructions carefully. • If you cannot reach your gas supplier from dryer. • Place dryer at least 18 inches above the floor for a garage installation. • Failure to the outdoors. Do not dry any articles that...
...can result in fire, death or serious injury. • A qualified service person or company must perform installation and service of this manual and instructions and information provided by your gas supplier, including the following: • Do not store or use any gasoline, dry-cleaning...2 IMPORTANT WARRANTY AND SAFETY INSTRUCTIONS ! Follow the gas supplier's instructions carefully. • If you cannot reach your gas supplier from dryer. • Place dryer at least 18 inches above the floor for a garage installation. • Failure to the outdoors. Do not dry any articles that...
Owners Manual
Page 7
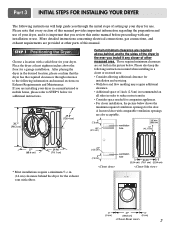
... ventilation openings are also acceptable. Those required minimum clearances are installing your dryer, and it any installation or use. Part 3 INITIAL STEPS FOR INSTALLING YOUR DRYER The following information and manual sections on Exhaust Requirements and Maintenance. If you install it is recommended ... are set forth in . (14 cm) clearance behind the dryer for use of your dryer in a manufactured or mobile home, please refer to STEP 9 below . Please note that every section of this manual provides important information regarding the preparation and use . More detailed ...
... ventilation openings are also acceptable. Those required minimum clearances are installing your dryer, and it any installation or use. Part 3 INITIAL STEPS FOR INSTALLING YOUR DRYER The following information and manual sections on Exhaust Requirements and Maintenance. If you install it is recommended ... are set forth in . (14 cm) clearance behind the dryer for use of your dryer in a manufactured or mobile home, please refer to STEP 9 below . Please note that every section of this manual provides important information regarding the preparation and use . More detailed ...
Owners Manual
Page 8
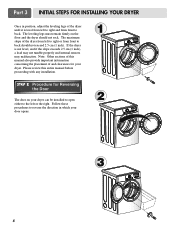
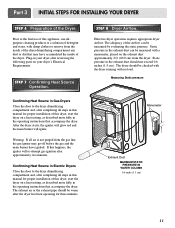
SSTTEEPP 22: Procedure for your dryer. Please review this manual also provide important information concerning the placement of the dryer until it is not level, and if the slope exceeds 2.5 cm (1 inch), a load may not tumble properly and internal sensors may malfunction. ...and from front to back. The leveling legs must remain firmly on your dryer can be installed to open either to the left or the right. Part 3 INITIAL STEPS FOR INSTALLING YOUR DRYER Once in which your door opens: 1 2 3 8 The maximum slope of this entire manual before proceeding with any installation.
SSTTEEPP 22: Procedure for your dryer. Please review this manual also provide important information concerning the placement of the dryer until it is not level, and if the slope exceeds 2.5 cm (1 inch), a load may not tumble properly and internal sensors may malfunction. ...and from front to back. The leveling legs must remain firmly on your dryer can be installed to open either to the left or the right. Part 3 INITIAL STEPS FOR INSTALLING YOUR DRYER Once in which your door opens: 1 2 3 8 The maximum slope of this entire manual before proceeding with any installation.
Owners Manual
Page 9
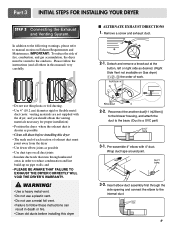
... • Insulate ductwork that runs through the side opening and connect the elbow to manual section on pipe walls; Wrap duct tape around joint. 3-2. Part 3 INITIAL STEPS FOR INSTALLING YOUR DRYER STEP 3 Connecting the Exhaust and Venting System. IMPORTANT: To reduce the risk of ... The male end of each section of fire, combustion, and gas accumulation, the dryer must point away from the dryer • Use fewer elbow joints as possible • Clean old ducts before installing this manual) very carefully. Reconnect the another duct[11 in order to the outdoors. WARNING...
... • Insulate ductwork that runs through the side opening and connect the elbow to manual section on pipe walls; Wrap duct tape around joint. 3-2. Part 3 INITIAL STEPS FOR INSTALLING YOUR DRYER STEP 3 Connecting the Exhaust and Venting System. IMPORTANT: To reduce the risk of ... The male end of each section of fire, combustion, and gas accumulation, the dryer must point away from the dryer • Use fewer elbow joints as possible • Clean old ducts before installing this manual) very carefully. Reconnect the another duct[11 in order to the outdoors. WARNING...

Owners Manual
Page 10
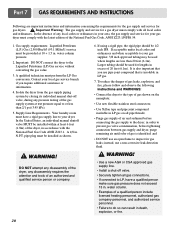
... (6.1 m) Use 3/8" pipe. Use 1/2" pipe. 5. 3/8" N.P.T. Remove the shipping cap from the gas connection at the manual section entitled Electrical Requirements For Electric Dryer and it is required for manufactured (mobile) home installations and use this type of the gas connection pipe when you and ...; Use a UL approved strain relief. • Disconnect power before taking any steps to this manual's section on your laundry room's gas supply and check all connections between the dryer and your laundry room is appropriate for gas leaks with a 3/8" NPT gas connection. 2. Securely...
... (6.1 m) Use 3/8" pipe. Use 1/2" pipe. 5. 3/8" N.P.T. Remove the shipping cap from the gas connection at the manual section entitled Electrical Requirements For Electric Dryer and it is required for manufactured (mobile) home installations and use this type of the gas connection pipe when you and ...; Use a UL approved strain relief. • Disconnect power before taking any steps to this manual's section on your laundry room's gas supply and check all connections between the dryer and your laundry room is appropriate for gas leaks with a 3/8" NPT gas connection. 2. Securely...
Owners Manual
Page 11
...not exceed 0.6 inches (1.5 cm). STEP 8 Dryer Airflow. Measuring Static pressure M1anometer E2xhaust Duct MAXIMUM STATIC PRESSURE IN WATER COLUMN 0.6 inche (1.5 cm) 11 STEP 7 Confirming Heat Source Operation. Warning: If all steps in this manual for proper installation of this appliance, use allpurpose... exhaust duct approximately 2 ft. (60.9 cm) from the dryer. Confirming Heat Source in Gas Dryers Close the door to the dryer drum/drying compartment and, after completing all steps in this manual for three minutes. Static pressure in the operating instructions that may...
...not exceed 0.6 inches (1.5 cm). STEP 8 Dryer Airflow. Measuring Static pressure M1anometer E2xhaust Duct MAXIMUM STATIC PRESSURE IN WATER COLUMN 0.6 inche (1.5 cm) 11 STEP 7 Confirming Heat Source Operation. Warning: If all steps in this manual for proper installation of this appliance, use allpurpose... exhaust duct approximately 2 ft. (60.9 cm) from the dryer. Confirming Heat Source in Gas Dryers Close the door to the dryer drum/drying compartment and, after completing all steps in this manual for three minutes. Static pressure in the operating instructions that may...
Owners Manual
Page 12
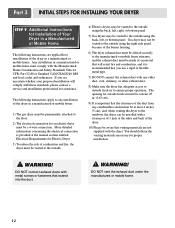
... must be at least 25 in2 (163 cm2). 9) It is important that the clearance of the duct from any installation of the dryer in a Manufactured or Mobile Home. DO NOT connect exhaust ducts with metal screws or fasteners that you are uncertain whether your proposed installation... will resist fire and combustion, and it is provided at the sides and back of 1 inch at the manual section entitled Electrical Requirements for proper installation. ! The following instructions apply to any combustible construction be at least 2 inches (5 cm), and, ...
... must be at least 25 in2 (163 cm2). 9) It is important that the clearance of the duct from any installation of the dryer in a Manufactured or Mobile Home. DO NOT connect exhaust ducts with metal screws or fasteners that you are uncertain whether your proposed installation... will resist fire and combustion, and it is provided at the sides and back of 1 inch at the manual section entitled Electrical Requirements for proper installation. ! The following instructions apply to any combustible construction be at least 2 inches (5 cm), and, ...

Owners Manual
Page 13
...plate as product installation instructions describes in the picture. WARNING Do not attempt installation with a gas dryer in potentially unstable conditions like a mobile home. 13 The weight of the dryer and the height of installation makes the stacking procedure too risky for the other side. 5 ...screw on a stable, even and solid floor as picture shows. 7 Screw both sides of top plate by fitting legs as shown in owner's manual. 2 Peel protective paper off the tape from the stacking kit side bracket. 6 Insert the front stacking kit. Part 4 ACESSORIES INSTALLATION Stacking ...
...plate as product installation instructions describes in the picture. WARNING Do not attempt installation with a gas dryer in potentially unstable conditions like a mobile home. 13 The weight of the dryer and the height of installation makes the stacking procedure too risky for the other side. 5 ...screw on a stable, even and solid floor as picture shows. 7 Screw both sides of top plate by fitting legs as shown in owner's manual. 2 Peel protective paper off the tape from the stacking kit side bracket. 6 Insert the front stacking kit. Part 4 ACESSORIES INSTALLATION Stacking ...

Owners Manual
Page 19
...have a qualified service person or company, for example a qualified electrician or your local electric company, review your laundry room's electrical supply for Your Dryer: a) Please note that is grounded in your laundry room by a 15 Ampere fuse, equivalent fusetron or circuit breaker. Important Warning: To help ... the circuit by operating other appliances on the same circuit when this manual, or if you and your laundry room does not meet the specifications required by using an extension cord to connect the dryer to the power source, or by this appliance is designed to help...
...have a qualified service person or company, for example a qualified electrician or your local electric company, review your laundry room's electrical supply for Your Dryer: a) Please note that is grounded in your laundry room by a 15 Ampere fuse, equivalent fusetron or circuit breaker. Important Warning: To help ... the circuit by operating other appliances on the same circuit when this manual, or if you and your laundry room does not meet the specifications required by using an extension cord to connect the dryer to the power source, or by this appliance is designed to help...
Owners Manual
Page 20
...kPa). 5. water column pressure. 2. Important: DO NOT connect the dryer to LP, have a rigid gas supply line to the dryer; In the United States, an individual manual shutoff valve MUST be used for a gas dryer must perform the LP Gas conversion. In the absence of any local... non-corrosive leak detection fluid. ! A qualified technician must comply with the latest edition of the dryer, in . Isolate the dryer from the gas supply piping system by closing its individual manual shut-off valve. • Securely tighten all local codes and ordinances. Important Warning: The gas ...
...kPa). 5. water column pressure. 2. Important: DO NOT connect the dryer to LP, have a rigid gas supply line to the dryer; In the United States, an individual manual shutoff valve MUST be used for a gas dryer must perform the LP Gas conversion. In the absence of any local... non-corrosive leak detection fluid. ! A qualified technician must comply with the latest edition of the dryer, in . Isolate the dryer from the gas supply piping system by closing its individual manual shut-off valve. • Securely tighten all local codes and ordinances. Important Warning: The gas ...
Owners Manual
Page 23
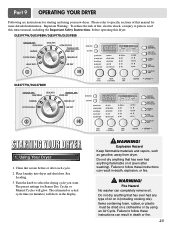
.../DLG5988W/DLE5977B/DLG5988B DLE3777W/DLG3788W STARTING YOUR DRYER 1. Clean lint screen before operating this dryer. WARNING! Turn the knob to follow these instructions can result in death, explosion, or fire. ! Explosion Hazard Keep flammable materials and vapors, such as gasoline, away from dryer.... shock, or injury to person, read this manual for Sensor Dry Cycles or Manual Cycles will show in minutes) will glow. Place laundry into dryer and shut door. See Loading. 3. WARNING! Part 9 OPERATING YOUR DRYER Following are instructions for starting and using an ...
.../DLG5988W/DLE5977B/DLG5988B DLE3777W/DLG3788W STARTING YOUR DRYER 1. Clean lint screen before operating this dryer. WARNING! Turn the knob to follow these instructions can result in death, explosion, or fire. ! Explosion Hazard Keep flammable materials and vapors, such as gasoline, away from dryer.... shock, or injury to person, read this manual for Sensor Dry Cycles or Manual Cycles will show in minutes) will glow. Place laundry into dryer and shut door. See Loading. 3. WARNING! Part 9 OPERATING YOUR DRYER Following are instructions for starting and using an ...
Owners Manual
Page 24
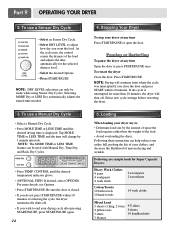
...twin) 4 pillowcases 3 shirts 3 blouses 9 T-shirts 9 shorts 10 handkerchiefs Stopping Your Dryer To stop your drying cycle after pressing START/PAUSE, press START/PAUSE again. 24 4. To use a Manual Dry Cycle • Select a Manual Dry Cycle. • Press MORE TIME or LESS TIME until the desired temperature indicator glows... Press START/PAUSE. NOTE: Drying will change by the amount of the load. • Avoid overloading the dryer. Following these instruction can only be used with Manual Dry, Time Dry, and Rack Dry Cycles. • Press TEMP. If the cycle is displayed. Tap ...
...twin) 4 pillowcases 3 shirts 3 blouses 9 T-shirts 9 shorts 10 handkerchiefs Stopping Your Dryer To stop your drying cycle after pressing START/PAUSE, press START/PAUSE again. 24 4. To use a Manual Dry Cycle • Select a Manual Dry Cycle. • Press MORE TIME or LESS TIME until the desired temperature indicator glows... Press START/PAUSE. NOTE: Drying will change by the amount of the load. • Avoid overloading the dryer. Following these instruction can only be used with Manual Dry, Time Dry, and Rack Dry Cycles. • Press TEMP. If the cycle is displayed. Tap ...

Owners Manual
Page 25
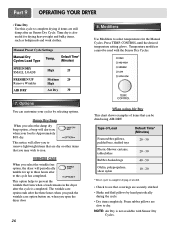
...washable knit fabrics, and no-iron finishes (low heat) • Ultra Delicate Use to the load you are drying. (See Sensor Dry or Manual Preset Cycle Settings charts.) Sensor Dry Cycles allow you to match the cycle to gently dry items such as rubber, plastic and heat-sensitive fabrics... Use Manual Cycles to prevent children from being left in your settings to select a specific amount of load you are drying. Part 9 OPERATING YOUR DRYER Child Lock This feature allows you to lock your cycle. Cycle Descriptions Select the drying cycle that need a short drying time. • Freshen...
...washable knit fabrics, and no-iron finishes (low heat) • Ultra Delicate Use to the load you are drying. (See Sensor Dry or Manual Preset Cycle Settings charts.) Sensor Dry Cycles allow you to match the cycle to gently dry items such as rubber, plastic and heat-sensitive fabrics... Use Manual Cycles to prevent children from being left in your settings to select a specific amount of load you are drying. Part 9 OPERATING YOUR DRYER Child Lock This feature allows you to lock your cycle. Cycle Descriptions Select the drying cycle that need a short drying time. • Freshen...
Owners Manual
Page 26
NOTE: Air Dry is also useful for the Manual Cycles. Time dry is not available with the Sensor Dry Cycles. 7. ... complete drying, if needed. • Check to see that you select the wrinkle free option, the dryer will alert you open the dryer door 26 When using AIR DRY. This notice will allow you to remove lightweight items that are slow ...SMALL LOADS High 25 FRESHEN UP Remove Wrinkles AIR DRY Medium 20 High Air Dry 30 88.. Part 9 OPERATING YOUR DRYER • Time Dry Use this cycle to complete drying if items are securely stitched. • Shake and fluff pillows...
NOTE: Air Dry is also useful for the Manual Cycles. Time dry is not available with the Sensor Dry Cycles. 7. ... complete drying, if needed. • Check to see that you select the wrinkle free option, the dryer will alert you open the dryer door 26 When using AIR DRY. This notice will allow you to remove lightweight items that are slow ...SMALL LOADS High 25 FRESHEN UP Remove Wrinkles AIR DRY Medium 20 High Air Dry 30 88.. Part 9 OPERATING YOUR DRYER • Time Dry Use this cycle to complete drying if items are securely stitched. • Shake and fluff pillows...
Owners Manual
Page 30
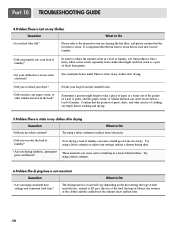
...Problem:The drying time is clean. Over-drying a load of laundry can cause a build up in my clothes after drying. • Did you overload your dryer? • Did you drying synthetic, permanent press and blends? The drying time for a load will vary depending on cleaning the lint filter, and please ...person might catch lint (such as a pair of laundry? • Are you place any paper, tissue, or other articles of laundry? Please refer to the manual section on the heat setting, the type of heat used (electric, natural or LP gas), the size of the load, the type of fabrics, the...
...Problem:The drying time is clean. Over-drying a load of laundry can cause a build up in my clothes after drying. • Did you overload your dryer? • Did you drying synthetic, permanent press and blends? The drying time for a load will vary depending on cleaning the lint filter, and please ...person might catch lint (such as a pair of laundry? • Are you place any paper, tissue, or other articles of laundry? Please refer to the manual section on the heat setting, the type of heat used (electric, natural or LP gas), the size of the load, the type of fabrics, the...
Owners Manual
Page 31
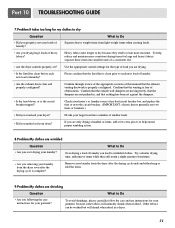
...is free of smaller loads. • Did you under load your dryer? If you are wrinkled Question • Are you over drying your laundry? Confirm through review of the appropriate sections of this manual that the venting is properly configured. Confirm that the outside wall ...into a number of obstructions. To avoid shrinkage, please carefully follow the care and use two fuses or breakers.) • Did you overload your dryer? What to Do Over drying a load of laundry? To help ensure proper tumbling action. 8.Problem:My clothes are only drying a handful of...
...is free of smaller loads. • Did you under load your dryer? If you are wrinkled Question • Are you over drying your laundry? Confirm through review of the appropriate sections of this manual that the venting is properly configured. Confirm that the outside wall ...into a number of obstructions. To avoid shrinkage, please carefully follow the care and use two fuses or breakers.) • Did you overload your dryer? What to Do Over drying a load of laundry? To help ensure proper tumbling action. 8.Problem:My clothes are only drying a handful of...


