
Owners Manual
Page 4
... the recommendations in material or workmanship. ! Your dryer's model and serial numbers are located on the Model and Serial Number Plate located on the front of its mechanical or electrical parts if they are defective in this manual, LG will need the complete model and serial numbers when... requesting information. Date of original purchase date is subjected to the instructions in this manual must be followed. To reduce the risk of this dryer is installed and operated according to ...
... the recommendations in material or workmanship. ! Your dryer's model and serial numbers are located on the Model and Serial Number Plate located on the front of its mechanical or electrical parts if they are defective in this manual, LG will need the complete model and serial numbers when... requesting information. Date of original purchase date is subjected to the instructions in this manual must be followed. To reduce the risk of this dryer is installed and operated according to ...
Owners Manual
Page 6
...appliance. 6 ! Follow the gas supplier's instructions carefully. • If you cannot reach your gas supplier, call your gas supplier from dryer. • Place dryer at least 18 inches above the floor for a garage installation. • Failure to follow all occupants. • Immediately call the fire...substances can be dried on a clothesline or by properly venting the dryer to light a match or cigarette, or turn on any gas or electrical appliance. • Do not touch any phone in this manual and instructions and information provided by the incomplete combustion of this ...
...appliance. 6 ! Follow the gas supplier's instructions carefully. • If you cannot reach your gas supplier, call your gas supplier from dryer. • Place dryer at least 18 inches above the floor for a garage installation. • Failure to follow all occupants. • Immediately call the fire...substances can be dried on a clothesline or by properly venting the dryer to light a match or cigarette, or turn on any gas or electrical appliance. • Do not touch any phone in this manual and instructions and information provided by the incomplete combustion of this ...
Owners Manual
Page 7
...above the floor for a garage installation. A louvered door with elbow. After placing the dryer in the desired location, please confirm that you review this entire manual before proceeding with a solid floor for your dryer, and it any installation or use . ventilation hole 27" (68.6 cm) 29....; Additional space of 1inch (2.5cm) is important that the dryer has the required clearances through the initial steps of the dryer in the ever you through reference to the following information and manual sections on Exhaust Requirements and Maintenance. Please note that every ...
...above the floor for a garage installation. A louvered door with elbow. After placing the dryer in the desired location, please confirm that you review this entire manual before proceeding with a solid floor for your dryer, and it any installation or use . ventilation hole 27" (68.6 cm) 29....; Additional space of 1inch (2.5cm) is important that the dryer has the required clearances through the initial steps of the dryer in the ever you through reference to the following information and manual sections on Exhaust Requirements and Maintenance. Please note that every ...
Owners Manual
Page 8
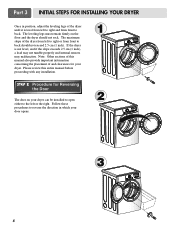
The maximum slope of and clearances for Reversing the Door The door on the floor and the dryer should not exceed 2.5 cm (1 inch). Please review this manual also provide important information concerning the placement of the dryer from left to right or from front to back. Follow these procedures to back should not rock...
The maximum slope of and clearances for Reversing the Door The door on the floor and the dryer should not exceed 2.5 cm (1 inch). Please review this manual also provide important information concerning the placement of the dryer from left to right or from front to back. Follow these procedures to back should not rock...
Owners Manual
Page 9
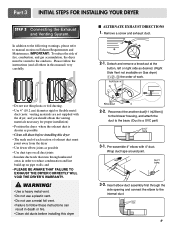
...of fire, combustion, and gas accumulation, the dryer must point away from the dryer • Use fewer elbow joints as possible • Clean old ducts before installing this manual) very carefully. Part 3 INITIAL STEPS FOR INSTALLING YOUR DRYER STEP 3 Connecting the Exhaust and Venting System.... and • PLEASE BE AWARE THAT FAILURE TO EXHAUST THE DRYER CORRECTLY WILL VOID THE DRYER'S WARRANTY. ! Insert elbow duct assembly...
...of fire, combustion, and gas accumulation, the dryer must point away from the dryer • Use fewer elbow joints as possible • Clean old ducts before installing this manual) very carefully. Part 3 INITIAL STEPS FOR INSTALLING YOUR DRYER STEP 3 Connecting the Exhaust and Venting System.... and • PLEASE BE AWARE THAT FAILURE TO EXHAUST THE DRYER CORRECTLY WILL VOID THE DRYER'S WARRANTY. ! Insert elbow duct assembly...

Owners Manual
Page 10
... or use a new stainless steel flexible connector if allowed by local codes. For LP (Liquefied Petroleum) gas connection, refer to this manual's section on connecting the dryer to an electrical power source, please refer to this appliance through neutral. 3. Use only a new U.L. listed No. 10 (copper wire... on your laundry room's gas supply and check all pipe connections (both internal and external) for Electric Dryer Only. Use this manual, before making the electrical connection for Natural Gas with a non-corrosive leak detection fluid. 5. Four-wire cord is important ...
... or use a new stainless steel flexible connector if allowed by local codes. For LP (Liquefied Petroleum) gas connection, refer to this manual's section on connecting the dryer to an electrical power source, please refer to this appliance through neutral. 3. Use only a new U.L. listed No. 10 (copper wire... on your laundry room's gas supply and check all pipe connections (both internal and external) for Electric Dryer Only. Use this manual, before making the electrical connection for Natural Gas with a non-corrosive leak detection fluid. 5. Four-wire cord is important ...
Owners Manual
Page 11
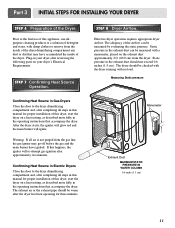
STEP 7 Confirming Heat Source Operation. Confirming Heat Source in Electric Dryers Close the door to the dryer drum/drying compartment and, after completing all steps in this manual for proper installation of this dryer, start the dryer on a heat setting, as described more fully in the operating instructions that ... E2xhaust Duct MAXIMUM STATIC PRESSURE IN WATER COLUMN 0.6 inche (1.5 cm) 11 Prior to the first use of this manual for three minutes. After the dryer starts, the igniter will glow red and the main burner will re-attempt gas ignition after completing all air is not...
STEP 7 Confirming Heat Source Operation. Confirming Heat Source in Electric Dryers Close the door to the dryer drum/drying compartment and, after completing all steps in this manual for proper installation of this dryer, start the dryer on a heat setting, as described more fully in the operating instructions that ... E2xhaust Duct MAXIMUM STATIC PRESSURE IN WATER COLUMN 0.6 inche (1.5 cm) 11 Prior to the first use of this manual for three minutes. After the dryer starts, the igniter will glow red and the main burner will re-attempt gas ignition after completing all air is not...
Owners Manual
Page 12
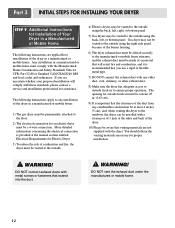
...DO NOT connect the exhaust duct with a clearances of 1 inch at the manual section entitled Electrical Requirements for Electric Dryer 3) To reduce the risk of combustion and fire, the dryer must be vented to the outside. 4) Electric dryers may be vented to the outside using the back, left , right, or...securely to ensure proper operation. The following instructions apply to any other duct, vent, chimney, or other exhaust duct. 8) Make sure the dryer has adequate access to outside using the right side panel because of the duct from any combustible construction be at least 2 inches (5 cm...
...DO NOT connect the exhaust duct with a clearances of 1 inch at the manual section entitled Electrical Requirements for Electric Dryer 3) To reduce the risk of combustion and fire, the dryer must be vented to the outside. 4) Electric dryers may be vented to the outside using the back, left , right, or...securely to ensure proper operation. The following instructions apply to any other duct, vent, chimney, or other exhaust duct. 8) Make sure the dryer has adequate access to outside using the right side panel because of the duct from any combustible construction be at least 2 inches (5 cm...

Owners Manual
Page 13
...be careful not to top plate as product installation instructions describes in owner's manual. 2 Peel protective paper off the tape from the stacking kit side bracket. 6 Insert the front stacking kit. The weight of the dryer and the height of installation makes the stacking procedure too risky for the ...the stopper of kit. 1 Stacking kit Place washer firmly on the back of the front kit. • Do not use stacking kit with a gas dryer in the picture. WARNING Do not attempt installation with a screw on a stable, even and solid floor as picture shows. 7 Screw both sides of ...
...be careful not to top plate as product installation instructions describes in owner's manual. 2 Peel protective paper off the tape from the stacking kit side bracket. 6 Insert the front stacking kit. The weight of the dryer and the height of installation makes the stacking procedure too risky for the ...the stopper of kit. 1 Stacking kit Place washer firmly on the back of the front kit. • Do not use stacking kit with a gas dryer in the picture. WARNING Do not attempt installation with a screw on a stable, even and solid floor as picture shows. 7 Screw both sides of ...

Owners Manual
Page 19
... instructions regarding electrical connections and requirements for Your Dryer: a) Please note that your dryer. Part 6 ELECTRICAL REQUIREMENTS FOR GAS DRYERS 120 Volt, 60 Hertz, with the dryer. c) Use separately fused circuits for washers and dryers, and DO NOT operate a washer and a dryer on the same circuit when this manual, or if you and your home has adequate...
... instructions regarding electrical connections and requirements for Your Dryer: a) Please note that your dryer. Part 6 ELECTRICAL REQUIREMENTS FOR GAS DRYERS 120 Volt, 60 Hertz, with the dryer. c) Use separately fused circuits for washers and dryers, and DO NOT operate a washer and a dryer on the same circuit when this manual, or if you and your home has adequate...
Owners Manual
Page 20
...are important instructions and information concerning the requirements for the gas supply and service for gas leaks; Isolate the dryer from the gas supply piping system by closing its individual manual shut-off valve. • Securely tighten all gas connections. • If connected to LP, have ...a rigid gas supply line to the dryer; Supply Line Requirements. N.P.T. If acceptable under local codes and ordinances and when ...
...are important instructions and information concerning the requirements for the gas supply and service for gas leaks; Isolate the dryer from the gas supply piping system by closing its individual manual shut-off valve. • Securely tighten all gas connections. • If connected to LP, have ...a rigid gas supply line to the dryer; Supply Line Requirements. N.P.T. If acceptable under local codes and ordinances and when ...
Owners Manual
Page 23
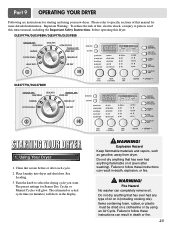
... cooking oils). Items containing foam, rubber, or plastic must be dried on it (even after each cycle. 2. DLE5977W/DLG5988W/DLE5977B/DLG5988B DLE3777W/DLG3788W STARTING YOUR DRYER 1. Clean lint screen before operating this entire manual, including the Important Safety Instructions, before or after washing). The preset settings for more detailed information. Do not dry...
... cooking oils). Items containing foam, rubber, or plastic must be dried on it (even after each cycle. 2. DLE5977W/DLG5988W/DLE5977B/DLG5988B DLE3777W/DLG3788W STARTING YOUR DRYER 1. Clean lint screen before operating this entire manual, including the Important Safety Instructions, before or after washing). The preset settings for more detailed information. Do not dry...
Owners Manual
Page 24
...clothes, and decrease the likelihood of the load. • Avoid overloading the dryer. To restart the dryer Close the door. Select new cycle settings before restarting the dryer. 5. To use a Manual Dry Cycle • Select a Manual Dry Cycle. • Press MORE TIME or LESS TIME until the desired ...PAUSE, press START/PAUSE again. 24 4. Part 9 OPERATING YOUR DRYER 2. Pausing or Restarting To pause the dryer at any time Open the door or press START/PAUSE once. Following these instruction can only be used with Manual Dry, Time Dry, and Rack Dry Cycles. • Press...
...clothes, and decrease the likelihood of the load. • Avoid overloading the dryer. To restart the dryer Close the door. Select new cycle settings before restarting the dryer. 5. To use a Manual Dry Cycle • Select a Manual Dry Cycle. • Press MORE TIME or LESS TIME until the desired ...PAUSE, press START/PAUSE again. 24 4. Part 9 OPERATING YOUR DRYER 2. Pausing or Restarting To pause the dryer at any time Open the door or press START/PAUSE once. Following these instruction can only be used with Manual Dry, Time Dry, and Rack Dry Cycles. • Press...

Owners Manual
Page 25
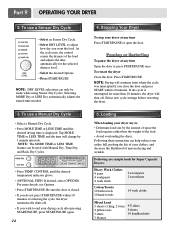
... Use for optimal drying Sensor Dry Cycle • Heavy Duty Use this cycle to lock your cycle. You can change the actual time in the dryer too long. • Air Dry Use the Air Dry Modifier for items that need a short drying time. • Freshen Up Use this cycle ..., sheets, blouses Low 32 ULTRA DELICATE Shear, workout wear and lace items Ultra Low 34 * Estimated Time with SENSOR DRY LEVEL (Normal) setting. When a Manual Cycle is displayed. To enable the Child Lock feature: Press and hold RACK DRY for drying synthetic fabrics, washable knit fabrics, and no-iron finishes...
... Use for optimal drying Sensor Dry Cycle • Heavy Duty Use this cycle to lock your cycle. You can change the actual time in the dryer too long. • Air Dry Use the Air Dry Modifier for items that need a short drying time. • Freshen Up Use this cycle ..., sheets, blouses Low 32 ULTRA DELICATE Shear, workout wear and lace items Ultra Low 34 * Estimated Time with SENSOR DRY LEVEL (Normal) setting. When a Manual Cycle is displayed. To enable the Child Lock feature: Press and hold RACK DRY for drying synthetic fabrics, washable knit fabrics, and no-iron finishes...
Owners Manual
Page 26
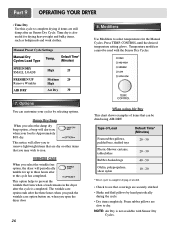
...dryer door 26 When using AIR DRY. The wrinkle care option ends after to three hours after the three hours when you push the wrinkle care option button on, when you to remove lightweight items that are dry or other items that coverings are slow to select temperatures for the Manual Cycles. Manual... Preset Cycle Settings Manual Dry Temp. Cycles Load Type Default Time* (Minutes) SPEED DRY SMALL LOADS High 25 FRESHEN UP Remove Wrinkles ...
...dryer door 26 When using AIR DRY. The wrinkle care option ends after to three hours after the three hours when you push the wrinkle care option button on, when you to remove lightweight items that are dry or other items that coverings are slow to select temperatures for the Manual Cycles. Manual... Preset Cycle Settings Manual Dry Temp. Cycles Load Type Default Time* (Minutes) SPEED DRY SMALL LOADS High 25 FRESHEN UP Remove Wrinkles ...
Owners Manual
Page 30
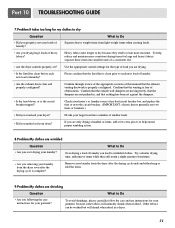
... Are you properly sort your larger load into smaller loads. Sometimes a person might catch lint (such as a pair of black linen pants). • Do your dryer? • Did you using a fabric softener to take a piece of paper or a tissue out of the pocket of a pair of pants, and this paper,... that the lint filter is clean. Over-drying a load of laundry can cause excess lint in my clothes after drying Question What to the manual section on cleaning the lint filter, and please confirm that the pockets of pants, shirts, and other articles of clothing are empty before each new...
... Are you properly sort your larger load into smaller loads. Sometimes a person might catch lint (such as a pair of black linen pants). • Do your dryer? • Did you using a fabric softener to take a piece of paper or a tissue out of the pocket of a pair of pants, and this paper,... that the lint filter is clean. Over-drying a load of laundry can cause excess lint in my clothes after drying Question What to the manual section on cleaning the lint filter, and please confirm that the pockets of pants, shirts, and other articles of clothing are empty before each new...
Owners Manual
Page 31
...Please confirm that the lint filter is clean prior to each new load of obstructions. Confirm through review of the appropriate sections of this manual that the venting is free of laundry? What to Do Over drying a load of laundry? Other fabrics can lead to wrinkled clothes....instructions for your garment? To avoid shrinkage, please carefully follow the care and use two fuses or breakers.) • Did you overload your dryer? Try a shorter drying time, and remove items while they tend to retain more consistent drying times for large and heavy fabrics, separate ...
...Please confirm that the lint filter is clean prior to each new load of obstructions. Confirm through review of the appropriate sections of this manual that the venting is free of laundry? What to Do Over drying a load of laundry? Other fabrics can lead to wrinkled clothes....instructions for your garment? To avoid shrinkage, please carefully follow the care and use two fuses or breakers.) • Did you overload your dryer? Try a shorter drying time, and remove items while they tend to retain more consistent drying times for large and heavy fabrics, separate ...


