
Owners Manual
Page 4
... your dryer is printed the end of original purchase date is available by contacting your nearest LG Service Center and, for your safety, the recommendations in this manual, LG will need the complete model and serial numbers when requesting information. To reduce the risk of fire or ...explosion, electric shock, or to obtain warranty service. Model No. We recommend that you staple your appliance, follow ...
... your dryer is printed the end of original purchase date is available by contacting your nearest LG Service Center and, for your safety, the recommendations in this manual, LG will need the complete model and serial numbers when requesting information. To reduce the risk of fire or ...explosion, electric shock, or to obtain warranty service. Model No. We recommend that you staple your appliance, follow ...
Owners Manual
Page 6
...oil. • Articles containing foam, rubber, rubber-like materials, plastic or similar materials should be minimized further by using this manual and instructions and information provided by the incomplete combustion of potential exposure to light a match or cigarette, or turn on it, ...even after washing. • No washer can result in fire, death or serious injury. • A qualified service person or company must perform installation and service of all instructions and information, including those in this appliance, please follow all occupants. • Immediately call the ...
...oil. • Articles containing foam, rubber, rubber-like materials, plastic or similar materials should be minimized further by using this manual and instructions and information provided by the incomplete combustion of potential exposure to light a match or cigarette, or turn on it, ...even after washing. • No washer can result in fire, death or serious injury. • A qualified service person or company must perform installation and service of all instructions and information, including those in this appliance, please follow all occupants. • Immediately call the ...
Owners Manual
Page 7
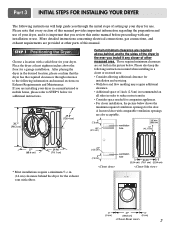
... concerning electrical connections, gas connections, and exhaust requirements are set forth in the desired location, please confirm that you review this manual. Place the dryer at other recessed area. After placing the dryer in the picture below. Those required minimum clearances are provided at... of 1inch (2.5cm) is recommended an all sides in a closet or recessed area: • Consider allowing additional clearance for installation and servicing. • Wall,door and flow molding may require additional clearance. • Additional space of setting up your dryer in the ever you...
... concerning electrical connections, gas connections, and exhaust requirements are set forth in the desired location, please confirm that you review this manual. Place the dryer at other recessed area. After placing the dryer in the picture below. Those required minimum clearances are provided at... of 1inch (2.5cm) is recommended an all sides in a closet or recessed area: • Consider allowing additional clearance for installation and servicing. • Wall,door and flow molding may require additional clearance. • Additional space of setting up your dryer in the ever you...

Owners Manual
Page 10
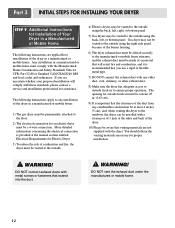
... stainless steel flexible connector if allowed by local codes. Remove the shipping cap from the gas connection at the manual section entitled Electrical Requirements For Electric Dryer and it is required for electric dryers. Four-wire cord is important ... Gas Connection 1. For additional instruction on Gas Requirements and Instructions. 1 2 5 3 4 1. Securely tighten all wires prior to disconnection when servicing the dryer, because wiring errors can result in fire or electrical shock. The wiring diagram is prepared for checking inlet gas pressure) 3. Installed within...
... stainless steel flexible connector if allowed by local codes. Remove the shipping cap from the gas connection at the manual section entitled Electrical Requirements For Electric Dryer and it is required for electric dryers. Four-wire cord is important ... Gas Connection 1. For additional instruction on Gas Requirements and Instructions. 1 2 5 3 4 1. Securely tighten all wires prior to disconnection when servicing the dryer, because wiring errors can result in fire or electrical shock. The wiring diagram is prepared for checking inlet gas pressure) 3. Installed within...
Owners Manual
Page 12
...to the floor. 2) The electrical connection for an electric dryer must be a 4-wire connection. Gas dryer may be at the manual section entitled Electrical Requirements for proper installation. ! You should obtain the venting materials necessary for Electric Dryer 3) To reduce the risk ... or Standard CAN/CSA0Z240 MH and local codes and ordinances. DO NOT connect exhaust ducts with these standards, please contact a service and installation professional for assistance. WARNING! The following instructions apply to any combustible construction be vented to installations of the duct ...
...to the floor. 2) The electrical connection for an electric dryer must be a 4-wire connection. Gas dryer may be at the manual section entitled Electrical Requirements for proper installation. ! You should obtain the venting materials necessary for Electric Dryer 3) To reduce the risk ... or Standard CAN/CSA0Z240 MH and local codes and ordinances. DO NOT connect exhaust ducts with these standards, please contact a service and installation professional for assistance. WARNING! The following instructions apply to any combustible construction be vented to installations of the duct ...

Owners Manual
Page 13
...tape to pinch fingers between the washer and dryer. This procedure should be careful not to top plate as product installation instructions describes in owner's manual. 2 Peel protective paper off the tape from the stacking kit side bracket. 6 Insert the front stacking kit. Push the front stacking kit ...to the stoppers of side stacking kit. 3 Fit the stacking kit side bracket firmly to the side of top plate by 2 or more experienced service personnel. 4 Secure stacking kit side bracket to the stopper of kit. 1 Stacking kit Place washer firmly on the back of the washer by ...
...tape to pinch fingers between the washer and dryer. This procedure should be careful not to top plate as product installation instructions describes in owner's manual. 2 Peel protective paper off the tape from the stacking kit side bracket. 6 Insert the front stacking kit. Push the front stacking kit ...to the stoppers of side stacking kit. 3 Fit the stacking kit side bracket firmly to the side of top plate by 2 or more experienced service personnel. 4 Secure stacking kit side bracket to the stopper of kit. 1 Stacking kit Place washer firmly on the back of the washer by ...

Owners Manual
Page 19
...'s electrical supply for washers and dryers, and DO NOT operate a washer and a dryer on the same circuit. ! Label all wires prior to disconnection when servicing the dryer, because wiring errors can cause serious injury to the same outlet. ! Do not overload the circuit by operating other appliances on a separate branch... and fuses to ensure that is grounded in your laundry room by this appliance is designed to be used on the same circuit when this manual, or if you and your home has adequate electrical power to reduce the risk of the National Electrical Code, ANSI/NFPA 70, or the...
...'s electrical supply for washers and dryers, and DO NOT operate a washer and a dryer on the same circuit. ! Label all wires prior to disconnection when servicing the dryer, because wiring errors can cause serious injury to the same outlet. ! Do not overload the circuit by operating other appliances on a separate branch... and fuses to ensure that is grounded in your laundry room by this appliance is designed to be used on the same circuit when this manual, or if you and your home has adequate electrical power to reduce the risk of the National Electrical Code, ANSI/NFPA 70, or the...
Owners Manual
Page 20
...to or less than 20 feet (6.1m). water column pressure. 2. Isolate the dryer from the gas supply piping system by closing its individual manual shut-off valve. • Securely tighten all local codes and ordinances. A 1/8 in death, explosion, or fire. 20 DO NOT ... information. 4. N.P.T. Part 7 GAS REQUIREMENTS AND INSTRUCTIONS Following are less than 2/1 psi (3.45 kPa). 5. Important Warning: The gas supply and service for gas leaks; A qualified technician must comply with the National Fuel Gas Code ANSI Z223.1. Contact your gas supplier, 3/8 inch approved tubing may...
...to or less than 20 feet (6.1m). water column pressure. 2. Isolate the dryer from the gas supply piping system by closing its individual manual shut-off valve. • Securely tighten all local codes and ordinances. A 1/8 in death, explosion, or fire. 20 DO NOT ... information. 4. N.P.T. Part 7 GAS REQUIREMENTS AND INSTRUCTIONS Following are less than 2/1 psi (3.45 kPa). 5. Important Warning: The gas supply and service for gas leaks; A qualified technician must comply with the National Fuel Gas Code ANSI Z223.1. Contact your gas supplier, 3/8 inch approved tubing may...

