
Owners Manual
Page 2
... PART4. TABLE OF CONTENTS PART1. SPECIFICATIONS ...3 PART2. ELECTRICAL REQUIREMENTS FOR ELECTRIC DRYER 15-18 PART6. GAS REQUIREMENTS AND INSTRUCTIONS 20 PART8. TROUBLESHOOTING GUIDE ...29-31 LG DRYER LIMITED WARRANTY ...32 2 ELECTRICAL REQUIREMENTS FOR GAS DRYERS 19 PART7. OPERATING YOUR DRYER...23-28 PART10. IMPORTANT WARRANTY AND SAFETY INSTRUCTIONS 4-6 PART3. EXHAUST REQUIREMENTS AND MAINTENANCE ... control heater takes a better care on your valued clothes. 5 EASY OF USE A whole selection of user-friendly functions always make you comfortable with dryer operation.
... PART4. TABLE OF CONTENTS PART1. SPECIFICATIONS ...3 PART2. ELECTRICAL REQUIREMENTS FOR ELECTRIC DRYER 15-18 PART6. GAS REQUIREMENTS AND INSTRUCTIONS 20 PART8. TROUBLESHOOTING GUIDE ...29-31 LG DRYER LIMITED WARRANTY ...32 2 ELECTRICAL REQUIREMENTS FOR GAS DRYERS 19 PART7. OPERATING YOUR DRYER...23-28 PART10. IMPORTANT WARRANTY AND SAFETY INSTRUCTIONS 4-6 PART3. EXHAUST REQUIREMENTS AND MAINTENANCE ... control heater takes a better care on your valued clothes. 5 EASY OF USE A whole selection of user-friendly functions always make you comfortable with dryer operation.
Owners Manual
Page 3
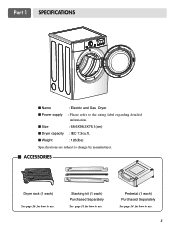
Pedestal (1 each) Purchased Separately See page 14 for how to use. Stacking kit (1 each ) See page 26 for how to the rating label regarding detailed information. I Size : 68.6X98.3X76.1(cm) I Weight : 126(Ibs) Specifications are subject to use. 3 I ACCESSORIES Dryer rack (1 each ) Purchased Separately See page 13 for how to change by manufacturer. Part 1 SPECIFICATIONS I Name : Electric and Gas Dryer I Power supply : Please refer to use. I Dryer capacity : IEC 7.3cu.ft.
Pedestal (1 each) Purchased Separately See page 14 for how to use. Stacking kit (1 each ) See page 26 for how to the rating label regarding detailed information. I Size : 68.6X98.3X76.1(cm) I Weight : 126(Ibs) Specifications are subject to use. 3 I ACCESSORIES Dryer rack (1 each ) Purchased Separately See page 13 for how to change by manufacturer. Part 1 SPECIFICATIONS I Name : Electric and Gas Dryer I Power supply : Please refer to use. I Dryer capacity : IEC 7.3cu.ft.
Owners Manual
Page 4
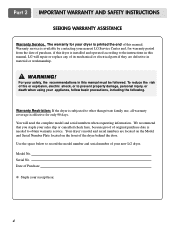
... numbers are defective in material or workmanship. ! Warranty service is printed the end of the dryer behind the door. Model No. The warranty for only 90 days. For your dryer is available by contacting your nearest LG Service Center and, for warranty period from the date of fire or explosion, electric shock, or...
... numbers are defective in material or workmanship. ! Warranty service is printed the end of the dryer behind the door. Model No. The warranty for only 90 days. For your dryer is available by contacting your nearest LG Service Center and, for warranty period from the date of fire or explosion, electric shock, or...
Owners Manual
Page 5
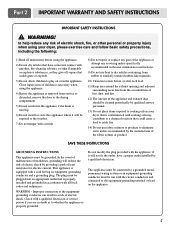
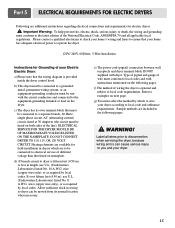
... equipped with cooking oils may contribute to a chemical reaction that have a proper outlet installed by providing a path of the equipmentgrounding conductor can result in your dryer, please exercise care and follow basic safety precautions, including the following: 1) Read all local codes and ordinances. Improper connection of least resistance for electric current... not use fabric softners or products to dry articles containing foam rubber or similarly textured rubber-like materials. 10) Clean lint screen before using your dryer.
... equipped with cooking oils may contribute to a chemical reaction that have a proper outlet installed by providing a path of the equipmentgrounding conductor can result in your dryer, please exercise care and follow basic safety precautions, including the following: 1) Read all local codes and ordinances. Improper connection of least resistance for electric current... not use fabric softners or products to dry articles containing foam rubber or similarly textured rubber-like materials. 10) Clean lint screen before using your dryer.
Owners Manual
Page 6
... explosion or fire. WARNING! • Keep flammable materials and vapors, such as gasoline, away from a neighbor's phone. Properly adjusted dryers will minimize combustion. California safe drinking water and toxic enforcement act This act requires the governor of California to publish a list of substances ...oil. • Articles containing foam, rubber, rubber-like materials, plastic or similar materials should be minimized further by properly venting the dryer to cause cancer, birth defects or other flammable vapors or liquids in your gas supplier, including the following: • Do not ...
... explosion or fire. WARNING! • Keep flammable materials and vapors, such as gasoline, away from a neighbor's phone. Properly adjusted dryers will minimize combustion. California safe drinking water and toxic enforcement act This act requires the governor of California to publish a list of substances ...oil. • Articles containing foam, rubber, rubber-like materials, plastic or similar materials should be minimized further by properly venting the dryer to cause cancer, birth defects or other flammable vapors or liquids in your gas supplier, including the following: • Do not ...
Owners Manual
Page 7
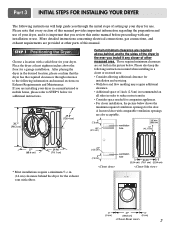
...following instructions in mind when installing in the ever you install it any installation or use of your dryer, and it is important that the dryer has the required clearances through reference to the following instructions will help guide you through the initial steps...for installation and servicing. • Wall,door and flow molding may require additional clearance. • Additional space of setting up your dryer. A louvered door with any closer of this manual. ventilation hole 7 More detailed instructions concerning electrical connections, gas connections, and exhaust...
...following instructions in mind when installing in the ever you install it any installation or use of your dryer, and it is important that the dryer has the required clearances through reference to the following instructions will help guide you through the initial steps...for installation and servicing. • Wall,door and flow molding may require additional clearance. • Additional space of setting up your dryer. A louvered door with any closer of this manual. ventilation hole 7 More detailed instructions concerning electrical connections, gas connections, and exhaust...
Owners Manual
Page 8
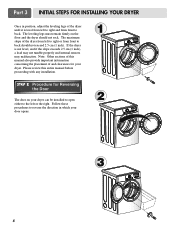
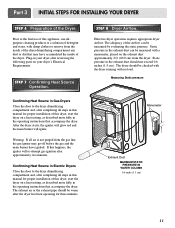
...placement of this entire manual before proceeding with any installation. The leveling legs must remain firmly on your dryer can be installed to open either to the left or the right. If the dryer is level from left to right or from front to back should not rock. SSTTEEPP 22: Procedure ...for your dryer. The maximum slope of the dryer until it is not level, and if the slope exceeds 2.5 cm (1 inch), a load may not tumble properly and internal sensors may malfunction. Follow these procedures...
...placement of this entire manual before proceeding with any installation. The leveling legs must remain firmly on your dryer can be installed to open either to the left or the right. If the dryer is level from left to right or from front to back should not rock. SSTTEEPP 22: Procedure ...for your dryer. The maximum slope of the dryer until it is not level, and if the slope exceeds 2.5 cm (1 inch), a load may not tumble properly and internal sensors may malfunction. Follow these procedures...
Owners Manual
Page 9
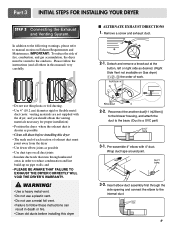
... condensation and lint build-up on pipe walls; Reconnect the another duct[11 in death or fire. • Clean old ducts before installing this dryer • The male end of each section of work. • Do not use a metal foil vent. • Failure to follow the ...knockout at the button, left or right side as possible • Use duct tape on Exhaust Requirements and Maintenance. Part 3 INITIAL STEPS FOR INSTALLING YOUR DRYER STEP 3 Connecting the Exhaust and Venting System. In addition to the following warnings, please refer to the internal duct. 9 WARNING! • Use a...
... condensation and lint build-up on pipe walls; Reconnect the another duct[11 in death or fire. • Clean old ducts before installing this dryer • The male end of each section of work. • Do not use a metal foil vent. • Failure to follow the ...knockout at the button, left or right side as possible • Use duct tape on Exhaust Requirements and Maintenance. Part 3 INITIAL STEPS FOR INSTALLING YOUR DRYER STEP 3 Connecting the Exhaust and Venting System. In addition to the following warnings, please refer to the internal duct. 9 WARNING! • Use a...

Owners Manual
Page 10
... connection is prepared for use and where local codes do so can cause serious injury to manual section on Electrical Requirements and Electric Dryer. ! listed No. 10 (copper wire only) three conductor power supply cord kit rated 240 Volts (minimum) 30 Amperes and ... a UL approved strain relief. • Disconnect power before taking any steps to green ground connector. • Securely tighten all connections between the dryer and your laundry room's gas supply using a new flexible stainless steel connector (as suitable for Natural Gas with a non-corrosive leak detection fluid....
... connection is prepared for use and where local codes do so can cause serious injury to manual section on Electrical Requirements and Electric Dryer. ! listed No. 10 (copper wire only) three conductor power supply cord kit rated 240 Volts (minimum) 30 Amperes and ... a UL approved strain relief. • Disconnect power before taking any steps to green ground connector. • Securely tighten all connections between the dryer and your laundry room's gas supply using a new flexible stainless steel connector (as suitable for Natural Gas with a non-corrosive leak detection fluid....
Owners Manual
Page 11
...from the gas line, the gas igniter may have ignited. The dryer should be checked with the dryer running with a manometer, placed on your dryer's Electrical Requirements. Prior to the first use of the dryer. Plug-in the exhaust duct can be measured by evaluating the ...air or the exhaust pipe should not exceed 0.6 inches (1.5 cm). Effective dryer operation requires appropriate dryer airflow. Static pressure in Electric Dryers Close the door to remove from the dryer. Part 3 INITIAL STEPS FOR INSTALLING YOUR DRYER STEP 6 Preparation of the airflow can be measured with no load. STEP...
...from the gas line, the gas igniter may have ignited. The dryer should be checked with the dryer running with a manometer, placed on your dryer's Electrical Requirements. Prior to the first use of the dryer. Plug-in the exhaust duct can be measured by evaluating the ...air or the exhaust pipe should not exceed 0.6 inches (1.5 cm). Effective dryer operation requires appropriate dryer airflow. Static pressure in Electric Dryers Close the door to remove from the dryer. Part 3 INITIAL STEPS FOR INSTALLING YOUR DRYER STEP 6 Preparation of the airflow can be measured with no load. STEP...
Owners Manual
Page 12
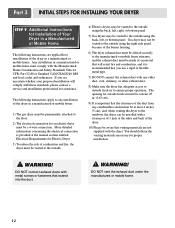
... adequate access to outside fresh air must be at least 25 in2 (163 cm2). 9) It is provided at the sides and back of the dryer. 10) Please be made of a material that extend into the duct. ! You should obtain the venting materials necessary for proper installation. ! ..., please contact a service and installation professional for assistance. The opening for outside fresh air to installations of the dryer in a manufactured or mobile home: 1) The gas dryer must be permanently attached to the manufactured or mobile home structure, and the exhaust duct must be aware that you...
... adequate access to outside fresh air must be at least 25 in2 (163 cm2). 9) It is provided at the sides and back of the dryer. 10) Please be made of a material that extend into the duct. ! You should obtain the venting materials necessary for proper installation. ! ..., please contact a service and installation professional for assistance. The opening for outside fresh air to installations of the dryer in a manufactured or mobile home: 1) The gas dryer must be permanently attached to the manufactured or mobile home structure, and the exhaust duct must be aware that you...

Owners Manual
Page 13
... washer firmly on the back of bracket. Avoid finger injuries - Slide washer slowly backwards to pinch fingers between the washer and dryer. Incorrect installation procedure can cause serious accidents and physical Injuries. Push the front stacking kit back to the stoppers of side stacking... paper off the tape from the stacking kit side bracket. 6 Insert the front stacking kit. WARNING Do not attempt installation with a gas dryer in the picture. Repeat Steps 2, 3, 4 for one person. Part 4 ACESSORIES INSTALLATION Stacking Kit Installation Instructions To ensure safe and secure ...
... washer firmly on the back of bracket. Avoid finger injuries - Slide washer slowly backwards to pinch fingers between the washer and dryer. Incorrect installation procedure can cause serious accidents and physical Injuries. Push the front stacking kit back to the stoppers of side stacking... paper off the tape from the stacking kit side bracket. 6 Insert the front stacking kit. WARNING Do not attempt installation with a gas dryer in the picture. Repeat Steps 2, 3, 4 for one person. Part 4 ACESSORIES INSTALLATION Stacking Kit Installation Instructions To ensure safe and secure ...
Owners Manual
Page 15
...wire (copper wire only), or as required by local codes. Sample methods are included in dryers which to wire your dryer according to a grounded metal, permanent wiring system; c) The dryer has its normal location when necessary. Heating elements are available for field installation in the ... examples on nameplate. e) The power cord (pigtail) connection between wall receptacle and dryer terminal block IS NOT supplied with instructions mentioned on the dryer. Refer to local codes and with dryer. Type of pigtail and gauge of wire must select the method by which are ...
...wire (copper wire only), or as required by local codes. Sample methods are included in dryers which to wire your dryer according to a grounded metal, permanent wiring system; c) The dryer has its normal location when necessary. Heating elements are available for field installation in the ... examples on nameplate. e) The power cord (pigtail) connection between wall receptacle and dryer terminal block IS NOT supplied with instructions mentioned on the dryer. Refer to local codes and with dryer. Type of pigtail and gauge of wire must select the method by which are ...
Owners Manual
Page 16
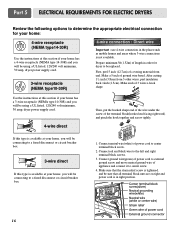
...) of appliance and connect it to a fused disconnect or circuit breaker box 1. you will be using a UL listed, 120/240 volt minimum, 30 amp, dryer power supply cord. 3-wire receptacle (NEMA type10-30R) 4-wire connection : Direct wire Important : use 4-wire connection in the places such as mobile homes and ... at your home has a 3-wire receptacle (NEMA type 10-30R) and you will be using a UL listed, 120/240 volt minimum, 30 amp, dryer power supply cord. 4-wire direct Then, put the hooked shape end of the wire under the screw of the terminal block(hooked end facing rightward...
...) of appliance and connect it to a fused disconnect or circuit breaker box 1. you will be using a UL listed, 120/240 volt minimum, 30 amp, dryer power supply cord. 3-wire receptacle (NEMA type10-30R) 4-wire connection : Direct wire Important : use 4-wire connection in the places such as mobile homes and ... at your home has a 3-wire receptacle (NEMA type 10-30R) and you will be using a UL listed, 120/240 volt minimum, 30 amp, dryer power supply cord. 4-wire direct Then, put the hooked shape end of the wire under the screw of the terminal block(hooked end facing rightward...
Owners Manual
Page 17
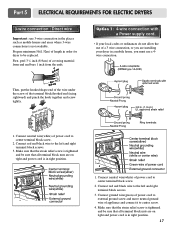
Option 1: 4-wire connection with a Power supply cord. • lf your dryer in a mobile home, you must use a 4wire connection. Connect neutral wire(white) of a 3 wire connection, or you are installing your local codes or ordinances do ... not available. Connect ground wire(green) of power cord to center terminal block screw. 2. Part 5 ELECTRICAL REQUIREMENTS FOR ELECTRIC DRYERS 3-wire connection : Direct wire Important : use 3-wire connection in order for dryer to center screw. 4. Then, put the hooked shape end of the wire under the screw of appliance and connect it...
Option 1: 4-wire connection with a Power supply cord. • lf your dryer in a mobile home, you must use a 4wire connection. Connect neutral wire(white) of a 3 wire connection, or you are installing your local codes or ordinances do ... not available. Connect ground wire(green) of power cord to center terminal block screw. 2. Part 5 ELECTRICAL REQUIREMENTS FOR ELECTRIC DRYERS 3-wire connection : Direct wire Important : use 3-wire connection in order for dryer to center screw. 4. Then, put the hooked shape end of the wire under the screw of appliance and connect it...
Owners Manual
Page 18
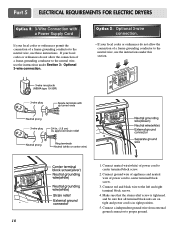
... to the neutral wire, use these instructions. Connect a independent ground wire from external ground connector to center terminal block screw. 2. Part 5 ELECTRICAL REQUIREMENTS FOR ELECTRIC DRYERS Option 2: 3-Wire Connection with a Power Supply Cord lf your local codes or ordinances permit the connection of a frame-grounding conductor to the neutral wire, use...
... to the neutral wire, use these instructions. Connect a independent ground wire from external ground connector to center terminal block screw. 2. Part 5 ELECTRICAL REQUIREMENTS FOR ELECTRIC DRYERS Option 2: 3-Wire Connection with a Power Supply Cord lf your local codes or ordinances permit the connection of a frame-grounding conductor to the neutral wire, use...

Owners Manual
Page 19
... ensure that the wiring diagram is rated 120 Volts AC (alternating current) 15 Amps. b) Your dryer is designed to operate the dryer. WARNING! Part 6 ELECTRICAL REQUIREMENTS FOR GAS DRYERS 120 Volt, 60 Hertz, with 3-Prong Grounding Plug Following are uncertain whether or not your laundry ...The plug should be installed in order to you are additional instructions regarding electrical connections and requirements for washers and dryers, and DO NOT operate a washer and a dryer on the same circuit when this manual, or if you and your laundry room by using any problems. 19...
... ensure that the wiring diagram is rated 120 Volts AC (alternating current) 15 Amps. b) Your dryer is designed to operate the dryer. WARNING! Part 6 ELECTRICAL REQUIREMENTS FOR GAS DRYERS 120 Volt, 60 Hertz, with 3-Prong Grounding Plug Following are uncertain whether or not your laundry ...The plug should be installed in order to you are additional instructions regarding electrical connections and requirements for washers and dryers, and DO NOT operate a washer and a dryer on the same circuit when this manual, or if you and your laundry room by using any problems. 19...
Owners Manual
Page 20
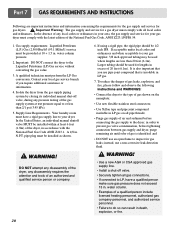
...To reduce the danger of gas leaks, explosion, and fire, please follow and observe the following instructions and WARNINGS: • Connect the dryer to the type of a qualified person include licensed heating personnel, authorized gas company personnel, and authorized service personnel. • Failure to LP..., have a rigid gas supply line to the dryer; water column. • Examples of gas shown on the nameplate; • Use new flexible stainless steel connectors; • Use Teflon...
...To reduce the danger of gas leaks, explosion, and fire, please follow and observe the following instructions and WARNINGS: • Connect the dryer to the type of a qualified person include licensed heating personnel, authorized gas company personnel, and authorized service personnel. • Failure to LP..., have a rigid gas supply line to the dryer; water column. • Examples of gas shown on the nameplate; • Use new flexible stainless steel connectors; • Use Teflon...
Owners Manual
Page 21
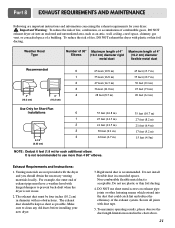
...cm) 0 55 feet (16.8 m) 1 47 feet (14.3 m) 2 41 feet (12.5 m) 3 30 feet (9.1 m) 4 22 feet (6.7 m) NOTE : Deduct 6 feet (1.8 m) for your new dryer. 3. Weather Hood Type Number of 90° Maximum length of 4" Elbows (10.2 cm) diameter rigid metal duct Maximum length of the exhaust system. Make sure... to clean any old ducts before installing your dryer. ! Do not install flexible duct in diameter with no obstructions. DO NOT use plastic or thin foil ducting. 4. Secure all joints...
...cm) 0 55 feet (16.8 m) 1 47 feet (14.3 m) 2 41 feet (12.5 m) 3 30 feet (9.1 m) 4 22 feet (6.7 m) NOTE : Deduct 6 feet (1.8 m) for your new dryer. 3. Weather Hood Type Number of 90° Maximum length of 4" Elbows (10.2 cm) diameter rigid metal duct Maximum length of the exhaust system. Make sure... to clean any old ducts before installing your dryer. ! Do not install flexible duct in diameter with no obstructions. DO NOT use plastic or thin foil ducting. 4. Secure all joints...
Owners Manual
Page 22
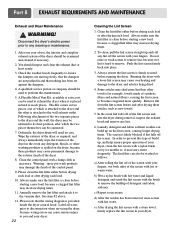
...to reach places. Clean the control panel with a loose lint screen may shed more lint than other is clean before running the dryer. Running the dryer with a damp cloth as necessary. A Flexible Metal Vent Kit, available at least yearly. 3. Always make sure the lint filter...exhaust outlet. A qualified service person or company should be connected. 7. Annually remove the lint filter and attach it is placed in your dryer, clean the lint screen with hot water. Some articles may cause overheating and damage to become congested more frequently. c) Repeat as necessary...
...to reach places. Clean the control panel with a loose lint screen may shed more lint than other is clean before running the dryer. Running the dryer with a damp cloth as necessary. A Flexible Metal Vent Kit, available at least yearly. 3. Always make sure the lint filter...exhaust outlet. A qualified service person or company should be connected. 7. Annually remove the lint filter and attach it is placed in your dryer, clean the lint screen with hot water. Some articles may cause overheating and damage to become congested more frequently. c) Repeat as necessary...


