

Owner's Manual
Page 4
... pipes. Short-circuit Breaker Power Supply 18 DISCONNECTING DEVICE FROM MAINS Mains plug is , a single outlet circuit which powers only that you turn off this apparatus or antenna during a thunder or lighting storm. The plug must be certain. Do not touch the TV with an exact replacement part by an authorized servicer. When mounting a TV on the power cord to dripping or splashing and...
... pipes. Short-circuit Breaker Power Supply 18 DISCONNECTING DEVICE FROM MAINS Mains plug is , a single outlet circuit which powers only that you turn off this apparatus or antenna during a thunder or lighting storm. The plug must be certain. Do not touch the TV with an exact replacement part by an authorized servicer. When mounting a TV on the power cord to dripping or splashing and...
Owner's Manual
Page 6
... SIMPLINK 50 USB Entry Modes 52 Photo List 53 Music List 59 Movie List 62 DivX Registration Code 68 Deactivation 69 PICTURE CONTROL Picture Size (Aspect Ratio) Control 70 Picture Wizard 72 Energy Saving 74 Preset Picture Settings (Picture Mode 75 Manual Picture Adjustment - Add / Delete Channel (Manual Tuning 41 - CONTENTS WARNING 2 SAFETY INSTRUCTIONS 3 FEATURE OF THIS TV 8 PREPARATION Accessories 9 Front Panel Information 10 Back Panel Information 11 Stand Instruction 13 Cable Management 15 Desktop Pedestal Installation 16 Swivel Stand 16 VESA Wall Mounting 17...
... SIMPLINK 50 USB Entry Modes 52 Photo List 53 Music List 59 Movie List 62 DivX Registration Code 68 Deactivation 69 PICTURE CONTROL Picture Size (Aspect Ratio) Control 70 Picture Wizard 72 Energy Saving 74 Preset Picture Settings (Picture Mode 75 Manual Picture Adjustment - Add / Delete Channel (Manual Tuning 41 - CONTENTS WARNING 2 SAFETY INSTRUCTIONS 3 FEATURE OF THIS TV 8 PREPARATION Accessories 9 Front Panel Information 10 Back Panel Information 11 Stand Instruction 13 Cable Management 15 Desktop Pedestal Installation 16 Swivel Stand 16 VESA Wall Mounting 17...
Owner's Manual
Page 8
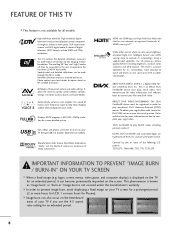
... "burn-in power consumption. The resulting ISF "day" and "night" modes will then be accessible by the user to experience the best their LG HDTV has to quickly switch between common settings. AV Mode is an official DivX Certified® device that plays DivX video. It allows the viewer to offer. View videos and photos and listen to complete your TV if you use the 4:3 aspect ratio setting for an...
... "burn-in power consumption. The resulting ISF "day" and "night" modes will then be accessible by the user to experience the best their LG HDTV has to quickly switch between common settings. AV Mode is an official DivX Certified® device that plays DivX video. It allows the viewer to offer. View videos and photos and listen to complete your TV if you use the 4:3 aspect ratio setting for an...

Owner's Manual
Page 12
...'t work. 3 RS-232C IN (CONTROL & SERVICE) PORT Used by third party devices. 4 AUDIO IN (RGB/DVI) 1/8" headphone jack for analog PC audio input. Supports HD. Connect cable signals to this jack. 9 USB IN Used for viewing photos, waching movies and listening to DVI cable (not included) 2 OPTICAL DIGITAL AUDIO OUT Optical digital audio output for use with AC power. Accepts DVI video using an adapter or HDMI to MP3s. 10 SERVICE ONLY Used for audio. 7 AV (Audio/Video) IN Analog composite connection. Uses a red, green, and blue cable for video & red and white for software updates. 11 Power Cord...
...'t work. 3 RS-232C IN (CONTROL & SERVICE) PORT Used by third party devices. 4 AUDIO IN (RGB/DVI) 1/8" headphone jack for analog PC audio input. Supports HD. Connect cable signals to this jack. 9 USB IN Used for viewing photos, waching movies and listening to DVI cable (not included) 2 OPTICAL DIGITAL AUDIO OUT Optical digital audio output for use with AC power. Accepts DVI video using an adapter or HDMI to MP3s. 10 SERVICE ONLY Used for audio. 7 AV (Audio/Video) IN Analog composite connection. Uses a red, green, and blue cable for video & red and white for software updates. 11 Power Cord...
Owner's Manual
Page 20
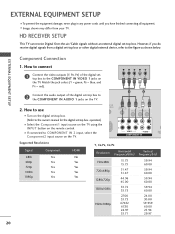
... the digital set -top box. How to use I Turn on the TV. Match the jack colors (Y = green, PB = blue, and PR = red). EXTERNAL EQUIPMENT SETUP I To prevent the equipment damage, never plug in any power cords until you do receive digital signals from your TV. I Image shown may differ from a digital set -top box. However, if you have finished connecting all equipment. O IN /DVI) REMOTE CONTROL IN AV IN 1 VIDEO /MONO AUDIO 2 L R 1 VIDEO AUDIO COMPONENT IN ANT CA Supported Resolutions Signal...
... the digital set -top box. How to use I Turn on the TV. Match the jack colors (Y = green, PB = blue, and PR = red). EXTERNAL EQUIPMENT SETUP I To prevent the equipment damage, never plug in any power cords until you do receive digital signals from your TV. I Image shown may differ from a digital set -top box. However, if you have finished connecting all equipment. O IN /DVI) REMOTE CONTROL IN AV IN 1 VIDEO /MONO AUDIO 2 L R 1 VIDEO AUDIO COMPONENT IN ANT CA Supported Resolutions Signal...
Owner's Manual
Page 21
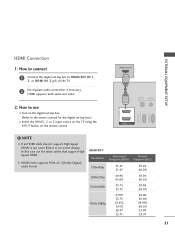
... 30.00 59.939 60.00 23.94 29.97 21 In this case use I Select the HDMI1, 2, or 3 input source on the TV using the INPUT button on the TV. 2 No separate audio connection is necessary. HDMI-DTV OUTPUT 1 OPTICAL DIGITAL AUDIO AUDIO OUT (RGB/DVI) 2 1 HDMI/DVI IN RS-232C IN (CONTROL & SERVICE) RGB IN(PC) ! EXTERNAL EQUIPMENT SETUP HDMI Connection 1. How to HDMI/DVI IN 1, 2, or HDMI IN 3 jack on the remote control. G HDMI mode supports PCM, AC-3(Dolby Digital) audio format.
... 30.00 59.939 60.00 23.94 29.97 21 In this case use I Select the HDMI1, 2, or 3 input source on the TV using the INPUT button on the TV. 2 No separate audio connection is necessary. HDMI-DTV OUTPUT 1 OPTICAL DIGITAL AUDIO AUDIO OUT (RGB/DVI) 2 1 HDMI/DVI IN RS-232C IN (CONTROL & SERVICE) RGB IN(PC) ! EXTERNAL EQUIPMENT SETUP HDMI Connection 1. How to HDMI/DVI IN 1, 2, or HDMI IN 3 jack on the remote control. G HDMI mode supports PCM, AC-3(Dolby Digital) audio format.
Owner's Manual
Page 22
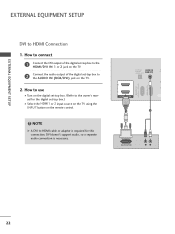
.... 2 Connect the audio output of the digital set -top box.) I Select the HDMI1 or 2 input source on the TV using the INPUT button on the TV. 2. EXTERNAL EQUIPMENT SETUP EXTERNAL EQUIPMENT SETUP DVI to the AUDIO IN (RGB/DVI) jack on the remote control. ! How to use I Turn on the digital set-top box. (Refer to the owner's manual for this connection. DVI doesn't support audio, so a separate audio connection is required for the digital set -top box to HDMI Connection 1. OPTICAL AUDIO IN R DIGITAL (RGB/DVI) CO AUDIO OUT RS-232C IN (CONTROL & SERVICE) RGB...
.... 2 Connect the audio output of the digital set -top box.) I Select the HDMI1 or 2 input source on the TV using the INPUT button on the TV. 2. EXTERNAL EQUIPMENT SETUP EXTERNAL EQUIPMENT SETUP DVI to the AUDIO IN (RGB/DVI) jack on the remote control. ! How to use I Turn on the digital set-top box. (Refer to the owner's manual for this connection. DVI doesn't support audio, so a separate audio connection is required for the digital set -top box to HDMI Connection 1. OPTICAL AUDIO IN R DIGITAL (RGB/DVI) CO AUDIO OUT RS-232C IN (CONTROL & SERVICE) RGB...

Owner's Manual
Page 29
EXTERNAL EQUIPMENT SETUP ! If noise is present, change the refresh rate to DVI Cable is in use. G Avoid keeping a fixed image on the screen properly. NOTE G Depending on the graphics card, DOS mode may not work if a HDMI to another resolution, change the PC output to another rate or adjust the brightness and contrast on the screen. G Depending on the graphics card, some resolution settings may be positioned on the...
EXTERNAL EQUIPMENT SETUP ! If noise is present, change the refresh rate to DVI Cable is in use. G Avoid keeping a fixed image on the screen properly. NOTE G Depending on the graphics card, DOS mode may not work if a HDMI to another resolution, change the PC output to another rate or adjust the brightness and contrast on the screen. G Depending on the graphics card, some resolution settings may be positioned on the...
Owner's Manual
Page 37
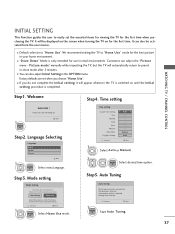
... the TV. Welcome 1 ENTER WELCOME ! Mode setting Mode Setting Selecting the environment. Previous Next 1 ENTER Select H o m e U s e mode. Factory defaults are set the essential items for viewing the TV for use this TV at store, select [Store Demo]. Thank you choose "Home Use". Step3. I If you want. I Default selection is completed. I You can also adjust Initial Setting in the OPTION menu. WATCHING TV / CHANNEL CONTROL Step1. Choose the setting mode you do not complete the Initial...
... the TV. Welcome 1 ENTER WELCOME ! Mode setting Mode Setting Selecting the environment. Previous Next 1 ENTER Select H o m e U s e mode. Factory defaults are set the essential items for viewing the TV for use this TV at store, select [Store Demo]. Thank you choose "Home Use". Step3. I If you want. I Default selection is completed. I You can also adjust Initial Setting in the OPTION menu. WATCHING TV / CHANNEL CONTROL Step1. Choose the setting mode you do not complete the Initial...
Owner's Manual
Page 38
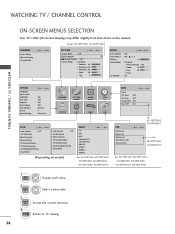
...; Color 60 • Tint E 0R Enter G AUDIO Auto Volume Clear Voice II Balance Sound Mode TV Speaker Move Enter : Off : Off + 3 0L R : Standard • Infinte Surround: Off • Treble 50 • Bass 50 • Reset : On WATCHING TV / CHANNEL CONTROL 38 OPTION Language Input Label SIMPLINK Key Lock Caption Demo Mode ISM Method Set ID Initial Setting Move Enter : On : Off : Off : Off : Normal : 1 : Home Use CHANNEL PICTURE AUDIO TIME OPTION LOCK INPUT USB LOCK Move Enter Lock...
...; Color 60 • Tint E 0R Enter G AUDIO Auto Volume Clear Voice II Balance Sound Mode TV Speaker Move Enter : Off : Off + 3 0L R : Standard • Infinte Surround: Off • Treble 50 • Bass 50 • Reset : On WATCHING TV / CHANNEL CONTROL 38 OPTION Language Input Label SIMPLINK Key Lock Caption Demo Mode ISM Method Set ID Initial Setting Move Enter : On : Off : Off : Off : Normal : 1 : Home Use CHANNEL PICTURE AUDIO TIME OPTION LOCK INPUT USB LOCK Move Enter Lock...
Owner's Manual
Page 49
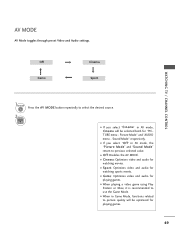
... the Game Mode. I When playing a video game using Play Station or Xbox, it is recommended to picture quality will be optimized for playing games. I Sport: Optimizes video and audio for "PICTURE menu - Picture Mode" and "AUDIO menu - I If you select "O f f" in AV mode, the "Picture Mode" and "Sound Mode" return to previous selected value. Sound Mode" respectively. I O f f: Disables the AV MODE. I G a m e: Optimizes video and audio for playing games. 49 AV MODE AV Mode toggles through preset Video and Audio settings. Off Game Cinema Sport WATCHING TV / CHANNEL CONTROL...
... the Game Mode. I When playing a video game using Play Station or Xbox, it is recommended to picture quality will be optimized for playing games. I Sport: Optimizes video and audio for "PICTURE menu - Picture Mode" and "AUDIO menu - I If you select "O f f" in AV mode, the "Picture Mode" and "Sound Mode" return to previous selected value. Sound Mode" respectively. I O f f: Disables the AV MODE. I G a m e: Optimizes video and audio for playing games. 49 AV MODE AV Mode toggles through preset Video and Audio settings. Off Game Cinema Sport WATCHING TV / CHANNEL CONTROL...
Owner's Manual
Page 58
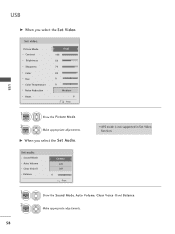
Set audio. G When you select the Set Video. Sound Mode Auto Volume Clear Voice ll Balance Cinema Off Off 0 L R Prev. 1 ENTER 2 ENTER Show the Sound Mode, Auto Volume, Clear Voice II and Balance. Picture Mode Contrast Brightness Sharpness Color Tint Color Temperature Noise Reduction Reset Vivid 100 50 70 80 0 W C 0 W C Medium Prev. 1 ENTER 2 ENTER Show the Picture Mode. Set video. Make appropriate adjustments. 58 Make appropriate adjustments. I APS mode is not supported in Set Video function. USB USB G When you select the Set Audio.
Set audio. G When you select the Set Video. Sound Mode Auto Volume Clear Voice ll Balance Cinema Off Off 0 L R Prev. 1 ENTER 2 ENTER Show the Sound Mode, Auto Volume, Clear Voice II and Balance. Picture Mode Contrast Brightness Sharpness Color Tint Color Temperature Noise Reduction Reset Vivid 100 50 70 80 0 W C 0 W C Medium Prev. 1 ENTER 2 ENTER Show the Picture Mode. Set video. Make appropriate adjustments. 58 Make appropriate adjustments. I APS mode is not supported in Set Video function. USB USB G When you select the Set Audio.

Owner's Manual
Page 61
... button to prevent a fixed image remaining on the screen for TV speaker, Set Audio features in front of time. ! G This TV can not play . NOTE G When music is playing, is no user input to stop the screen saver. G Press ENTER, A, H o m e, Q.MENU, B A C K, E X I The play information box (as the play time. G If you select "Off" for a extended period of the music play time. Sound Mode Auto Volume Clear Voice ll Balance 1 Q.MENU Show the Sound Mode. 2 Make appropriate adjustments. USB Using the Music List...
... button to prevent a fixed image remaining on the screen for TV speaker, Set Audio features in front of time. ! G This TV can not play . NOTE G When music is playing, is no user input to stop the screen saver. G Press ENTER, A, H o m e, Q.MENU, B A C K, E X I The play information box (as the play time. G If you select "Off" for a extended period of the music play time. Sound Mode Auto Volume Clear Voice ll Balance 1 Q.MENU Show the Sound Mode. 2 Make appropriate adjustments. USB Using the Music List...
Owner's Manual
Page 66
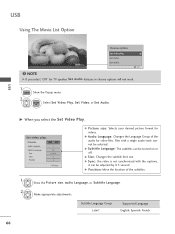
... Supported Language English, Spanish, French 66 G Picture size: Selects your desired picture format for TV speaker, Set Audio features in choose options will not work. 1 Q.MENU Show the Popup menu. 2 ENTER Select Set Video Play, Set Video, or Set Audio. Set video play . Picture Size Audio Language F Full G 1 Subtitle Language . Position Off Normal 0 0 Prev. G Audio Language: Changes the Language Group of the subtitles. 1 Show the Picture size, audio Language, or Subtitle Language. 2 Make appropriate adjustments. Set audio. Files with the captions, it can be selected...
... Supported Language English, Spanish, French 66 G Picture size: Selects your desired picture format for TV speaker, Set Audio features in choose options will not work. 1 Q.MENU Show the Popup menu. 2 ENTER Select Set Video Play, Set Video, or Set Audio. Set video play . Picture Size Audio Language F Full G 1 Subtitle Language . Position Off Normal 0 0 Prev. G Audio Language: Changes the Language Group of the subtitles. 1 Show the Picture size, audio Language, or Subtitle Language. 2 Make appropriate adjustments. Set audio. Files with the captions, it can be selected...
Owner's Manual
Page 67
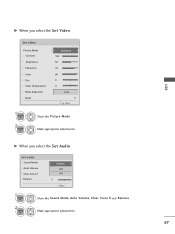
USB G When you select the Set Video. Picture Mode Contrast Brightness Sharpness Color Tint Color Temperature Noise Reduction Reset Standard 100 50 70 80 0 W C 0 W C Low Prev. 1 ENTER 2 ENTER Show the Picture Mode. G When you select the Set Audio. Set audio. Sound Mode Auto Volume Clear Voice ll Balance Cinema Off Off 0 L R Prev. 1 ENTER Show the Sound Mode, Auto Volume, Clear Voice II and Balance. 2 ENTER Make appropriate adjustments. 67 Set video. Make appropriate adjustments.
USB G When you select the Set Video. Picture Mode Contrast Brightness Sharpness Color Tint Color Temperature Noise Reduction Reset Standard 100 50 70 80 0 W C 0 W C Low Prev. 1 ENTER 2 ENTER Show the Picture Mode. G When you select the Set Audio. Set audio. Sound Mode Auto Volume Clear Voice ll Balance Cinema Off Off 0 L R Prev. 1 ENTER Show the Sound Mode, Auto Volume, Clear Voice II and Balance. 2 ENTER Make appropriate adjustments. 67 Set video. Make appropriate adjustments.
Owner's Manual
Page 75
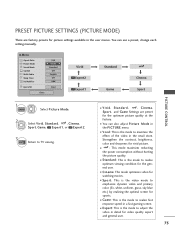
... presets for picture settings available in the user menus. I Vivid: This is the video mode to maximize the effect of the video in a fast gaming screen. Q.Menu Aspect Ratio Picture Mode Sound Mode Caption Multi Audio Sleep Timer CH Del/Add/Fav 16:9 F Vivid G Standard Off English Off Add Eject USB Eject Close Vivid Expert2 Expert1 Standard Game Auto Power Save Cinema Sport PICTURE CONTROL 1 Q.MENU Select Picture Mode. 2 Select V i v i d, S t a n d a r d, , C i n e m a, AutoPowerSave Sport, Game, Expert1, or Expert2. 3 EXIT Return to realize optimum viewing condition for...
... presets for picture settings available in the user menus. I Vivid: This is the video mode to maximize the effect of the video in a fast gaming screen. Q.Menu Aspect Ratio Picture Mode Sound Mode Caption Multi Audio Sleep Timer CH Del/Add/Fav 16:9 F Vivid G Standard Off English Off Add Eject USB Eject Close Vivid Expert2 Expert1 Standard Game Auto Power Save Cinema Sport PICTURE CONTROL 1 Q.MENU Select Picture Mode. 2 Select V i v i d, S t a n d a r d, , C i n e m a, AutoPowerSave Sport, Game, Expert1, or Expert2. 3 EXIT Return to realize optimum viewing condition for...
Owner's Manual
Page 100
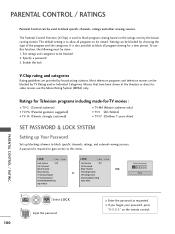
... Categories. It is to block program viewing based on the remote control. To use the Movie Rating System (MPAA) only. A password is used to this function, the following must be done : 1. PARENTAL CONTROL / RATINGS Parental Control can be blocked by choosing the type of the program and the categories. Set ratings and categories to block specific channels, ratings, and external viewing sources. Most television programs and television movies can be blocked by...
... Categories. It is to block program viewing based on the remote control. To use the Movie Rating System (MPAA) only. A password is used to this function, the following must be done : 1. PARENTAL CONTROL / RATINGS Parental Control can be blocked by choosing the type of the program and the categories. Set ratings and categories to block specific channels, ratings, and external viewing sources. Most television programs and television movies can be blocked by...

Owner's Manual
Page 112
... power control settings. I Try another channel. I Activate any object between the product and the VCR. No picture I Is the power cord inserted into the outlet where the product's power cord was plugged in case of no when connecting HDMI screen display. APPENDIX 112 I If an HDMI cable doesn't support High Speed HDM, it can cause flickers or no signal for all models. I Station signal is weak, reorient antenna to another product's power cord into wall power...
... power control settings. I Try another channel. I Activate any object between the product and the VCR. No picture I Is the power cord inserted into the outlet where the product's power cord was plugged in case of no when connecting HDMI screen display. APPENDIX 112 I If an HDMI cable doesn't support High Speed HDM, it can cause flickers or no signal for all models. I Station signal is weak, reorient antenna to another product's power cord into wall power...

Owner's Manual
Page 113
... Speed HDMI cable. PC Mode Problems The signal is out of the speakers Unusual sound from one of range I Adjust resolution, horizontal frequency, or vertical frequency. I Check whether the video file and subtitle file are the same. I A change in ambient humidity or temperature may be with the product. No sound when connecting HDMI/USB I Sound muted? I Use normal MP3 file. *This feature is supported. I Check USB cable over version 2.0. I Check whether the video/audio codec is...
... Speed HDMI cable. PC Mode Problems The signal is out of the speakers Unusual sound from one of range I Adjust resolution, horizontal frequency, or vertical frequency. I Check whether the video file and subtitle file are the same. I A change in ambient humidity or temperature may be with the product. No sound when connecting HDMI/USB I Sound muted? I Use normal MP3 file. *This feature is supported. I Check USB cable over version 2.0. I Check whether the video/audio codec is...

Owner's Manual
Page 122
...: k t) To adjust balance. ISM Method (Command: j p) To avoid having a fixed image remain on Acknowledgement [l][ ][Set ID][ ][OK/NG][Data][x] 13. Energy saving (Command: j q) To control the low energy function on /off Data 01: OSD on screen. Auto configuration only works in the PICTURE menu. Transmission [m][a][ ][Set ID][ ][Data00][ ][Data01] [ ][Data02][ ][Data03][ ][Data04][ ][Data05][Cr] Digital channels have a Physical, Major, and Minor channel number. Data 00: Physical Channel Number NTSC...
...: k t) To adjust balance. ISM Method (Command: j p) To avoid having a fixed image remain on Acknowledgement [l][ ][Set ID][ ][OK/NG][Data][x] 13. Energy saving (Command: j q) To control the low energy function on /off Data 01: OSD on screen. Auto configuration only works in the PICTURE menu. Transmission [m][a][ ][Set ID][ ][Data00][ ][Data01] [ ][Data02][ ][Data03][ ][Data04][ ][Data05][Cr] Digital channels have a Physical, Major, and Minor channel number. Data 00: Physical Channel Number NTSC...


