

Owner's Manual
Page 2
.... For more information on -Demand (VOD) movies. Visit www.divx.com for more information about licenses, visit www.lg.com. Go to complete your files into DivX video. yyYour TV's OSD (On Screen Display) may differ slightly from Dolby Laboratories. To obtain your registration code, locate the DivX VOD section in this...
.... For more information on -Demand (VOD) movies. Visit www.divx.com for more information about licenses, visit www.lg.com. Go to complete your files into DivX video. yyYour TV's OSD (On Screen Display) may differ slightly from Dolby Laboratories. To obtain your registration code, locate the DivX VOD section in this...
Owner's Manual
Page 4
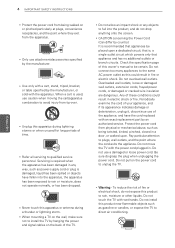
... connect too many appliances to be placed upon . Any of the appliance, and have fallen into the product, and do not drop anything onto the screen. Do not use attachments/accessories specified by country): It is used, use of these conditions could result in a door, or walked upon a dedicated circuit; When...
... connect too many appliances to be placed upon . Any of the appliance, and have fallen into the product, and do not drop anything onto the screen. Do not use attachments/accessories specified by country): It is used, use of these conditions could result in a door, or walked upon a dedicated circuit; When...
Owner's Manual
Page 6
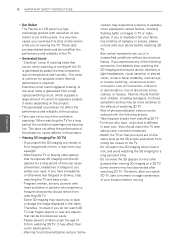
... TV and have vision that can occur in unspecified conditions without any other purpose than viewing 3D imaging on the same level as the 3D screen and refrain from a highspeed switching circuit, which supplies a large amount of the TV. Parents should refrain from your family has a history of two ...million to duck or dodge the image displayed in each eye, they may cause you 're viewing the TV. It varies depending on the screen while you to six million pixels. If you could see fine dots on the product. In a very few cases, you experience any objects that...
... TV and have vision that can occur in unspecified conditions without any other purpose than viewing 3D imaging on the same level as the 3D screen and refrain from a highspeed switching circuit, which supplies a large amount of the TV. Parents should refrain from your family has a history of two ...million to duck or dodge the image displayed in each eye, they may cause you 're viewing the TV. It varies depending on the screen while you to six million pixels. If you could see fine dots on the product. In a very few cases, you experience any objects that...
Owner's Manual
Page 7
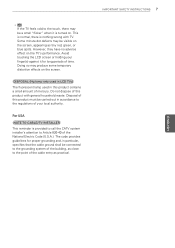
...USA NOTE TO CABLE/TV INSTALLER This reminder is nothing wrong with general household waste. However, they have no adverse effect on the screen. Doing so may produce some temporary distortion effects on the TV's performance. Some minute dot defects may be carried out in accordance to... the regulations of your finger(s) against it is turned on the screen, appearing as practical. Do not dispose of this product contains a small amount of mercury. The code provides guidelines for long periods of ...
...USA NOTE TO CABLE/TV INSTALLER This reminder is nothing wrong with general household waste. However, they have no adverse effect on the screen. Doing so may produce some temporary distortion effects on the TV's performance. Some minute dot defects may be carried out in accordance to... the regulations of your finger(s) against it is turned on the screen, appearing as practical. Do not dispose of this product contains a small amount of mercury. The code provides guidelines for long periods of ...
Owner's Manual
Page 9
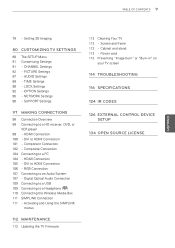
... 81 - RGB Connection 107 Connecting to HDMI Connection 106 - Cabinet and stand 113 - Power cord 113 Preventing "Image burn" or "Burn-in" on your TV screen 114 TROUBLESHOOTING 116 SPECIFICATIONS 124 IR CODES 126 EXTERNAL CONTROL DEVICE SETUP 134 OPEN SOURCE LICENSE PICTURE Settings 87 - NETWORK Settings 96 - Component Connection 102...
... 81 - RGB Connection 107 Connecting to HDMI Connection 106 - Cabinet and stand 113 - Power cord 113 Preventing "Image burn" or "Burn-in" on your TV screen 114 TROUBLESHOOTING 116 SPECIFICATIONS 124 IR CODES 126 EXTERNAL CONTROL DEVICE SETUP 134 OPEN SOURCE LICENSE PICTURE Settings 87 - NETWORK Settings 96 - Component Connection 102...
Owner's Manual
Page 14
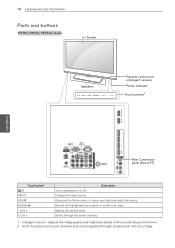
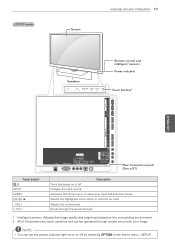
... buttons are touch sensitive and can be operated through the saved channels. 1 Intelligent sensor - 14 ASSEMBLING AND PREPARING Parts and buttons PZ750, PZ950, PZ950U series Screen Speakers INPUT HOME ENTER VOL CH Remote control and intelligent1 sensors Power indicator Touch buttons2 USB IN 1 USB IN 2/USB Apps ENEGNLGISH 4 3 OPTICAL AUDIO IN...
... buttons are touch sensitive and can be operated through the saved channels. 1 Intelligent sensor - 14 ASSEMBLING AND PREPARING Parts and buttons PZ750, PZ950, PZ950U series Screen Speakers INPUT HOME ENTER VOL CH Remote control and intelligent1 sensors Power indicator Touch buttons2 USB IN 1 USB IN 2/USB Apps ENEGNLGISH 4 3 OPTICAL AUDIO IN...
Owner's Manual
Page 15
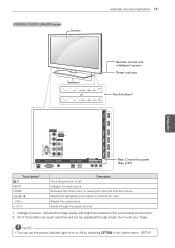
... touch with your input and exits the menus. Selects the highlighted menu option or confirms an input Adjusts the volume level. LV5400, LV5500, LW6500 series Screen ASSEMBLING AND PREPARING 15 Speakers H CH VOL ENTER HOME INPUT or H CH VOL ENTER HOME INPUT Remote control and intelligent1 sensors Power indicator Touch buttons2...
... touch with your input and exits the menus. Selects the highlighted menu option or confirms an input Adjusts the volume level. LV5400, LV5500, LW6500 series Screen ASSEMBLING AND PREPARING 15 Speakers H CH VOL ENTER HOME INPUT or H CH VOL ENTER HOME INPUT Remote control and intelligent1 sensors Power indicator Touch buttons2...
Owner's Manual
Page 16
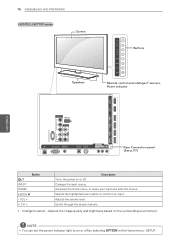
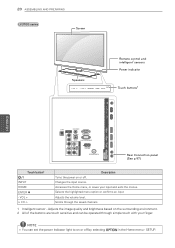
... selecting OPTION in the Home menu - NOTE yyYou can set the power indicator light to on or off . 16 ASSEMBLING AND PREPARING LW5700, LW7700 series Screen Speakers CH VOL ENTER HOME H INPUT Buttons Remote control and intelligent1 sensors, Power indicator USB Apps USB IN 2 HDD IN USB IN 1 /DVI ENEGNLGISH IN...
... selecting OPTION in the Home menu - NOTE yyYou can set the power indicator light to on or off . 16 ASSEMBLING AND PREPARING LW5700, LW7700 series Screen Speakers CH VOL ENTER HOME H INPUT Buttons Remote control and intelligent1 sensors, Power indicator USB Apps USB IN 2 HDD IN USB IN 1 /DVI ENEGNLGISH IN...
Owner's Manual
Page 17
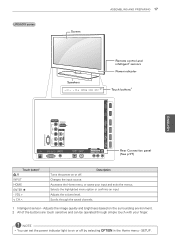
SETUP. LW5600 series Screen ASSEMBLING AND PREPARING 17 Speakers CH VOL ENTER HOME INPUT Remote control and intelligent1 sensors Power indicator Touch buttons2 USB Apps USB IN 2 HDD IN ...
SETUP. LW5600 series Screen ASSEMBLING AND PREPARING 17 Speakers CH VOL ENTER HOME INPUT Remote control and intelligent1 sensors Power indicator Touch buttons2 USB Apps USB IN 2 HDD IN ...

Owner's Manual
Page 18
18 ASSEMBLING AND PREPARING LW9500 series Screen ENEGNLGISH Speakers CH VOL ENTER HOME INPUT H Remote control and intelligent1 sensors Power indicator Touch buttons2 USB Apps USB IN 2 HDD IN USB IN 1 /DVI ...
18 ASSEMBLING AND PREPARING LW9500 series Screen ENEGNLGISH Speakers CH VOL ENTER HOME INPUT H Remote control and intelligent1 sensors Power indicator Touch buttons2 USB Apps USB IN 2 HDD IN USB IN 1 /DVI ...
Owner's Manual
Page 19
... your finger. Scrolls through simple touch with your input and exits the menus. Adjusts the image quality and brightness based on or off . LZ9700 series Screen ASSEMBLING AND PREPARING 19 Speakers CH VOL ENTER HOME INPUT H Remote control and intelligent1 sensors Power indicator Touch buttons2 2 USB Apps USB IN WIRELESS 1 CONTROL...
... your finger. Scrolls through simple touch with your input and exits the menus. Adjusts the image quality and brightness based on or off . LZ9700 series Screen ASSEMBLING AND PREPARING 19 Speakers CH VOL ENTER HOME INPUT H Remote control and intelligent1 sensors Power indicator Touch buttons2 2 USB Apps USB IN WIRELESS 1 CONTROL...
Owner's Manual
Page 20
.... 1 Intelligent sensor - VOL + v CH ^ Description Turns the power on or off . Accesses the Home menu, or saves your finger. 20 ASSEMBLING AND PREPARING LV3700 series Screen Speakers CH VOL ENTER HOME INPUT Remote control and intelligent1 sensors Power indicator Touch buttons2 USB IN 1 USB IN 2/USB Apps H/P ENEGNLGISH /DVI IN 3 LAN...
.... 1 Intelligent sensor - VOL + v CH ^ Description Turns the power on or off . Accesses the Home menu, or saves your finger. 20 ASSEMBLING AND PREPARING LV3700 series Screen Speakers CH VOL ENTER HOME INPUT Remote control and intelligent1 sensors Power indicator Touch buttons2 USB IN 1 USB IN 2/USB Apps H/P ENEGNLGISH /DVI IN 3 LAN...
Owner's Manual
Page 21
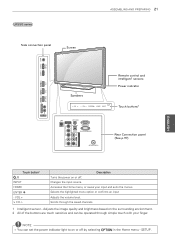
LK550 series Side connection panel Screen ASSEMBLING AND PREPARING 21 USB IN 1 USB IN 2 H/P USB Apps ENEGNLGISH /DVI IN 3 /DVI IN 2 /DVI COMPONENT IN 2 AUDIO / Y PB PR AV IN 2 AUDIO / VIDEO ...
LK550 series Side connection panel Screen ASSEMBLING AND PREPARING 21 USB IN 1 USB IN 2 H/P USB Apps ENEGNLGISH /DVI IN 3 /DVI IN 2 /DVI COMPONENT IN 2 AUDIO / Y PB PR AV IN 2 AUDIO / VIDEO ...
Owner's Manual
Page 22
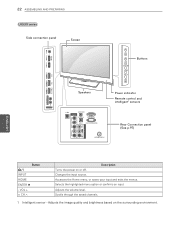
... through the saved channels. 1 Intelligent sensor - Changes the input source. USB IN 1 USB IN 2 H/P USB Apps 22 ASSEMBLING AND PREPARING LK530 series Side connection panel Screen CH VOL ENTER HOME INPUT Buttons /DVI IN 3 /DVI IN 2 IN 1 (ARC) /DVI COMPONENT IN 2 AUDIO / Y PB PR AV IN 2 AUDIO / VIDEO Speakers LAN COMPONENT...
... through the saved channels. 1 Intelligent sensor - Changes the input source. USB IN 1 USB IN 2 H/P USB Apps 22 ASSEMBLING AND PREPARING LK530 series Side connection panel Screen CH VOL ENTER HOME INPUT Buttons /DVI IN 3 /DVI IN 2 IN 1 (ARC) /DVI COMPONENT IN 2 AUDIO / Y PB PR AV IN 2 AUDIO / VIDEO Speakers LAN COMPONENT...

Owner's Manual
Page 23
...of its side or tilt towards the left or right. Make sure not to hold the TV as this may result in damage to the screen. yyIt is recommended to move the TV in the box or packing material that the TV originally came in the following illustration. Setting up ... a flat surface. Stand Body Stand Base ENEGNLGISH yyWhen transporting the TV, do not expose the TV to jolts or excessive vibration. CAUTION yyAvoid touching the screen at least 2 people. yyHold the top and bottom of screws 3 4 yyWhen transporting a large TV, there should face away from damage. Attaching the stand If...
...of its side or tilt towards the left or right. Make sure not to hold the TV as this may result in damage to the screen. yyIt is recommended to move the TV in the box or packing material that the TV originally came in the following illustration. Setting up ... a flat surface. Stand Body Stand Base ENEGNLGISH yyWhen transporting the TV, do not expose the TV to jolts or excessive vibration. CAUTION yyAvoid touching the screen at least 2 people. yyHold the top and bottom of screws 3 4 yyWhen transporting a large TV, there should face away from damage. Attaching the stand If...

Owner's Manual
Page 24
... screws 4 4 CAUTION yyTighten the screws firmly to prevent the TV from tilting forward. 24 ASSEMBLING AND PREPARING 3 Secure the TV and the stand with the screen side down on a flat surface. 2 Remove the 4 screws and pull the stand away from the TV. Model 50PZ750, 50PZ950, 50PZ950U 60PZ750, 60PZ950, 60PZ950U Screw for...
... screws 4 4 CAUTION yyTighten the screws firmly to prevent the TV from tilting forward. 24 ASSEMBLING AND PREPARING 3 Secure the TV and the stand with the screen side down on a flat surface. 2 Remove the 4 screws and pull the stand away from the TV. Model 50PZ750, 50PZ950, 50PZ950U 60PZ750, 60PZ950, 60PZ950U Screw for...

Owner's Manual
Page 25
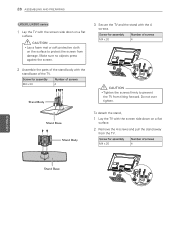
... a foam mat or soft protective cloth on the surface to prevent the TV from damage. To detach the stand, 1 Lay the TV with the screen side down on a flat surface. 2 Remove the 4 screws and pull the stand away from the TV. Screw for assembly M4 x 12 Number of ...the stand body with the 4 screws. ASSEMBLING AND PREPARING 25 LV3700, LV5400, LV5500, LW5600, LW5700, LW6500, LW7700 series 1 Lay the TV with the screen side down on a flat surface. Model Screw for assembly LV3700, M4 x 12 LV5400, LV5500, LW5600, LW5700, LW7700 series, 47/55LW6500 65LW6500 M4 x 16 ...
... a foam mat or soft protective cloth on the surface to prevent the TV from damage. To detach the stand, 1 Lay the TV with the screen side down on a flat surface. 2 Remove the 4 screws and pull the stand away from the TV. Screw for assembly M4 x 12 Number of ...the stand body with the 4 screws. ASSEMBLING AND PREPARING 25 LV3700, LV5400, LV5500, LW5600, LW5700, LW6500, LW7700 series 1 Lay the TV with the screen side down on a flat surface. Model Screw for assembly LV3700, M4 x 12 LV5400, LV5500, LW5600, LW5700, LW7700 series, 47/55LW6500 65LW6500 M4 x 16 ...

Owner's Manual
Page 26
... assembly M4 x 16 Number of screws 4 CAUTION yyTighten the screws firmly to protect the screen from tilting forward. Do not over tighten. 26 ASSEMBLING AND PREPARING LW9500 series 1 Lay the TV with the screen side down on a flat surface. Stand Rear Cover 4 Secure the TV and the stand... with the screen side down on a flat surface. 2 Remove the 4 screws and pull the stand away from the...
... assembly M4 x 16 Number of screws 4 CAUTION yyTighten the screws firmly to protect the screen from tilting forward. Do not over tighten. 26 ASSEMBLING AND PREPARING LW9500 series 1 Lay the TV with the screen side down on a flat surface. Stand Rear Cover 4 Secure the TV and the stand... with the screen side down on a flat surface. 2 Remove the 4 screws and pull the stand away from the...

Owner's Manual
Page 27
Screw for assembly M4 x 26 Number of screws 4 CAUTION yyTighten the screws firmly to protect the screen from the TV. Screw for assembly M5 x 35 Number of the stand rear cover with the screen side down on a flat surface. 2 Remove the 4 screws and pull the stand away from damage. Stand ... of screws 4 ENEGNLGISH 4 Assemble the parts of screws 4 5 Secure the TV and the stand with the 4 screws. Make sure no objects press against the screen. 2 Assemble the parts of the TV. CAUTION yyLay a foam mat or soft protective cloth on a flat surface. To detach the stand, 1 Lay the TV...
Screw for assembly M4 x 26 Number of screws 4 CAUTION yyTighten the screws firmly to protect the screen from the TV. Screw for assembly M5 x 35 Number of the stand rear cover with the screen side down on a flat surface. 2 Remove the 4 screws and pull the stand away from damage. Stand ... of screws 4 ENEGNLGISH 4 Assemble the parts of screws 4 5 Secure the TV and the stand with the 4 screws. Make sure no objects press against the screen. 2 Assemble the parts of the TV. CAUTION yyLay a foam mat or soft protective cloth on a flat surface. To detach the stand, 1 Lay the TV...
Owner's Manual
Page 28
... from tilting forward. Do not over tighten. Screw for assembly M4 x 20 Number of screws 4 Stand Body 3 Secure the TV and the stand with the screen side down on a flat surface. 2 Remove the 4 screws and pull the stand away from damage. Screw for assembly M4 x 20 Number of screws 4 ...CAUTION yyTighten the screws firmly to protect the screen from the TV. Stand Base Stand Body M4X20 To detach the stand, 1 Lay the TV with the 4 screws. 28 ASSEMBLING AND PREPARING LK530, LK550...
... from tilting forward. Do not over tighten. Screw for assembly M4 x 20 Number of screws 4 Stand Body 3 Secure the TV and the stand with the screen side down on a flat surface. 2 Remove the 4 screws and pull the stand away from damage. Screw for assembly M4 x 20 Number of screws 4 ...CAUTION yyTighten the screws firmly to protect the screen from the TV. Stand Base Stand Body M4X20 To detach the stand, 1 Lay the TV with the 4 screws. 28 ASSEMBLING AND PREPARING LK530, LK550...


