User Guide
Page 5
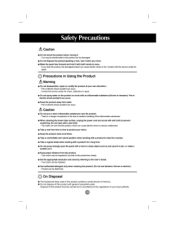
...panel face forward and hold it when you lock at a_l times, = Take a comfotta_e and nauru! There is a danger of expl_on or fire due to the regu{ations of the inf_mmable _ta_. [] When c_aning the brown tube surface, un_ug the power...service center for @ Precautions in Using the Product II Do r_t disassemble, repair or modify the product at your vision, II Keep the product clean at the prod_ too closely [] Set... on the product or _Jb with an inflammable subslance (thinner or benzene). position when working with a product to prevent scratching Do not clean _ a wet cloth. - Fire...
...panel face forward and hold it when you lock at a_l times, = Take a comfotta_e and nauru! There is a danger of expl_on or fire due to the regu{ations of the inf_mmable _ta_. [] When c_aning the brown tube surface, un_ug the power...service center for @ Precautions in Using the Product II Do r_t disassemble, repair or modify the product at your vision, II Keep the product clean at the prod_ too closely [] Set... on the product or _Jb with an inflammable subslance (thinner or benzene). position when working with a product to prevent scratching Do not clean _ a wet cloth. - Fire...
User Guide
Page 6
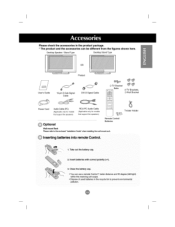
... use a remole Control 7 meter distance and 30 degree (left/right) within the receiving unit scope, • Dispose o? Desktop S_aker / Stand Ty_ Desktop Stand Type OR Product User's Guide 15_pin D-Sub Signal C_le DVFD Signal C_b_e 2 -T',/Bracket [_lta ..... _:_, 2-TV Brackets, 2oWall Bracket Power Cord Audio Cable (PC) (Appl cable only for m_ets tha_ support _e speakers) RCA-PC Audio Cable (A_plicable on_y for modes that su ppo_1 the _,eakers} [ , Twister HoI_r Remote Cor4ro_i Batteries Wall-mount...
... use a remole Control 7 meter distance and 30 degree (left/right) within the receiving unit scope, • Dispose o? Desktop S_aker / Stand Ty_ Desktop Stand Type OR Product User's Guide 15_pin D-Sub Signal C_le DVFD Signal C_b_e 2 -T',/Bracket [_lta ..... _:_, 2-TV Brackets, 2oWall Bracket Power Cord Audio Cable (PC) (Appl cable only for m_ets tha_ support _e speakers) RCA-PC Audio Cable (A_plicable on_y for modes that su ppo_1 the _,eakers} [ , Twister HoI_r Remote Cor4ro_i Batteries Wall-mount...
User Guide
Page 10
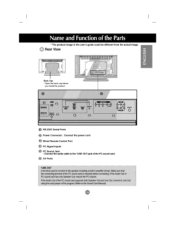
Open tl_ back cap before you install the product, @ O RS-232C Serial Ports Power Connector : Connect the power cord Wired Remote Control P_ Q PC Signal Inputs _ PC Sound Jack : C_nect the audio cableto the *LINEOUT jack of the PC sound card, O AV Ports * The pr_uct ima_ in the user's guide could be different from the actual im_e. @ Rear View Back Cap -
Open tl_ back cap before you install the product, @ O RS-232C Serial Ports Power Connector : Connect the power cord Wired Remote Control P_ Q PC Signal Inputs _ PC Sound Jack : C_nect the audio cableto the *LINEOUT jack of the PC sound card, O AV Ports * The pr_uct ima_ in the user's guide could be different from the actual im_e. @ Rear View Back Cap -
User Guide
Page 12
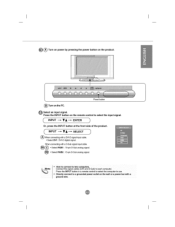
... to Connect to two ¢omputersl C_n_ the sig_a_c_les (DVI and D,Sub) to a grounded power outlet on the wall or a power bar w_th a ground w!re, Pre_s _e _NPUT button in a remote contro__o_!ect the _mputer _.ou_. Turn _ the PC. _ Select an input signal Press the iNPUT button on the product. O_ Turn on power by pressing the power button on the remote control to select the input signal Or, press the INPUT button at...
... to Connect to two ¢omputersl C_n_ the sig_a_c_les (DVI and D,Sub) to a grounded power outlet on the wall or a power bar w_th a ground w!re, Pre_s _e _NPUT button in a remote contro__o_!ect the _mputer _.ou_. Turn _ the PC. _ Select an input signal Press the iNPUT button on the product. O_ Turn on power by pressing the power button on the remote control to select the input signal Or, press the INPUT button at...

User Guide
Page 14
..., C ,.PUT----V-A SELECT _ VVi_n connecting with a RCA cable. Press the INPUT button on the remote control to the S_Videoinput terminaFto watch high image quality movies_ Product RCA Cable (notIr_c1_d) VC|_JDVD R_iver Select an input signal. When cc_nectir_ w_than _V_eo cabte, * _ec_ SNi_o, Yellow, Sound (left) - Connect the input terminal with a S-Video cable. Red) _hen connecting with a proper color match (Video- When connecting with an F_A _. , _le_ AV. White, Sound (right:)- Connect the video cable as shown...
..., C ,.PUT----V-A SELECT _ VVi_n connecting with a RCA cable. Press the INPUT button on the remote control to the S_Videoinput terminaFto watch high image quality movies_ Product RCA Cable (notIr_c1_d) VC|_JDVD R_iver Select an input signal. When cc_nectir_ w_than _V_eo cabte, * _ec_ SNi_o, Yellow, Sound (left) - Connect the input terminal with a S-Video cable. Red) _hen connecting with a proper color match (Video- When connecting with an F_A _. , _le_ AV. White, Sound (right:)- Connect the video cable as shown...
User Guide
Page 23
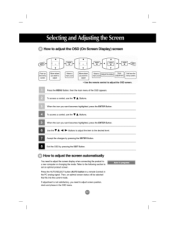
... to set an optimal prod_ screen Press _he AUTO!SELECT button (AUTO b_on in a remote Control) in the OSD menu, fi!e mo_. How to adjust the OSD (On Screen Display) screen Adju_ the _ta_ ] • Use the remote control to adjust screen position, dock and phase in the PC a_Iog signa_ Then, an optimal screen status will be selected that f_s into the current: mode, ff adjustment is not satisffactory, y_ need to adjust...
... to set an optimal prod_ screen Press _he AUTO!SELECT button (AUTO b_on in a remote Control) in the OSD menu, fi!e mo_. How to adjust the OSD (On Screen Display) screen Adju_ the _ta_ ] • Use the remote control to adjust screen position, dock and phase in the PC a_Iog signa_ Then, an optimal screen status will be selected that f_s into the current: mode, ff adjustment is not satisffactory, y_ need to adjust...

User Guide
Page 24
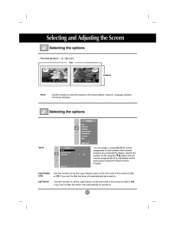
..., l I Adjusting Screen Color EZ Vid_ _ AV/S_Video/Component input only ACC The EZ Video function automatically adjusts the screen image quality depending on the AV u_age environment. * Dynamic : Sel_ this option to display with a mild image . Standard : The most _neral arm natu_l screen display stat_, * Mild : Select this option to use the user-defined settings. Game : _ect this option to enjoy dynamic image w_n playing a game. , User : Select this option to display with a sharp image. . l I
..., l I Adjusting Screen Color EZ Vid_ _ AV/S_Video/Component input only ACC The EZ Video function automatically adjusts the screen image quality depending on the AV u_age environment. * Dynamic : Sel_ this option to display with a mild image . Standard : The most _neral arm natu_l screen display stat_, * Mild : Select this option to use the user-defined settings. Game : _ect this option to enjoy dynamic image w_n playing a game. , User : Select this option to display with a sharp image. . l I

User Guide
Page 25
... The function is only avail_le on file x4_ type that come with speakers. Adjusting Scr n Color ACC _ RGB1, 2 IDMI input only .6SOOK_OO_OK 65_K: Slightly reddish white 9300K: S_ighfly b_uish white, 3600K: SFightly yeibwish white, • User : Select this option to use the user-defied settings Co¢'fft_:St To ad}_st the contrast of the screen, Brigh_ To adiust the bd_htne_e...
... The function is only avail_le on file x4_ type that come with speakers. Adjusting Scr n Color ACC _ RGB1, 2 IDMI input only .6SOOK_OO_OK 65_K: Slightly reddish white 9300K: S_ighfly b_uish white, 3600K: SFightly yeibwish white, • User : Select this option to use the user-defied settings Co¢'fft_:St To ad}_st the contrast of the screen, Brigh_ To adiust the bd_htne_e...
User Guide
Page 26
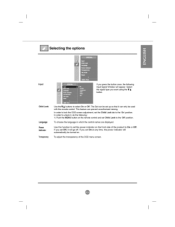
... turned on the front side of the OSD menu screen. Child Lock Language Power |r_ator Transpare_y Use the T & button to select On or Off The Set can be used wffh tt"_ remote control This tenure can prevent unauthorized viewing_ In order to lock the OSD screen adjustment, set the Child Lock tab to the '_ p_ition. ff you press the button once, the following _np_ Signal Window wH_appear Select the signal type you set...
... turned on the front side of the OSD menu screen. Child Lock Language Power |r_ator Transpare_y Use the T & button to select On or Off The Set can be used wffh tt"_ remote control This tenure can prevent unauthorized viewing_ In order to lock the OSD screen adjustment, set the Child Lock tab to the '_ p_ition. ff you press the button once, the following _np_ Signal Window wH_appear Select the signal type you set...

User Guide
Page 27
...) connect the product with several other products ar_ _e the TiFe mode function_ Tile mode it is used to enlarge the screen ar_ also used with severa_ products to view screen, _b mode ar_ choose TiJe alignment and set the ]D of the screen can be adiusted the Pee[tion menu and san be set by setting an ID, AIi Tile setting are re{eased when selecting...
...) connect the product with several other products ar_ _e the TiFe mode function_ Tile mode it is used to enlarge the screen ar_ also used with severa_ products to view screen, _b mode ar_ choose TiJe alignment and set the ]D of the screen can be adiusted the Pee[tion menu and san be set by setting an ID, AIi Tile setting are re{eased when selecting...
User Guide
Page 29
... when severat products are connected for display, Specify the number (0~99) using the V A button and exiL Use the assigned Set I D to iodividual_y contrc4 each product using the Product Control P_ram, Logo Display Lamp Use this run.ion to set it to On OF Off. i Ught Sensor Use this function to set it to On oF Off. _ Selecting the options - If you set the Light Sensor on the...
... when severat products are connected for display, Specify the number (0~99) using the V A button and exiL Use the assigned Set I D to iodividual_y contrc4 each product using the Product Control P_ram, Logo Display Lamp Use this run.ion to set it to On OF Off. i Ught Sensor Use this function to set it to On oF Off. _ Selecting the options - If you set the Light Sensor on the...

User Guide
Page 30
... screen position Down vertically, l I Adjusting Screen CLOCK/PHASE and Position ARC To select the image size of the dis,play, This item allows you to remove any vertic_ bars or stripes visibEe on fhe screen background The horizontal screen size wilt also change This function is for the automatic adj_tment of the screen (RGB PC input only}, Press the I_ button to display the submenu for analoge singnal input...
... screen position Down vertically, l I Adjusting Screen CLOCK/PHASE and Position ARC To select the image size of the dis,play, This item allows you to remove any vertic_ bars or stripes visibEe on fhe screen background The horizontal screen size wilt also change This function is for the automatic adj_tment of the screen (RGB PC input only}, Press the I_ button to display the submenu for analoge singnal input...
User Guide
Page 33
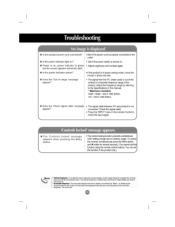
...Adjust the frequency range by referring to the Specifications in the remote Contrc4 to the outlet, @ _sthe _e_ indica_o_ I_ht _? . Check the signal cable_ • Press the 1NPUT' menu in this manual. • Maximum resolution RGB1 / RGB2 : 19_ X 1080 @60Hz DVf : 1920 X 1080 @60Hz @ D_s the 'Ch_k signal cable message after? • The sigpa] cable...theproduct is in power saving mode, move the mouse or press any key, @ Does the Out of rane _message appear? • The signaJ from the PC Nideo card> is properly c_n_ed to ch_ the input signal See if the _wer sw_tch is turned on. @ ...
...Adjust the frequency range by referring to the Specifications in the remote Contrc4 to the outlet, @ _sthe _e_ indica_o_ I_ht _? . Check the signal cable_ • Press the 1NPUT' menu in this manual. • Maximum resolution RGB1 / RGB2 : 19_ X 1080 @60Hz DVf : 1920 X 1080 @60Hz @ D_s the 'Ch_k signal cable message after? • The sigpa] cable...theproduct is in power saving mode, move the mouse or press any key, @ Does the Out of rane _message appear? • The signaJ from the PC Nideo card> is properly c_n_ed to ch_ the input signal See if the _wer sw_tch is turned on. @ ...
User Guide
Page 34
@_sthes_ _s_tiown_ong? @_ _in_iR@
@_sthes_ _s_tiown_ong? @_ _in_iR@

User Guide
Page 35
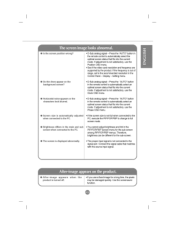
... Panel- Cobr Table menu in the PIP/POP/PBP menu_ • Select the appropriate equalize sound. ° Adjust the volume, @ _re_ has _ cdo_ reso[uti_ (16eot_s). • Set the number of the LCD. Setfln_ - Display - J @ No s_nd? @ No sound is available when the P_P/POP/PBP m_e is en_sg_. @ S_and is t_ du_L @ S_P_ is t_ Wow • See if the audio cable...
... Panel- Cobr Table menu in the PIP/POP/PBP menu_ • Select the appropriate equalize sound. ° Adjust the volume, @ _re_ has _ cdo_ reso[uti_ (16eot_s). • Set the number of the LCD. Setfln_ - Display - J @ No s_nd? @ No sound is available when the P_P/POP/PBP m_e is en_sg_. @ S_and is t_ du_L @ S_P_ is t_ Wow • See if the audio cable...

User Guide
Page 42
... Select 13, Remote Lock Orv'Off 14, PIP/PBR!POP On/Off 15. Tile H Size 25, Tile V Size 26 Tile tD Set 27, Elapsed time return 2& Light Sensor value return 29, Temperature value return 30. PIP Position 16, Balance 17, ACC 18, PIPiPBP/POP SOURCE 19, Auto Configure 20, Key 21, Tiling Mode 22_ Tile H Position 23. Screen Mute 05. Power 02, Input...
... Select 13, Remote Lock Orv'Off 14, PIP/PBR!POP On/Off 15. Tile H Size 25, Tile V Size 26 Tile tD Set 27, Elapsed time return 2& Light Sensor value return 29, Temperature value return 30. PIP Position 16, Balance 17, ACC 18, PIPiPBP/POP SOURCE 19, Auto Configure 20, Key 21, Tiling Mode 22_ Tile H Position 23. Screen Mute 05. Power 02, Input...
User Guide
Page 44
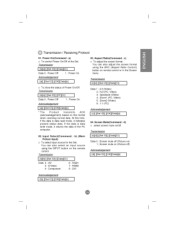
... also select an input source using the ARC (Aspect Ratio Control) bu_on on this format when receiving normal dam At this time, if the data is data read mode, it indicates present status data_ tf the data is data write mode, it returns the data of Power On/Off. You can also adjust the screen format using the INPUT button on the remote control Transmission [ [k][b][ ][Set ID][ ][Datal[Cr] Data 2 : AV 3 : S-Video 4 : Component...
... also select an input source using the ARC (Aspect Ratio Control) bu_on on this format when receiving normal dam At this time, if the data is data read mode, it indicates present status data_ tf the data is data write mode, it returns the data of Power On/Off. You can also adjust the screen format using the INPUT button on the remote control Transmission [ [k][b][ ][Set ID][ ][Datal[Cr] Data 2 : AV 3 : S-Video 4 : Component...

User Guide
Page 45
...] Data Min : 00H ~ Max ; 64H (Hexadecimal code) Acknowledgement [ [_[ ][Set ID][ ][OK][Data][x] Data Min : 00H - T.r_nsmissJo,n [ [k][e][![Set!Q][![Qata![gr! ] Data 0 : Volume Mute On (Volume Off) 1 : Volume Mute Off (Volume On) Acknowledgement ] !e![!{set!D]!TfOK!{Qata]{x]! Volume Control; (Command : f) G To adjust Volume + Transmission I @ Transmission / Receiving Protocol 05. You can also adjust the contrast Picture menu. Acknewte_ement [ [hi[ ][Set ID][ ][OKl[Datal[x] I [k][g][ ][Set ID][ ][Data][Cr] 1 Data Min : 00H ~ Max...
...] Data Min : 00H ~ Max ; 64H (Hexadecimal code) Acknowledgement [ [_[ ][Set ID][ ][OK][Data][x] Data Min : 00H - T.r_nsmissJo,n [ [k][e][![Set!Q][![Qata![gr! ] Data 0 : Volume Mute On (Volume Off) 1 : Volume Mute Off (Volume On) Acknowledgement ] !e![!{set!D]!TfOK!{Qata]{x]! Volume Control; (Command : f) G To adjust Volume + Transmission I @ Transmission / Receiving Protocol 05. You can also adjust the contrast Picture menu. Acknewte_ement [ [hi[ ][Set ID][ ][OKl[Datal[x] I [k][g][ ][Set ID][ ][Data][Cr] 1 Data Min : 00H ~ Max...

User Guide
Page 46
... panel controls on the set , use this mode. Transmission [ [k][m][ ][Set IDI[ ][Data][Cr] ] Data 0 : Lock Off 1 : Lock On Acknowledgement [ [ml[ ][Set IUl[ ][OK][Data][x I ] Data 0 : Lock Off t : Lock On c If you're not using the remote control aM front pane[ controls on /off, remote control lock is on the set . Sharpness(Command : k) (Video only) c To adjust the screen Sharpness, You can also adjust the sharpness in the Picture menu, Transmissioq I [kl[J][ 1[set ID][ ][Data][Cr] I Data Red...
... panel controls on the set , use this mode. Transmission [ [k][m][ ][Set IDI[ ][Data][Cr] ] Data 0 : Lock Off 1 : Lock On Acknowledgement [ [ml[ ][Set IUl[ ][OK][Data][x I ] Data 0 : Lock Off t : Lock On c If you're not using the remote control aM front pane[ controls on /off, remote control lock is on the set . Sharpness(Command : k) (Video only) c To adjust the screen Sharpness, You can also adjust the sharpness in the Picture menu, Transmissioq I [kl[J][ 1[set ID][ ][Data][Cr] I Data Red...
User Guide
Page 48
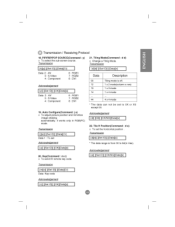
..., Auto Configure(Command: j u) a To adjust picture position and minimize image shaking automatically, it works only in RGB(PC) mode. Transmission [ [jl[u][ ][Set IDI[ ][Data][Cr] ] Data 1 : To set the horizontal position. Tile H Position(Command : d e) G To set Acknowledgement [[d![![00]!][OK,'NG![Data]![x] 22. @ Transmission/Receiving Protocol 18, PIP/PBP/POP SOURCE(Command : y) 21, Tiling Mode(Command : d d) Q To select the sub-screen source, Transmission G Change...
..., Auto Configure(Command: j u) a To adjust picture position and minimize image shaking automatically, it works only in RGB(PC) mode. Transmission [ [jl[u][ ][Set IDI[ ][Data][Cr] ] Data 1 : To set the horizontal position. Tile H Position(Command : d e) G To set Acknowledgement [[d![![00]!][OK,'NG![Data]![x] 22. @ Transmission/Receiving Protocol 18, PIP/PBP/POP SOURCE(Command : y) 21, Tiling Mode(Command : d d) Q To select the sub-screen source, Transmission G Change...

