User Guide
Page 2
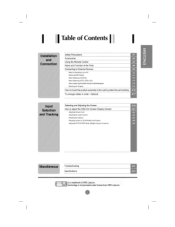
Option[ Troubleshooti_ Specificafior_ is a trademarkof SRS_bsJnc. Tableof Conten I il Safety Precautions Acces_,_c_ries Using the Remote Centre[ Name and Function of the Parts C_nne_ng to External Devices Whe_Con_octi_gto ye_ PC Watching R,GB Oulpu_s W_n W_lc_in9 VCRJDVD W_ Wa_chin 9 HDTV (STB)/DVD Wat Chi_'_ AV O_p_s How to mount fl're product a_mbly to t#_ wa_l to protect the set lumbling To arrange cables in o_er - techr,31ogiys inc_r_t_ under license from SRS LabsJnc,
Option[ Troubleshooti_ Specificafior_ is a trademarkof SRS_bsJnc. Tableof Conten I il Safety Precautions Acces_,_c_ries Using the Remote Centre[ Name and Function of the Parts C_nne_ng to External Devices Whe_Con_octi_gto ye_ PC Watching R,GB Oulpu_s W_n W_lc_in9 VCRJDVD W_ Wa_chin 9 HDTV (STB)/DVD Wat Chi_'_ AV O_p_s How to mount fl're product a_mbly to t#_ wa_l to protect the set lumbling To arrange cables in o_er - techr,31ogiys inc_r_t_ under license from SRS LabsJnc,
User Guide
Page 6
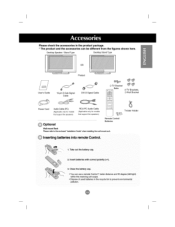
... (PC) (Appl cable only for m_ets tha_ support _e speakers) RCA-PC Audio Cable (A_plicable on_y for modes that su ppo_1 the _,eakers} [ , Twister HoI_r Remote Cor4ro_i Batteries Wall-mount Rack Ptease refer to the er_lcs_=d Ir_3mat#n Guide ° w_ instalfng the wall-mount rack Inserting batteries into...
... (PC) (Appl cable only for m_ets tha_ support _e speakers) RCA-PC Audio Cable (A_plicable on_y for modes that su ppo_1 the _,eakers} [ , Twister HoI_r Remote Cor4ro_i Batteries Wall-mount Rack Ptease refer to the er_lcs_=d Ir_3mat#n Guide ° w_ instalfng the wall-mount rack Inserting batteries into...
User Guide
Page 7
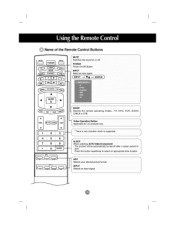
t Name of the Remote Control Buttons , , _ ,_ rMUTE Switches the sound on or off afte[ a certain pe_od of J L Press this button re_ti_ve!y to seiect an _P_Pd_e t!me dur_t!0n j ii t The product will be automa#caJly _med off . POWER Power On!Off Button INPUT Select an input stgnaL ("INPUT _ VA "_" EmER_ MODE Selects the remote CABLE or STB \ operating modes_ :TV, DVD_ VCR_ AUDIO i[ 7 :[ , L (SLEEP 8 / When watching AV_Video/Comp orient o Is_EEP}---
t Name of the Remote Control Buttons , , _ ,_ rMUTE Switches the sound on or off afte[ a certain pe_od of J L Press this button re_ti_ve!y to seiect an _P_Pd_e t!me dur_t!0n j ii t The product will be automa#caJly _med off . POWER Power On!Off Button INPUT Select an input stgnaL ("INPUT _ VA "_" EmER_ MODE Selects the remote CABLE or STB \ operating modes_ :TV, DVD_ VCR_ AUDIO i[ 7 :[ , L (SLEEP 8 / When watching AV_Video/Comp orient o Is_EEP}---
User Guide
Page 10
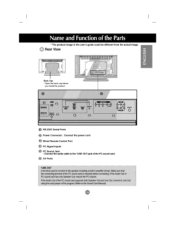
Open tl_ back cap before you install the product, @ O RS-232C Serial Ports Power Connector : Connect the power cord Wired Remote Control P_ Q PC Signal Inputs _ PC Sound Jack : C_nect the audio cableto the *LINEOUT jack of the PC sound card, O AV Ports * The pr_uct ima_ in the user's guide could be different from the actual im_e. @ Rear View Back Cap -
Open tl_ back cap before you install the product, @ O RS-232C Serial Ports Power Connector : Connect the power cord Wired Remote Control P_ Q PC Signal Inputs _ PC Sound Jack : C_nect the audio cableto the *LINEOUT jack of the PC sound card, O AV Ports * The pr_uct ima_ in the user's guide could be different from the actual im_e. @ Rear View Back Cap -
User Guide
Page 12
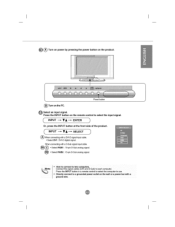
...; Setect DVI : DVI-D digitaJ s_naL When _nacting with a D-S_ signal input cabS, - O_recUy_nne_ to a grounded power outlet on the product. Pre_s _e _NPUT button in a remote contro__o_!ect the _mputer _.ou_. Se_ RGB2 ; 15=pin D=_b _ skJnak * How to Connect to two ¢omputersl C_n_ the sig_a_c_les (DVI and D,Sub) to... Or, press the INPUT button at the front side of the product. Turn _ the PC. _ Select an input signal Press the iNPUT button on the remote control to each _mputet.
...; Setect DVI : DVI-D digitaJ s_naL When _nacting with a D-S_ signal input cabS, - O_recUy_nne_ to a grounded power outlet on the product. Pre_s _e _NPUT button in a remote contro__o_!ect the _mputer _.ou_. Se_ RGB2 ; 15=pin D=_b _ skJnak * How to Connect to two ¢omputersl C_n_ the sig_a_c_les (DVI and D,Sub) to... Or, press the INPUT button at the front side of the product. Turn _ the PC. _ Select an input signal Press the iNPUT button on the remote control to each _mputet.

User Guide
Page 14
Red) _hen connecting with an F_A _. , _le_ AV. White, Sound (right:)- Press the INPUT button on the remote control to the S_Videoinput terminaFto watch high image quality movies_ Product RCA Cable (notIr_c1_d) VC|_JDVD R_iver Select an input signal. Connect the video cable ...
Red) _hen connecting with an F_A _. , _le_ AV. White, Sound (right:)- Press the INPUT button on the remote control to the S_Videoinput terminaFto watch high image quality movies_ Product RCA Cable (notIr_c1_d) VC|_JDVD R_iver Select an input signal. Connect the video cable ...

User Guide
Page 15
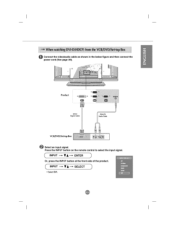
v,-- E.,E. ) Or, press the INPUT button at the front side of the product, ( ,.PU-T. v=-_SELECT) ._ COMPONENT. Connect the video/audio cable as shown in the below figure and then, connect the power cord (See page A9), • Connect the input terrnin_ with a proper coJor match. H:DTV Rec_ 480i o 576i o 480p o 576p o 720p o 1080i o Select an input signal, Press the INPUT button on the remote control to select the input: signal. ( ,,pTu--
v,-- E.,E. ) Or, press the INPUT button at the front side of the product, ( ,.PU-T. v=-_SELECT) ._ COMPONENT. Connect the video/audio cable as shown in the below figure and then, connect the power cord (See page A9), • Connect the input terrnin_ with a proper coJor match. H:DTV Rec_ 480i o 576i o 480p o 576p o 720p o 1080i o Select an input signal, Press the INPUT button on the remote control to select the input: signal. ( ,,pTu--
User Guide
Page 16
ENTER) Or, pros the INPUT button at the front side of the product. • _le_ DVL O Connect the video/audio cable as shown in the below figure and then connect the power cord (See page Ag). Press the INPUT button on the remote control to select the input signal. ( .,,PU-T--,A-- Product _ Select an input signal.
ENTER) Or, pros the INPUT button at the front side of the product. • _le_ DVL O Connect the video/audio cable as shown in the below figure and then connect the power cord (See page Ag). Press the INPUT button on the remote control to select the input signal. ( .,,PU-T--,A-- Product _ Select an input signal.

User Guide
Page 21
Name of the Buttons on front of the Unit b"rO/SELECTBu_o9 [ForPCAnalogsignall (Only 1920X1:080 Mode) 2) [Other signals] -The current sigr._ and mode information will be displayed (, INPUTButton _ INPUT "--" V _i,"--* AUTPJ_.._E_CT • Se_ct _ input signal AV S-_fideo Component RGB1 RGB2 DVl _ite Video Separate Vi_o HDTV/DVD 15-_n D_Sub analog s_r_3J 15-#n D-Sub analog s_t DVI d_itaE signal • The unR that receives the signal from the remote con_ot,
Name of the Buttons on front of the Unit b"rO/SELECTBu_o9 [ForPCAnalogsignall (Only 1920X1:080 Mode) 2) [Other signals] -The current sigr._ and mode information will be displayed (, INPUTButton _ INPUT "--" V _i,"--* AUTPJ_.._E_CT • Se_ct _ input signal AV S-_fideo Component RGB1 RGB2 DVl _ite Video Separate Vi_o HDTV/DVD 15-_n D_Sub analog s_r_3J 15-#n D-Sub analog s_t DVI d_itaE signal • The unR that receives the signal from the remote con_ot,
User Guide
Page 23
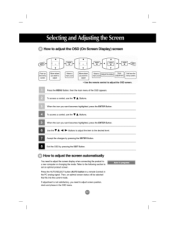
Refer to the following section to set an optimal prod_ screen Press _he AUTO!SELECT button (AUTO b_on in a remote Control) in the PC a_Iog signa_ Then, an optimal screen status will be selected that f_s into the current: mode, ff adjustment is not satisffactory, ...y_ need to adjust the OSD screen. How to adjust the OSD (On Screen Display) screen Adju_ the _ta_ ] • Use the remote control to adjust screen position, dock and phase in the OSD menu, When the icon you want becomes highlighted, press the ENTER...
Refer to the following section to set an optimal prod_ screen Press _he AUTO!SELECT button (AUTO b_on in a remote Control) in the PC a_Iog signa_ Then, an optimal screen status will be selected that f_s into the current: mode, ff adjustment is not satisffactory, ...y_ need to adjust the OSD screen. How to adjust the OSD (On Screen Display) screen Adju_ the _ta_ ] • Use the remote control to adjust screen position, dock and phase in the OSD menu, When the icon you want becomes highlighted, press the ENTER...
User Guide
Page 26
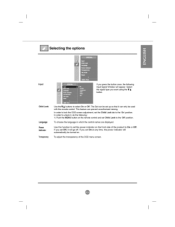
To choose the lar_Juage in which the centre{ names are displayed. In order to untock _, do the tel{owing : 1 ) Push the MENU button on the remote control and set the Child Lock tab to the '_ p_ition. To adjust the transparency of the product to On or Off, ff you set On ...at any time, the power indicator wil_ automatically be used wffh tt"_ remote control This tenure can prevent unauthorized viewing_ In order to lock the OSD screen adjustment, set Child Lock to the 'On' position. Child Lock Language...
To choose the lar_Juage in which the centre{ names are displayed. In order to untock _, do the tel{owing : 1 ) Push the MENU button on the remote control and set the Child Lock tab to the '_ p_ition. To adjust the transparency of the product to On or Off, ff you set On ...at any time, the power indicator wil_ automatically be used wffh tt"_ remote control This tenure can prevent unauthorized viewing_ In order to lock the OSD screen adjustment, set Child Lock to the 'On' position. Child Lock Language...
User Guide
Page 33
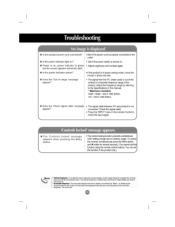
... ve_cal or horizontal frequency range of the product. bu_ the sc_c_ a_@ears e_y da_a @ _sthe p_er thdicat_ am_r? • If theproduct is in the remote Contrc4 to the Specifications in this manual. • Maximum resolution RGB1 / RGB2 : 19_ X 1080 @60Hz DVf : 1920 X 1080 @60Hz @ D_s the 'Ch_k signal cable message...
... ve_cal or horizontal frequency range of the product. bu_ the sc_c_ a_@ears e_y da_a @ _sthe p_er thdicat_ am_r? • If theproduct is in the remote Contrc4 to the Specifications in this manual. • Maximum resolution RGB1 / RGB2 : 19_ X 1080 @60Hz DVf : 1920 X 1080 @60Hz @ D_s the 'Ch_k signal cable message...
User Guide
Page 34
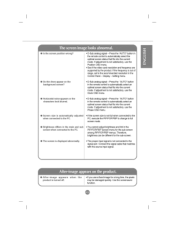
@_sthes_ _s_tiown_ong? @_ _in_iR@
@_sthes_ _s_tiown_ong? @_ _in_iR@
User Guide
Page 40
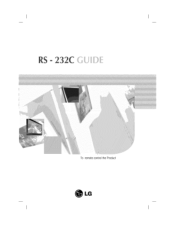
TO remote control the Product LG
TO remote control the Product LG

User Guide
Page 42
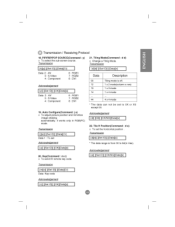
... 24. Lamp fault check 32, Video input fault return COMMAND1 k k k k k k k k k k k k k k k k k k j m d d d d d d d d d d d d * : _onal COMMAND2 a b c d e f g h i j k 1 m n q t u y u c d e f g h i I Power 02, Input Setect 03, Aspect Ratio 04. Sharpness 12 OSD Select 13, Remote Lock Orv'Off 14, PIP/PBR!POP On/Off 15. Tile H Size 25, Tile V Size 26 Tile tD Set 27, Elapsed time return 2& Light Sensor...
... 24. Lamp fault check 32, Video input fault return COMMAND1 k k k k k k k k k k k k k k k k k k j m d d d d d d d d d d d d * : _onal COMMAND2 a b c d e f g h i j k 1 m n q t u y u c d e f g h i I Power 02, Input Setect 03, Aspect Ratio 04. Sharpness 12 OSD Select 13, Remote Lock Orv'Off 14, PIP/PBR!POP On/Off 15. Tile H Size 25, Tile V Size 26 Tile tD Set 27, Elapsed time return 2& Light Sensor...
User Guide
Page 44
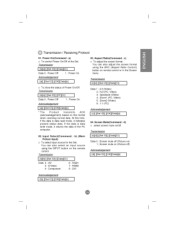
... Control) bu_on on , (Picture off) Acknewledgement [ [d][ l[Set ID][ l[OK][Data][x] ! You can also adjust the screen format using the INPUT button on the remote control Transmission [ [k][b][ ][Set ID][ ][Datal[Cr] Data 2 : AV 3 : S-Video 4 : Component ] 6 : RGB1 7 : RGB2 8 : DV]... On Acknowledgement [ [a][ l[Set ID][ l[OK][Data][x] ] * The Product transmits ACK (acknowledgement) based on /off (Picture on) 1 : Screen mute on remote control or in the Screen menu, Transmission llklEclCJESet'°]Eitpata]CCrl Data 1 : 4:3 (Video) 2: Fult (PC, Video) 3 : Spectacle (Video) 4 :...
... Control) bu_on on , (Picture off) Acknewledgement [ [d][ l[Set ID][ l[OK][Data][x] ! You can also adjust the screen format using the INPUT button on the remote control Transmission [ [k][b][ ][Set ID][ ][Datal[Cr] Data 2 : AV 3 : S-Video 4 : Component ] 6 : RGB1 7 : RGB2 8 : DV]... On Acknowledgement [ [a][ l[Set ID][ l[OK][Data][x] ] * The Product transmits ACK (acknowledgement) based on /off (Picture on) 1 : Screen mute on remote control or in the Screen menu, Transmission llklEclCJESet'°]Eitpata]CCrl Data 1 : 4:3 (Video) 2: Fult (PC, Video) 3 : Spectacle (Video) 4 :...

User Guide
Page 46
...Picture menu, TtanstT#Ssion I [kl[i][ ][Set ID][ ][Data][Cr] I ] Data 0 : Lock Off t : Lock On c If you're not using the remote control aM front pane[ controls on the set . Max : 64H (Hexadecimal code) Acknowledgement I [k][ ][Set ID][ ][OKl[Datal[x ] I Data Min : OOH ~...: OSD On Acknewle_ement I []][ l[Set ID][ ][OKl[Data][x] I Data 0 : OSD Off 1 : OSD On 13, Remote Control LockJkey Lock (Command : m) a To lock the remote control and the front panel controls on /off, remote control lock is on the set , use this mode. You can also adjust the sharpness in the Tt_nsmission...
...Picture menu, TtanstT#Ssion I [kl[i][ ][Set ID][ ][Data][Cr] I ] Data 0 : Lock Off t : Lock On c If you're not using the remote control aM front pane[ controls on the set . Max : 64H (Hexadecimal code) Acknowledgement I [k][ ][Set ID][ ][OKl[Datal[x ] I Data Min : OOH ~...: OSD On Acknewle_ement I []][ l[Set ID][ ][OKl[Data][x] I Data 0 : OSD Off 1 : OSD On 13, Remote Control LockJkey Lock (Command : m) a To lock the remote control and the front panel controls on /off, remote control lock is on the set , use this mode. You can also adjust the sharpness in the Tt_nsmission...
User Guide
Page 48
Key(Command : m c) G TO send IR remote key code, * The data range is off. 1 x 2 mode(column x row} 1 x 3 mode 1 x 4 mode 44 4 x 4 mode The data can not be set to 64(in RGB(PC) ...
Key(Command : m c) G TO send IR remote key code, * The data range is off. 1 x 2 mode(column x row} 1 x 3 mode 1 x 4 mode 44 4 x 4 mode The data can not be set to 64(in RGB(PC) ...


