Owner's Manual
Page 5
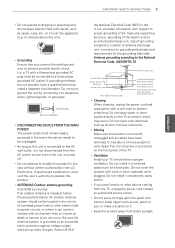
... outdoor antenna is turned off , unplugged and all cables have a qualified electrician install a separate circuit breaker. Be sure the antenna system is not disconnected from LG Electronics. Antenna grounding according to the National Electrical Code, ANSI/NFPA 70 Antenna Lead in excessively dusty places. Do not cover the product with cloth or other liquids directly on the front panel of overhead power...
... outdoor antenna is turned off , unplugged and all cables have a qualified electrician install a separate circuit breaker. Be sure the antenna system is not disconnected from LG Electronics. Antenna grounding according to the National Electrical Code, ANSI/NFPA 70 Antenna Lead in excessively dusty places. Do not cover the product with cloth or other liquids directly on the front panel of overhead power...
Owner's Manual
Page 8
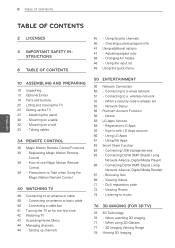
... 23 - Connecting a cable box 41 Turning the TV on a wall 33 - Adjusting aspect ratio 48 - Network Status 56 Premium Account Function 56 - Connecting USB storage devices 63 - Using My Apps 62 Smart Share Function 62 - Listening to use Magic Motion Remote Control 39 - Changing AV modes 48 - Connecting to a wireless network 52 - Mounting on a table 32 - Connecting an antenna or basic cable 40 - Viewing Videos 71 - Viewing Photos 74 - When using 3D Glasses 77 - 3D Imaging Viewing Range 78 Viewing 3D Imaging
... 23 - Connecting a cable box 41 Turning the TV on a wall 33 - Adjusting aspect ratio 48 - Network Status 56 Premium Account Function 56 - Connecting USB storage devices 63 - Using My Apps 62 Smart Share Function 62 - Listening to use Magic Motion Remote Control 39 - Changing AV modes 48 - Connecting to a wireless network 52 - Mounting on a table 32 - Connecting an antenna or basic cable 40 - Viewing Videos 71 - Viewing Photos 74 - When using 3D Glasses 77 - 3D Imaging Viewing Range 78 Viewing 3D Imaging
Owner's Manual
Page 9
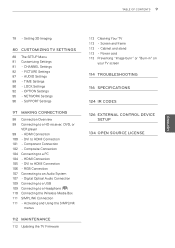
... TV SETTINGS 80 The SETUP Menu 81 Customizing Settings 81 - AUDIO Settings 89 - HDMI Connection 100 - DVI to a Headphone ( LCD ) 110 Connecting the Wireless Media Box 111 SIMPLINK Connection 111 - Digital Optical Audio Connection 109 Connecting to a USB 109 Connecting to HDMI Connection 106 - Power cord 113 Preventing "Image burn" or "Burn-in" on your TV screen 114 TROUBLESHOOTING 116 SPECIFICATIONS 124 IR CODES 126 EXTERNAL CONTROL DEVICE SETUP 134 OPEN SOURCE LICENSE NETWORK Settings 96 - DVI to an Audio System 107 - RGB Connection 107 Connecting to HDMI Connection 101...
... TV SETTINGS 80 The SETUP Menu 81 Customizing Settings 81 - AUDIO Settings 89 - HDMI Connection 100 - DVI to a Headphone ( LCD ) 110 Connecting the Wireless Media Box 111 SIMPLINK Connection 111 - Digital Optical Audio Connection 109 Connecting to a USB 109 Connecting to HDMI Connection 106 - Power cord 113 Preventing "Image burn" or "Burn-in" on your TV screen 114 TROUBLESHOOTING 116 SPECIFICATIONS 124 IR CODES 126 EXTERNAL CONTROL DEVICE SETUP 134 OPEN SOURCE LICENSE NETWORK Settings 96 - DVI to an Audio System 107 - RGB Connection 107 Connecting to HDMI Connection 101...
Owner's Manual
Page 15
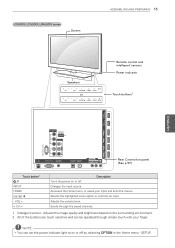
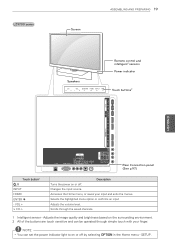
... the Home menu - Selects the highlighted menu option or confirms an input Adjusts the volume level. LV5400, LV5500, LW6500 series Screen ASSEMBLING AND PREPARING 15 Speakers H CH VOL ENTER HOME INPUT or H CH VOL ENTER HOME INPUT Remote control and intelligent1 sensors Power indicator Touch buttons2 USB Apps USB IN 2 HDD IN USB IN 1 ENEGNLGISH /DVI IN 4 Y COMPONENT IN1 WIRELESS ꔡ CONTROL PB VIDEO AV IN1 /DVI IN 3 /DVI IN 1 (ARC) IN 2 VIDEO L/MONO AUDIO R PR L /DVI AUDIO RS-232C IN (CONTROL&SERVICE...
... the Home menu - Selects the highlighted menu option or confirms an input Adjusts the volume level. LV5400, LV5500, LW6500 series Screen ASSEMBLING AND PREPARING 15 Speakers H CH VOL ENTER HOME INPUT or H CH VOL ENTER HOME INPUT Remote control and intelligent1 sensors Power indicator Touch buttons2 USB Apps USB IN 2 HDD IN USB IN 1 ENEGNLGISH /DVI IN 4 Y COMPONENT IN1 WIRELESS ꔡ CONTROL PB VIDEO AV IN1 /DVI IN 3 /DVI IN 1 (ARC) IN 2 VIDEO L/MONO AUDIO R PR L /DVI AUDIO RS-232C IN (CONTROL&SERVICE...
Owner's Manual
Page 16
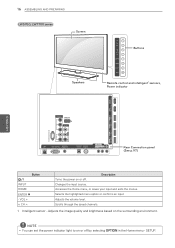
... (CONTROL&SERVICE) R LAN RGB IN (PC) (ARUGDBI/ODVINI) OPATUICDAILODOIGUITTAL ACNATBELNENINA/ AV IN 2 AUDIO / VIDEO COMPONENT IN 2 H/P AUDIO / Y PB PR Rear Connection panel (See p.97) Button / I INPUT HOME ENTER ꔉ - Changes the input source. Scrolls through the saved channels. 1 Intelligent sensor - SETUP. Adjusts the image quality and brightness based on or off . NOTE yyYou can set the power indicator light to on the surrounding environment. VOL + v CH ^ Description Turns the power on or off by selecting...
... (CONTROL&SERVICE) R LAN RGB IN (PC) (ARUGDBI/ODVINI) OPATUICDAILODOIGUITTAL ACNATBELNENINA/ AV IN 2 AUDIO / VIDEO COMPONENT IN 2 H/P AUDIO / Y PB PR Rear Connection panel (See p.97) Button / I INPUT HOME ENTER ꔉ - Changes the input source. Scrolls through the saved channels. 1 Intelligent sensor - SETUP. Adjusts the image quality and brightness based on or off . NOTE yyYou can set the power indicator light to on the surrounding environment. VOL + v CH ^ Description Turns the power on or off by selecting...
Owner's Manual
Page 17
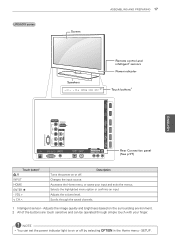
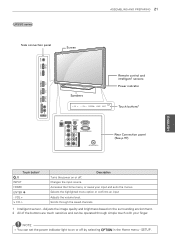
... input Adjusts the volume level. SETUP. LW5600 series Screen ASSEMBLING AND PREPARING 17 Speakers CH VOL ENTER HOME INPUT Remote control and intelligent1 sensors Power indicator Touch buttons2 USB Apps USB IN 2 HDD IN USB IN 1 /DVI ENEGNLGISH IN 4 Y COMPINO1NENT WIRELESS ꔡ CONTROL PB VIDEO AV IN1 /DVI IN 3 /DVI IN 1 (ARC) IN 2 VIDEO L/MONO AUDIO R PR L /DVI AUDIO RS-232C IN (CONTROL&SERVICE) R LAN RGB IN (PC) (ARUGDBI/ODVINI) OPATUICDAILODOIGUITTAL ACNATBELNENINA/ AV IN 2 AUDIO / VIDEO COMPONENT IN 2 H/P AUDIO / Y PB PR Rear Connection panel...
... input Adjusts the volume level. SETUP. LW5600 series Screen ASSEMBLING AND PREPARING 17 Speakers CH VOL ENTER HOME INPUT Remote control and intelligent1 sensors Power indicator Touch buttons2 USB Apps USB IN 2 HDD IN USB IN 1 /DVI ENEGNLGISH IN 4 Y COMPINO1NENT WIRELESS ꔡ CONTROL PB VIDEO AV IN1 /DVI IN 3 /DVI IN 1 (ARC) IN 2 VIDEO L/MONO AUDIO R PR L /DVI AUDIO RS-232C IN (CONTROL&SERVICE) R LAN RGB IN (PC) (ARUGDBI/ODVINI) OPATUICDAILODOIGUITTAL ACNATBELNENINA/ AV IN 2 AUDIO / VIDEO COMPONENT IN 2 H/P AUDIO / Y PB PR Rear Connection panel...
Owner's Manual
Page 18
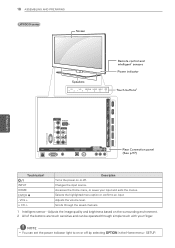
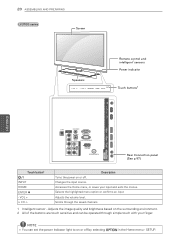
... set the power indicator light to on or off by selecting OPTION in the Home menu - Accesses the Home menu, or saves your finger. 18 ASSEMBLING AND PREPARING LW9500 series Screen ENEGNLGISH Speakers CH VOL ENTER HOME INPUT H Remote control and intelligent1 sensors Power indicator Touch buttons2 USB Apps USB IN 2 HDD IN USB IN 1 /DVI IN 4 Y COMPONENT IN1 WIRELESS ꔡ CONTROL PB VIDEO AV IN1 /DVI IN 3 /DVI IN 1 (ARC) IN 2 VIDEO L/MONO AUDIO R PR L /DVI AUDIO RS-232C IN (CONTROL&SERVICE...
... set the power indicator light to on or off by selecting OPTION in the Home menu - Accesses the Home menu, or saves your finger. 18 ASSEMBLING AND PREPARING LW9500 series Screen ENEGNLGISH Speakers CH VOL ENTER HOME INPUT H Remote control and intelligent1 sensors Power indicator Touch buttons2 USB Apps USB IN 2 HDD IN USB IN 1 /DVI IN 4 Y COMPONENT IN1 WIRELESS ꔡ CONTROL PB VIDEO AV IN1 /DVI IN 3 /DVI IN 1 (ARC) IN 2 VIDEO L/MONO AUDIO R PR L /DVI AUDIO RS-232C IN (CONTROL&SERVICE...
Owner's Manual
Page 19
... Home menu, or saves your finger. Changes the input source. LZ9700 series Screen ASSEMBLING AND PREPARING 19 Speakers CH VOL ENTER HOME INPUT H Remote control and intelligent1 sensors Power indicator Touch buttons2 2 USB Apps USB IN WIRELESS 1 CONTROL HDD IN 4 ENEGNLGISH /DVI IN 3 2 1 (ARC) AUDIO PR H/P VIDEO Y PB COMPO NENT LAN RGB IN (PC) AUDIO IN (RGB/DVI) IN 1 AV COMPO NENT VIDEO AUDIO Y PB OPTICAL ANTENNA PR DIGITAL /CABLE AUDIO OUT IN IN 2 AV RS-232C IN (CONTROL&SERVICE) Rear Connection panel...
... Home menu, or saves your finger. Changes the input source. LZ9700 series Screen ASSEMBLING AND PREPARING 19 Speakers CH VOL ENTER HOME INPUT H Remote control and intelligent1 sensors Power indicator Touch buttons2 2 USB Apps USB IN WIRELESS 1 CONTROL HDD IN 4 ENEGNLGISH /DVI IN 3 2 1 (ARC) AUDIO PR H/P VIDEO Y PB COMPO NENT LAN RGB IN (PC) AUDIO IN (RGB/DVI) IN 1 AV COMPO NENT VIDEO AUDIO Y PB OPTICAL ANTENNA PR DIGITAL /CABLE AUDIO OUT IN IN 2 AV RS-232C IN (CONTROL&SERVICE) Rear Connection panel...
Owner's Manual
Page 20
... confirms an input Adjusts the volume level. 20 ASSEMBLING AND PREPARING LV3700 series Screen Speakers CH VOL ENTER HOME INPUT Remote control and intelligent1 sensors Power indicator Touch buttons2 USB IN 1 USB IN 2/USB Apps H/P ENEGNLGISH /DVI IN 3 LAN COMPONENT IN1 Y AUDIO IN (RGB/DVI) OPTICAL DIGITAL RGB IN (PC) PB VIDEO PR AV IN1 VIDEO L/MONO AUDIO R AUDIO OUT RS-232C IN (CONTROL&SERVICE) ꔡ WIRELESS CONTROL L AUDIO R ANTENNA/CABLE IN AV IN 2 AUDIO / VIDEO COMPONENT IN 2 AUDIO / Y PB PR /DVI /DVI IN 1 (ARC) IN 2 Rear Connection panel (See...
... confirms an input Adjusts the volume level. 20 ASSEMBLING AND PREPARING LV3700 series Screen Speakers CH VOL ENTER HOME INPUT Remote control and intelligent1 sensors Power indicator Touch buttons2 USB IN 1 USB IN 2/USB Apps H/P ENEGNLGISH /DVI IN 3 LAN COMPONENT IN1 Y AUDIO IN (RGB/DVI) OPTICAL DIGITAL RGB IN (PC) PB VIDEO PR AV IN1 VIDEO L/MONO AUDIO R AUDIO OUT RS-232C IN (CONTROL&SERVICE) ꔡ WIRELESS CONTROL L AUDIO R ANTENNA/CABLE IN AV IN 2 AUDIO / VIDEO COMPONENT IN 2 AUDIO / Y PB PR /DVI /DVI IN 1 (ARC) IN 2 Rear Connection panel (See...
Owner's Manual
Page 21
... IN 2 AUDIO / VIDEO IN 1 (ARC) Speakers CH VOL ENTER HOME INPUT Remote control and intelligent1 sensors Power indicator Touch buttons2 LAN COMPONENT IN1 Y AUDIO IN (RGB/DVI) OPTICAL DIGITAL RGB IN (PC) PB AUDIO OUT RS-232C IN (CONTROL&SERVICE) VIDEO PR AV IN1 VIDEO L/MONO AUDIO R L AUDIO R ANTENNA/CABLE IN Rear Connection panel (See p.97) Touch button2 / I INPUT HOME ENTER ꔉ - Changes the input source. Adjusts the image quality and brightness based on or off . NOTE yyYou can set the power indicator light to on...
... IN 2 AUDIO / VIDEO IN 1 (ARC) Speakers CH VOL ENTER HOME INPUT Remote control and intelligent1 sensors Power indicator Touch buttons2 LAN COMPONENT IN1 Y AUDIO IN (RGB/DVI) OPTICAL DIGITAL RGB IN (PC) PB AUDIO OUT RS-232C IN (CONTROL&SERVICE) VIDEO PR AV IN1 VIDEO L/MONO AUDIO R L AUDIO R ANTENNA/CABLE IN Rear Connection panel (See p.97) Touch button2 / I INPUT HOME ENTER ꔉ - Changes the input source. Adjusts the image quality and brightness based on or off . NOTE yyYou can set the power indicator light to on...
Owner's Manual
Page 47
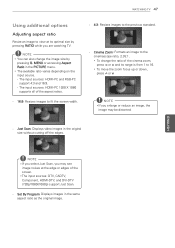
... 47 Using additional options Adjusting aspect ratio Resize an image to view at the edge or edges of the screen. Cinema Zoom: Formats an image to the previous standard. - MENU or accessing Aspect Ratio in the original size without cutting off the edges. yyThe input sources: DTV, CADTV, Component, HDMI-DTV, and DVI-DTV (720p/1080i/1080p) support Just Scan. - Set By Program: Displays images in the same aspect ratio as the original image. yyThe available ratio varies...
... 47 Using additional options Adjusting aspect ratio Resize an image to view at the edge or edges of the screen. Cinema Zoom: Formats an image to the previous standard. - MENU or accessing Aspect Ratio in the original size without cutting off the edges. yyThe input sources: DTV, CADTV, Component, HDMI-DTV, and DVI-DTV (720p/1080i/1080p) support Just Scan. - Set By Program: Displays images in the same aspect ratio as the original image. yyThe available ratio varies...

Owner's Manual
Page 63
... MediaHome program that is connected to this TV, some setting changes of movie, photo and music files from the original. yyYou can select a channel while viewing the small preview channel list on supported file types and other devices may be slower or may need to load during playback. In this TV. yyWhen playing a video in DLNA mode, the Multi Audio and Closed Caption features are too many types of software or other instructions...
... MediaHome program that is connected to this TV, some setting changes of movie, photo and music files from the original. yyYou can select a channel while viewing the small preview channel list on supported file types and other devices may be slower or may need to load during playback. In this TV. yyWhen playing a video in DLNA mode, the Multi Audio and Closed Caption features are too many types of software or other instructions...
Owner's Manual
Page 79
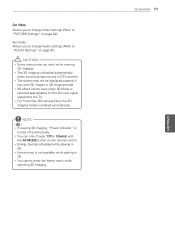
... seen when 3D Mode is not available while playing in 3D. yy3D effect can only choose "Off or Cinema" with the AV MODE button on the remote control. NOTE ( ) LCD yyIf viewing 3D imaging, "Power indicator" is disabled automatically when switching input source or DTV channel. Allows you to change Video settings (Refer to "PICTURE Settings" on page 87). Set Audio. yyHome menu is selected appropriately for the 3D input signal supplied to "AUDIO Settings" on page...
... seen when 3D Mode is not available while playing in 3D. yy3D effect can only choose "Off or Cinema" with the AV MODE button on the remote control. NOTE ( ) LCD yyIf viewing 3D imaging, "Power indicator" is disabled automatically when switching input source or DTV channel. Allows you to change Video settings (Refer to "PICTURE Settings" on page 87). Set Audio. yyHome menu is selected appropriately for the 3D input signal supplied to "AUDIO Settings" on page...
Owner's Manual
Page 84
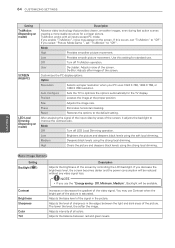
.... De-Blur: Adjusts after-image of the screen, it adjusts the backlight to improve the contrast ratio. After analysing the signal of the input video by controlling the LCD backlight. Adjusts intensity of the screen. Low Provides smooth picture movement. User De-Judder: Adjusts noise of all inputs except PC mode. Use this occurs, set "TruMotion" to "Off". Mode Off Turn off TruMotion operation. Low Brightens the picture and deepens black levels using the strong...
.... De-Blur: Adjusts after-image of the screen, it adjusts the backlight to improve the contrast ratio. After analysing the signal of the input video by controlling the LCD backlight. Adjusts intensity of the screen. Low Provides smooth picture movement. User De-Judder: Adjusts noise of all inputs except PC mode. Use this occurs, set "TruMotion" to "Off". Mode Off Turn off TruMotion operation. Low Brightens the picture and deepens black levels using the strong...
Owner's Manual
Page 107
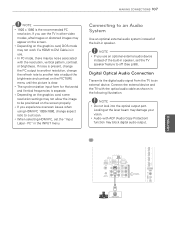
... L R AUDIO COMPON ENT IN AV IN1 ANTENNA /CABLE IN 1 (ARC) 2 /DVI IN AV IN2 ENEGNLGISH VIDEO L/MONO AUDIO R OPTICAL AUDIO IN Digital Optical Audio Connection Transmits the digital audio signal from the TV to be noise associated with ACP (Audio Copy Protection) function may not allow the image to an external device. If noise is present, change the PC output to another resolution, change aspect ratio to Just scan. Looking at the laser beam may not work if a HDMI...
... L R AUDIO COMPON ENT IN AV IN1 ANTENNA /CABLE IN 1 (ARC) 2 /DVI IN AV IN2 ENEGNLGISH VIDEO L/MONO AUDIO R OPTICAL AUDIO IN Digital Optical Audio Connection Transmits the digital audio signal from the TV to be noise associated with ACP (Audio Copy Protection) function may not allow the image to an external device. If noise is present, change the PC output to another resolution, change aspect ratio to Just scan. Looking at the laser beam may not work if a HDMI...
Owner's Manual
Page 111
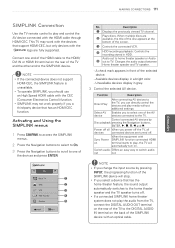
.... Switch audio- This TV may not work with the devices that support HDMI-CEC, but only devices with an optical cable. When multiple discs are fully supported. Audio out to home theater speaker or Audio 5 out to play , the TV will stop. Available devices display in grey. 3 Control the selected AV device. Control connected AV devices by pressing INPUT, the progressing function of the SIMPLINK device will automatically turn on...
.... Switch audio- This TV may not work with the devices that support HDMI-CEC, but only devices with an optical cable. When multiple discs are fully supported. Audio out to home theater speaker or Audio 5 out to play , the TV will stop. Available devices display in grey. 3 Control the selected AV device. Control connected AV devices by pressing INPUT, the progressing function of the SIMPLINK device will automatically turn on...
Owner's Manual
Page 114
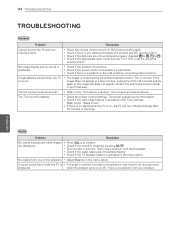
... again. 114 TROUBLESHOOTING TROUBLESHOOTING General Problem Resolution Cannot control the TV with the broadcast. yyCheck if the batteries are still working and properly installed ( to , to a wall outlet. The TV turns off suddenly. yyCheck the power control settings. yyCheck if the audio cables are displaying. yyCheck if the appropriate input mode such as TV or VCR is connected to ). yyCheck if the Auto sleep feature is produced. ENEGNLGISH Audio Problem Resolution No sound is normal...
... again. 114 TROUBLESHOOTING TROUBLESHOOTING General Problem Resolution Cannot control the TV with the broadcast. yyCheck if the batteries are still working and properly installed ( to , to a wall outlet. The TV turns off suddenly. yyCheck the power control settings. yyCheck if the audio cables are displaying. yyCheck if the appropriate input mode such as TV or VCR is connected to ). yyCheck if the Auto sleep feature is produced. ENEGNLGISH Audio Problem Resolution No sound is normal...
Owner's Manual
Page 115
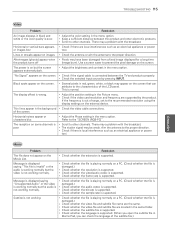
... or power or images blur tool. Lines or streaks appear on the external device. This is supported. of range, set to the characteristics of the subtitle file.) Aim the antenna to other electronic products. yyCheck whether the video/audio codec is normal. yyCheck whether the language is supported. TROUBLESHOOTING 115 ENEGNLGISH Video Problem Resolution An image displays in the background yyCheck the video cable connections. yyCheck if the signal cable is supported. yyCheck...
... or power or images blur tool. Lines or streaks appear on the external device. This is supported. of range, set to the characteristics of the subtitle file.) Aim the antenna to other electronic products. yyCheck whether the video/audio codec is normal. yyCheck whether the language is supported. TROUBLESHOOTING 115 ENEGNLGISH Video Problem Resolution An image displays in the background yyCheck the video cable connections. yyCheck if the signal cable is supported. yyCheck...
Owner's Manual
Page 132
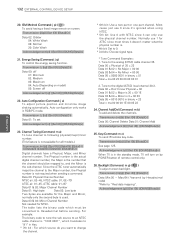
... to change the channel. * 6th bit: Use a two part or one part channel. Most cases just use the physical channel number. Tune to , and the Minor is in the standby mode, TV will turn on by Hexadecimal code) *Refer to Hexadecimal before sending. Acknowledgement [c][ ][Set ID][ ][OK/NG][Data][x] When TV is the sub-channel. Energy Saving (Command: j q) To control the energy saving function. Auto configuration only works in...
... to change the channel. * 6th bit: Use a two part or one part channel. Most cases just use the physical channel number. Tune to , and the Minor is in the standby mode, TV will turn on by Hexadecimal code) *Refer to Hexadecimal before sending. Acknowledgement [c][ ][Set ID][ ][OK/NG][Data][x] When TV is the sub-channel. Energy Saving (Command: j q) To control the energy saving function. Auto configuration only works in...
Specification
Page 2
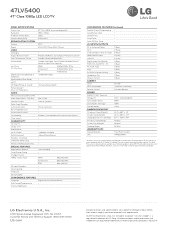
... Channel Programming • Auto/Manual Clock • On/Off Timer • Sleep Timer • Auto Off/Auto Sleep • AV INPUTS/OUTPUTS RF In (Antenna/Cable) 1 (Rear) AV In 2 (Rear) Component Video In (Y, Pb, Pr) + Audio 2 (Rear) HDMI™/HDCP Input 4 (Side) USB 2.0 2 (Side) Digital Audio Out (Optical) 1 (Rear) RGB In (D-Sub 15 Pin) - Hz 100V ~ 240V, 50/60Hz Consumption (Max.) 165W Consumption (Average) 138W Standby Mode PC 1 (Rear) PC Audio Input 1 (Rear) LAN 1 (Rear) RS-232C (Control/Service) 1 (Rear) Headphone Out 1 (Rear) Wireless Control...
... Channel Programming • Auto/Manual Clock • On/Off Timer • Sleep Timer • Auto Off/Auto Sleep • AV INPUTS/OUTPUTS RF In (Antenna/Cable) 1 (Rear) AV In 2 (Rear) Component Video In (Y, Pb, Pr) + Audio 2 (Rear) HDMI™/HDCP Input 4 (Side) USB 2.0 2 (Side) Digital Audio Out (Optical) 1 (Rear) RGB In (D-Sub 15 Pin) - Hz 100V ~ 240V, 50/60Hz Consumption (Max.) 165W Consumption (Average) 138W Standby Mode PC 1 (Rear) PC Audio Input 1 (Rear) LAN 1 (Rear) RS-232C (Control/Service) 1 (Rear) Headphone Out 1 (Rear) Wireless Control...


