
Specification (English)
Page 2
... x 18.1" Weight in package 80.7 lbs UPC 719192173002 Limited Warranty 1 Year Parts/Labor DIMENSIONS/REMOTE/INPUTS/OUTPUTS 4.1" 45.5" 29.1" 13.5" 7.9" (200mm) 27.5" 7.9" (200mm) 32.0" LG Electronics U.S.A., Inc. • 1000 Sylvan Avenue Englewood Cliffs, NJ 07632 Customer Service and Technical ... Sensor • 1080P Source Input - All other trademarks are the property of LG Corp. 47LG50 LCD 1080P HDTV 47" Class (46.9" diagonal) TECHNICAL SPECIFICATIONS LCD PANEL Native Display Resolution 1920 x 1080p Brightness (cd/m2) 500 Dynamic Contrast ...
... x 18.1" Weight in package 80.7 lbs UPC 719192173002 Limited Warranty 1 Year Parts/Labor DIMENSIONS/REMOTE/INPUTS/OUTPUTS 4.1" 45.5" 29.1" 13.5" 7.9" (200mm) 27.5" 7.9" (200mm) 32.0" LG Electronics U.S.A., Inc. • 1000 Sylvan Avenue Englewood Cliffs, NJ 07632 Customer Service and Technical ... Sensor • 1080P Source Input - All other trademarks are the property of LG Corp. 47LG50 LCD 1080P HDTV 47" Class (46.9" diagonal) TECHNICAL SPECIFICATIONS LCD PANEL Native Display Resolution 1920 x 1080p Brightness (cd/m2) 500 Dynamic Contrast ...

Owner's Manual (English)
Page 6
... falling when the TV is used on a stand 16 Antenna or Cable Connection 17 EXTERNAL EQUIPMENT SETUP HD Receiver Setup 18 DVD Setup 21 VCR Setup 23 Other A/V Source Setup 25 PC Setup 26 USB Connection 32 Audio Out Connection 33 WATCHING TV / CHANNEL CONTROL Remote Control Functions 34 ...Turning On the TV 36 Channel Selection 36 Volume Adjustment 36 Quick Menu / Favorite Channel Setup 37 Initial Setting 38 On-Screen Menus ...
... falling when the TV is used on a stand 16 Antenna or Cable Connection 17 EXTERNAL EQUIPMENT SETUP HD Receiver Setup 18 DVD Setup 21 VCR Setup 23 Other A/V Source Setup 25 PC Setup 26 USB Connection 32 Audio Out Connection 33 WATCHING TV / CHANNEL CONTROL Remote Control Functions 34 ...Turning On the TV 36 Channel Selection 36 Volume Adjustment 36 Quick Menu / Favorite Channel Setup 37 Initial Setting 38 On-Screen Menus ...

Owner's Manual (English)
Page 7
User Mode 70 Clear Voice 71 Balance 72 TV Speakers On/Off Setup 73 Audio Reset 74 Stereo/SAP Broadcast Setup 75 Audio Language 76 On-Screen Menus Language Selection 77 Caption Mode - Caption .../Off Time Setting 83 Sleep Timer Setting 84 Auto Shut-off Setting 85 PARENTAL CONTROL / RATINGS Set Password & Lock System 86 Channel Blocking 89 Movie & TV Rating 90 Downloadable Rating 95 External Input Blocking 96 Key lock 97 APPENDIX Troubleshooting 98 Maintenance 100 Product Specifications 101 Programming the...
User Mode 70 Clear Voice 71 Balance 72 TV Speakers On/Off Setup 73 Audio Reset 74 Stereo/SAP Broadcast Setup 75 Audio Language 76 On-Screen Menus Language Selection 77 Caption Mode - Caption .../Off Time Setting 83 Sleep Timer Setting 84 Auto Shut-off Setting 85 PARENTAL CONTROL / RATINGS Set Password & Lock System 86 Channel Blocking 89 Movie & TV Rating 90 Downloadable Rating 95 External Input Blocking 96 Key lock 97 APPENDIX Troubleshooting 98 Maintenance 100 Product Specifications 101 Programming the...

Owner's Manual (English)
Page 9
...use shielded signal interface cables with ferrite cores to P.15) * Wipe spots on the exterior only with your TV. Owner's Manual CD Manual Remote Control, Batteries Power Cord or Protection Cover Protective Bracket and Bolt for Power Cord (This feature is not available ...for stand fixing (Refer to P.12) (Refer to maintain standards compliance. 9 RETURN TV Q. PREPARATION PREPARATION ACCESSORIES Ensure that the ...
...use shielded signal interface cables with ferrite cores to P.15) * Wipe spots on the exterior only with your TV. Owner's Manual CD Manual Remote Control, Batteries Power Cord or Protection Cover Protective Bracket and Bolt for Power Cord (This feature is not available ...for stand fixing (Refer to P.12) (Refer to maintain standards compliance. 9 RETURN TV Q. PREPARATION PREPARATION ACCESSORIES Ensure that the ...

Owner's Manual (English)
Page 10
...Remote Control Sensor POWER Button CH CHANNEL ( , ) Buttons VOL ENTER MENU INPUT VOLUME (+, -) Buttons ENTER Button MENU Button INPUT Button 10 Illuminates blue when the set is included with a cloth (If a polishing cloth is switched on. (Can be adjusted using Power Indicator in standby mode. And then wipe the TV with your TV..., use it). PREPARATION PREPARATION FRONT PANEL INFORMATION I NOTE: If your TV has a protection tape attached, remove the tape. I Image shown may differ from your TV. Intelligent Sensor Adjusts picture ...
...Remote Control Sensor POWER Button CH CHANNEL ( , ) Buttons VOL ENTER MENU INPUT VOLUME (+, -) Buttons ENTER Button MENU Button INPUT Button 10 Illuminates blue when the set is included with a cloth (If a polishing cloth is switched on. (Can be adjusted using Power Indicator in standby mode. And then wipe the TV with your TV..., use it). PREPARATION PREPARATION FRONT PANEL INFORMATION I NOTE: If your TV has a protection tape attached, remove the tape. I Image shown may differ from your TV. Intelligent Sensor Adjusts picture ...

Owner's Manual (English)
Page 11
...11 VIDEO L/MONO AUDIO R HDMI IN 3 USB IN 3 5 ANTENNA/ CABLE IN 6 4 RGB IN DIGITAL AUDIO OUT 1 RGB(PC) AUDIO REMOTE (RGB/DVI) CONTROL IN OPTICAL COAXIAL 7 10 1 (Except 42/47/52LG50DC) HDMI/DVI IN 2 2 1 1 RS-232C IN AUDIO OUT (CONTROL & SERVICE) 8 AV IN 1 VIDEO AUDIO COMPONENT IN 2 S-VIDEO...a wired remote control. 5 RS-232C IN (CONTROL & SERVICE) PORT Used by third party devices. 7 DIGITAL AUDIO OUT Digital audio output for use with amps and home theater systems. 9 AV (Audio/Video) IN ( ) Analog composite connection. Caution: Never attempt to operate the TV on DC...
...11 VIDEO L/MONO AUDIO R HDMI IN 3 USB IN 3 5 ANTENNA/ CABLE IN 6 4 RGB IN DIGITAL AUDIO OUT 1 RGB(PC) AUDIO REMOTE (RGB/DVI) CONTROL IN OPTICAL COAXIAL 7 10 1 (Except 42/47/52LG50DC) HDMI/DVI IN 2 2 1 1 RS-232C IN AUDIO OUT (CONTROL & SERVICE) 8 AV IN 1 VIDEO AUDIO COMPONENT IN 2 S-VIDEO...a wired remote control. 5 RS-232C IN (CONTROL & SERVICE) PORT Used by third party devices. 7 DIGITAL AUDIO OUT Digital audio output for use with amps and home theater systems. 9 AV (Audio/Video) IN ( ) Analog composite connection. Caution: Never attempt to operate the TV on DC...

Owner's Manual (English)
Page 18
..., and PR = red). 2 Connect the audio output of the digital settop box to use I Turn on the TV. 2. How to the COMPONENT IN VIDEO 1 jacks on the TV. Y PB PR L R 1 2 RGB IN RGB(PC) AUDIO REMOTE (RGB/DVI) CONTROL DVI IN (C 2 Y 1 PB PR L R VIDEO AUDIO COMPONENT IN Supported Resolutions Signal Component 480i Yes... Yes Yes Yes 18 Y, CB/PB, CR/PR Resolution Horizontal Vertical Frequency(KHz) Frequency(Hz) 720x480i 720x480p 1280x720p 1920x1080i 1920x1080p 15.73 15.73 31.47 31.50 44.96 45.00 33.72 33.75 26.97 27.00 33.71 33.75 67.432 67.50 59.94 60...
..., and PR = red). 2 Connect the audio output of the digital settop box to use I Turn on the TV. 2. How to the COMPONENT IN VIDEO 1 jacks on the TV. Y PB PR L R 1 2 RGB IN RGB(PC) AUDIO REMOTE (RGB/DVI) CONTROL DVI IN (C 2 Y 1 PB PR L R VIDEO AUDIO COMPONENT IN Supported Resolutions Signal Component 480i Yes... Yes Yes Yes 18 Y, CB/PB, CR/PR Resolution Horizontal Vertical Frequency(KHz) Frequency(Hz) 720x480i 720x480p 1280x720p 1920x1080i 1920x1080p 15.73 15.73 31.47 31.50 44.96 45.00 33.72 33.75 26.97 27.00 33.71 33.75 67.432 67.50 59.94 60...

Owner's Manual (English)
Page 19
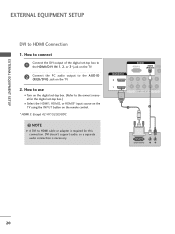
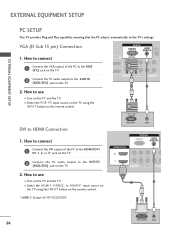
EXTERNAL EQUIPMENT SETUP HDMI Connection 1. How to use I Select the HDMI1, HDMI2, or HDMI3* input source on the TV using the INPUT button on the TV. 2 No separate audio connection is necessary. HDMI supports both audio and video. 2. How to connect 1 Connect the digital set-top box to the owner's...the digital set-top box. (Refer to HDMI/DVI IN1, 2, or 3* jack on the remote control. * HDMI 3: Except 42/47/52LG50DC HDMI-DTV Resolution Horizontal Vertical Frequency(KHz) Frequency(Hz) 720x480p 1280x720p 1920x1080i 1920x1080p 31.47 31.50 44.96 45.00 33.72 33.75 26.97 27.00 33.71...
EXTERNAL EQUIPMENT SETUP HDMI Connection 1. How to use I Select the HDMI1, HDMI2, or HDMI3* input source on the TV using the INPUT button on the TV. 2 No separate audio connection is necessary. HDMI supports both audio and video. 2. How to connect 1 Connect the digital set-top box to the owner's...the digital set-top box. (Refer to HDMI/DVI IN1, 2, or 3* jack on the remote control. * HDMI 3: Except 42/47/52LG50DC HDMI-DTV Resolution Horizontal Vertical Frequency(KHz) Frequency(Hz) 720x480p 1280x720p 1920x1080i 1920x1080p 31.47 31.50 44.96 45.00 33.72 33.75 26.97 27.00 33.71...
Owner's Manual (English)
Page 20
... A U D I Select the HDMI1, HDMI2, or HDMI3* input source on the TV using the INPUT button on the TV. 2. NOTE G A DVI to connect 1 Connect the DVI output of the digital set -top box.) I O (RGB/DVI) jack on the remote control. * HDMI 3: Except 42/47/52LG50DC ! RGB IN RGB(PC) AUDIO REMO (RGB/DVI) CONTRO HDMI...
... A U D I Select the HDMI1, HDMI2, or HDMI3* input source on the TV using the INPUT button on the TV. 2. NOTE G A DVI to connect 1 Connect the DVI output of the digital set -top box.) I O (RGB/DVI) jack on the remote control. * HDMI 3: Except 42/47/52LG50DC ! RGB IN RGB(PC) AUDIO REMO (RGB/DVI) CONTRO HDMI...

Owner's Manual (English)
Page 21
... manual for operating instructions. 1 2 RGB IN RGB(PC) AUDIO REMOT (RGB/DVI) CONTROL VI IN ( 2 Y 1 PB PR L R VIDEO AUDIO COMPONENT IN Component Input ports To get better picture quality, connect a DVD player to use I Turn on the TV. Y PB PR L R 2 Connect the audio outputs of the... IN VIDEO1 jacks on the DVD player, insert a DVD. I If connected to the COMPONENT IN AUDIO1 jacks on the remote control. Component ports on the TV Y Y Video output ports Y on the TV. Match the jack colors (Y = green, PB = blue, and PR = red). I Select the Component 1 input ...
... manual for operating instructions. 1 2 RGB IN RGB(PC) AUDIO REMOT (RGB/DVI) CONTROL VI IN ( 2 Y 1 PB PR L R VIDEO AUDIO COMPONENT IN Component Input ports To get better picture quality, connect a DVD player to use I Turn on the TV. Y PB PR L R 2 Connect the audio outputs of the... IN VIDEO1 jacks on the DVD player, insert a DVD. I If connected to the COMPONENT IN AUDIO1 jacks on the remote control. Component ports on the TV Y Y Video output ports Y on the TV. Match the jack colors (Y = green, PB = blue, and PR = red). I Select the Component 1 input ...

Owner's Manual (English)
Page 22
...of the DVD to the DVD player's manual for operating instructions. * HDMI 3: Except 42/47/52LG50DC RGB(PC) AUDIO (RGB/D HDMI/DVI IN 2 1 2 Y 1 PB PR L VIDEO A COMPONENT IN 1 HDMI-DVD OUTPUT 22 I Turn on the remote control. How to the DVD player's manual for operating instructions. I Refer to use I... the INPUT button on the DVD player, insert a DVD. I Select the HDMI1, HDMI2, or HDMI3* input source on the TV using the INPUT button on the TV. 2 No separate audio connection is necessary. How to connect 1 Connect the HDMI output of the DVD to use I Refer to the ...
...of the DVD to the DVD player's manual for operating instructions. * HDMI 3: Except 42/47/52LG50DC RGB(PC) AUDIO (RGB/D HDMI/DVI IN 2 1 2 Y 1 PB PR L VIDEO A COMPONENT IN 1 HDMI-DVD OUTPUT 22 I Turn on the remote control. How to the DVD player's manual for operating instructions. I Refer to use I... the INPUT button on the DVD player, insert a DVD. I Select the HDMI1, HDMI2, or HDMI3* input source on the TV using the INPUT button on the TV. 2 No separate audio connection is necessary. How to connect 1 Connect the HDMI output of the DVD to use I Refer to the ...
Owner's Manual (English)
Page 24
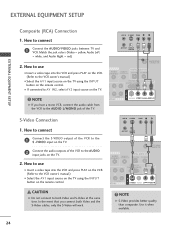
... the A V 1 input source on the TV using the INPUT button on the TV. ! CAUTION G Do not connect to AV IN2, select AV2 input source on the remote control. I Select the A V 1 input source on the TV using the INPUT button on the TV. 2 Connect the audio outputs of the VCR... to the AUDIO L/MONO jack of the TV. EXTERNAL EQUIPMENT SETUP EXTERNAL EQUIPMENT SETUP Composite (RCA) Connection ...
... the A V 1 input source on the TV using the INPUT button on the TV. ! CAUTION G Do not connect to AV IN2, select AV2 input source on the remote control. I Select the A V 1 input source on the TV using the INPUT button on the TV. 2 Connect the audio outputs of the VCR... to the AUDIO L/MONO jack of the TV. EXTERNAL EQUIPMENT SETUP EXTERNAL EQUIPMENT SETUP Composite (RCA) Connection ...

Owner's Manual (English)
Page 25
Match the jack colors. (Video = yellow, Audio Left = white, and Audio Right = red) 2. I Select the A V 2 input source on the TV using the INPUT button on the TV. How to use I Operate the corresponding external equipment. VIDEO L/MONO AUDIO R HDMI IN 3 USB IN Camcorder Video Game Set VIDEO L R 1 AV IN 2 25 EXTERNAL EQUIPMENT SETUP OTHER A/V SOURCE SETUP 1. I If connected to AV IN1 input, select the A V 1 input source on the remote control. How to connect 1 Connect the AUDIO/VIDEO jacks between TV and external equipment.
Match the jack colors. (Video = yellow, Audio Left = white, and Audio Right = red) 2. I Select the A V 2 input source on the TV using the INPUT button on the TV. How to use I Operate the corresponding external equipment. VIDEO L/MONO AUDIO R HDMI IN 3 USB IN Camcorder Video Game Set VIDEO L R 1 AV IN 2 25 EXTERNAL EQUIPMENT SETUP OTHER A/V SOURCE SETUP 1. I If connected to AV IN1 input, select the A V 1 input source on the remote control. How to connect 1 Connect the AUDIO/VIDEO jacks between TV and external equipment.
Owner's Manual (English)
Page 26
How to use I Select the RGB-PC input source on the TV using the INPUT button on the PC and the TV. I Turn on the remote control. * HDMI 3: Except 42/47/52LG50DC RGB OUTPUT AUDIO RGB IN RGB(PC) AUDIO R (RGB/DVI) CO HDMI/DVI IN 2 1 2 Y 1 PB PR L R VIDEO AUDIO COMPONENT IN 1 2 26 DVI-PC...
How to use I Select the RGB-PC input source on the TV using the INPUT button on the PC and the TV. I Turn on the remote control. * HDMI 3: Except 42/47/52LG50DC RGB OUTPUT AUDIO RGB IN RGB(PC) AUDIO R (RGB/DVI) CO HDMI/DVI IN 2 1 2 Y 1 PB PR L R VIDEO AUDIO COMPONENT IN 1 2 26 DVI-PC...
Owner's Manual (English)
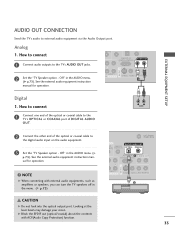
Page 33
.... ! G Block the SPDIF out (optical/coaxial) about the contents with external audio equipments, such as amplifiers or speakers, you can turn the TV speakers off in the menu. (G p.73) CAUTION G Do not look into the optical output port. See the external audio equipment instruction manual for... operation. ANTENNA/ CABLE IN DIGITAL AUDIO OUT IO REMOTE DVI) CONTROL IN OPTICAL COAXIAL RS-232C IN 1 AUDIO OUT (CONTROL & SERVICE) R AUDIO AV IN 1 S-VIDEO VIDEO L(MONO) AUDIO R 2 33 ...
.... ! G Block the SPDIF out (optical/coaxial) about the contents with external audio equipments, such as amplifiers or speakers, you can turn the TV speakers off in the menu. (G p.73) CAUTION G Do not look into the optical output port. See the external audio equipment instruction manual for... operation. ANTENNA/ CABLE IN DIGITAL AUDIO OUT IO REMOTE DVI) CONTROL IN OPTICAL COAXIAL RS-232C IN 1 AUDIO OUT (CONTROL & SERVICE) R AUDIO AV IN 1 S-VIDEO VIDEO L(MONO) AUDIO R 2 33 ...

Owner's Manual (English)
Page 34
... Q. G p.37 MENU Displays the main menu. WATCHING TV / CHANNEL CONTROL WATCHING TV / CHANNEL CONTROL REMOTE CONTROL FUNCTIONS When using the remote control, aim it at the remote control sensor on or off , depending on -screen displays and return to the next one. TV/STB/DVD/VCR Select the remote operating mode: TV, STB, DVD, or VCR. G p.37 MUTE...
... Q. G p.37 MENU Displays the main menu. WATCHING TV / CHANNEL CONTROL WATCHING TV / CHANNEL CONTROL REMOTE CONTROL FUNCTIONS When using the remote control, aim it at the remote control sensor on or off , depending on -screen displays and return to the next one. TV/STB/DVD/VCR Select the remote operating mode: TV, STB, DVD, or VCR. G p.37 MUTE...

Owner's Manual (English)
Page 36
... Adjust the volume to suit your personal preference. 1 Press the VOL (+ or -) button to adjust the volume. 2 If you intend to be away on the remote control. The TV reverts to switch the sound off, press the MUTE button. 3 You can cancel the Mute function by using the... TV, press the POWER button on the remote control. CHANNEL SELECTION 1 Press the CH ( or ) or NUMBER buttons to standby mode. At this moment, the TV switches to select a channel number. I This TV is programmed to remember which power state it was last set...
... Adjust the volume to suit your personal preference. 1 Press the VOL (+ or -) button to adjust the volume. 2 If you intend to be away on the remote control. The TV reverts to switch the sound off, press the MUTE button. 3 You can cancel the Mute function by using the... TV, press the POWER button on the remote control. CHANNEL SELECTION 1 Press the CH ( or ) or NUMBER buttons to standby mode. At this moment, the TV switches to select a channel number. I This TV is programmed to remember which power state it was last set...

Owner's Manual (English)
Page 46
... cable. 46 G If a connected SIMPLINK home theater system doesn't play other products with HDMI cable without additional cables and settings. The TV might not function properly when using SIMPLINK, turn it with other AV devices connected with HDMI-CEC function. G When you select a device... SIMPLINK device with the HDMI cable. To start using it on in the user menus. WATCHING TV / CHANNEL CONTROL This function operates only with devices with the INPUT button on the remote control, the SIMPLINK device will stop. G When you switch the Input source with the logo....
... cable. 46 G If a connected SIMPLINK home theater system doesn't play other products with HDMI cable without additional cables and settings. The TV might not function properly when using SIMPLINK, turn it with other AV devices connected with HDMI-CEC function. G When you select a device... SIMPLINK device with the HDMI cable. To start using it on in the user menus. WATCHING TV / CHANNEL CONTROL This function operates only with devices with the INPUT button on the remote control, the SIMPLINK device will stop. G When you switch the Input source with the logo....

Owner's Manual (English)
Page 49
... CH Move Page FAV Mark RETURN Exit • Some files may be displayed the preview image by icon only. The On Screen Display on the remote control 3 4 Photo List Drive1 JMJ001 1366x768, 125KB Upper Page 2/3 No Marked Upper KY101 06/10/2008 KY102 04/03/2008 JMJ001 01/01/2000 JMJ002...
... CH Move Page FAV Mark RETURN Exit • Some files may be displayed the preview image by icon only. The On Screen Display on the remote control 3 4 Photo List Drive1 JMJ001 1366x768, 125KB Upper Page 2/3 No Marked Upper KY101 06/10/2008 KY102 04/03/2008 JMJ001 01/01/2000 JMJ002...

Owner's Manual (English)
Page 53
The On Screen Display on the remote control Music List Drive1 Arirang 3 4 Page 1/1 No Marked Title Upper Arirang Good Bye 3945 KB, 128 Kbps Upper Move PopUp Menu CH Move Page 6 FAV ... jacket is displayed. 3 Current page/Total pages 2 4 Total number of marked musics 5 Usable USB memory 1 6 Corresponding buttons on your model may be slightly different. This TV cannot play MP3 files form a USB storage device. Supported music file: *.MP3 Bit rate range 40Kbps ~ 320Kbps • Sampling rate (Sampling Frequency) MPEG1 : 32000, 44100...
The On Screen Display on the remote control Music List Drive1 Arirang 3 4 Page 1/1 No Marked Title Upper Arirang Good Bye 3945 KB, 128 Kbps Upper Move PopUp Menu CH Move Page 6 FAV ... jacket is displayed. 3 Current page/Total pages 2 4 Total number of marked musics 5 Usable USB memory 1 6 Corresponding buttons on your model may be slightly different. This TV cannot play MP3 files form a USB storage device. Supported music file: *.MP3 Bit rate range 40Kbps ~ 320Kbps • Sampling rate (Sampling Frequency) MPEG1 : 32000, 44100...


