
Owner's Manual
Page 8
... aspect ratio 48 - Using the input list 49 Using the quick menu 50 ENTERTAINMENT 50 Network Connection 50 - Using LG Apps 61 - Mounting on for the first time 42 Watching TV 43 Accessing Home Menu 44 Managing channels 44 - Network Status 56 Premium Account Function 56 - Using My Apps 62 ...3D imaging 77 - Mounting on a table 32 - How to use Magic Motion Remote Control 39 - Connecting USB storage devices 63 - Setting up the TV 23 - Sign in with LG Apps account 60 - Browsing files 68 - When using 3D Glasses 77 - 3D Imaging Viewing Range 78 Viewing 3D Imaging
... aspect ratio 48 - Using the input list 49 Using the quick menu 50 ENTERTAINMENT 50 Network Connection 50 - Using LG Apps 61 - Mounting on for the first time 42 Watching TV 43 Accessing Home Menu 44 Managing channels 44 - Network Status 56 Premium Account Function 56 - Using My Apps 62 ...3D imaging 77 - Mounting on a table 32 - How to use Magic Motion Remote Control 39 - Connecting USB storage devices 63 - Setting up the TV 23 - Sign in with LG Apps account 60 - Browsing files 68 - When using 3D Glasses 77 - 3D Imaging Viewing Range 78 Viewing 3D Imaging
Owner's Manual
Page 32
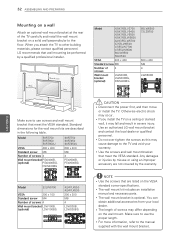
...TV on a solid wall perpendicular to the floor. Otherwise electric shock may differ depending on the VESA standard screw specifications. yyThe wall mount bracket is optional. yyThe length of screws may occur. LG recommends that wall mounting be performed by a qualified professional installer. 10 cm 10 cm (4 inch) 10 cm Model 42.../47/55LV3700 42/47/55LV5400 42/47/55LV5500 42/47/55LW5600 42/47/55LW5700 47/55LW6500 47/55LW7700 47/...
...TV on a solid wall perpendicular to the floor. Otherwise electric shock may differ depending on the VESA standard screw specifications. yyThe wall mount bracket is optional. yyThe length of screws may occur. LG recommends that wall mounting be performed by a qualified professional installer. 10 cm 10 cm (4 inch) 10 cm Model 42.../47/55LV3700 42/47/55LV5400 42/47/55LV5500 42/47/55LW5600 42/47/55LW5700 47/55LW6500 47/55LW7700 47/...

Owner's Manual
Page 42
... v) LIST 0 - 9 VOL (+, -) MUTE AV MODE1 Description Scrolls through saved channels. The TV switches to the previously customized settings. 4 To turn the TV on the saved or recent watched channel list. 42 WATCHING TV Watching TV 1 In Standby mode, press the power button on the remote control to turn the... TV off, press the power button on the remote control. ENEGNLGISH ...
... v) LIST 0 - 9 VOL (+, -) MUTE AV MODE1 Description Scrolls through saved channels. The TV switches to the previously customized settings. 4 To turn the TV on the saved or recent watched channel list. 42 WATCHING TV Watching TV 1 In Standby mode, press the power button on the remote control to turn the... TV off, press the power button on the remote control. ENEGNLGISH ...
Owner's Manual
Page 130
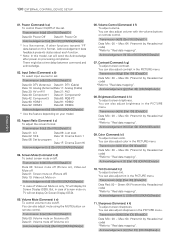
...Data 10: Analog (Antenna) Data 11: Analog (Cable) Data 20: AV or AV1 Data 21: AV2 Data 40: Component1 Data 41: Component2 Data 42: Component3 Data 60: RGB-PC Data 90: HDMI1 Data 91: HDMI2 Data 92: HDMI3 Data 93: HDMI4 Acknowledgement [b][ ][Set ID][ ][OK/NG... j ][ ][Set ID][ ][OK/NG][Data][x] 11. Input Select (Command: x b) To select input source for set will send the Acknowledge after power on only, TV will not display On Screen Display (OSD). 05. Acknowledgement [h][ ][Set ID][ ][OK/NG][Data][x] 09. Sharpness (Command: k k) To adjust screen sharpness. Acknowledgement [k][...
...Data 10: Analog (Antenna) Data 11: Analog (Cable) Data 20: AV or AV1 Data 21: AV2 Data 40: Component1 Data 41: Component2 Data 42: Component3 Data 60: RGB-PC Data 90: HDMI1 Data 91: HDMI2 Data 92: HDMI3 Data 93: HDMI4 Acknowledgement [b][ ][Set ID][ ][OK/NG... j ][ ][Set ID][ ][OK/NG][Data][x] 11. Input Select (Command: x b) To select input source for set will send the Acknowledge after power on only, TV will not display On Screen Display (OSD). 05. Acknowledgement [h][ ][Set ID][ ][OK/NG][Data][x] 09. Sharpness (Command: k k) To adjust screen sharpness. Acknowledgement [k][...


