

Owners Manual
Page 1
See the label attached on the back cover and quote this manual carefully before operating your dealer when you require service. http://www.lge.com http://ar.lge.com LCD TV OWNER'S MANUAL LCD TV MODELS 37LC2RR 42LC2RR Please read this information to your set . Retain it for future reference. P/NO : 38289U0577P (0711-REV06) Printed in Korea Record model number and serial number of the set .
See the label attached on the back cover and quote this manual carefully before operating your dealer when you require service. http://www.lge.com http://ar.lge.com LCD TV OWNER'S MANUAL LCD TV MODELS 37LC2RR 42LC2RR Please read this information to your set . Retain it for future reference. P/NO : 38289U0577P (0711-REV06) Printed in Korea Record model number and serial number of the set .

Owners Manual
Page 3
... the exhaust vent. parate booklet or sheet, or be included by the current leakage. Additional safe- Do not connect ground to a child or adult. 1 Owner Manual WARNING WARNING IMPORTANT SAFETY INSTRUCTIONS Important safety instructions shall be entitled "Important Safety Instructions". Keep these instructions. Follow all warnings. If grounding methods are not...
... the exhaust vent. parate booklet or sheet, or be included by the current leakage. Additional safe- Do not connect ground to a child or adult. 1 Owner Manual WARNING WARNING IMPORTANT SAFETY INSTRUCTIONS Important safety instructions shall be entitled "Important Safety Instructions". Keep these instructions. Follow all warnings. If grounding methods are not...

Owners Manual
Page 4
... may cause damaged the product or could give an electric shock. 6 There should be careful not to service the product your- WARNING WARNING Owner Manual IMPORTANT SAFETY INSTRUCTIONS WWARNING 9 Do not use water the product while cleaning. This may cause a fire or could give an electric shock. 11 ...may cause an electric shock. 12 During a lightning thunder, unplug the product from the wall outlet and contact your dealer or service center. Owner Manual 3 Do not place the product in a built-in the vicinity of smoke or strange smell from the product, switch it off ,unplug it ...
... may cause damaged the product or could give an electric shock. 6 There should be careful not to service the product your- WARNING WARNING Owner Manual IMPORTANT SAFETY INSTRUCTIONS WWARNING 9 Do not use water the product while cleaning. This may cause a fire or could give an electric shock. 11 ...may cause an electric shock. 12 During a lightning thunder, unplug the product from the wall outlet and contact your dealer or service center. Owner Manual 3 Do not place the product in a built-in the vicinity of smoke or strange smell from the product, switch it off ,unplug it ...

Owners Manual
Page 6
... 32-33 Watching & Record 34 Recorded TV 35 Recorded program Selection and Popup Menu 35-36 Playing recorded programs 36 Using the remote control 37 Manual Recording 38 Scheduled List 39 Video Quality 39 Format hard disk 40 PIP/Double Window/POP - Moving the PIP Sub Picture(PIP mode only) . . . 42...
... 32-33 Watching & Record 34 Recorded TV 35 Recorded program Selection and Popup Menu 35-36 Playing recorded programs 36 Using the remote control 37 Manual Recording 38 Scheduled List 39 Video Quality 39 Format hard disk 40 PIP/Double Window/POP - Moving the PIP Sub Picture(PIP mode only) . . . 42...

Owners Manual
Page 7
...ACC-User Option) . . 52 XD 53 Advanced Cinema Mode Setup 54 Advanced Black Level 55 Reset 56 Sound Adjustment Digital Auto Sound Processing (DASP 57 Manual Sound Control (DASP-User Option) . . . . . 58 Auto Volume Leveler (AVL) 59 Balance Adjustment 60 TV Speaker Setup 61 Stereo/SAP Broadcasts ...65 Sleep Timer 66 Special Features Key Lock 67 Closed Captions 68 XD Demo 69 Screen Adjustment Auto Configure (RGB[PC] Mode Only) 70 Manual Configure 71 Selecting Wide XGA Mode 72 Aspect Ratio Control (ARC 73 Initializing (Reset to Original Factory Settings) . . 74 APPENDIX External ...
...ACC-User Option) . . 52 XD 53 Advanced Cinema Mode Setup 54 Advanced Black Level 55 Reset 56 Sound Adjustment Digital Auto Sound Processing (DASP 57 Manual Sound Control (DASP-User Option) . . . . . 58 Auto Volume Leveler (AVL) 59 Balance Adjustment 60 TV Speaker Setup 61 Stereo/SAP Broadcasts ...65 Sleep Timer 66 Special Features Key Lock 67 Closed Captions 68 XD Demo 69 Screen Adjustment Auto Configure (RGB[PC] Mode Only) 70 Manual Configure 71 Selecting Wide XGA Mode 72 Aspect Ratio Control (ARC 73 Initializing (Reset to Original Factory Settings) . . 74 APPENDIX External ...

Owners Manual
Page 8
... the exterior only with the polishing cloth for the product exterior if there is missing, please contact the dealer where you purchased the product. Owner's Manual Owner's Manual 1.5V 1.5V Batteries (some models) INPUT TV POWER INPUT ARC TV DVD VCR CAPTION PIP SIZE POSITION PIP CH- Please be cautions of the...
... the exterior only with the polishing cloth for the product exterior if there is missing, please contact the dealer where you purchased the product. Owner's Manual Owner's Manual 1.5V 1.5V Batteries (some models) INPUT TV POWER INPUT ARC TV DVD VCR CAPTION PIP SIZE POSITION PIP CH- Please be cautions of the...
Owners Manual
Page 9
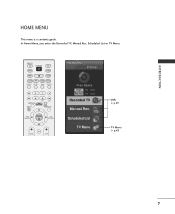
In Home Menu, you enter the Recorded TV, Manual Rec, Scheduled List or TV Menu. INPUT TV POWER INPUT ARC TV DVD VCR CAPTION PIP SIZE POSITION PIP CH- Scheduled List TV Menu DVR p.29 TV Menu p.43 7 INTRODUCTION HOME MENU This menu is a contents guide. PIP CH+ SWAP PIP INPUT MARK LIVE TV MEMORY/ERASE TIME MENU MACHINE EXIT SLEEP TIME CONTROL ENTER TIME CONTROL FCR VOL CH TIME MACHINE Home Free Space High 3h 19m Normal 5h 24m Recorded TV Manual Rec.
In Home Menu, you enter the Recorded TV, Manual Rec, Scheduled List or TV Menu. INPUT TV POWER INPUT ARC TV DVD VCR CAPTION PIP SIZE POSITION PIP CH- Scheduled List TV Menu DVR p.29 TV Menu p.43 7 INTRODUCTION HOME MENU This menu is a contents guide. PIP CH+ SWAP PIP INPUT MARK LIVE TV MEMORY/ERASE TIME MENU MACHINE EXIT SLEEP TIME CONTROL ENTER TIME CONTROL FCR VOL CH TIME MACHINE Home Free Space High 3h 19m Normal 5h 24m Recorded TV Manual Rec.

Owners Manual
Page 17
the fixed images on the sides of the screen may remain visible on the VCR. (Refer to the VCR owner's manual.) VIDEO AUDIO 15 When connecting with an antenna T COMPONENT IN NO) UDIO VIDEO AUDIO ANTENNA IN 1 ANT OUT S-VIDEO VIDEO L R ANT IN OUTPUT SWITCH Wall ...
the fixed images on the sides of the screen may remain visible on the VCR. (Refer to the VCR owner's manual.) VIDEO AUDIO 15 When connecting with an antenna T COMPONENT IN NO) UDIO VIDEO AUDIO ANTENNA IN 1 ANT OUT S-VIDEO VIDEO L R ANT IN OUTPUT SWITCH Wall ...
Owners Manual
Page 18
... jacks between TV and VCR. How to use I Insert a video tape into the VCR and press PLAY on the VCR. (Refer to the VCR owner's manual.) I Insert a video tape into the VCR and press PLAY on the set . 2. NOTE G The picture quality is improved: compared to the S -VIDEO input on the... using the INPUT button on the remote control. In the event that you have a mono VCR, con- CAUTION G Do not connect to the VCR owner's manual.) I If connected to the AUDIO 2 input jacks on the remote control. 1 RGB IN RGB PC/DTV) AUDIO (RGB/DVI) S-232C IN ROL & SERVICE) 2 AV OUT...
... jacks between TV and VCR. How to use I Insert a video tape into the VCR and press PLAY on the VCR. (Refer to the VCR owner's manual.) I Insert a video tape into the VCR and press PLAY on the set . 2. NOTE G The picture quality is improved: compared to the S -VIDEO input on the... using the INPUT button on the remote control. In the event that you have a mono VCR, con- CAUTION G Do not connect to the VCR owner's manual.) I If connected to the AUDIO 2 input jacks on the remote control. 1 RGB IN RGB PC/DTV) AUDIO (RGB/DVI) S-232C IN ROL & SERVICE) 2 AV OUT...

Owners Manual
Page 20
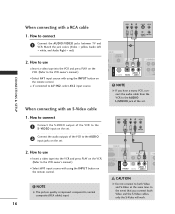
How to connect 1 Connect the second TV or monitor to hook up the second TV or monitor. 1. AV OUT SETUP The TV has a special signal output capability which allows you to the TV's AV OUT jacks. AUDIO RGB/DVI) AV OUT COMPONE See the Operating Manual of the second TV or monitor 2 for AV out. NOTE G Component, RGB, HDMI input sources cannot be used for further details regarding that device's input settings. ! G We recommend to use the AV OUT jacks for VCR recording. S-VIDEO VIDEO (MONO) AUDIO 1 VIDEO AUDIO VIDEO L R S-VIDEO CONNECTIONS & SETUP 18
How to connect 1 Connect the second TV or monitor to hook up the second TV or monitor. 1. AV OUT SETUP The TV has a special signal output capability which allows you to the TV's AV OUT jacks. AUDIO RGB/DVI) AV OUT COMPONE See the Operating Manual of the second TV or monitor 2 for AV out. NOTE G Component, RGB, HDMI input sources cannot be used for further details regarding that device's input settings. ! G We recommend to use the AV OUT jacks for VCR recording. S-VIDEO VIDEO (MONO) AUDIO 1 VIDEO AUDIO VIDEO L R S-VIDEO CONNECTIONS & SETUP 18

Owners Manual
Page 21
... below. Y PB PR L R 1 2 VARIABLE AUDIO OUT COMPONENT IN VIDEO AUDIO Component Input ports To get better picture quality, connect a DVD player to the DVD player's manual for operating instructions. I Select Component 1 input source with a component cable 1. Match the jack colors (Y = green, PB = blue, and PR = red).
... below. Y PB PR L R 1 2 VARIABLE AUDIO OUT COMPONENT IN VIDEO AUDIO Component Input ports To get better picture quality, connect a DVD player to the DVD player's manual for operating instructions. I Select Component 1 input source with a component cable 1. Match the jack colors (Y = green, PB = blue, and PR = red).

Owners Manual
Page 22
... with using the INPUT button on the DVD player, insert a DVD. G If the DVD does not support Auto HDMI, you need to the DVD player's manual for operating instructions. ! VIDEO S-VIDEO L R ANT IN OUTPUT SWITCH ANT OUT 1 2 2. RGB IN RGB PC/DTV) AUDIO (RGB/DVI) AV OUT I Turn on... to set . How to connect 1 Connect the S-VIDEO output of the DVD to the S -VIDEO input on the set . How to the DVD player's manual for operating instructions. To get the best picture quality, adjust the output resolution of the DVD to 1280x720p. 20 REMOTE CONTROL IN HDMI IN 2 1 (DVI...
... with using the INPUT button on the DVD player, insert a DVD. G If the DVD does not support Auto HDMI, you need to the DVD player's manual for operating instructions. ! VIDEO S-VIDEO L R ANT IN OUTPUT SWITCH ANT OUT 1 2 2. RGB IN RGB PC/DTV) AUDIO (RGB/DVI) AV OUT I Turn on... to set . How to connect 1 Connect the S-VIDEO output of the DVD to the S -VIDEO input on the set . How to the DVD player's manual for operating instructions. To get the best picture quality, adjust the output resolution of the DVD to 1280x720p. 20 REMOTE CONTROL IN HDMI IN 2 1 (DVI...

Owners Manual
Page 23
... connecting with using the INPUT button on the remote control. How to use I Turn on the digital set -top box.) I If connected to the owner's manual for the digital set -top box. (Refer to COMPONENT IN2 input, select Component2 input source. Signal 480i 480p 720p 1080i Component 1/2 Yes Yes Yes Yes...
... connecting with using the INPUT button on the remote control. How to use I Turn on the digital set -top box.) I If connected to the owner's manual for the digital set -top box. (Refer to COMPONENT IN2 input, select Component2 input source. Signal 480i 480p 720p 1080i Component 1/2 Yes Yes Yes Yes...

Owners Manual
Page 24
DVI) Connect the audio outputs of the source device to the owner's manual for the digital set . 2 No separated audio connection is necessary. 2. G If the digital set the output resolution appropriately. To get the best picture quality, adjust ... pin cable 1. NOTE G If the digital set-top box supports Auto HDMI function, the output resolution of the digital set-top box to the owner's manual for the digital set-top box.) I Turn on the set .
DVI) Connect the audio outputs of the source device to the owner's manual for the digital set . 2 No separated audio connection is necessary. 2. G If the digital set the output resolution appropriately. To get the best picture quality, adjust ... pin cable 1. NOTE G If the digital set-top box supports Auto HDMI function, the output resolution of the digital set-top box to the owner's manual for the digital set-top box.) I Turn on the set .

Owners Manual
Page 25
When connecting with a HDMI to the owner's manual for the digital set-top box.) I Select HDMI1/DVI input source with using the INPUT button on the remote control. 1 2 DVI-DTV OUTPUT L R CONNECTIONS & SETUP ...
When connecting with a HDMI to the owner's manual for the digital set-top box.) I Select HDMI1/DVI input source with using the INPUT button on the remote control. 1 2 DVI-DTV OUTPUT L R CONNECTIONS & SETUP ...
Owners Manual
Page 28
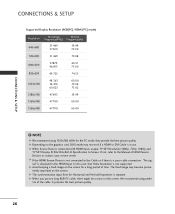
NOTE G We recommend using under 5m of time. G When you use . G If the HDMI Source Device is not connected to the Manual of HDMI Source Devices or contact your service center. G Avoid keeping a fixed image on the screen. We recommend using 1360x768, 60Hz for Horizontal and Vertical ...
NOTE G We recommend using under 5m of time. G When you use . G If the HDMI Source Device is not connected to the Manual of HDMI Source Devices or contact your service center. G Avoid keeping a fixed image on the screen. We recommend using 1360x768, 60Hz for Horizontal and Vertical ...

Owners Manual
Page 31
..., you may pause and rewind normal TV viewing at any of the live broadcast. CHANNEL PICTURE SOUND TIMER SPECIAL SCREEN DVR Time control Recorded TV Manual Recording Scheduled List Video Quality HDD Format 1 CHANNEL Time control G On PICTURE Recorded TV Off SOUND...
..., you may pause and rewind normal TV viewing at any of the live broadcast. CHANNEL PICTURE SOUND TIMER SPECIAL SCREEN DVR Time control Recorded TV Manual Recording Scheduled List Video Quality HDD Format 1 CHANNEL Time control G On PICTURE Recorded TV Off SOUND...

Owners Manual
Page 37
TIME MACHINE Home Free Space High 3h 19m Normal 5h 24m Recorded TV Manual Rec. A is shown above. MEMORY/ERASE EXIT MARK LIVE TV TIME MENU MACHINE SLEEP TIME CONTROL ENTER TIME CONTROL FCR VOL CH 1 Use the CH+ ...
TIME MACHINE Home Free Space High 3h 19m Normal 5h 24m Recorded TV Manual Rec. A is shown above. MEMORY/ERASE EXIT MARK LIVE TV TIME MENU MACHINE SLEEP TIME CONTROL ENTER TIME CONTROL FCR VOL CH 1 Use the CH+ ...

Owners Manual
Page 40
...38 Use the D or E button to one month in DVR menu. G Frequency : Choose among Once, Daily and Weekly. 3 After setting the Manual Rec., press the ENTER button. and then use in the future. G T V : Select either the current program or a scanned program. SPECIAL ...FUNCTIONS DVR (Digital Video Recorder) MANUAL RECORDING This function is easy to register to set the Input, T V, D a t e, Time, Duration, Frequency . G Time /Duration : Ensure you have...
...38 Use the D or E button to one month in DVR menu. G Frequency : Choose among Once, Daily and Weekly. 3 After setting the Manual Rec., press the ENTER button. and then use in the future. G T V : Select either the current program or a scanned program. SPECIAL ...FUNCTIONS DVR (Digital Video Recorder) MANUAL RECORDING This function is easy to register to set the Input, T V, D a t e, Time, Duration, Frequency . G Time /Duration : Ensure you have...

Owners Manual
Page 41
... MARK LIVE TV TIME MENU MACHINE SLEEP TIME CONTROL ENTER TIME CONTROL TIME MACHINE Home Free Space High 3h 19m Normal 5h 24m Recorded TV Manual Rec. ton to select the D V R menu. 2 Press the G button and then use D or E button to select the Video Quality. 3 Press ... to normal TV viewing. 2 CHANNEL PICTURE SOUND TIMER SPECIAL SCREEN DVR Time control Recorded TV Manual Recording Scheduled List Video Quality HDD Format 1 CHANNEL Time control PICTURE Recorded TV SOUND Manual Recording TIMER Scheduled List SPECIAL Video Quality G SCREEN DVR HDD Format High Normal 23 39 This...
... MARK LIVE TV TIME MENU MACHINE SLEEP TIME CONTROL ENTER TIME CONTROL TIME MACHINE Home Free Space High 3h 19m Normal 5h 24m Recorded TV Manual Rec. ton to select the D V R menu. 2 Press the G button and then use D or E button to select the Video Quality. 3 Press ... to normal TV viewing. 2 CHANNEL PICTURE SOUND TIMER SPECIAL SCREEN DVR Time control Recorded TV Manual Recording Scheduled List Video Quality HDD Format 1 CHANNEL Time control PICTURE Recorded TV SOUND Manual Recording TIMER Scheduled List SPECIAL Video Quality G SCREEN DVR HDD Format High Normal 23 39 This...


