
Owner's Manual
Page 1
Retain it for future reference. Refer to the label on the back cover and quote this manual carefully before operating your dealer when requiring service. To your set . ENGLISH LCD TV PLASMA TV OWNER'S MANUAL LCD TV MODELS 22/26LG1*** 32/37LG1*** 42/47LG1*** 22/26LG3*** 32/37LG3*** 42/47LG3*** 32LG5*** 37/42LG5*** 47/52LG5*** PLASMA TV MODELS 32PC5*** 42PG1*** 50PG1*** 42PG2*** 50PG2*** Please read this information. Record model number and serial number of the set .
Retain it for future reference. Refer to the label on the back cover and quote this manual carefully before operating your dealer when requiring service. To your set . ENGLISH LCD TV PLASMA TV OWNER'S MANUAL LCD TV MODELS 22/26LG1*** 32/37LG1*** 42/47LG1*** 22/26LG3*** 32/37LG3*** 42/47LG3*** 32LG5*** 37/42LG5*** 47/52LG5*** PLASMA TV MODELS 32PC5*** 42PG1*** 50PG1*** 42PG2*** 50PG2*** Please read this information. Record model number and serial number of the set .
Owner's Manual
Page 3
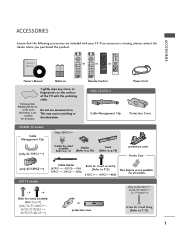
... Power Cord *Lightly wipe any stains or fingerprints on the screen This feature is missing, please contact the dealer where you purchased the product. Owner's Manual Owner's manual Owner's Manual Batteries TV POWER INPUT STB DVD Q.
... Power Cord *Lightly wipe any stains or fingerprints on the screen This feature is missing, please contact the dealer where you purchased the product. Owner's Manual Owner's manual Owner's Manual Batteries TV POWER INPUT STB DVD Q.
Owner's Manual
Page 4
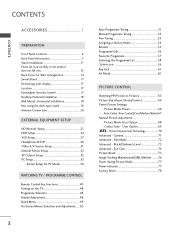
...Programme Selection 48 Volume Adjustment 48 Quick Menu 49 On Screen Menus Selection and Adjustment ......50 2 Auto Programme Tuning 51 Manual Programme Tuning 52 Fine Tuning 53 Assigning a Station Name 54 Booster 55 Programme Edit 56 Favourite Programme 57 Selecting the Programme...Settings - User Option 69 - Picture Improvement Technology 70 Advanced - Colour Tone - Auto Colour Tone Control(Cool/Medium/Warm)67 Manual Picture Adjustment - Screen Setup for Wire Arrangement 14 Swivel Stand 17 Positioning your display 17 Location 17 Kensington Security System 17 Desktop ...
...Programme Selection 48 Volume Adjustment 48 Quick Menu 49 On Screen Menus Selection and Adjustment ......50 2 Auto Programme Tuning 51 Manual Programme Tuning 52 Fine Tuning 53 Assigning a Station Name 54 Booster 55 Programme Edit 56 Favourite Programme 57 Selecting the Programme...Settings - User Option 69 - Picture Improvement Technology 70 Advanced - Colour Tone - Auto Colour Tone Control(Cool/Medium/Warm)67 Manual Picture Adjustment - Screen Setup for Wire Arrangement 14 Swivel Stand 17 Positioning your display 17 Location 17 Kensington Security System 17 Desktop ...

Owner's Manual
Page 17
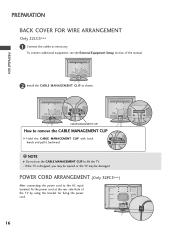
Only 32PC5*** Arrange the cables as shown. CABLE MANAGEMENT CLIP ! To connect additional equipment, see the External Equipment Setup section of the manual. 2 Open the CABLE MANAGEMENT CLIP as shown and manage the cables. 3 Fit the CABLE MANAGEMENT CLIP as shown picture. If the TV is dropped, you may be injured or the TV may be damaged. 15 PREPARATION LCD TV Models 1 Connect the cables as necessary. NOTE G Do not use the CABLE MANAGEMENT CLIP to lift the TV. -
Only 32PC5*** Arrange the cables as shown. CABLE MANAGEMENT CLIP ! To connect additional equipment, see the External Equipment Setup section of the manual. 2 Open the CABLE MANAGEMENT CLIP as shown and manage the cables. 3 Fit the CABLE MANAGEMENT CLIP as shown picture. If the TV is dropped, you may be injured or the TV may be damaged. 15 PREPARATION LCD TV Models 1 Connect the cables as necessary. NOTE G Do not use the CABLE MANAGEMENT CLIP to lift the TV. -
Owner's Manual
Page 18
... CORD ARRANGEMENT (Only 32PC5***) After connecting the power cord to the AC input terminal, fix the power cord at the rear side Hole of the manual. 2 Install the CABLE MANAGEMENT CLIP as necessary.
... CORD ARRANGEMENT (Only 32PC5***) After connecting the power cord to the AC input terminal, fix the power cord at the rear side Hole of the manual. 2 Install the CABLE MANAGEMENT CLIP as necessary.
Owner's Manual
Page 19
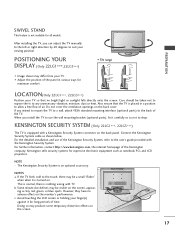
... shown may be a small "flicker" when when it is an optional accessory. Do not cover the ventilation openings on . b. If you can adjust the TV manually to the left or right direction by 20 degrees to allow a free flow of time. Doing so may be taken not to expose the tv...
... shown may be a small "flicker" when when it is an optional accessory. Do not cover the ventilation openings on . b. If you can adjust the TV manually to the left or right direction by 20 degrees to allow a free flow of time. Doing so may be taken not to expose the tv...
Owner's Manual
Page 23
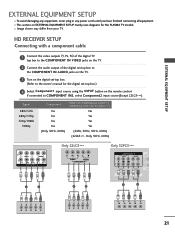
.../52LG5***) No Yes Yes Yes (24Hz, 30Hz, 50Hz, 60Hz) (22LG3***- EXTERNAL EQUIPMENT SETUP I Image shown may differ from your TV. If connected to the owner's manual for the digital set -top box to the COMPONENT IN AUDIO jacks on the TV. 3 Turn on EXTERNAL EQUIPMENT SETUP mainly uses diagrams for the...
.../52LG5***) No Yes Yes Yes (24Hz, 30Hz, 50Hz, 60Hz) (22LG3***- EXTERNAL EQUIPMENT SETUP I Image shown may differ from your TV. If connected to the owner's manual for the digital set -top box to the COMPONENT IN AUDIO jacks on the TV. 3 Turn on EXTERNAL EQUIPMENT SETUP mainly uses diagrams for the...
Owner's Manual
Page 24
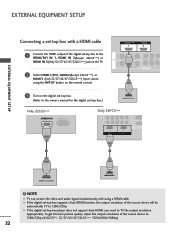
...***: 1920x1080i/1080p). 22 G If the digital set-top box supports Auto HDMI function, the output resolution of the digital set-top box to the owner's manual for the digital set-top box.) Only 22LG3*** HDMI/DVI IN RGB(PC) IN Only 32PCCOM5P*O*NE*NT IN VIDEO AUDIO 1 2 1 HDMI/DVI IN 2 HDMI...
...***: 1920x1080i/1080p). 22 G If the digital set-top box supports Auto HDMI function, the output resolution of the digital set-top box to the owner's manual for the digital set-top box.) Only 22LG3*** HDMI/DVI IN RGB(PC) IN Only 32PCCOM5P*O*NE*NT IN VIDEO AUDIO 1 2 1 HDMI/DVI IN 2 HDMI...
Owner's Manual
Page 25
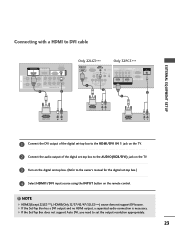
... input source using the INPUT button on the remote control. ! G If the Set-Top Box does not support Auto DVI, you need to the owner's manual for the digital set the output resolution appropriately. 23 G If the Set-Top Box has a DVI output and no HDMI output, a separated audio connection is...
... input source using the INPUT button on the remote control. ! G If the Set-Top Box does not support Auto DVI, you need to the owner's manual for the digital set the output resolution appropriately. 23 G If the Set-Top Box has a DVI output and no HDMI output, a separated audio connection is...
Owner's Manual
Page 26
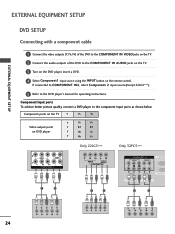
... 22LG3***). 5 Refer to the component input ports as shown below. Component Input ports To achieve better picture quality, connect a DVD player to the DVD player's manual for operating instructions. EXTERNAL EQUIPMENT SETUP EXTERNAL EQUIPMENT SETUP DVD SETUP Connecting with a component cable 1 Connect the video outputs (Y, PB, PR) of the DVD to...
... 22LG3***). 5 Refer to the component input ports as shown below. Component Input ports To achieve better picture quality, connect a DVD player to the DVD player's manual for operating instructions. EXTERNAL EQUIPMENT SETUP EXTERNAL EQUIPMENT SETUP DVD SETUP Connecting with a component cable 1 Connect the video outputs (Y, PB, PR) of the DVD to...

Owner's Manual
Page 27
... DVD player, insert a DVD. 4 Select A V 2 input source using the INPUT button on the TV. 2 Connect the audio outputs of the DVD to the DVD player's manual for operating instructions. AV IN 2 Only 22LG3*** AV IN VIDEO AUDIO S-VIDEO H/P LR VICE) Y PB PR L R VIDEO AUDIO COMPONENT IN 1 2 VIDEO S-VIDEO L R ANT IN OUTPUT...
... DVD player, insert a DVD. 4 Select A V 2 input source using the INPUT button on the TV. 2 Connect the audio outputs of the DVD to the DVD player's manual for operating instructions. AV IN 2 Only 22LG3*** AV IN VIDEO AUDIO S-VIDEO H/P LR VICE) Y PB PR L R VIDEO AUDIO COMPONENT IN 1 2 VIDEO S-VIDEO L R ANT IN OUTPUT...
Owner's Manual
Page 28
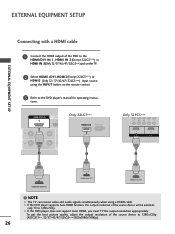
... L/MONO AUDIO R G The TV can receive video and audio signals simultaneously when using the INPUT button on the remote control. 3 Refer to the DVD player's manual for operating instruc- G If the DVD player does not support Auto HDMI, you must TV the output resolution appropriately. G If the DVD player supports Auto...
... L/MONO AUDIO R G The TV can receive video and audio signals simultaneously when using the INPUT button on the remote control. 3 Refer to the DVD player's manual for operating instruc- G If the DVD player does not support Auto HDMI, you must TV the output resolution appropriately. G If the DVD player supports Auto...

Owner's Manual
Page 30
... = yellow, Audio Left = white, and Audio Right = red) 2 Insert a video tape into the VCR and press PLAY on the VCR. (Refer to the VCR owner's manual.) 3 Select A V 1 input source using the INPUT button on the remote control.
... = yellow, Audio Left = white, and Audio Right = red) 2 Insert a video tape into the VCR and press PLAY on the VCR. (Refer to the VCR owner's manual.) 3 Select A V 1 input source using the INPUT button on the remote control.

Owner's Manual
Page 31
... the S-VHS VCR simultaneously, only the S-VIDEO can be received. 29 NOTE G If both S-VIDEO and VIDEO sockets have been conneced to the VCR owner's manual.) 4 Select AV2(or A V(Only 22LG3***)) input source using the INPUT button on the TV. The picture quality is improved; compared to normal composite (RCA cable...
... the S-VHS VCR simultaneously, only the S-VIDEO can be received. 29 NOTE G If both S-VIDEO and VIDEO sockets have been conneced to the VCR owner's manual.) 4 Select AV2(or A V(Only 22LG3***)) input source using the INPUT button on the TV. The picture quality is improved; compared to normal composite (RCA cable...
Owner's Manual
Page 34
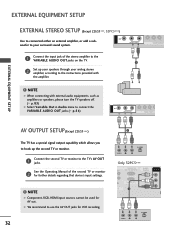
... up your speakers through your surround sound system. NOTEHDMI DVI IN HDMI IN G When connecting with the amplifier. ! Only 32PC5*** COMPONENT IN See the Operating Manual of the stereo amplifier to the VARIABLE AUDIO OUT jacks on the TV. 1 2 Set up the second TV or monitor. S-VIDEO VARIABLE AUDIO OUT R AUDIO...
... up your speakers through your surround sound system. NOTEHDMI DVI IN HDMI IN G When connecting with the amplifier. ! Only 32PC5*** COMPONENT IN See the Operating Manual of the stereo amplifier to the VARIABLE AUDIO OUT jacks on the TV. 1 2 Set up the second TV or monitor. S-VIDEO VARIABLE AUDIO OUT R AUDIO...

Owner's Manual
Page 38
... Picture Mode Colour Temperature XD Advanced Aspect Ratio Picture Reset Screen 3 Press the button and then use / button to the previous menu screen. 34 36 Manual Config. After adjustment, if the image is still not correct, your TV is in RGB (PC), you can adjust the... Manual Config.. Screen Auto cCoonnffiigg.. EXTERNAL EQUIPMENT SETUP 1 Press the MENU button and then use / button to select the Picture menu. 2 Press the button and then ...
... Picture Mode Colour Temperature XD Advanced Aspect Ratio Picture Reset Screen 3 Press the button and then use / button to the previous menu screen. 34 36 Manual Config. After adjustment, if the image is still not correct, your TV is in RGB (PC), you can adjust the... Manual Config.. Screen Auto cCoonnffiigg.. EXTERNAL EQUIPMENT SETUP 1 Press the MENU button and then use / button to select the Picture menu. 2 Press the button and then ...

Owner's Manual
Page 39
...then use Phase, Clock function in COMPONENT (480i/480p/576i/576p/720p/1080i/1080p), HDMI (480p/576p/720p/1080i/1080p). EXTERNAL EQUIPMENT SETUP Manual Configure (Adjustment for screen Phase, Clock, Position) (RGB [PC] mode only) If the picture is to minimize any horizontal noise and... vertical bars or stripes visible on the screen background the horizontal screen size will also change. Phase This function allows you to select Manual Config.. Picture Picture Mode Colour Temperature XD Advanced Aspect Ratio Picture Reset SSccrreeeenn G To Set 4 Press the button and then use ...
...then use Phase, Clock function in COMPONENT (480i/480p/576i/576p/720p/1080i/1080p), HDMI (480p/576p/720p/1080i/1080p). EXTERNAL EQUIPMENT SETUP Manual Configure (Adjustment for screen Phase, Clock, Position) (RGB [PC] mode only) If the picture is to minimize any horizontal noise and... vertical bars or stripes visible on the screen background the horizontal screen size will also change. Phase This function allows you to select Manual Config.. Picture Picture Mode Colour Temperature XD Advanced Aspect Ratio Picture Reset SSccrreeeenn G To Set 4 Press the button and then use ...
Owner's Manual
Page 40
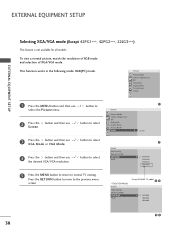
... SETUP EXTERNAL EQUIPMENT SETUP Selecting XGA/VGA mode (Except 42PG1***, 42PG2***, 22LG3***) This feature is not available for all models. Manual Config. Picture Picture Mode Colour Temperature XD Advanced Aspect Ratio Picture Reset Screen 1 Press the MENU button and then use / button...Ratio Picture Reset SSccrreeeenn G To Set Screen Auto Config. XVGA Mode Reset * Except PLASMA TV models 3 4 G 640x480 848x480 852x480 34 38 Manual Config. XGA Mode Reset 2 G 1024x768 1280x768 1360x768 1366x768 * Only VGA Mode Screen Auto Config. To view a normal picture, match the ...
... SETUP EXTERNAL EQUIPMENT SETUP Selecting XGA/VGA mode (Except 42PG1***, 42PG2***, 22LG3***) This feature is not available for all models. Manual Config. Picture Picture Mode Colour Temperature XD Advanced Aspect Ratio Picture Reset Screen 1 Press the MENU button and then use / button...Ratio Picture Reset SSccrreeeenn G To Set Screen Auto Config. XVGA Mode Reset * Except PLASMA TV models 3 4 G 640x480 848x480 852x480 34 38 Manual Config. XGA Mode Reset 2 G 1024x768 1280x768 1360x768 1366x768 * Only VGA Mode Screen Auto Config. To view a normal picture, match the ...
Owner's Manual
Page 41
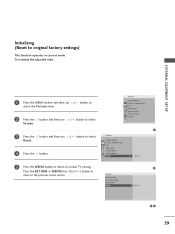
Manual Config. XGA Mode Reset G To Set 34 39 Initializing (Reset to normal TV viewing. To initialize the adjusted value EXTERNAL EQUIPMENT SETUP 1 Press the MENU ...
Manual Config. XGA Mode Reset G To Set 34 39 Initializing (Reset to normal TV viewing. To initialize the adjusted value EXTERNAL EQUIPMENT SETUP 1 Press the MENU ...

Owner's Manual
Page 51
... then / button to display each menu. 2 Press the / button to select your desired picture format. For Zoom Setting, select 14:9, Zoom1 and Zoom2 in this manual. Selects your desired Sound Mode. • Multi Audio : Selects the sound output. • Programme Edit : Adjusts the stored programmes by changing mode source. • Picture...
... then / button to display each menu. 2 Press the / button to select your desired picture format. For Zoom Setting, select 14:9, Zoom1 and Zoom2 in this manual. Selects your desired Sound Mode. • Multi Audio : Selects the sound output. • Programme Edit : Adjusts the stored programmes by changing mode source. • Picture...


