
Specification (English)
Page 1
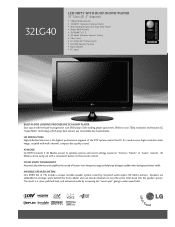
...vibrations to optimize picture and sound settings based on the remote control. INVISIBLE SPEAKER SYSTEM LG's 2008 line of the DTV system used in progressive scan DVD player. 32LG40 LCD HDTV WITH BUILT-IN DVD PLAYER 32" Class (31.5" diagonal) • 720p HD Resolution • 12,000:1 ... Save space with the built-in the US. It's a wide screen, high-resolution video image, coupled with a convenient button on "Cinema", "Sports" or "Game" content. The result is the highest performance segment of TVs include a unique invisible speaker system, tuned by increasing the "sweet spot...
...vibrations to optimize picture and sound settings based on the remote control. INVISIBLE SPEAKER SYSTEM LG's 2008 line of the DTV system used in progressive scan DVD player. 32LG40 LCD HDTV WITH BUILT-IN DVD PLAYER 32" Class (31.5" diagonal) • 720p HD Resolution • 12,000:1 ... Save space with the built-in the US. It's a wide screen, high-resolution video image, coupled with a convenient button on "Cinema", "Sports" or "Game" content. The result is the highest performance segment of TVs include a unique invisible speaker system, tuned by increasing the "sweet spot...

Owner's Manual (English)
Page 4
... direct air conditioning. 16 Do not expose to dripping or splashing and do not drop onto the screen with an exact replacement part by an authorized servicer. a TV with liquids, such as being twisted, kinked, pinched, closed in . Do not try to ground the unit by the hanging...circuit Breaker Power Supply 18 DISCONNECTING DEVICE FROM MAINS Mains plug is recommend that appliances be placed upon . on the power cord to unplug the TV. 15 WARNING - To reduce the risk of the appliance, and have a qualified electrician install a separate circuit breaker. Do not use of...
... direct air conditioning. 16 Do not expose to dripping or splashing and do not drop onto the screen with an exact replacement part by an authorized servicer. a TV with liquids, such as being twisted, kinked, pinched, closed in . Do not try to ground the unit by the hanging...circuit Breaker Power Supply 18 DISCONNECTING DEVICE FROM MAINS Mains plug is recommend that appliances be placed upon . on the power cord to unplug the TV. 15 WARNING - To reduce the risk of the appliance, and have a qualified electrician install a separate circuit breaker. Do not use of...
Owner's Manual (English)
Page 6
... Instruction 10 Cable Management 11 Desktop Pedestal Installation 12 Swivel Stand 12 Attaching the TV to a Desk 12 VESA Wall Mounting 13 Securing the TV to the wall to prevent falling when the TV is used on Discs 46 Selecting Language - Channel Editing 40 4 Input List ...Source Setup 23 Audio out Connection 24 PC Setup 25 WATCHING TV / CHANNEL CONTROL Remote Control Functions 32 Turning On TV 34 Channel Selection 34 Volume Adjustment 34 Quick Menu / Favorite Channel Setup 35 Initial Setting 36 On-Screen Menus Selection 37 Channel Setup - Changing the password 52 ...
... Instruction 10 Cable Management 11 Desktop Pedestal Installation 12 Swivel Stand 12 Attaching the TV to a Desk 12 VESA Wall Mounting 13 Securing the TV to the wall to prevent falling when the TV is used on Discs 46 Selecting Language - Channel Editing 40 4 Input List ...Source Setup 23 Audio out Connection 24 PC Setup 25 WATCHING TV / CHANNEL CONTROL Remote Control Functions 32 Turning On TV 34 Channel Selection 34 Volume Adjustment 34 Quick Menu / Favorite Channel Setup 35 Initial Setting 36 On-Screen Menus Selection 37 Channel Setup - Changing the password 52 ...
Owner's Manual (English)
Page 7
... Mode 76 Sound Setting Adjustment - Caption Option 86 TIME SETTING Clock Setting - User Mode 77 Balance 78 TV Speakers On/Off Setup 79 Audio Reset 80 Stereo/SAP Broadcasts Setup 81 Audio Language 82 On-Screen Menus Language Selection 83 Caption Mode - Digital Broadcasting System Captions 85 - Auto Clock Setup 87 Manual...
... Mode 76 Sound Setting Adjustment - Caption Option 86 TIME SETTING Clock Setting - User Mode 77 Balance 78 TV Speakers On/Off Setup 79 Audio Reset 80 Stereo/SAP Broadcasts Setup 81 Audio Language 82 On-Screen Menus Language Selection 83 Caption Mode - Digital Broadcasting System Captions 85 - Auto Clock Setup 87 Manual...
Owner's Manual (English)
Page 8
...the screen, appearing as tiny red, green, or blue spots. is a trademark of Dolby Laboratories. This is normal, there is nothing wrong with general household waste. I Some minute dot defects may produce some temporary distortion effects on . On Disposal (Only Hg lamp used LCD TV) The...this product contains a small amount of time. Reverse engineering or disassembly is incorporated under license from SRS Labs, Inc. I Avoid touching the LCD screen or holding your local authority. 6 Doing so may be visible on the monitor's performance. Disposal of SRS Labs, Inc. is a ...
...the screen, appearing as tiny red, green, or blue spots. is a trademark of Dolby Laboratories. This is normal, there is nothing wrong with general household waste. I Some minute dot defects may produce some temporary distortion effects on . On Disposal (Only Hg lamp used LCD TV) The...this product contains a small amount of time. Reverse engineering or disassembly is incorporated under license from SRS Labs, Inc. I Avoid touching the LCD screen or holding your local authority. 6 Doing so may be visible on the monitor's performance. Disposal of SRS Labs, Inc. is a ...
Owner's Manual (English)
Page 12
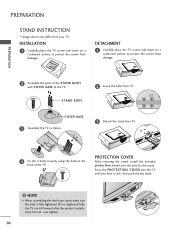
... the 4 bolts securely using the holes in the back of the TV. PROTECTION COVER After removing the stand, install the included protection cover over tighten. 10 DETACHMENT 1 Carefully place the TV screen side down on a cushioned surface to protect the screen from damage. PREPARATION PREPARATION STAND INSTRUCTION I Image shown may differ from damage. 2 Assemble...
... the 4 bolts securely using the holes in the back of the TV. PROTECTION COVER After removing the stand, install the included protection cover over tighten. 10 DETACHMENT 1 Carefully place the TV screen side down on a cushioned surface to protect the screen from damage. PREPARATION PREPARATION STAND INSTRUCTION I Image shown may differ from damage. 2 Assemble...

Owner's Manual (English)
Page 23
... is used; I Set VCR output switch to 3 or 4 and then tune TV to the RF antenna in socket of the VCR. 2. How to connect 1 Connect the RF antenna out socket of the screen may remain visible on the screen. I To avoid picture noise (interference), leave an adequate distance between the VCR ...and TV. How to use I Insert a video tape into the VCR and press PLAY on the...
... is used; I Set VCR output switch to 3 or 4 and then tune TV to the RF antenna in socket of the VCR. 2. How to connect 1 Connect the RF antenna out socket of the screen may remain visible on the screen. I To avoid picture noise (interference), leave an adequate distance between the VCR ...and TV. How to use I Insert a video tape into the VCR and press PLAY on the...

Owner's Manual (English)
Page 29
If noise is clear. in use. ness and contrast on the screen. The fixed image may be noise associated with the resolution, vertical pattern, contrast or brightness. G In PC mode, there may become permanently imprinted on the ... the best picture quality, adjust the PC graphics card to another resolution, change the refresh rate to 1360x768. G Depending on the screen for Horizontal and Vertical frequencies is in the Screen (RGB-PC) menu. Supported Display Specifications (RGB-PC, HDMI-PC) Resolution 640x350 Horizontal Vertical Frequency(KHz) Frequency(Hz) 31.469 70...
If noise is clear. in use. ness and contrast on the screen. The fixed image may be noise associated with the resolution, vertical pattern, contrast or brightness. G In PC mode, there may become permanently imprinted on the ... the best picture quality, adjust the PC graphics card to another resolution, change the refresh rate to 1360x768. G Depending on the screen for Horizontal and Vertical frequencies is in the Screen (RGB-PC) menu. Supported Display Specifications (RGB-PC, HDMI-PC) Resolution 640x350 Horizontal Vertical Frequency(KHz) Frequency(Hz) 31.469 70...
Owner's Manual (English)
Page 30
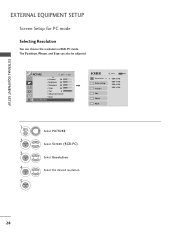
... can choose the resolution in RGB-PC mode. Select Resolution. Select the desired resolution. 28 EXTERNAL EQUIPMENT SETUP EXTERNAL EQUIPMENT SETUP Screen Setup for PC mode Selecting Resolution You can also be adjusted. PICTURE Move Enter E • Contrast 50 • Brightness 50... • Sharpness 50 • Color 50 • Tint 0R G • Advanced Control • Reset Screen (RGB-PC) SCREEN Resolution G Auto config. Position Size Phase Reset Move MENU Prev. 1024 x 768 1280 x 768 1360 x 768 1366 x 768 1 MENU/ SET UP...
... can choose the resolution in RGB-PC mode. Select Resolution. Select the desired resolution. 28 EXTERNAL EQUIPMENT SETUP EXTERNAL EQUIPMENT SETUP Screen Setup for PC mode Selecting Resolution You can also be adjusted. PICTURE Move Enter E • Contrast 50 • Brightness 50... • Sharpness 50 • Color 50 • Tint 0R G • Advanced Control • Reset Screen (RGB-PC) SCREEN Resolution G Auto config. Position Size Phase Reset Move MENU Prev. 1024 x 768 1280 x 768 1360 x 768 1366 x 768 1 MENU/ SET UP...
Owner's Manual (English)
Page 31
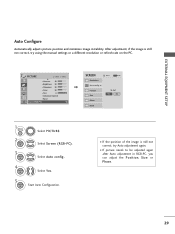
Select Screen (RGB-PC). I If the position of the image is still not correct, try Auto adjustment again. Select Auto config.. 4 ENTER Select Y e s. 5 ENTER Start Auto Configuration. G ... image instability. PICTURE Move Enter E • Contrast 50 • Brightness 50 • Sharpness 50 • Color 50 • Tint 0R G • Advanced Control • Reset Screen (RGB-PC) SCREEN Resolution Auto config.
Select Screen (RGB-PC). I If the position of the image is still not correct, try Auto adjustment again. Select Auto config.. 4 ENTER Select Y e s. 5 ENTER Start Auto Configuration. G ... image instability. PICTURE Move Enter E • Contrast 50 • Brightness 50 • Sharpness 50 • Color 50 • Tint 0R G • Advanced Control • Reset Screen (RGB-PC) SCREEN Resolution Auto config.
Owner's Manual (English)
Page 32
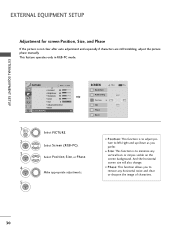
... G E 1 MENU/ SET UP 2 ENTER 3 ENTER 4 ENTER 5 ENTER Select PICTURE. And the horizontal screen size will also change. EXTERNAL EQUIPMENT SETUP EXTERNAL EQUIPMENT SETUP Adjustment for screen Position, Size, and Phase If the picture is to minimize any horizontal noise and clear or sharpen the image ...G Size Phase Reset Move MENU Prev. I Position: This function is to adjust picture to remove any vertical bars or stripes visible on the screen background. I S i z e: This function is not clear after auto adjustment and especially if characters are still trembling, adjust the picture phase ...
... G E 1 MENU/ SET UP 2 ENTER 3 ENTER 4 ENTER 5 ENTER Select PICTURE. And the horizontal screen size will also change. EXTERNAL EQUIPMENT SETUP EXTERNAL EQUIPMENT SETUP Adjustment for screen Position, Size, and Phase If the picture is to minimize any horizontal noise and clear or sharpen the image ...G Size Phase Reset Move MENU Prev. I Position: This function is to adjust picture to remove any vertical bars or stripes visible on the screen background. I S i z e: This function is not clear after auto adjustment and especially if characters are still trembling, adjust the picture phase ...
Owner's Manual (English)
Page 33
... No 31 PICTURE Move Enter E • Contrast 50 • Brightness 50 • Sharpness 50 • Color 50 • Tint 0R G • Advanced Control • Reset Screen (RGB-PC) 1 MENU/ SET UP 2 ENTER 3 ENTER 4 ENTER 5 ENTER Select PICTURE. This feature operates only in RGB-PC mode. EXTERNAL EQUIPMENT SETUP...
... No 31 PICTURE Move Enter E • Contrast 50 • Brightness 50 • Sharpness 50 • Color 50 • Tint 0R G • Advanced Control • Reset Screen (RGB-PC) 1 MENU/ SET UP 2 ENTER 3 ENTER 4 ENTER 5 ENTER Select PICTURE. This feature operates only in RGB-PC mode. EXTERNAL EQUIPMENT SETUP...
Owner's Manual (English)
Page 34
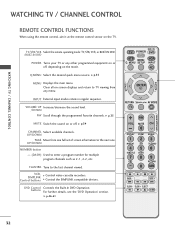
...G p.35 MENU Displays the main menu. UP/DOWN PAGE Move from any other programmed equipment on -screen displays and return to TV viewing from one full set of screen information to the next one. BUILT-IN TV POWER DVD STB MENU/ VCR Q. G p.35 MUTE Switch the sound on or off , depending on... the TV. TV/STB/VCR Select the remote operating mode: TV, STB, VCR, or BUILT-IN DVD. /BUILT-IN DVD POWER Turns your TV or any menu. VCR, SIMPLINK Control buttons Control video cassette recorders. SLOW + EJECT DISC MENU 32 FLASHBK Tune to enter a program number ...
...G p.35 MENU Displays the main menu. UP/DOWN PAGE Move from any other programmed equipment on -screen displays and return to TV viewing from one full set of screen information to the next one. BUILT-IN TV POWER DVD STB MENU/ VCR Q. G p.35 MUTE Switch the sound on or off , depending on... the TV. TV/STB/VCR Select the remote operating mode: TV, STB, VCR, or BUILT-IN DVD. /BUILT-IN DVD POWER Turns your TV or any menu. VCR, SIMPLINK Control buttons Control video cassette recorders. SLOW + EJECT DISC MENU 32 FLASHBK Tune to enter a program number ...
Owner's Manual (English)
Page 35
...Toggles through preset picture and audio settings. Don't mix old or used batteries with -). I Install two 1.5V AAA batteries. WATCHING TV / CHANNEL CONTROL THUMBSTICK Navigate the on-screen menus and adjust the system settings to your preference. (Up/Down/Left Right/ENTER) RETURN Allows the user to the... TV. When you press this button, the SIMPLINK menu appears at the screen. Button For further details, see the 'DVD Operation' section. I Close cover. 33 G p.46-61 Installing...
...Toggles through preset picture and audio settings. Don't mix old or used batteries with -). I Install two 1.5V AAA batteries. WATCHING TV / CHANNEL CONTROL THUMBSTICK Navigate the on-screen menus and adjust the system settings to your preference. (Up/Down/Left Right/ENTER) RETURN Allows the user to the... TV. When you press this button, the SIMPLINK menu appears at the screen. Button For further details, see the 'DVD Operation' section. I Close cover. 33 G p.46-61 Installing...
Owner's Manual (English)
Page 37
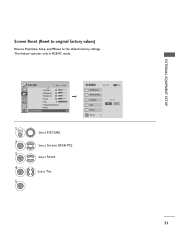
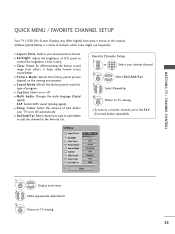
... brightness of LCD panel to the Favorite List. MENU Select Del/Add/Fav. 3 Select Favorite. 4Q. I Sleep Timer: Select the amount of program. I Sound Mode: Selects the factory preset sound for type of time before your TV turns off . WATCHING TV / CHANNEL CONTROL QUICK MENU / FAVORITE CHANNEL SETUP Your TV's OSD (On Screen Display) may...
... brightness of LCD panel to the Favorite List. MENU Select Del/Add/Fav. 3 Select Favorite. 4Q. I Sleep Timer: Select the amount of program. I Sound Mode: Selects the factory preset sound for type of time before your TV turns off . WATCHING TV / CHANNEL CONTROL QUICK MENU / FAVORITE CHANNEL SETUP Your TV's OSD (On Screen Display) may...
Owner's Manual (English)
Page 38
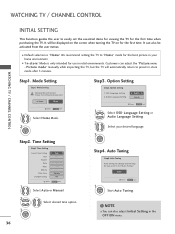
.... Choose the setting mode you want . Time Setting Step2. Option Setting 1. Picture mode" manually while inspecting the TV, but the TV will be activated from the user menus. WATCHING TV / CHANNEL CONTROL Step1. Audio Language Setting F English G French Enter RETURN Exit 1 Select OSD Language Setting or ... Enter 1 ENTER Enter RETURN Exit Start Auto Tuning. ! I You can also be displayed on the screen when turning the TV on for the first time when purchasing the TV. In Store Home Enter RETURN Exit 1 Select H o me Mode. 2 ENTER Step2. Do you ...
.... Choose the setting mode you want . Time Setting Step2. Option Setting 1. Picture mode" manually while inspecting the TV, but the TV will be activated from the user menus. WATCHING TV / CHANNEL CONTROL Step1. Audio Language Setting F English G French Enter RETURN Exit 1 Select OSD Language Setting or ... Enter 1 ENTER Enter RETURN Exit Start Auto Tuning. ! I You can also be displayed on the screen when turning the TV on for the first time when purchasing the TV. In Store Home Enter RETURN Exit 1 Select H o me Mode. 2 ENTER Step2. Do you ...

Owner's Manual (English)
Page 39
...-General Downloadable Rating Input Block Lock System : Off Set Password Block Channel TV Rating-English TV Rating-French Downloadable Rating Input Block For USA For Canada 37 WATCHING TV / CHANNEL CONTROL ON-SCREEN MENUS SELECTION Your TV's OSD (On Screen Display) may differ slightly from that shown in this manual. CHANNEL Auto Tuning Manual Tuning Channel... : Off : Off : 1 : Home 1 MENU/ SET UP Display each menu. 2 ENTER Select a menu item. 3 ENTER Enter to the pop up menu. 4 MENU/ SET UP Return to TV viewing.
...-General Downloadable Rating Input Block Lock System : Off Set Password Block Channel TV Rating-English TV Rating-French Downloadable Rating Input Block For USA For Canada 37 WATCHING TV / CHANNEL CONTROL ON-SCREEN MENUS SELECTION Your TV's OSD (On Screen Display) may differ slightly from that shown in this manual. CHANNEL Auto Tuning Manual Tuning Channel... : Off : Off : 1 : Home 1 MENU/ SET UP Display each menu. 2 ENTER Select a menu item. 3 ENTER Enter to the pop up menu. 4 MENU/ SET UP Return to TV viewing.

Owner's Manual (English)
Page 41
... e l e t e. 6 RETURN Return to Manual Tuning menu if the Lock System is required to gain access to the previous menu. I A password is turned on -screen signal strength monitor to see the quality of the signal being received. CHANNEL Auto Tuning Manual Tuning Channel Edit Move Enter CHANNEL Auto Tuning Manual...2 DTV 2-1 Bad Normal Good Delete Close 1 MENU/ SET UP Select CHANNEL. 2 ENTER Select Manual Tuning. 3 ENTER 4 5 Select D T V, T V, CADTV, or C A T V. WATCHING TV / CHANNEL CONTROL Add/Delete Channel (Manual Tuning) If selecting DTV or CADTV input signal, you want to...
... e l e t e. 6 RETURN Return to Manual Tuning menu if the Lock System is required to gain access to the previous menu. I A password is turned on -screen signal strength monitor to see the quality of the signal being received. CHANNEL Auto Tuning Manual Tuning Channel Edit Move Enter CHANNEL Auto Tuning Manual...2 DTV 2-1 Bad Normal Good Delete Close 1 MENU/ SET UP Select CHANNEL. 2 ENTER Select Manual Tuning. 3 ENTER 4 5 Select D T V, T V, CADTV, or C A T V. WATCHING TV / CHANNEL CONTROL Add/Delete Channel (Manual Tuning) If selecting DTV or CADTV input signal, you want to...

Owner's Manual (English)
Page 42
... Move CH Move Page MENU Previous RETURN Exit 40 RETURN Return to the previous menu. Return to TV viewing. Once a channel is highlighted you want to the small window at the topright corner of the screen. CHANNEL Auto Tuning Manual Tuning Channel Edit Move Enter 1 MENU/ SET UP Select CHANNEL. 2 ENTER Select...
... Move CH Move Page MENU Previous RETURN Exit 40 RETURN Return to the previous menu. Return to TV viewing. Once a channel is highlighted you want to the small window at the topright corner of the screen. CHANNEL Auto Tuning Manual Tuning Channel Edit Move Enter 1 MENU/ SET UP Select CHANNEL. 2 ENTER Select...

Owner's Manual (English)
Page 47
... Power off all devices: When you can directly control the devices and play discs. I Switch audio-out: Offers an easy way to the TV through a HDMI cable but does not support SIMPLINK, does not provide this function) Note: To operate SIMPLINK, an HDMI cable over Version 1.2...When multiple discs are available, the titles 1 of the screen. 3 VCR playback: Control the connected 3 VCR. 4 HDD Recordings playback: Control 4 recordings stored in bright color) 45 SIMPLINK Menu 1 TV viewing: Switch to TV: Select Home Theater speaker or TV speaker for Audio Out. I Select AV device: Enables you...
... Power off all devices: When you can directly control the devices and play discs. I Switch audio-out: Offers an easy way to the TV through a HDMI cable but does not support SIMPLINK, does not provide this function) Note: To operate SIMPLINK, an HDMI cable over Version 1.2...When multiple discs are available, the titles 1 of the screen. 3 VCR playback: Control the connected 3 VCR. 4 HDD Recordings playback: Control 4 recordings stored in bright color) 45 SIMPLINK Menu 1 TV viewing: Switch to TV: Select Home Theater speaker or TV speaker for Audio Out. I Select AV device: Enables you...

