Owner's Manual
Page 6
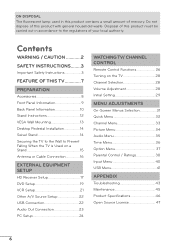
... Menus Selection 31 Quick Menu 32 Channel Menu 33 Picture Menu 34 Audio Menu 35 Time Menu 36 Option Menu 37 Parental Control / Ratings 38 Input Menu 40 USB Menu 41 APPENDIX Troubleshooting 43 Maintenance 45 Product Specifications 46 Open Source License 47 6
... Menus Selection 31 Quick Menu 32 Channel Menu 33 Picture Menu 34 Audio Menu 35 Time Menu 36 Option Menu 37 Parental Control / Ratings 38 Input Menu 40 USB Menu 41 APPENDIX Troubleshooting 43 Maintenance 45 Product Specifications 46 Open Source License 47 6
Owner's Manual
Page 9
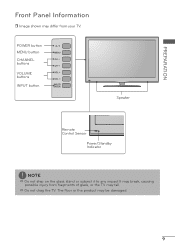
POWER button MENU button CHANNEL buttons VOLUME buttons INPUT button Speaker Remote Control Sensor Power/Standby Indicator NOTE a Do not step on the glass stand or subject it to any impact.It may break, causing possible injury from your TV. The floor or the product may be damaged. 9 a Do not drag the TV. PREPARATION Front Panel Information r Image shown may differ from fragments of glass, or the TV may fall.
POWER button MENU button CHANNEL buttons VOLUME buttons INPUT button Speaker Remote Control Sensor Power/Standby Indicator NOTE a Do not step on the glass stand or subject it to any impact.It may break, causing possible injury from your TV. The floor or the product may be damaged. 9 a Do not drag the TV. PREPARATION Front Panel Information r Image shown may differ from fragments of glass, or the TV may fall.

Owner's Manual
Page 10
... IN (PC) Analog PC Connection. Uses a D-sub 15 pin cable (VGA cable). AUDIO IN 0.32 cm (1/8 inch) headphone jack for analog PC audio input. 4 ANTENNA/CABLE IN Connect over-the-air or cable signals to DVI cable (not included). 3 AV (Audio/Video) IN Analog composite connection. Back Panel... Information r Image shown may differ from your TV. 32LD400, 42LD400 47LD500 PREPARATION 10 AC IN 9 9 11 2 3 4 / DVI IN RGB IN AV IN ANTENNA/ CABLE IN RGB (PC) AUDIO VIDEO AUDIO 5 1 ...
... IN (PC) Analog PC Connection. Uses a D-sub 15 pin cable (VGA cable). AUDIO IN 0.32 cm (1/8 inch) headphone jack for analog PC audio input. 4 ANTENNA/CABLE IN Connect over-the-air or cable signals to DVI cable (not included). 3 AV (Audio/Video) IN Analog composite connection. Back Panel... Information r Image shown may differ from your TV. 32LD400, 42LD400 47LD500 PREPARATION 10 AC IN 9 9 11 2 3 4 / DVI IN RGB IN AV IN ANTENNA/ CABLE IN RGB (PC) AUDIO VIDEO AUDIO 5 1 ...

Owner's Manual
Page 11
... devices should have bezels less than 10 mm (0.39 inches) thick. Uses a red, green, and blue cable for video & red and white for audio. 9 USB INPUT Used for use with external speakers. 8 DVI AUDIO IN Digital Connection. 10 HDMI IN 3 Digital Connection. Supports HD video and Digital audio. PREPARATION 5 OPTICAL DIGITAL...
... devices should have bezels less than 10 mm (0.39 inches) thick. Uses a red, green, and blue cable for video & red and white for audio. 9 USB INPUT Used for use with external speakers. 8 DVI AUDIO IN Digital Connection. 10 HDMI IN 3 Digital Connection. Supports HD video and Digital audio. PREPARATION 5 OPTICAL DIGITAL...

Owner's Manual
Page 17
... you have finished connecting all equipment. Y PB PR L R 1 2 2 Connect the audio output of the digital set -top box operation.) r Select the Component input source on the TV using the INPUT button on the TV. / DVI IN RGB IN RGB (PC) AUDIO 1 AV IN VIDEO AUDIO ANTENNA/ CABLE IN OPTICAL DIGITAL AUDIO OUT...
... you have finished connecting all equipment. Y PB PR L R 1 2 2 Connect the audio output of the digital set -top box operation.) r Select the Component input source on the TV using the INPUT button on the TV. / DVI IN RGB IN RGB (PC) AUDIO 1 AV IN VIDEO AUDIO ANTENNA/ CABLE IN OPTICAL DIGITAL AUDIO OUT...

Owner's Manual
Page 18
... to the owner's manual for the digital set -top box to connect 1 Connect the digital set -top box operation.) r Select the HDMI 1, HDMI 2, or HDMI 3* input source on the TV using the INPUT button on the TV. 2 No separate audio connection is necessary.
... to the owner's manual for the digital set -top box to connect 1 Connect the digital set -top box operation.) r Select the HDMI 1, HDMI 2, or HDMI 3* input source on the TV using the INPUT button on the TV. 2 No separate audio connection is necessary.

Owner's Manual
Page 19
...Y PB PR L R 1 2 2 Connect the audio output of the digital set -top box operation.) r Select the HDMI 1 or HDMI 2 input source on the TV using the INPUT button on the TV. 2. DVD Setup Component Connection 1. How to use r Turn on the digital set-top box. (Refer to the owner's manual ... or 2 jack on the TV. 2 Connect the digital set -top box to HDMI cable or adapter is necessary. r Select the Component input source on the TV using the INPUT button on the TV. How to the DVI AUDIO jack on the remote control. How to connect 1 Connect the video outputs (Y, PB...
...Y PB PR L R 1 2 2 Connect the audio output of the digital set -top box operation.) r Select the HDMI 1 or HDMI 2 input source on the TV using the INPUT button on the TV. 2. DVD Setup Component Connection 1. How to use r Turn on the digital set-top box. (Refer to the owner's manual ... or 2 jack on the TV. 2 Connect the digital set -top box to HDMI cable or adapter is necessary. r Select the Component input source on the TV using the INPUT button on the TV. How to the DVI AUDIO jack on the remote control. How to connect 1 Connect the video outputs (Y, PB...
Owner's Manual
Page 20
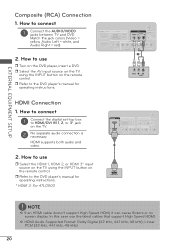
...IN 1, 2, or 3* jack on the DVD player, insert a DVD. In this case use r Select the HDMI 1, HDMI 2, or HDMI 3* input source on the TV using the INPUT button on the remote control. Match the jack colors (Video = yellow, Audio Left = white, and Audio Right = red) 2. HDMI supports both audio...AUDIO OUT COMPONENT IN 2 DVI AUDIO Y PB PR VIDEO AUDIO AUDIO OUT 1 VIDEO L R AUDIO HDMI Connection 1. r Select the AV input source on the TV using the INPUT button on the remote control. How to connect 1 Connect the digital set-top box to use r Turn on the TV. 2 No ...
...IN 1, 2, or 3* jack on the DVD player, insert a DVD. In this case use r Select the HDMI 1, HDMI 2, or HDMI 3* input source on the TV using the INPUT button on the remote control. Match the jack colors (Video = yellow, Audio Left = white, and Audio Right = red) 2. HDMI supports both audio...AUDIO OUT COMPONENT IN 2 DVI AUDIO Y PB PR VIDEO AUDIO AUDIO OUT 1 VIDEO L R AUDIO HDMI Connection 1. r Select the AV input source on the TV using the INPUT button on the remote control. How to connect 1 Connect the digital set-top box to use r Turn on the TV. 2 No ...

Owner's Manual
Page 21
r Insert a video tape into the VCR and press PLAY on the VCR. (Refer to the VCR owner's manual.) r Select the AV input source on the TV using the INPUT button on the TV. 2 Connect the antenna cable to the AUDIO L(MONO) jack of the VCR. 2. How to the VCR owner's manual). 1 ANTENNA/ CABLE...
r Insert a video tape into the VCR and press PLAY on the VCR. (Refer to the VCR owner's manual.) r Select the AV input source on the TV using the INPUT button on the TV. 2 Connect the antenna cable to the AUDIO L(MONO) jack of the VCR. 2. How to the VCR owner's manual). 1 ANTENNA/ CABLE...
Owner's Manual
Page 22
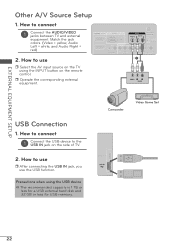
How to use r After connecting the USB IN jack, you use r Select the AV input source on the TV using the USB device a The recommended capacity is 1 TB or less for a USB external hard disk and 32 GB or less ...for USB memory. How to connect 1 Connect the USB device to use the USB function. Precautions when using the INPUT button on the side of TV. 2. How to the USB IN jack on the remote control. How to connect 1 Connect the AUDIO/VIDEO jacks between...
How to use r After connecting the USB IN jack, you use r Select the AV input source on the TV using the USB device a The recommended capacity is 1 TB or less for a USB external hard disk and 32 GB or less ...for USB memory. How to connect 1 Connect the USB device to use the USB function. Precautions when using the INPUT button on the side of TV. 2. How to the USB IN jack on the remote control. How to connect 1 Connect the AUDIO/VIDEO jacks between...

Owner's Manual
Page 23
... one end of the audio cable to the TV port of AUDIO OUT. 2 Connect the other end of the optical cable to the digital audio input on the audio equipment. 3 Set the "TV Speaker option Off" in the menu. See the external audio equipment instruction manual for operation. How to connect... 1 Connect one end of the optical cable to the TV port of OPTICAL DIGITAL AUDIO OUT. 2 Connect the other end of TV to the audio input on the audio equipment. / DVI IN RGB IN RGB (PC) AUDIO 1 AV IN VIDEO AUDIO ANTENNA/ CABLE IN OPTICAL DIGITAL AUDIO OUT 1 COMPONENT IN 2 ...
... one end of the audio cable to the TV port of AUDIO OUT. 2 Connect the other end of the optical cable to the digital audio input on the audio equipment. 3 Set the "TV Speaker option Off" in the menu. See the external audio equipment instruction manual for operation. How to connect... 1 Connect one end of the optical cable to the TV port of OPTICAL DIGITAL AUDIO OUT. 2 Connect the other end of TV to the audio input on the audio equipment. / DVI IN RGB IN RGB (PC) AUDIO 1 AV IN VIDEO AUDIO ANTENNA/ CABLE IN OPTICAL DIGITAL AUDIO OUT 1 COMPONENT IN 2 ...
Owner's Manual
Page 24
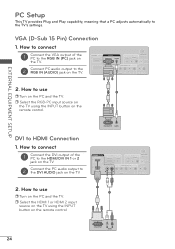
... the TV. VGA (D-Sub 15 Pin) Connection 1. r Select the HDMI 1 or HDMI 2 input source on the TV using the INPUT button on the remote control. 1 2 24 DVI OUTPUT L R AUDIO r Select the RGB-PC input source on the TV using the INPUT button on the remote control. 1 2 DVI to the TV's settings. EXTERNAL EQUIPMENT SETUP...
... the TV. VGA (D-Sub 15 Pin) Connection 1. r Select the HDMI 1 or HDMI 2 input source on the TV using the INPUT button on the remote control. 1 2 24 DVI OUTPUT L R AUDIO r Select the RGB-PC input source on the TV using the INPUT button on the remote control. 1 2 DVI to the TV's settings. EXTERNAL EQUIPMENT SETUP...

Owner's Manual
Page 26
...Remote Control Functions When using the remote control, aim it at the remote control sensor on from the images below. Rotates through inputs. Item TV POWER INPUT 1 RATIO SAP SOUND PICTURE NUMBER buttons 2 FLASHBK Description Returns to enter a program number for multiple program channels such as ... Changes the picture mode. Selects MTS sound. The remote control may differ from standby or off to the last channel viewed. 26 POWER TV INPUT 1 PICTURE SOUND SAP RATIO 123 456 2 789 - 0 FLASHBK FAV VOL CC CH 3 MUTE Q.MENU MENU RETURN ENTER 4 WATCHING TV...
...Remote Control Functions When using the remote control, aim it at the remote control sensor on from the images below. Rotates through inputs. Item TV POWER INPUT 1 RATIO SAP SOUND PICTURE NUMBER buttons 2 FLASHBK Description Returns to enter a program number for multiple program channels such as ... Changes the picture mode. Selects MTS sound. The remote control may differ from standby or off to the last channel viewed. 26 POWER TV INPUT 1 PICTURE SOUND SAP RATIO 123 456 2 789 - 0 FLASHBK FAV VOL CC CH 3 MUTE Q.MENU MENU RETURN ENTER 4 WATCHING TV...

Owner's Manual
Page 28
a In standby mode to switch the sound off, press the MUTE button. 3 You can cancel the Mute function by using the INPUT button on the remote control. 3 When finished using the TV, press press the POWER button on the remote control. Volume Adjustment 1 Press the VOLUME button ...
a In standby mode to switch the sound off, press the MUTE button. 3 You can cancel the Mute function by using the INPUT button on the remote control. 3 When finished using the TV, press press the POWER button on the remote control. Volume Adjustment 1 Press the VOLUME button ...

Owner's Manual
Page 31
... Enter Balance 0L R Sound Mode : Standard Treble 50 Bass 50 Reset TV Speaker : On Digital Audio Out : PCM Analog Audio Out : Variable OPTION OPTION Language Input Label Key Lock Caption Initial Setting Move Enter English : Off : Off TIME TIME Clock Off Time On Time Sleep Timer Auto Sleep Move Enter Off... : Off : Off : On LOCK Move Enter LOCK Lock System : Off Set Password Block Channel Movie Rating TV Rating-Children TV Rating-General Downloadable Rating Input Block 31
... Enter Balance 0L R Sound Mode : Standard Treble 50 Bass 50 Reset TV Speaker : On Digital Audio Out : PCM Analog Audio Out : Variable OPTION OPTION Language Input Label Key Lock Caption Initial Setting Move Enter English : Off : Off TIME TIME Clock Off Time On Time Sleep Timer Auto Sleep Move Enter Off... : Off : Off : On LOCK Move Enter LOCK Lock System : Off Set Password Block Channel Movie Rating TV Rating-Children TV Rating-General Downloadable Rating Input Block 31
Owner's Manual
Page 32
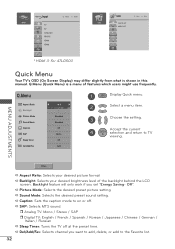
INPUT Input TV AV Component RPG-PC HDMI1 HDMI2 Move Enter USB Move Enter USB PHOTO LIST MUSIC LIST * HDMI 3: For 47LD500 Quick Menu Your TV's OSD (...
INPUT Input TV AV Component RPG-PC HDMI1 HDMI2 Move Enter USB Move Enter USB PHOTO LIST MUSIC LIST * HDMI 3: For 47LD500 Quick Menu Your TV's OSD (...

Owner's Manual
Page 33
... being received. Yes No 3 Set the setting. r Auto Tuning memorizes only the channels available at the time. a Manual Tuning r When selecting DTV or Cable DTV input signal in Manual Tuning, you will be unable to select it using CHANNEL button during TV viewing. If you change your television to see the... Auto Tuning Manual Tuning Channel Edit Move Enter Press 'Yes' button to TV viewing. a Auto Tuning r Automatically finds all channels available through antenna or cable inputs, and stores them in the Channel Edit menu. 33
... being received. Yes No 3 Set the setting. r Auto Tuning memorizes only the channels available at the time. a Manual Tuning r When selecting DTV or Cable DTV input signal in Manual Tuning, you will be unable to select it using CHANNEL button during TV viewing. If you change your television to see the... Auto Tuning Manual Tuning Channel Edit Move Enter Press 'Yes' button to TV viewing. a Auto Tuning r Automatically finds all channels available through antenna or cable inputs, and stores them in the Channel Edit menu. 33
Owner's Manual
Page 34
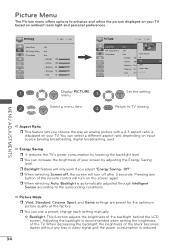
... adjusting the Energy Saving level. You can increase the brightness of the backlight behind the LCD screen. Off". r When selecting Auto, Backlight is displayed on input source (analog broadcasting, digital broadcasting, aux). Adjusting the backlight is reduced. 34 PICTURE Move Enter Aspect Ratio Energy Saving Picture Mode : 16:9 : Auto : Vivid Backlight...
... adjusting the Energy Saving level. You can increase the brightness of the backlight behind the LCD screen. Off". r When selecting Auto, Backlight is displayed on input source (analog broadcasting, digital broadcasting, aux). Adjusting the backlight is reduced. 34 PICTURE Move Enter Aspect Ratio Energy Saving Picture Mode : 16:9 : Auto : Vivid Backlight...

Owner's Manual
Page 37
... with the initial password "0-0-0-0". 37 ENTER 4 RETURN Return to "On", the TV will automatically turn off at the preset time. a AV: Input source from a computer. a Component: Input source from high definition (HD) devices. * HDMI 3: For 47LD500 a Key Lock r Sets the key lock on -screen menus and audio ...languages. ENTER 2 Select a menu item. a HDMI1/HDMI2/HDMI3*: Input source from DVD or a Digital set the TV operating environment. a Sleep Timer r Turns the TV off in case of no signal for each...
... with the initial password "0-0-0-0". 37 ENTER 4 RETURN Return to "On", the TV will automatically turn off at the preset time. a AV: Input source from a computer. a Component: Input source from high definition (HD) devices. * HDMI 3: For 47LD500 a Key Lock r Sets the key lock on -screen menus and audio ...languages. ENTER 2 Select a menu item. a HDMI1/HDMI2/HDMI3*: Input source from DVD or a Digital set the TV operating environment. a Sleep Timer r Turns the TV off in case of no signal for each...

Owner's Manual
Page 38
...a Text (Text1-4): The term for the words that scroll across the bottom of the program provided for digital broadcasting system captions (digital input source from DTV/Cable DTV). Parental Control / Ratings The Lock menu offers options to set when you turned the power off. ENTER ... Enter Lock System : Off Off Set Password On Block Channel Movie Rating TV Rating-Children TV Rating-General Downloadable Rating Input Block 1 MENU Display LOCK ENTER menu. 2 1 2 3 Input the password. 456 789 0 3 Select a menu item. ENTER 5 RETURN Return to memorize the caption/text mode ...
...a Text (Text1-4): The term for the words that scroll across the bottom of the program provided for digital broadcasting system captions (digital input source from DTV/Cable DTV). Parental Control / Ratings The Lock menu offers options to set when you turned the power off. ENTER ... Enter Lock System : Off Off Set Password On Block Channel Movie Rating TV Rating-Children TV Rating-General Downloadable Rating Input Block 1 MENU Display LOCK ENTER menu. 2 1 2 3 Input the password. 456 789 0 3 Select a menu item. ENTER 5 RETURN Return to memorize the caption/text mode ...

