
Owners Manual
Page 2
... Englewood Cliffs, NJ 07632 Phone: 1-201-816-2000 http://www.lgusa.com 2 This equipment generates, uses and can be determined by turning the equipment off and on a circuit different from that the cable ground shall be of sufficient magnitude to modify this product. CAUTION: Do...limits are designed to which can radiate radio frequency energy and, if not installed and used in any way without written authorization from LG Electronics Corporation. Increase the separation between the equipment and receiver. - REFER TO QUALIFIED SERVICE PERSONNEL. Connect the equipment into an outlet...
... Englewood Cliffs, NJ 07632 Phone: 1-201-816-2000 http://www.lgusa.com 2 This equipment generates, uses and can be determined by turning the equipment off and on a circuit different from that the cable ground shall be of sufficient magnitude to modify this product. CAUTION: Do...limits are designed to which can radiate radio frequency energy and, if not installed and used in any way without written authorization from LG Electronics Corporation. Increase the separation between the equipment and receiver. - REFER TO QUALIFIED SERVICE PERSONNEL. Connect the equipment into an outlet...
Owners Manual
Page 5
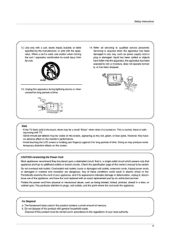
... by the manufacturer, or sold with TV. - Check the specification page of your appliance, and if its appearance indicates damage or deterioration, unplug it is turned on the monitor's performance. - Some minute dot defects may produce some temporary distortion effects on the screen, appearing as power supply cord or plug is...
... by the manufacturer, or sold with TV. - Check the specification page of your appliance, and if its appearance indicates damage or deterioration, unplug it is turned on the monitor's performance. - Some minute dot defects may produce some temporary distortion effects on the screen, appearing as power supply cord or plug is...
Owners Manual
Page 6
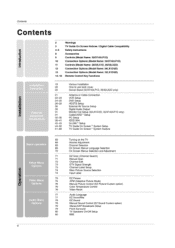
... 72 Options 73 73 74 74 75 Video Menu 75 Options 76 76 76 77 77 Audio Menu 78 Options 78 79 79 80 80 Turning on the TV Volume Adjustment Channel Selection On Screen Menus Language Selection On Screen Menus Selection and Adjustment EZ Scan (Channel Search) Manual Scan Channel...
... 72 Options 73 73 74 74 75 Video Menu 75 Options 76 76 76 77 77 Audio Menu 78 Options 78 79 79 80 80 Turning on the TV Volume Adjustment Channel Selection On Screen Menus Language Selection On Screen Menus Selection and Adjustment EZ Scan (Channel Search) Manual Scan Channel...
Owners Manual
Page 14
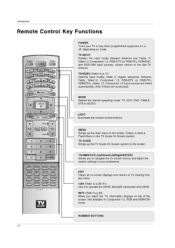
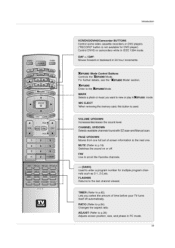
.... MENU Brings up the TV Guide On Screen system to the screen. CABLE VCR STB • AX MENU XSTUOIO PAy, Go or ENTER 0 • POWER Turns your preference. PIP CH+ PIP INPUT 0000 TIMER RATIO ADJUST SWAP 00 00 SAP ES F1C AF'M EZ SOUND 00 00 CC FREEZE AUTO DEMO...
.... MENU Brings up the TV Guide On Screen system to the screen. CABLE VCR STB • AX MENU XSTUOIO PAy, Go or ENTER 0 • POWER Turns your preference. PIP CH+ PIP INPUT 0000 TIMER RATIO ADJUST SWAP 00 00 SAP ES F1C AF'M EZ SOUND 00 00 CC FREEZE AUTO DEMO...
Owners Manual
Page 15
... last channel viewed. Control DVHS or camcorders while in 24 hour increments. ADJUST (Refer to the next one full set of time before your TV turns itself off .
... last channel viewed. Control DVHS or camcorders while in 24 hour increments. ADJUST (Refer to the next one full set of time before your TV turns itself off .
Owners Manual
Page 18
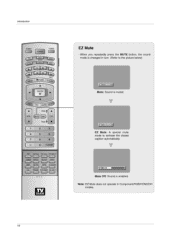
.../DVI modes. 18 EZ Mute EZ Mute: A special mute mode to the picture below) Mute: Sound is enabled. Note: EZ Mute does not operate in turn. (Refer to activate the closed caption automatically.
.../DVI modes. 18 EZ Mute EZ Mute: A special mute mode to the picture below) Mute: Sound is enabled. Note: EZ Mute does not operate in turn. (Refer to activate the closed caption automatically.

Owners Manual
Page 21
... Dwellings/Apartments (Connect to wall antenna socket) Wall Antenna Socket RF Coaxial Wire (75 ohm) ANTENNA NAN Installation VHF Antenna UHF Antenna Turn clockwise to bend the bronze wire when connecting the antenna. For optimum picture quality, adjust antenna direction if needed. External Equipment Connections NOTE... Analog and Digital TV signals provided on cable and antenna Cable TV Wall Jack Co Bronze Wire RF Coaxial Wire (75 ohm) Antenna Turn clockwise to tighten. Analog and Digital TV signals provided on cable Cable TV Wall Jack I signal amplifier • In a poor signal...
... Dwellings/Apartments (Connect to wall antenna socket) Wall Antenna Socket RF Coaxial Wire (75 ohm) ANTENNA NAN Installation VHF Antenna UHF Antenna Turn clockwise to bend the bronze wire when connecting the antenna. For optimum picture quality, adjust antenna direction if needed. External Equipment Connections NOTE... Analog and Digital TV signals provided on cable and antenna Cable TV Wall Jack Co Bronze Wire RF Coaxial Wire (75 ohm) Antenna Turn clockwise to tighten. Analog and Digital TV signals provided on cable Cable TV Wall Jack I signal amplifier • In a poor signal...
Owners Manual
Page 24
PO APADO, • 011%10 DVD • Turn on the remote control. - o Select Videol input source with using the TVNIDEO button on the DVD player, insert a DVD. Leb4Chlill 26 inch TV Back • ...
PO APADO, • 011%10 DVD • Turn on the remote control. - o Select Videol input source with using the TVNIDEO button on the DVD player, insert a DVD. Leb4Chlill 26 inch TV Back • ...
Owners Manual
Page 25
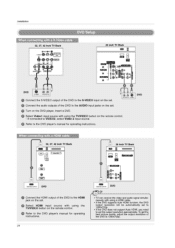
... "VW' V DVD O Connect the video outputs (Y, Ps, PR) of the DVD to the component input ports as shown below. ul it r ® 0 r:'M 41 I AVJI Cu. O Turn on the DVD player, insert a DVD. If connected to COMPONENT2 input, select Component 2 input source. • Refer to the DVD player's manual for Component 2 input...
... "VW' V DVD O Connect the video outputs (Y, Ps, PR) of the DVD to the component input ports as shown below. ul it r ® 0 r:'M 41 I AVJI Cu. O Turn on the DVD player, insert a DVD. If connected to COMPONENT2 input, select Component 2 input source. • Refer to the DVD player's manual for Component 2 input...

Owners Manual
Page 26
O Turn on the digital set-top box. (Refer to the PC AUDIO INPUT jack on the remote control. 26 Installation ID naLl a ,! - However, if you do ...
O Turn on the digital set-top box. (Refer to the PC AUDIO INPUT jack on the remote control. 26 Installation ID naLl a ,! - However, if you do ...
Owners Manual
Page 27
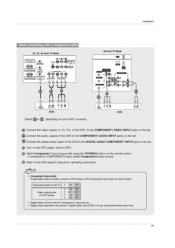
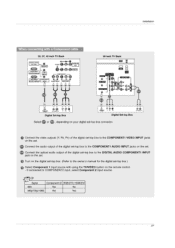
.../1080i Yes Yes 27 Connect the audio output of the digital set-top box to the DIGITAL AUDIO COMPONENT1 INPUT jack on the set. • Turn on the digital set-top box. (Refer to the COMPONENT1 VIDEO INPUT jacks on the set. T.. .. Si 26 inch TV Back tem Li 0 ILL CI...
.../1080i Yes Yes 27 Connect the audio output of the digital set-top box to the DIGITAL AUDIO COMPONENT1 INPUT jack on the set. • Turn on the digital set-top box. (Refer to the COMPONENT1 VIDEO INPUT jacks on the set. T.. .. Si 26 inch TV Back tem Li 0 ILL CI...
Owners Manual
Page 28
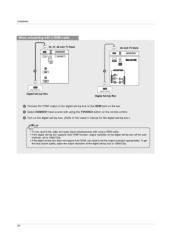
... Set-top Box UPIO•OTY OVTINT Digital Set-lop Box • Connect the HDMI output of the digital set-top box to 1280x720p. 28 O Turn on the remote control. matically set to 1280x720p. • If the digital set-top box does not support Auto HDMI, you need to set the...
... Set-top Box UPIO•OTY OVTINT Digital Set-lop Box • Connect the HDMI output of the digital set-top box to 1280x720p. 28 O Turn on the remote control. matically set to 1280x720p. • If the digital set-top box does not support Auto HDMI, you need to set the...
Owners Manual
Page 29
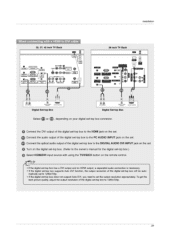
... box supports Auto DVI function, the output resolution of the digital set-top box to the DIGITAL AUDIO DVI INPUT jack on the set. • Turn on the digital set-top box. (Refer to the PC AUDIO INPUT jack on the set -top box will be auto- matically set to 1280x720p...
... box supports Auto DVI function, the output resolution of the digital set-top box to the DIGITAL AUDIO DVI INPUT jack on the set. • Turn on the digital set-top box. (Refer to the PC AUDIO INPUT jack on the set -top box will be auto- matically set to 1280x720p...
Owners Manual
Page 30
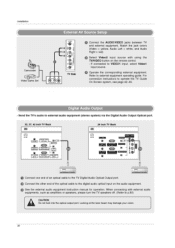
O Select Video2 input source with external audio equipments, such as amplifiers or speakers, please turn the TV speakers off. (Refer to operate the TV Guide On Screen system, see page 42-43. Digital Audio Output - ROD INPUT CO PONENT1 IPC/...
O Select Video2 input source with external audio equipments, such as amplifiers or speakers, please turn the TV speakers off. (Refer to operate the TV Guide On Screen system, see page 42-43. Digital Audio Output - ROD INPUT CO PONENT1 IPC/...
Owners Manual
Page 31
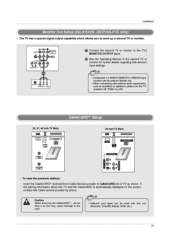
... • Connect the second TV or monitor to the TV's MONITOR OUTPUT jacks. • See the Operating Manual of TV as amplifiers or speakers, please turn the TV speakers off. (Refer to hook up a second TV or monitor. A Caution: When removing the CableCARD"•', do not drop it as this may...
... • Connect the second TV or monitor to the TV's MONITOR OUTPUT jacks. • See the Operating Manual of TV as amplifiers or speakers, please turn the TV speakers off. (Refer to hook up a second TV or monitor. A Caution: When removing the CableCARD"•', do not drop it as this may...
Owners Manual
Page 32
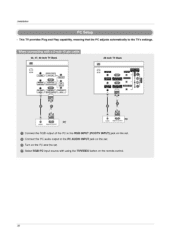
... INPvT1 INPUT 1S) AC IN MEM a c1710 r Luc, COM N0I a NP.fr O Fh1N7 VI O r co NPVT 1001113 1, 1 1 JI OP AUDIO ROB-PC OUTPUT PC iF.t.4. O Turn on the set. When connecting with using the TVNIDEO button on the set . AUDIO club? O Connect the PC audio output to the PC AUDIO INPUT...
... INPvT1 INPUT 1S) AC IN MEM a c1710 r Luc, COM N0I a NP.fr O Fh1N7 VI O r co NPVT 1001113 1, 1 1 JI OP AUDIO ROB-PC OUTPUT PC iF.t.4. O Turn on the set. When connecting with using the TVNIDEO button on the set . AUDIO club? O Connect the PC audio output to the PC AUDIO INPUT...
Owners Manual
Page 33
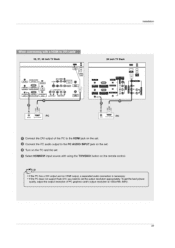
Installation When connecting with a HDMI to DVI cable 32, 37, 42 inch TV Back : WSW [ I D 26 inch TV Back 3941 0 04.INK DIGITAL AUDIO {0, TICAL) Es iOV1Ptril 9.000.10 • • 410.
Installation When connecting with a HDMI to DVI cable 32, 37, 42 inch TV Back : WSW [ I D 26 inch TV Back 3941 0 04.INK DIGITAL AUDIO {0, TICAL) Es iOV1Ptril 9.000.10 • • 410.
Owners Manual
Page 44
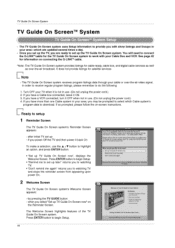
Note - Turn OFF your IV Gude On Screen eastern now prep the GU ley on the Reminder Screen. Press ENTER button to setup 1 Reminder Screen The TV ... wrotela typo drop 44 Once you have a Cable box connected, leave it is not in your Cable Box and VCR. If you have a VCR connected, turn it back On To make a selection, use . (Do not unplug the power cord.) 4. if you have more than one Cable system in use. (Do not...
Note - Turn OFF your IV Gude On Screen eastern now prep the GU ley on the Reminder Screen. Press ENTER button to setup 1 Reminder Screen The TV ... wrotela typo drop 44 Once you have a Cable box connected, leave it is not in your Cable Box and VCR. If you have a VCR connected, turn it back On To make a selection, use . (Do not unplug the power cord.) 4. if you have more than one Cable system in use. (Do not...
Owners Manual
Page 49
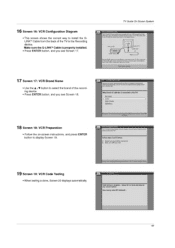
... lho lab al 004V TV Thin Os ere .0 1, e C. A hese tune_ro VC1 to thannei 02 Neht. TV Guide On Screen System Gt.3t Saoc, xem cr-r ./turn eit, pt., twuke G, J* u 1441.1v 1••• .nett Vapor, blew 1V Anl VCR *ay roi. •411,TVCadele On Scar. zit • • TV...
... lho lab al 004V TV Thin Os ere .0 1, e C. A hese tune_ro VC1 to thannei 02 Neht. TV Guide On Screen System Gt.3t Saoc, xem cr-r ./turn eit, pt., twuke G, J* u 1441.1v 1••• .nett Vapor, blew 1V Anl VCR *ay roi. •411,TVCadele On Scar. zit • • TV...

Owners Manual
Page 50
... Whew. 21 Screen 21: Confirming Your Settings • Verify the Setup information is correct. • If it is, select Yes, end setup, and you / TV .1 turned of TV GAY GIStow %MotIMO ZIode• *IOWSogut %Aube' CalleNunImputithrseoo• CAMIlowledetcoleeet tea - fired tat to ore tworniii te ewe, GI no. period ohm you...
... Whew. 21 Screen 21: Confirming Your Settings • Verify the Setup information is correct. • If it is, select Yes, end setup, and you / TV .1 turned of TV GAY GIStow %MotIMO ZIode• *IOWSogut %Aube' CalleNunImputithrseoo• CAMIlowledetcoleeet tea - fired tat to ore tworniii te ewe, GI no. period ohm you...

