

Owners Manual
Page 1
... the U.S Environmental Protection Agency(EPA), As an ENI:;RGY STAR Partaker LGE U. P/NO : 38289U0527M (0611-REV02) Printed in Korea Please read this manual _refully before operating your set , See the label attached on the back cover and quote this information to your dealer when you require service. A.,Inc.... _ de_ermined _hat _his Noduct meets _he ENERGY S_I)_\R guidelines [br energy efficiency. ____f_ MODEL: 26LC2D OWNER'S MANUAL Internet Home Page : h_p://www.lge.com ENERGYSTAR is a set of the set , Retain it for futu_ reference.
... the U.S Environmental Protection Agency(EPA), As an ENI:;RGY STAR Partaker LGE U. P/NO : 38289U0527M (0611-REV02) Printed in Korea Please read this manual _refully before operating your set , See the label attached on the back cover and quote this information to your dealer when you require service. A.,Inc.... _ de_ermined _hat _his Noduct meets _he ENERGY S_I)_\R guidelines [br energy efficiency. ____f_ MODEL: 26LC2D OWNER'S MANUAL Internet Home Page : h_p://www.lge.com ENERGYSTAR is a set of the set , Retain it for futu_ reference.
Owners Manual
Page 5
... 40 40 Turning on the TV 'volume Adjustment Channel Selection On Screen Menus Language Selection On Screen Menus Selection and Adjustment EZ Scan (Channel Search) Manual Scan Channei Edit DTV Signal Strength Input Source Input Label Auto Picture Control(EZ Picture) Color Temperature Control XD Advanced-Cinema 3:2 Mode Black Level Video...
... 40 40 Turning on the TV 'volume Adjustment Channel Selection On Screen Menus Language Selection On Screen Menus Selection and Adjustment EZ Scan (Channel Search) Manual Scan Channei Edit DTV Signal Strength Input Source Input Label Auto Picture Control(EZ Picture) Color Temperature Control XD Advanced-Cinema 3:2 Mode Black Level Video...
Owners Manual
Page 6
Contents 41 41 42 42 43 44 45 46 47~48 Manual Clock Setup Auto Clock Setup On!Off Timer Setup Sleep Timer Auto Off Aspect Ratio Control Caption!Text Caption Option Parental Lock Setup 49~53 54~55 56 57~58 59~60 6i 62 External Control Device Setup IR Codes Programming the Remote Programming Codes Troubleshooting Checklist Maintenance Product Specifications 6
Contents 41 41 42 42 43 44 45 46 47~48 Manual Clock Setup Auto Clock Setup On!Off Timer Setup Sleep Timer Auto Off Aspect Ratio Control Caption!Text Caption Option Parental Lock Setup 49~53 54~55 56 57~58 59~60 6i 62 External Control Device Setup IR Codes Programming the Remote Programming Codes Troubleshooting Checklist Maintenance Product Specifications 6
Owners Manual
Page 7
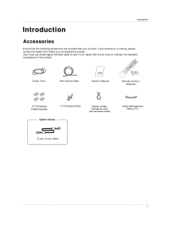
int n Introduction Ensure that the following a_essories are included with ferrite cores to maintain the standard compliance for the 3roduct. User must use shield signat interface cable (D*sub 15 pin cable) with your product, if any accessory is missing, please contact the dealer from where you purchased the product. Power Cord 75_ Round Cable Owners Manual Remote Control / Batteries 2oTV brackets 2-Wall brackets 2-TV Bracket BoiLs Option Extras Twister Holder Arrange the wires with the twister holden Cable Management (Refer p.14) D-sub 15 pin Cabte 7
int n Introduction Ensure that the following a_essories are included with ferrite cores to maintain the standard compliance for the 3roduct. User must use shield signat interface cable (D*sub 15 pin cable) with your product, if any accessory is missing, please contact the dealer from where you purchased the product. Power Cord 75_ Round Cable Owners Manual Remote Control / Batteries 2oTV brackets 2-Wall brackets 2-TV Bracket BoiLs Option Extras Twister Holder Arrange the wires with the twister holden Cable Management (Refer p.14) D-sub 15 pin Cabte 7
Owners Manual
Page 16
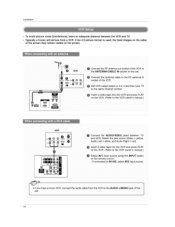
... AUDIO/VIDEO lacks between the VCR and TV. - select AV2 input source, 16 Match the jack colet_ (Video = yellow. o If connected to the VCR owner's manuaL; If the 4:3 picture format is used; Typically a frozen still picture from a VCR. the fixed images on the sides of the screen may remain visible on...
... AUDIO/VIDEO lacks between the VCR and TV. - select AV2 input source, 16 Match the jack colet_ (Video = yellow. o If connected to the VCR owner's manuaL; If the 4:3 picture format is used; Typically a frozen still picture from a VCR. the fixed images on the sides of the screen may remain visible on...
Owners Manual
Page 17
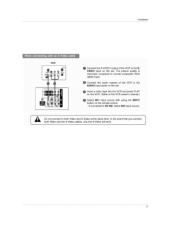
... to the AUDIO input jacks on the set, _nsert a video tape into the VCR and press PLAY on the VCR, {'Refer to the VCR owner's manual ) Select AV1 nDut source with using the iNPUT button on the set. The picture quality is improved; Do not connect to both Video and S-Video...
... to the AUDIO input jacks on the set, _nsert a video tape into the VCR and press PLAY on the VCR, {'Refer to the VCR owner's manual ) Select AV1 nDut source with using the iNPUT button on the set. The picture quality is improved; Do not connect to both Video and S-Video...
Owners Manual
Page 19
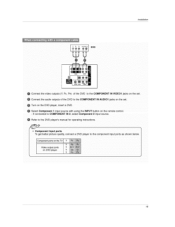
... better picture quality, connect a DVD p}ayer to the component input peas as shown below, vi oooutput on the set . If connected to the DVD player's manual for operating instructions. - Refer to COMPONENT IN 2. select Component 2 input source. lnsL_flation DVO [] O Connect the video outputs (Y, P_, P£) of the DVD to the COMPONENT...
... better picture quality, connect a DVD p}ayer to the component input peas as shown below, vi oooutput on the set . If connected to the DVD player's manual for operating instructions. - Refer to COMPONENT IN 2. select Component 2 input source. lnsL_flation DVO [] O Connect the video outputs (Y, P_, P£) of the DVD to the COMPONENT...
Owners Manual
Page 20
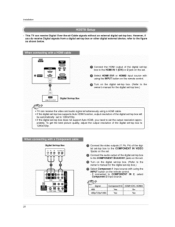
... digitalexternal device, referto the figure as shown below, Connect the HDMI output of the digi_ to the COMPONENT IN AUDIO1 jacks on the set owner!s manual for the digital set4op boX.) Digital Set-top Box • TV can receive Digital Over-the-air/Cable signals without an external digital set4op box... 2 jack on the set, ®_ Select HDMI1iDVI or HDMI2 input source with using the INPUT button on the digital set4op box. (Refer to the owner's manual for the digita!
... digitalexternal device, referto the figure as shown below, Connect the HDMI output of the digi_ to the COMPONENT IN AUDIO1 jacks on the set owner!s manual for the digital set4op boX.) Digital Set-top Box • TV can receive Digital Over-the-air/Cable signals without an external digital set4op box... 2 jack on the set, ®_ Select HDMI1iDVI or HDMI2 input source with using the INPUT button on the digital set4op box. (Refer to the owner's manual for the digita!
Owners Manual
Page 21
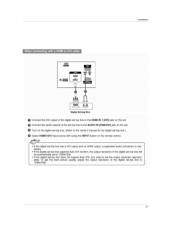
... the set-top box to the AUDIO IN (RGB!DVI) jack on the set Turn on the digital set-top box_ _Refer to the owner's manual for the digital set the output resolution a4oproprt = ateLy. i if the digital set=top box supports Auto DV_ function, the output resolution of the digital...
... the set-top box to the AUDIO IN (RGB!DVI) jack on the set Turn on the digital set-top box_ _Refer to the owner's manual for the digital set the output resolution a4oproprt = ateLy. i if the digital set=top box supports Auto DV_ function, the output resolution of the digital...

Owners Manual
Page 23
Connect the other end of an optical cable to external; When connecting with external audio equipments, such as amplifiers or speakers, please turn the TV speakers off. (Refer to the digital audio optical input on the audio equipment. audio equipment (stereo system) via the Digital Audio Output Optical port, 0 Connect one end of the optical cable to p.40) 23 See the external audio equipment instruction manual for operation. Send the TV's audio to the TV Digital Audio Optical Output port. lnsL_flation -
Connect the other end of an optical cable to external; When connecting with external audio equipments, such as amplifiers or speakers, please turn the TV speakers off. (Refer to the digital audio optical input on the audio equipment. audio equipment (stereo system) via the Digital Audio Output Optical port, 0 Connect one end of the optical cable to p.40) 23 See the external audio equipment instruction manual for operation. Send the TV's audio to the TV Digital Audio Optical Output port. lnsL_flation -

Owners Manual
Page 25
.../DVl Source Devices or contact your TV. There may not fit to Screen.Press the ADJUST button to Screen. tf not, refer to the Manual of TV SET and contact an PC graphics card service center. 3 When Source Devices connected with the resofution, vertical pattern, contrast or brightness ...in PC, HDMtiDVl mode. Check the image on the screen, 7. The synchronization input form for a long period of time. Refer to the Manual of the PC graphic card. 6 Avoid keeping a fixed image on the graphics card, DOS mode may become permanently imprinted on your sewice center. 5. The...
.../DVl Source Devices or contact your TV. There may not fit to Screen.Press the ADJUST button to Screen. tf not, refer to the Manual of TV SET and contact an PC graphics card service center. 3 When Source Devices connected with the resofution, vertical pattern, contrast or brightness ...in PC, HDMtiDVl mode. Check the image on the screen, 7. The synchronization input form for a long period of time. Refer to the Manual of the PC graphic card. 6 Avoid keeping a fixed image on the graphics card, DOS mode may become permanently imprinted on your sewice center. 5. The...
Owners Manual
Page 29
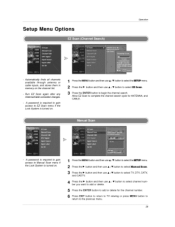
... through antenna or cable inputs; Ailow EZ Scan to complete the channel search cycle for ANTENNA, and CABLE A password is required to gain access to Manual Scan menu if the Lock System is turned on the channel list.
... through antenna or cable inputs; Ailow EZ Scan to complete the channel search cycle for ANTENNA, and CABLE A password is required to gain access to Manual Scan menu if the Lock System is turned on the channel list.
Owners Manual
Page 34
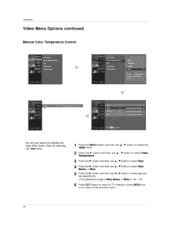
Operation Video Menu Options continued Manual Color Temperature Control V T - ton to return to TV viewing or press MENU but- You can al_ adjust the detailed set tings (Red, Green, Blue) by ...
Operation Video Menu Options continued Manual Color Temperature Control V T - ton to return to TV viewing or press MENU but- You can al_ adjust the detailed set tings (Red, Green, Blue) by ...

Owners Manual
Page 35
...originaJ picture. 2. o When selecting EZ Picture options (User 1 and User 2), you can choose the Auto / Manual and when selecting Manual, you can adjust the XD Contrast, XD color and XD Noise. 1 Press the MENU button and then use A... to setect XD, 3 Press the I_ button and then use A / V button to select Auto or M_u_ * Selecting the Manual 4o Press the _ button and then use _1 t !_ button to the natural colors. Operafio_ - Contrast : Optimizing the contrast ... selecting EZ Picture options (Daylight, Normal and Night time), XD is LG Electronic's unique picture improving technology to Auto.
...originaJ picture. 2. o When selecting EZ Picture options (User 1 and User 2), you can choose the Auto / Manual and when selecting Manual, you can adjust the XD Contrast, XD color and XD Noise. 1 Press the MENU button and then use A... to setect XD, 3 Press the I_ button and then use A / V button to select Auto or M_u_ * Selecting the Manual 4o Press the _ button and then use _1 t !_ button to the natural colors. Operafio_ - Contrast : Optimizing the contrast ... selecting EZ Picture options (Daylight, Normal and Night time), XD is LG Electronic's unique picture improving technology to Auto.

Owners Manual
Page 41
..., or time option,. The factory default value of the Auto Clock is OH, because a clock information sent each broadcasting station is wrong, reset the clock manually, 1 Press the MENU button and then use A t T button to select the _ menu, 2 Press the I_ button and then use ,I V button to ... the I_ button and then use the A l T button to set automaticalty from a digital channel signal provided by the auto clock function. Set the clock manually, ff the current time is set incon'ectly by the broadcasting station. - Once selected, use A /V button to select Auto, Off On, depending on...
..., or time option,. The factory default value of the Auto Clock is OH, because a clock information sent each broadcasting station is wrong, reset the clock manually, 1 Press the MENU button and then use A t T button to select the _ menu, 2 Press the I_ button and then use ,I V button to ... the I_ button and then use the A l T button to set automaticalty from a digital channel signal provided by the auto clock function. Set the clock manually, ff the current time is set incon'ectly by the broadcasting station. - Once selected, use A /V button to select Auto, Off On, depending on...


