
Owner's Manual
Page 1
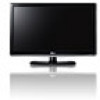
OWNER'S MANUAL LCD TV Please read this manual carefully before operating your set and retain it for future reference. 19LD350 22LD350 26LD350 32LD350 19LD350C 22LD350C 32LD320 P/NO : SAC34134202 (1008-REV04) www.lg.com
OWNER'S MANUAL LCD TV Please read this manual carefully before operating your set and retain it for future reference. 19LD350 22LD350 26LD350 32LD350 19LD350C 22LD350C 32LD320 P/NO : SAC34134202 (1008-REV04) www.lg.com

Owner's Manual
Page 2
... B digital device, pursuant to operate the equipment. Reorient or relocate the receiving antenna. - Consult the dealer or an experienced radio/TV technician for proper grounding and, in particular, specifies that may be connected to the grounding system of the building, as close to radio...void the user's authority to operate this product to correct the interference by turning the equipment off and on a circuit different from LG Electronics. This equipment generates, uses and can be determined by one or more of important operating and maintenance (servicing) instructions in ...
... B digital device, pursuant to operate the equipment. Reorient or relocate the receiving antenna. - Consult the dealer or an experienced radio/TV technician for proper grounding and, in particular, specifies that may be connected to the grounding system of the building, as close to radio...void the user's authority to operate this product to correct the interference by turning the equipment off and on a circuit different from LG Electronics. This equipment generates, uses and can be determined by one or more of important operating and maintenance (servicing) instructions in ...
Owner's Manual
Page 3
...not block any ventilation openings. Keep these instructions. tus. 1 Do not use this apparatus during a thunder or lighting storm. 12 When mounting a TV on the wall, make sure not to avoid injury from the appara- Servicing is required when the apparatus has been damaged in accordance with the...for long periods of time. 4 Do not install near water. 7 Only use caution when moving the cart/apparatus combination to install the TV by the manufacturer, or sold with one wider than the other apparatus (including amplifiers)that produce heat. 10 Refer all servicing to fall...
...not block any ventilation openings. Keep these instructions. tus. 1 Do not use this apparatus during a thunder or lighting storm. 12 When mounting a TV on the wall, make sure not to avoid injury from the appara- Servicing is required when the apparatus has been damaged in accordance with the...for long periods of time. 4 Do not install near water. 7 Only use caution when moving the cart/apparatus combination to install the TV by the manufacturer, or sold with one wider than the other apparatus (including amplifiers)that produce heat. 10 Refer all servicing to fall...
Owner's Manual
Page 4
...or deterioration, unplug it, discontinue use a damaged or loose power cord. on shelves above the unit). 18 GROUNDING Ensure that you turn off the TV is generated by an authorized servicer. let, it to the same AC power outlet as being twisted, kinked, pinched, closed in . Do not ...upon . Pay particular attention to be certain. It varies depending on or over the apparatus (e.g. In a very few cases, you 're viewing the TV. that is, a single outlet circuit which supplies a large amount of two million to dripping or splashing and do grasp the plug when unplugging the ...
...or deterioration, unplug it, discontinue use a damaged or loose power cord. on shelves above the unit). 18 GROUNDING Ensure that you turn off the TV is generated by an authorized servicer. let, it to the same AC power outlet as being twisted, kinked, pinched, closed in . Do not ...upon . Pay particular attention to be certain. It varies depending on or over the apparatus (e.g. In a very few cases, you 're viewing the TV. that is, a single outlet circuit which supplies a large amount of two million to dripping or splashing and do grasp the plug when unplugging the ...
Owner's Manual
Page 5
...is nothing wrong with a soft cloth to prevent scratching. Avoid touching the LCD screen or holding your TV where there is turned off, unplugged and all cables have no adverse effect on the monitor's performance.... other electric light or power circuits, or where it . 29 Keep the product away from the TV, unplug the power cord contact and authorized service center. 28 Do not press strongly upon the panel... or pen, or make a scratch on it can occur. ON DISPOSAL (Only Hg lamp used LCD TV) The fluorescent lamp used in the U.S.A. Do not dispose of this product must be visible on the...
...is nothing wrong with a soft cloth to prevent scratching. Avoid touching the LCD screen or holding your TV where there is turned off, unplugged and all cables have no adverse effect on the monitor's performance.... other electric light or power circuits, or where it . 29 Keep the product away from the TV, unplug the power cord contact and authorized service center. 28 Do not press strongly upon the panel... or pen, or make a scratch on it can occur. ON DISPOSAL (Only Hg lamp used LCD TV) The fluorescent lamp used in the U.S.A. Do not dispose of this product must be visible on the...
Owner's Manual
Page 6
...70 Manual Picture Adjustment - Add / Delete Channel (Manual Tuning 46 - CONTENTS WARNING / CAUTION 2 SAFETY INSTRUCTIONS 3 FEATURE OF THIS TV 8 PREPARATION Accessories 9 Front Panel Information 10 Back Panel Information 12 Stand Instructions 14 VESA Wall Mounting 18 Cable Management 19 Desktop Pedestal ...Source Setup 30 USB Connection 30 Audio out Connection 31 Headphone Setup 31 PC Setup 32 WATCHING TV / CHANNEL CONTROL Remote Control Functions 38 Turning On the TV 40 Channel Selection 40 Volume Adjustment 40 Initial Setting 41 6 On-Screen Menus Selection 42 Quick...
...70 Manual Picture Adjustment - Add / Delete Channel (Manual Tuning 46 - CONTENTS WARNING / CAUTION 2 SAFETY INSTRUCTIONS 3 FEATURE OF THIS TV 8 PREPARATION Accessories 9 Front Panel Information 10 Back Panel Information 12 Stand Instructions 14 VESA Wall Mounting 18 Cable Management 19 Desktop Pedestal ...Source Setup 30 USB Connection 30 Audio out Connection 31 Headphone Setup 31 PC Setup 32 WATCHING TV / CHANNEL CONTROL Remote Control Functions 38 Turning On the TV 40 Channel Selection 40 Volume Adjustment 40 Initial Setting 41 6 On-Screen Menus Selection 42 Quick...
Owner's Manual
Page 7
... Clock Setting - Analog Broadcasting System Captions 90 - Digital Broadcasting System Captions 91 - User Mode 82 Infinite Sound 83 Balance 84 TV Speakers On/Off Setup 85 Audio Reset 86 Stereo/SAP Broadcasts Setup 87 Audio Language 88 On-Screen Menus Language Selection 89 Caption ... Time Setting 95 Sleep Timer Setting 96 PARENTAL CONTROL / RATINGS Set Password & Lock System 97 Channel Blocking 100 Movie & TV Rating 101 Downloadable Rating 106 External Input Blocking 107 APPENDIX Troubleshooting 108 Maintenance 111 Product Specifications 112 IR Codes 113 External Control ...
... Clock Setting - Analog Broadcasting System Captions 90 - Digital Broadcasting System Captions 91 - User Mode 82 Infinite Sound 83 Balance 84 TV Speakers On/Off Setup 85 Audio Reset 86 Stereo/SAP Broadcasts Setup 87 Audio Language 88 On-Screen Menus Language Selection 89 Caption ... Time Setting 95 Sleep Timer Setting 96 PARENTAL CONTROL / RATINGS Set Password & Lock System 97 Channel Blocking 100 Movie & TV Rating 101 Downloadable Rating 106 External Input Blocking 107 APPENDIX Troubleshooting 108 Maintenance 111 Product Specifications 112 IR Codes 113 External Control ...
Owner's Manual
Page 8
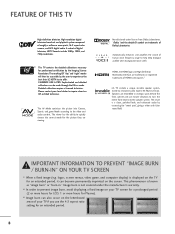
...-resolution digital television broadcast and playback system composed of HDMI Licensing LLC." Detailed calibration requires a licensed technician. LG TV include a unique invisible speaker system, tuned by the Imaging Science Foundation. The resulting ISF "day" and...Mr. Mark Levinson. Manufactured under the manufacturer's warranty. This phenomenon is displayed on the letterboxed areas of Dolby Laboratories. This TV contains the detailed calibrations necessary for an extended period. 8 CALIBRATE LIKE A PRO: Sophisticated and detailed calibrations can become permanently ...
...-resolution digital television broadcast and playback system composed of HDMI Licensing LLC." Detailed calibration requires a licensed technician. LG TV include a unique invisible speaker system, tuned by the Imaging Science Foundation. The resulting ISF "day" and...Mr. Mark Levinson. Manufactured under the manufacturer's warranty. This phenomenon is displayed on the letterboxed areas of Dolby Laboratories. This TV contains the detailed calibrations necessary for an extended period. 8 CALIBRATE LIKE A PRO: Sophisticated and detailed calibrations can become permanently ...

Owner's Manual
Page 9
... using the VGA (D-sub 15 pin cable) PC connection, the user must use shielded signal interface cables with your TV. Excessive pressure may differ from the images below. For 19/22LD350, 19/22LD350C Cable Holder (Refer to P.19) For 26/32LD350 Protection Cover (Refer to P.14) x 8... stand assembly (Refer to P.15) Screw for stand fixing (Refer to P.21) Protection Cover (Refer to maintain standards compliance. ENERGY SAVING 1 AV MODE INPUT 42 TV 753 86 LIST 0 9 VOL FAVMARK FLASHBK M EN U IN MUTERATIO CH P A FO G E ENTER Q .M ENU B A CK E XIT 1.5V 1.5V Owner's Manual...
... using the VGA (D-sub 15 pin cable) PC connection, the user must use shielded signal interface cables with your TV. Excessive pressure may differ from the images below. For 19/22LD350, 19/22LD350C Cable Holder (Refer to P.19) For 26/32LD350 Protection Cover (Refer to P.14) x 8... stand assembly (Refer to P.15) Screw for stand fixing (Refer to P.21) Protection Cover (Refer to maintain standards compliance. ENERGY SAVING 1 AV MODE INPUT 42 TV 753 86 LIST 0 9 VOL FAVMARK FLASHBK M EN U IN MUTERATIO CH P A FO G E ENTER Q .M ENU B A CK E XIT 1.5V 1.5V Owner's Manual...

Owner's Manual
Page 10
PREPARATION PREPARATION FRONT PANEL INFORMATION I Image shown may differ from your TV. 19/22LD350, 19/22LD350C MENU Button INPUT Button POWER Button ENTER Button VOLUME (-, +) Buttons CHANNEL ( , ) Buttons INPUT MENU ENTER VOL CH SPEAKER Remote Control Sensor Power/Standby Indicator Illuminates red in standby mode. Illuminates blue when the TV is switched on. 26/32LD350 CH VOL ENTER MENU INPUT CHANNEL ( , ) Buttons VOLUME (+, -) Buttons ENTER Button MENU Button INPUT Button POWER Button 10
PREPARATION PREPARATION FRONT PANEL INFORMATION I Image shown may differ from your TV. 19/22LD350, 19/22LD350C MENU Button INPUT Button POWER Button ENTER Button VOLUME (-, +) Buttons CHANNEL ( , ) Buttons INPUT MENU ENTER VOL CH SPEAKER Remote Control Sensor Power/Standby Indicator Illuminates red in standby mode. Illuminates blue when the TV is switched on. 26/32LD350 CH VOL ENTER MENU INPUT CHANNEL ( , ) Buttons VOLUME (+, -) Buttons ENTER Button MENU Button INPUT Button POWER Button 10
Owner's Manual
Page 11
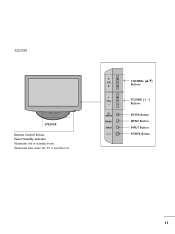
CH VOL ENTER MENU INPUT CHANNEL (D,E) Buttons VOLUME (+, -) Buttons ENTER Button MENU Button INPUT Button POWER Button 11 32LD320 SPEAKER Remote Control Sensor, Power/Standby Indicator Illuminates red in standby mode. Illuminates blue when the TV is switched on.
CH VOL ENTER MENU INPUT CHANNEL (D,E) Buttons VOLUME (+, -) Buttons ENTER Button MENU Button INPUT Button POWER Button 11 32LD320 SPEAKER Remote Control Sensor, Power/Standby Indicator Illuminates red in standby mode. Illuminates blue when the TV is switched on.

Owner's Manual
Page 13
Accepts DVI video using an adapter or HDMI to operate the TV on DC power. 13 Supports HD. Caution: Never attempt to DVI cable (not included). 2 RGB IN (PC) Analog PC Connection. AC IN 11 PREPARATION AV ... IN (CONTROL & SERVICE) PORT Used by third party devices. Connect cable signals to this jack. 7 COMPONENT IN Analog Connection. I Image shown may differ from your TV. Supports HD video and Digital audio. Uses a red, green, and blue cable for video & red and white for audio. 8 USB IN SERVICE ONLY Used for...
Accepts DVI video using an adapter or HDMI to operate the TV on DC power. 13 Supports HD. Caution: Never attempt to DVI cable (not included). 2 RGB IN (PC) Analog PC Connection. AC IN 11 PREPARATION AV ... IN (CONTROL & SERVICE) PORT Used by third party devices. Connect cable signals to this jack. 7 COMPONENT IN Analog Connection. I Image shown may differ from your TV. Supports HD video and Digital audio. Uses a red, green, and blue cable for video & red and white for audio. 8 USB IN SERVICE ONLY Used for...
Owner's Manual
Page 14
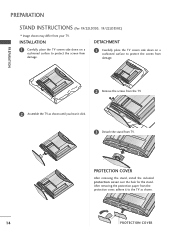
... included protection cover over the hole for the stand. PREPARATION PREPARATION STAND INSTRUCTIONS (For 19/22LD350, 19/22LD350C) I Image shown may differ from the TV. 2 Assemble the TV as shown. 14 PROTECTION COVER INSTALLATION DETACHMENT 1 Carefully place the TV screen side down on a cushioned surface to protect the screen from damage. 1 Carefully place the...
... included protection cover over the hole for the stand. PREPARATION PREPARATION STAND INSTRUCTIONS (For 19/22LD350, 19/22LD350C) I Image shown may differ from the TV. 2 Assemble the TV as shown. 14 PROTECTION COVER INSTALLATION DETACHMENT 1 Carefully place the TV screen side down on a cushioned surface to protect the screen from damage. 1 Carefully place the...
Owner's Manual
Page 15
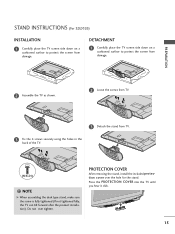
...from damage. Do not over the hole for the stand. Press the PROTECTION COVER into the TV until you hear it click. 15 STAND INSTRUCTIONS (For 32LD320) INSTALLATION 1 Carefully place the TV screen side down on a cushioned surface to protect the screen from damage. NOTE G When assembling... the desk type stand, make sure the screw is fully tightened (If not tightened fully, the TV can tilt forward after the product installation). PROTECTION COVER After removing the stand, install the included protection cover over tighten. PREPARATION 2 Assemble the...
...from damage. Do not over the hole for the stand. Press the PROTECTION COVER into the TV until you hear it click. 15 STAND INSTRUCTIONS (For 32LD320) INSTALLATION 1 Carefully place the TV screen side down on a cushioned surface to protect the screen from damage. NOTE G When assembling... the desk type stand, make sure the screw is fully tightened (If not tightened fully, the TV can tilt forward after the product installation). PROTECTION COVER After removing the stand, install the included protection cover over tighten. PREPARATION 2 Assemble the...

Owner's Manual
Page 16
... type stand, make sure the screws are fully tightened (If not tightened fully, the TV can tilt forward after the product installation). Do not over tighten. 16 (M4x20) STAND BODY 3 Assemble the TV as shown. (M4x20) COVER BASE 4 Fix the 4 screws securely using the 4 screws... supplied. INSTALLATION 1 Carefully place the TV screen side down on a cushioned surface to protect the screen from your TV. PREPARATION PREPARATION STAND INSTRUCTIONS (For 26/32LD350) I Image shown may differ from damage. 2 Assemble the parts...
... type stand, make sure the screws are fully tightened (If not tightened fully, the TV can tilt forward after the product installation). Do not over tighten. 16 (M4x20) STAND BODY 3 Assemble the TV as shown. (M4x20) COVER BASE 4 Fix the 4 screws securely using the 4 screws... supplied. INSTALLATION 1 Carefully place the TV screen side down on a cushioned surface to protect the screen from your TV. PREPARATION PREPARATION STAND INSTRUCTIONS (For 26/32LD350) I Image shown may differ from damage. 2 Assemble the parts...
Owner's Manual
Page 17
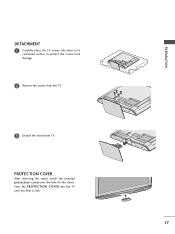
PROTECTION COVER After removing the stand, install the included protection cover over the hole for the stand. Press the PROTECTION COVER into the TV until you hear it click. 17 PREPARATION DETACHMENT 1 Carefully place the TV screen side down on a cushioned surface to protect the screen from damage. 2 Remove the screws from the TV. 3 Detach the stand from TV.
PROTECTION COVER After removing the stand, install the included protection cover over the hole for the stand. Press the PROTECTION COVER into the TV until you hear it click. 17 PREPARATION DETACHMENT 1 Carefully place the TV screen side down on a cushioned surface to protect the screen from damage. 2 Remove the screws from the TV. 3 Detach the stand from TV.
Owner's Manual
Page 18
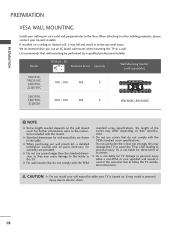
Model VESA (A * B) A B Standard Screw Quantity Wall Mounting Bracket (sold separately) 19LD350, 19LD350C, 22LD350, 100 * 100 M4 4 22LD350C 26LD350, 32LD350, 200 * 100 M4 4 32LD320 LSW100B, LSW100BG ! G For wall mounts that you use fasten the screws too strongly... mount used or the consumer fails to the instructions included with the VESA standard screw specifications. Do not use an LG brand wall mount when mounting the TV to the TV. It may result in personal injury due to personal injury. PREPARATION PREPARATION VESA WALL MOUNTING Install your wall mount on...
Model VESA (A * B) A B Standard Screw Quantity Wall Mounting Bracket (sold separately) 19LD350, 19LD350C, 22LD350, 100 * 100 M4 4 22LD350C 26LD350, 32LD350, 200 * 100 M4 4 32LD320 LSW100B, LSW100BG ! G For wall mounts that you use fasten the screws too strongly... mount used or the consumer fails to the instructions included with the VESA standard screw specifications. Do not use an LG brand wall mount when mounting the TV to the TV. It may result in personal injury due to personal injury. PREPARATION PREPARATION VESA WALL MOUNTING Install your wall mount on...
Owner's Manual
Page 19
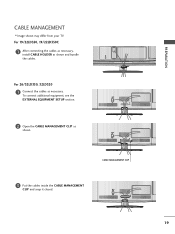
For 26/32LD350, 32LD320 1 Connect the cables as shown. To connect additional equipment, see the EXTERNAL EQUIPMENT SETUP section. 2 Open the CABLE MANAGEMENT CLIP as necessary. AC IN AC IN AC-IN K AC IN AC IN AC IN CABLE MANAGEMENT CLIP AC IN 3 Put the cables inside the CABLE MANAGEMENT CLIP and snap it closed. AC IN AC IN 19 PREPARATION CABLE MANAGEMENT I Image shown may differ from your TV. For 19/22LD350, 19/22LD350C 1 After connecting the cables as necessary, install CABLE HOLDER as shown and bundle the cables.
For 26/32LD350, 32LD320 1 Connect the cables as shown. To connect additional equipment, see the EXTERNAL EQUIPMENT SETUP section. 2 Open the CABLE MANAGEMENT CLIP as necessary. AC IN AC IN AC-IN K AC IN AC IN AC IN CABLE MANAGEMENT CLIP AC IN 3 Put the cables inside the CABLE MANAGEMENT CLIP and snap it closed. AC IN AC IN 19 PREPARATION CABLE MANAGEMENT I Image shown may differ from your TV. For 19/22LD350, 19/22LD350C 1 After connecting the cables as necessary, install CABLE HOLDER as shown and bundle the cables.
Owner's Manual
Page 20
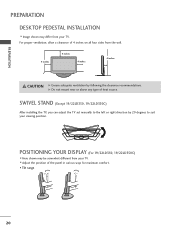
... PEDESTAL INSTALLATION I Image shown may be somewhat different from your TV. POSITIONING YOUR DISPLAY (For 19/22LD350, 19/22LD350C) I Adjust the position of 4 inches on all four sides from your TV. SWIVEL STAND (Except 19/22LD350, 19/22LD350C) After installing the TV, you can adjust the TV set manually to suit your viewing position. I Here shown...
... PEDESTAL INSTALLATION I Image shown may be somewhat different from your TV. POSITIONING YOUR DISPLAY (For 19/22LD350, 19/22LD350C) I Adjust the position of 4 inches on all four sides from your TV. SWIVEL STAND (Except 19/22LD350, 19/22LD350C) After installing the TV, you can adjust the TV set manually to suit your viewing position. I Here shown...
Owner's Manual
Page 21
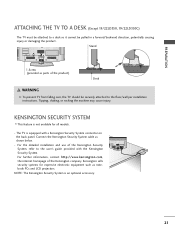
..., the internet homepage of the Kensington Security System, refer to the floor/wall per installation instructions. PREPARATION ATTACHING THE TV TO A DESK (Except 19/22LD350, 19/22LD350C) The TV must be attached to a desk so it cannot be securely attached to the user's guide provided with a Kensington... Security System connector on the back panel. The TV is not available for expensive electronic equipment such as shown below. - ...
..., the internet homepage of the Kensington Security System, refer to the floor/wall per installation instructions. PREPARATION ATTACHING THE TV TO A DESK (Except 19/22LD350, 19/22LD350C) The TV must be attached to a desk so it cannot be securely attached to the user's guide provided with a Kensington... Security System connector on the back panel. The TV is not available for expensive electronic equipment such as shown below. - ...


