
Owner's Manual
Page 1
OWNER'S MANUAL LCD TV Please read this manual carefully before operating your set and retain it for future reference. 19LD350 22LD350 26LD350 32LD350 19LD350C 22LD350C 32LD320 P/NO : SAC34134202 (1008-REV04) www.lg.com
OWNER'S MANUAL LCD TV Please read this manual carefully before operating your set and retain it for future reference. 19LD350 22LD350 26LD350 32LD350 19LD350C 22LD350C 32LD320 P/NO : SAC34134202 (1008-REV04) www.lg.com

Owner's Manual
Page 9
... When using the VGA (D-sub 15 pin cable) PC connection, the user must use shielded signal interface cables with ferrite cores to P.15) 9 For 19/22LD350, 19/22LD350C Cable Holder (Refer to P.19) For 26/32LD350 Protection Cover (Refer to P.14) x 8 (M4x20) Screws for stand assembly(Refer to P.16) For 32LD320 Screw...
... When using the VGA (D-sub 15 pin cable) PC connection, the user must use shielded signal interface cables with ferrite cores to P.15) 9 For 19/22LD350, 19/22LD350C Cable Holder (Refer to P.19) For 26/32LD350 Protection Cover (Refer to P.14) x 8 (M4x20) Screws for stand assembly(Refer to P.16) For 32LD320 Screw...

Owner's Manual
Page 10
PREPARATION PREPARATION FRONT PANEL INFORMATION I Image shown may differ from your TV. 19/22LD350, 19/22LD350C MENU Button INPUT Button POWER Button ENTER Button VOLUME (-, +) Buttons CHANNEL ( , ) Buttons INPUT MENU ENTER VOL CH SPEAKER Remote Control Sensor Power/Standby Indicator Illuminates red in standby mode. Illuminates blue when the TV is switched on. 26/32LD350 CH VOL ENTER MENU INPUT CHANNEL ( , ) Buttons VOLUME (+, -) Buttons ENTER Button MENU Button INPUT Button POWER Button 10
PREPARATION PREPARATION FRONT PANEL INFORMATION I Image shown may differ from your TV. 19/22LD350, 19/22LD350C MENU Button INPUT Button POWER Button ENTER Button VOLUME (-, +) Buttons CHANNEL ( , ) Buttons INPUT MENU ENTER VOL CH SPEAKER Remote Control Sensor Power/Standby Indicator Illuminates red in standby mode. Illuminates blue when the TV is switched on. 26/32LD350 CH VOL ENTER MENU INPUT CHANNEL ( , ) Buttons VOLUME (+, -) Buttons ENTER Button MENU Button INPUT Button POWER Button 10
Owner's Manual
Page 14
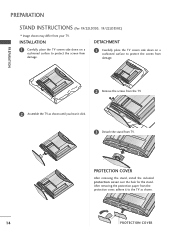
... TV screen side down on a cushioned surface to protect the screen from damage. 2 Remove the screws from your TV. PREPARATION PREPARATION STAND INSTRUCTIONS (For 19/22LD350, 19/22LD350C) I Image shown may differ from the TV. 2 Assemble the TV as shown until you hear it to the TV as shown. 14 PROTECTION COVER
... TV screen side down on a cushioned surface to protect the screen from damage. 2 Remove the screws from your TV. PREPARATION PREPARATION STAND INSTRUCTIONS (For 19/22LD350, 19/22LD350C) I Image shown may differ from the TV. 2 Assemble the TV as shown until you hear it to the TV as shown. 14 PROTECTION COVER
Owner's Manual
Page 18
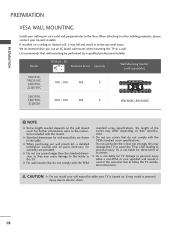
...result in personal injury due to the floor. Model VESA (A * B) A B Standard Screw Quantity Wall Mounting Bracket (sold separately) 19LD350, 19LD350C, 22LD350, 100 * 100 M4 4 22LD350C 26LD350, 32LD350, 200 * 100 M4 4 32LD320 LSW100B, LSW100BG ! G Do not use fasten the screws too strongly, this may result in severe ...mount kit while your nearest installer. If installed on a ceiling or slanted wall, it may differ depending on their specifications. G LG is not liable for TV damage or personal injury when a non-VESA or non specified wall mount is used or the consumer ...
...result in personal injury due to the floor. Model VESA (A * B) A B Standard Screw Quantity Wall Mounting Bracket (sold separately) 19LD350, 19LD350C, 22LD350, 100 * 100 M4 4 22LD350C 26LD350, 32LD350, 200 * 100 M4 4 32LD320 LSW100B, LSW100BG ! G Do not use fasten the screws too strongly, this may result in severe ...mount kit while your nearest installer. If installed on a ceiling or slanted wall, it may differ depending on their specifications. G LG is not liable for TV damage or personal injury when a non-VESA or non specified wall mount is used or the consumer ...
Owner's Manual
Page 19
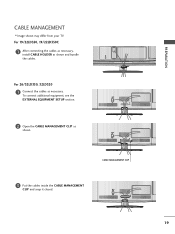
To connect additional equipment, see the EXTERNAL EQUIPMENT SETUP section. 2 Open the CABLE MANAGEMENT CLIP as necessary. PREPARATION CABLE MANAGEMENT I Image shown may differ from your TV. For 26/32LD350, 32LD320 1 Connect the cables as shown. AC IN AC IN AC-IN K AC IN AC IN AC IN CABLE MANAGEMENT CLIP AC IN 3 Put the cables inside the CABLE MANAGEMENT CLIP and snap it closed. For 19/22LD350, 19/22LD350C 1 After connecting the cables as necessary, install CABLE HOLDER as shown and bundle the cables. AC IN AC IN 19
To connect additional equipment, see the EXTERNAL EQUIPMENT SETUP section. 2 Open the CABLE MANAGEMENT CLIP as necessary. PREPARATION CABLE MANAGEMENT I Image shown may differ from your TV. For 26/32LD350, 32LD320 1 Connect the cables as shown. AC IN AC IN AC-IN K AC IN AC IN AC IN CABLE MANAGEMENT CLIP AC IN 3 Put the cables inside the CABLE MANAGEMENT CLIP and snap it closed. For 19/22LD350, 19/22LD350C 1 After connecting the cables as necessary, install CABLE HOLDER as shown and bundle the cables. AC IN AC IN 19
Owner's Manual
Page 20
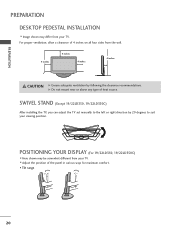
... of the panel in various ways for maximum comfort. • Tilt range 12 0 03 20 SWIVEL STAND (Except 19/22LD350, 19/22LD350C) After installing the TV, you can adjust the TV set manually to the left or right direction by following the clearance recommendations.... For proper ventilation, allow a clearance of 4 inches on all four sides from your TV. POSITIONING YOUR DISPLAY (For 19/22LD350, 19/22LD350C) I Here shown may differ from your viewing position. I Adjust the position of heat source. PREPARATION PREPARATION DESKTOP PEDESTAL INSTALLATION I Image ...
... of the panel in various ways for maximum comfort. • Tilt range 12 0 03 20 SWIVEL STAND (Except 19/22LD350, 19/22LD350C) After installing the TV, you can adjust the TV set manually to the left or right direction by following the clearance recommendations.... For proper ventilation, allow a clearance of 4 inches on all four sides from your TV. POSITIONING YOUR DISPLAY (For 19/22LD350, 19/22LD350C) I Here shown may differ from your viewing position. I Adjust the position of heat source. PREPARATION PREPARATION DESKTOP PEDESTAL INSTALLATION I Image ...
Owner's Manual
Page 21
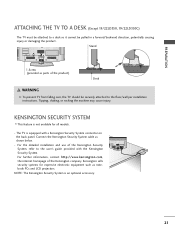
... TV from falling over, the TV should be securely attached to the floor/wall per installation instructions. PREPARATION ATTACHING THE TV TO A DESK (Except 19/22LD350, 19/22LD350C) The TV must be attached to the user's guide provided with a Kensington Security System connector on the back panel. For the detailed installation and...
... TV from falling over, the TV should be securely attached to the floor/wall per installation instructions. PREPARATION ATTACHING THE TV TO A DESK (Except 19/22LD350, 19/22LD350C) The TV must be attached to the user's guide provided with a Kensington Security System connector on the back panel. For the detailed installation and...
Owner's Manual
Page 41
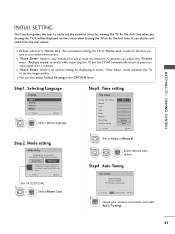
.... Auto Tuning Auto Tuning Before starting, be sure that the TV antenna is only intended for use in the OPTION menu. Previous Next For 19/22LD350C 1 ENTER Select H o m e U s e. I You can also be displayed on the screen when turning the TV on for the first time when purchasing the TV. Step3. WATCHING...
.... Auto Tuning Auto Tuning Before starting, be sure that the TV antenna is only intended for use in the OPTION menu. Previous Next For 19/22LD350C 1 ENTER Select H o m e U s e. I You can also be displayed on the screen when turning the TV on for the first time when purchasing the TV. Step3. WATCHING...
Owner's Manual
Page 42
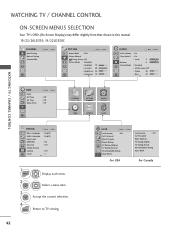
... / CHANNEL CONTROL ON-SCREEN MENUS SELECTION Your TV's OSD (On Screen Display) may differ slightly from that shown in this manual. 19/22/26LD350, 19/22LD350C CHANNEL Auto Tuning Manual Tuning Channel Edit Move Enter PICTURE Move Enter Aspect Ratio : 16:9 Picture Wizard Energy Saving : Off Picture Mode : Standard • Backlight...
... / CHANNEL CONTROL ON-SCREEN MENUS SELECTION Your TV's OSD (On Screen Display) may differ slightly from that shown in this manual. 19/22/26LD350, 19/22LD350C CHANNEL Auto Tuning Manual Tuning Channel Edit Move Enter PICTURE Move Enter Aspect Ratio : 16:9 Picture Wizard Energy Saving : Off Picture Mode : Standard • Backlight...
Owner's Manual
Page 44
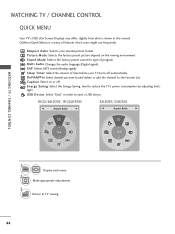
... add/delete or add the channel to TV viewing. 44 Energy Saving: Select the Energy Saving level to eject a USB device. 19/22/26LD350, 19/22LD350C 32LD350, 32LD320 F Aspect Ratio G F Aspect Ratio G A 16:9 A 16:9 1 Q.MENU 2 Display each menu. USB Device: Select "Eject" in this manual. Picture Mode: Selects the factory preset...
... add/delete or add the channel to TV viewing. 44 Energy Saving: Select the Energy Saving level to eject a USB device. 19/22/26LD350, 19/22LD350C 32LD350, 32LD320 F Aspect Ratio G F Aspect Ratio G A 16:9 A 16:9 1 Q.MENU 2 Display each menu. USB Device: Select "Eject" in this manual. Picture Mode: Selects the factory preset...
Owner's Manual
Page 52
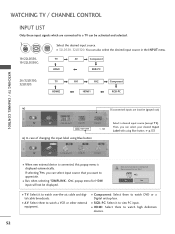
... it to watch DVD or a Digital set-top box. I H D M I 32LD350, 32LD320: You can also select the desired input source in the INPUT menu. 19/22LD350, 19/22LD350C: TV HDMI AV Component RGB-PC 26/32LD350, 32LD320: TV HDMI2 AV1 AV2 HDMI1 Component RGB-PC WATCHING TV / CHANNEL CONTROL ie) Disconnected inputs are...
... it to watch DVD or a Digital set-top box. I H D M I 32LD350, 32LD320: You can also select the desired input source in the INPUT menu. 19/22LD350, 19/22LD350C: TV HDMI AV Component RGB-PC 26/32LD350, 32LD320: TV HDMI2 AV1 AV2 HDMI1 Component RGB-PC WATCHING TV / CHANNEL CONTROL ie) Disconnected inputs are...
Owner's Manual
Page 53
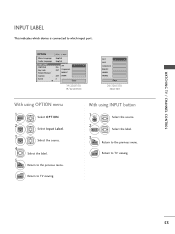
... : English Audio Language : English Input Label SIMPLINK AV : On F G Key Lock : Off Component Simple Manual RGB-PC Caption : Off HDMI Set ID : 1 E Close 19/22LD350, 19/22LD350C AV1 F G AV2 Component RGB-PC HDMI1 HDMI2 Close 26/32LD350, 32LD320 With using INPUT button 1 INPUT Select the source. 2 BLUE Select the label. 3 BACK Return...
... : English Audio Language : English Input Label SIMPLINK AV : On F G Key Lock : Off Component Simple Manual RGB-PC Caption : Off HDMI Set ID : 1 E Close 19/22LD350, 19/22LD350C AV1 F G AV2 Component RGB-PC HDMI1 HDMI2 Close 26/32LD350, 32LD320 With using INPUT button 1 INPUT Select the source. 2 BLUE Select the label. 3 BACK Return...

Owner's Manual
Page 107
... System : Off Set Password Block Channel Movie Rating TV Rating-Children TV Rating-General AV F G Downloadable Rating Input Block Component RGB-PC HDMI Close 19/22LD350, 19/22LD350C 1 MENU ENTER Select L O C K. 21 2 3 456 789 0 3 Input the password. Select Input Block. 4 ENTER Select input source. 5 Select O n or O f f. 6 BACK Return to TV viewing. AV1...
... System : Off Set Password Block Channel Movie Rating TV Rating-Children TV Rating-General AV F G Downloadable Rating Input Block Component RGB-PC HDMI Close 19/22LD350, 19/22LD350C 1 MENU ENTER Select L O C K. 21 2 3 456 789 0 3 Input the password. Select Input Block. 4 ENTER Select input source. 5 Select O n or O f f. 6 BACK Return to TV viewing. AV1...

Owner's Manual
Page 112
... x 206.8 mm (26.1 inch x 19.0 inch x 8.1 inch) 663.0 mm x 423.0 mm x 79.9 mm (26.1 inch x 16.6 inch x 3.1 inch) 7.3 kg (16.0 lbs) 6.2 kg (13.6 lbs) 22LD350 (22LD350-UB) 22LD350C (22LD350C-UA) 526.0 mm x 377.0 mm x 164.9 mm (20.7 inch x 14.8 inch x 6.4 inch) 526.0 mm x 331.0 mm x 65.0 mm (20.7 inch x 13.0 inch x 2.5 inch) 4.3 kg (9.4 lbs...
... x 206.8 mm (26.1 inch x 19.0 inch x 8.1 inch) 663.0 mm x 423.0 mm x 79.9 mm (26.1 inch x 16.6 inch x 3.1 inch) 7.3 kg (16.0 lbs) 6.2 kg (13.6 lbs) 22LD350 (22LD350-UB) 22LD350C (22LD350C-UA) 526.0 mm x 377.0 mm x 164.9 mm (20.7 inch x 14.8 inch x 6.4 inch) 526.0 mm x 331.0 mm x 65.0 mm (20.7 inch x 13.0 inch x 2.5 inch) 4.3 kg (9.4 lbs...