
Owner's Manual
Page 1
OWNER'S MANUAL LCD TV Please read this manual carefully before operating your set and retain it for future reference. 19LD350 22LD350 26LD350 32LD350 19LD350C 22LD350C 32LD320 P/NO : SAC34134202 (1008-REV04) www.lg.com
OWNER'S MANUAL LCD TV Please read this manual carefully before operating your set and retain it for future reference. 19LD350 22LD350 26LD350 32LD350 19LD350C 22LD350C 32LD320 P/NO : SAC34134202 (1008-REV04) www.lg.com
Owner's Manual
Page 4
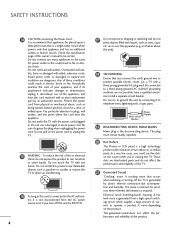
... switching circuit, which powers only that occurs when watching or turning off this unit is , a single outlet circuit which supplies a large amount of this owner's manual to be connected to six million pixels. To reduce the risk of two million to a three-prong grouned AC outlet) If grounding methods are not...
... switching circuit, which powers only that occurs when watching or turning off this unit is , a single outlet circuit which supplies a large amount of this owner's manual to be connected to six million pixels. To reduce the risk of two million to a three-prong grouned AC outlet) If grounding methods are not...
Owner's Manual
Page 6
... 40 Initial Setting 41 6 On-Screen Menus Selection 42 Quick Menu 44 Channel Setup - Auto Scan (Auto Tuning 45 - Add / Delete Channel (Manual Tuning 46 - Channel Editing 47 Channel List 48 Favorite Channel Setup 49 Favorite Channel List 50 Brief Information 51 Input List 52 Input Label 53... AV Mode 54 Simple Manual 54 Key Lock 55 SIMPLINK 56 USB Entry Modes 58 Photo List 59 Music List 63 PICTURE CONTROL Picture Size (Aspect Ratio) Control...
... 40 Initial Setting 41 6 On-Screen Menus Selection 42 Quick Menu 44 Channel Setup - Auto Scan (Auto Tuning 45 - Add / Delete Channel (Manual Tuning 46 - Channel Editing 47 Channel List 48 Favorite Channel Setup 49 Favorite Channel List 50 Brief Information 51 Input List 52 Input Label 53... AV Mode 54 Simple Manual 54 Key Lock 55 SIMPLINK 56 USB Entry Modes 58 Photo List 59 Music List 63 PICTURE CONTROL Picture Size (Aspect Ratio) Control...
Owner's Manual
Page 7
Digital Broadcasting System Captions 91 - Analog Broadcasting System Captions 90 - Caption Option 92 TIME SETTING Clock Setting - Auto Clock Setup 93 Manual Clock Setup 94 Auto On/Off Time Setting 95 Sleep Timer Setting 96 PARENTAL CONTROL / RATINGS Set Password & Lock System 97 Channel Blocking 100 Movie & ...
Digital Broadcasting System Captions 91 - Analog Broadcasting System Captions 90 - Caption Option 92 TIME SETTING Clock Setting - Auto Clock Setup 93 Manual Clock Setup 94 Auto On/Off Time Setting 95 Sleep Timer Setting 96 PARENTAL CONTROL / RATINGS Set Password & Lock System 97 Channel Blocking 100 Movie & ...

Owner's Manual
Page 9
...9 VOL FAVMARK FLASHBK M EN U IN MUTERATIO CH P A FO G E ENTER Q .M ENU B A CK E XIT 1.5V 1.5V Owner's Manual CD Manual Remote Control, Batteries (AAA) Power Cord Not included with all models Polishing Cloth * Wipe spots on the exterior only with your TV. Excessive pressure may... differ from the images below. The accessories included may cause scratches or discoloration. For 19/22LD350...
...9 VOL FAVMARK FLASHBK M EN U IN MUTERATIO CH P A FO G E ENTER Q .M ENU B A CK E XIT 1.5V 1.5V Owner's Manual CD Manual Remote Control, Batteries (AAA) Power Cord Not included with all models Polishing Cloth * Wipe spots on the exterior only with your TV. Excessive pressure may... differ from the images below. The accessories included may cause scratches or discoloration. For 19/22LD350...
Owner's Manual
Page 18
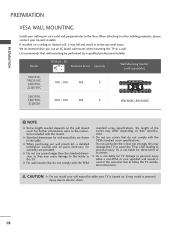
...For wall mounts that do not comply with the VESA standard screw specifications. G LG is not liable for assembly are shown in the table. G When purchasing our wall mount kit, a detailed installation manual and all parts necessary for TV damage or personal injury when a non-VESA ... Do not use an LG brand wall mount when mounting the TV to follow the TV installation instructions. CAUTION G Do not install your wall mount kit while your TV is used . Model VESA (A * B) A B Standard Screw Quantity Wall Mounting Bracket (sold separately) 19LD350, 19LD350C, 22LD350, 100 * 100 M4...
...For wall mounts that do not comply with the VESA standard screw specifications. G LG is not liable for assembly are shown in the table. G When purchasing our wall mount kit, a detailed installation manual and all parts necessary for TV damage or personal injury when a non-VESA ... Do not use an LG brand wall mount when mounting the TV to follow the TV installation instructions. CAUTION G Do not install your wall mount kit while your TV is used . Model VESA (A * B) A B Standard Screw Quantity Wall Mounting Bracket (sold separately) 19LD350, 19LD350C, 22LD350, 100 * 100 M4...
Owner's Manual
Page 20
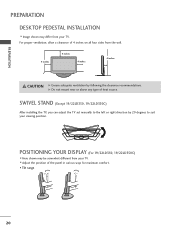
... PREPARATION DESKTOP PEDESTAL INSTALLATION I Here shown may differ from your TV. I Adjust the position of heat source. POSITIONING YOUR DISPLAY (For 19/22LD350, 19/22LD350C) I Image shown may be somewhat different from the wall. 4 inches 4 inches 4 inches 4 inches CAUTION G Ensure adequate ventilation...20 degrees to the left or right direction by following the clearance recommendations. SWIVEL STAND (Except 19/22LD350, 19/22LD350C) After installing the TV, you can adjust the TV set manually to suit your TV. For proper ventilation, allow a clearance of 4 inches on all four ...
... PREPARATION DESKTOP PEDESTAL INSTALLATION I Here shown may differ from your TV. I Adjust the position of heat source. POSITIONING YOUR DISPLAY (For 19/22LD350, 19/22LD350C) I Image shown may be somewhat different from the wall. 4 inches 4 inches 4 inches 4 inches CAUTION G Ensure adequate ventilation...20 degrees to the left or right direction by following the clearance recommendations. SWIVEL STAND (Except 19/22LD350, 19/22LD350C) After installing the TV, you can adjust the TV set manually to suit your TV. For proper ventilation, allow a clearance of 4 inches on all four ...

Owner's Manual
Page 24
... in any power cords until you do receive digital signals from a digital set -top box. I This part of the digital settop box to the owner's manual for 32LD350.
... in any power cords until you do receive digital signals from a digital set -top box. I This part of the digital settop box to the owner's manual for 32LD350.
Owner's Manual
Page 25
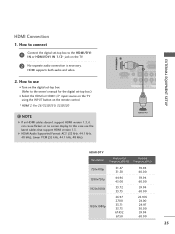
EXTERNAL EQUIPMENT SETUP /DVI IN HDMI Connection 1. How to connect 1 Connect the digital set-top box to the owner's manual for the digital set -top box. (Refer to the HDMI/DVI I Select the HDMI or HDMI1/2* input source on the TV using the INPUT button ...
EXTERNAL EQUIPMENT SETUP /DVI IN HDMI Connection 1. How to connect 1 Connect the digital set-top box to the owner's manual for the digital set -top box. (Refer to the HDMI/DVI I Select the HDMI or HDMI1/2* input source on the TV using the INPUT button ...
Owner's Manual
Page 26
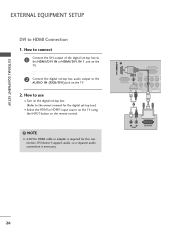
AV IN 1 /DVI IN EXTERNAL EQUIPMENT SETUP EXTERNAL EQUIPMENT SETUP DVI to the owner's manual for this connection. How to use I Select the HDMI or HDMI1 input source on the TV using the INPUT button on the remote control. ! DVI ...
AV IN 1 /DVI IN EXTERNAL EQUIPMENT SETUP EXTERNAL EQUIPMENT SETUP DVI to the owner's manual for this connection. How to use I Select the HDMI or HDMI1 input source on the TV using the INPUT button on the remote control. ! DVI ...

Owner's Manual
Page 27
I Refer to the DVD player's manual for operating instructions. 1 2 RS-232C IN (CONTROL&SERVICE) OPTICAL AUDIO IN DIGITAL (RGB/DVI) AUDIO OUT VIDEO L/MONO AUDIO R N (PC) Y PB PR L R VIDEO AUDIO COMPONENT ...
I Refer to the DVD player's manual for operating instructions. 1 2 RS-232C IN (CONTROL&SERVICE) OPTICAL AUDIO IN DIGITAL (RGB/DVI) AUDIO OUT VIDEO L/MONO AUDIO R N (PC) Y PB PR L R VIDEO AUDIO COMPONENT ...
Owner's Manual
Page 28
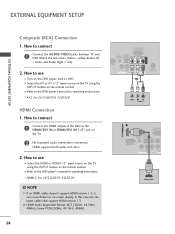
... 1 RS-232C I Select the HDMI or HDMI1 / 2* input source on the TV using the INPUT button on the remote control. How to the DVD player's manual for operating instructions. * HDMI 2: For 26/32LD350, 32LD320 ! Match the jack colors (Video = yellow, Audio Left = white, and Audio Right = red). 2. I Refer to ...DVD. I Select the A V or AV1/2* input source on the TV using the INPUT button on the remote control. How to the DVD player's manual for operating instructions. * AV2: For 26/32LD350, 32LD320 HDMI Connection 1. I Refer to use the latest cables that support HDMI version 1.3.
... 1 RS-232C I Select the HDMI or HDMI1 / 2* input source on the TV using the INPUT button on the remote control. How to the DVD player's manual for operating instructions. * HDMI 2: For 26/32LD350, 32LD320 ! Match the jack colors (Video = yellow, Audio Left = white, and Audio Right = red). 2. I Refer to ...DVD. I Select the A V or AV1/2* input source on the TV using the INPUT button on the remote control. How to the DVD player's manual for operating instructions. * AV2: For 26/32LD350, 32LD320 HDMI Connection 1. I Refer to use the latest cables that support HDMI version 1.3.
Owner's Manual
Page 29
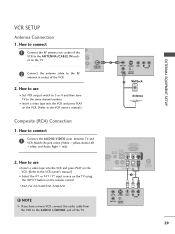
R ANTENNA IO /CABLE IN 2 Connect the antenna cable to the RF antenna in socket of the VCR to the VCR owner's manual.) I Select the A V or AV1/2* input source on the TV using the INPUT button on the remote control. * AV2: For 26/32LD350, 32LD320 ! I Insert a video tape ... to use I Insert a video tape into the VCR and press PLAY on the TV. How to the same channel number. How to the VCR owner's manual.) 1 ANT OUT S-VIDEO VIDEO L R AUDIO ANT IN OUTPUT SWITCH 2 Wall Jack Antenna Composite (RCA) Connection 1. NOTE G If you have a mono VCR, connect the audio cable...
R ANTENNA IO /CABLE IN 2 Connect the antenna cable to the RF antenna in socket of the VCR to the VCR owner's manual.) I Select the A V or AV1/2* input source on the TV using the INPUT button on the remote control. * AV2: For 26/32LD350, 32LD320 ! I Insert a video tape ... to use I Insert a video tape into the VCR and press PLAY on the TV. How to the same channel number. How to the VCR owner's manual.) 1 ANT OUT S-VIDEO VIDEO L R AUDIO ANT IN OUTPUT SWITCH 2 Wall Jack Antenna Composite (RCA) Connection 1. NOTE G If you have a mono VCR, connect the audio cable...
Owner's Manual
Page 31
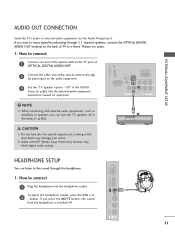
... equipment via the Audio Output port. IN 2 USB IN HEADPHONE SETUP You can turn the TV speakers off . button. See the external audio equipment instruction manual for operation. 1 RS-232C IN (CONTROL&SERVICE) OPTICAL AUDIO IN DIGITAL (RGB/DVI) AUDIO OUT VIDEO L/MONO AUDIO R RGB IN (PC) 1 Y PB PR L R VIDEO AUDIO...
... equipment via the Audio Output port. IN 2 USB IN HEADPHONE SETUP You can turn the TV speakers off . button. See the external audio equipment instruction manual for operation. 1 RS-232C IN (CONTROL&SERVICE) OPTICAL AUDIO IN DIGITAL (RGB/DVI) AUDIO OUT VIDEO L/MONO AUDIO R RGB IN (PC) 1 Y PB PR L R VIDEO AUDIO...
Owner's Manual
Page 35
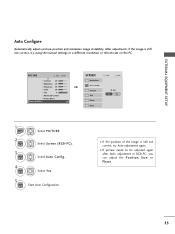
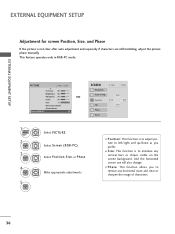
... image is still not correct, try Auto adjustment again. Select Screen (RGB-PC). After adjustment, if the image is still not correct, try using the manual settings or a different resolution or refresh rate on the PC. EXTERNAL EQUIPMENT SETUP Auto Configure Automatically adjusts picture position and minimizes image instability. To Set...
... image is still not correct, try Auto adjustment again. Select Screen (RGB-PC). After adjustment, if the image is still not correct, try using the manual settings or a different resolution or refresh rate on the PC. EXTERNAL EQUIPMENT SETUP Auto Configure Automatically adjusts picture position and minimizes image instability. To Set...
Owner's Manual
Page 36
...-PC mode. Select Screen (RGB-PC). I S i z e: This function is not clear after auto adjustment and especially if characters are still trembling, adjust the picture phase manually. Make appropriate adjustments.
...-PC mode. Select Screen (RGB-PC). I S i z e: This function is not clear after auto adjustment and especially if characters are still trembling, adjust the picture phase manually. Make appropriate adjustments.
Owner's Manual
Page 41
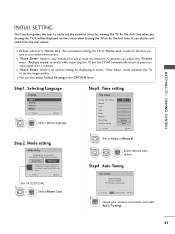
... intended for use in your antenna connection and start Auto Tuning. 41 I "Store Demo" Mode is connected. 1 ENTER Previous INFO i Simple Manual Next Check your home environment. I Default selection is an optimal setting for the first time. Selecting Language Language English Español Franç... Zone Daylight Saving F Auto G 02 21 2009 10 AM 10 Eastern Auto Previous Next 1 Select A ut o or Manual. 2 ENTER Select desired time option. Picture mode" manually while inspecting the TV, but the TV will be activated from the user menus. "Store Demo" mode initializes the TV ...
... intended for use in your antenna connection and start Auto Tuning. 41 I "Store Demo" Mode is connected. 1 ENTER Previous INFO i Simple Manual Next Check your home environment. I Default selection is an optimal setting for the first time. Selecting Language Language English Español Franç... Zone Daylight Saving F Auto G 02 21 2009 10 AM 10 Eastern Auto Previous Next 1 Select A ut o or Manual. 2 ENTER Select desired time option. Picture mode" manually while inspecting the TV, but the TV will be activated from the user menus. "Store Demo" mode initializes the TV ...
Owner's Manual
Page 42
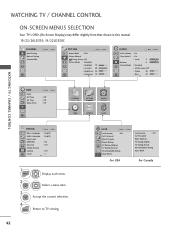
... ON-SCREEN MENUS SELECTION Your TV's OSD (On Screen Display) may differ slightly from that shown in this manual. 19/22/26LD350, 19/22LD350C CHANNEL Auto Tuning Manual Tuning Channel Edit Move Enter PICTURE Move Enter Aspect Ratio : 16:9 Picture Wizard Energy Saving : Off Picture ... OPTION LOCK WATCHING TV / CHANNEL CONTROL OPTION Move Enter Menu Language : English Audio Language : English Input Label SIMPLINK : On Key Lock : Off Simple Manual Caption : Off Set ID : 1 E 1 MENU Display each menu. 2 ENTER Select a menu item. 3 ENTER Accept the current selection. 4 EXIT...
... ON-SCREEN MENUS SELECTION Your TV's OSD (On Screen Display) may differ slightly from that shown in this manual. 19/22/26LD350, 19/22LD350C CHANNEL Auto Tuning Manual Tuning Channel Edit Move Enter PICTURE Move Enter Aspect Ratio : 16:9 Picture Wizard Energy Saving : Off Picture ... OPTION LOCK WATCHING TV / CHANNEL CONTROL OPTION Move Enter Menu Language : English Audio Language : English Input Label SIMPLINK : On Key Lock : Off Simple Manual Caption : Off Set ID : 1 E 1 MENU Display each menu. 2 ENTER Select a menu item. 3 ENTER Accept the current selection. 4 EXIT...

Owner's Manual
Page 43
32LD350, 32LD320 CHANNEL Auto Tuning Manual Tuning Channel Edit Move Enter PICTURE Move Enter Aspect Ratio : 16:9 Picture Wizard Energy Saving : Off Picture Mode : Standard • Backlight 70 • Contrast 90 &#...; Infinite Sound :Off • Treble 50 • Bass 50 E Enter + R WATCHING TV / CHANNEL CONTROL OPTION Menu Language Audio Language Input Label SIMPLINK Key Lock Simple Manual Caption Set ID E Move Enter : English : English : On : Off : Off : 1 CHANNEL PICTURE AUDIO TIME OPTION LOCK INPUT USB TIME Clock Off Time On Time Sleep...
32LD350, 32LD320 CHANNEL Auto Tuning Manual Tuning Channel Edit Move Enter PICTURE Move Enter Aspect Ratio : 16:9 Picture Wizard Energy Saving : Off Picture Mode : Standard • Backlight 70 • Contrast 90 &#...; Infinite Sound :Off • Treble 50 • Bass 50 E Enter + R WATCHING TV / CHANNEL CONTROL OPTION Menu Language Audio Language Input Label SIMPLINK Key Lock Simple Manual Caption Set ID E Move Enter : English : English : On : Off : Off : 1 CHANNEL PICTURE AUDIO TIME OPTION LOCK INPUT USB TIME Clock Off Time On Time Sleep...
Owner's Manual
Page 44
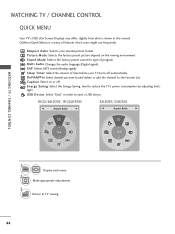
... 2 Display each menu. Sound Mode: Selects the factory preset sound for type of time before your desired picture format. USB Device: Select "Eject" in this manual. WATCHING TV / CHANNEL CONTROL WATCHING TV / CHANNEL CONTROL QUICK MENU Your TV's OSD (On Screen Display) may differ slightly from what is a menu of features...
... 2 Display each menu. Sound Mode: Selects the factory preset sound for type of time before your desired picture format. USB Device: Select "Eject" in this manual. WATCHING TV / CHANNEL CONTROL WATCHING TV / CHANNEL CONTROL QUICK MENU Your TV's OSD (On Screen Display) may differ slightly from what is a menu of features...


