
KM-NET ADMIN Operation Guide for Ver 2.0
Page 9
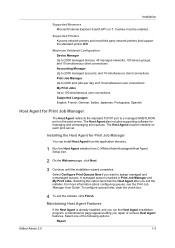
...is already installed, and you run the Host Agent installation program, a maintenance page appears letting you exit the installer. Supported Printers Kyocera network printers and most third party network printers that support the standard printer MIB Maximum Validated Configuration Device Manager Up to 2000 managed ... launches the Host Agent after you repair or remove Host Agent features. To configure queues later, clear the check box. 4 To exit the installer, click Finish. The Host Agent also includes supporting software for Print Job Manager You can install Host Agent from the application...
...is already installed, and you run the Host Agent installation program, a maintenance page appears letting you exit the installer. Supported Printers Kyocera network printers and most third party network printers that support the standard printer MIB Maximum Validated Configuration Device Manager Up to 2000 managed ... launches the Host Agent after you repair or remove Host Agent features. To configure queues later, clear the check box. 4 To exit the installer, click Finish. The Host Agent also includes supporting software for Print Job Manager You can install Host Agent from the application...
KM-NET Viewer Operation Guide Rev-5.2-2010.10
Page 8
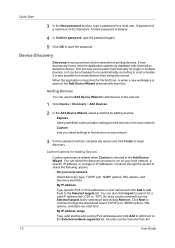
A password is a process that checks networks for printing devices. This process can be scheduled to find devices in the Add Device Wizard. Custom Lets you select settings to run on any network. 3 For the selected method, complete the wizard and click Finish to a set schedule. Continue through the wizard to continue through the...
A password is a process that checks networks for printing devices. This process can be scheduled to find devices in the Add Device Wizard. Custom Lets you select settings to run on any network. 3 For the selected method, complete the wizard and click Finish to a set schedule. Continue through the wizard to continue through the...
KM-NET Viewer Operation Guide Rev-5.2-2010.10
Page 30
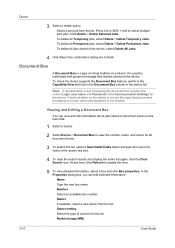
... not set , accessing the document box requires the correct Login user name and Password in document boxes on the device. To check if a device supports the Document Box feature, switch to finish. If authentication on a device. In the Properties dialog box, you can view and edit information about jobs stored in the...
... not set , accessing the document box requires the correct Login user name and Password in document boxes on the device. To check if a device supports the Document Box feature, switch to finish. If authentication on a device. In the Properties dialog box, you can view and edit information about jobs stored in the...
KM-NET Viewer Operation Guide Rev-5.2-2010.10
Page 51
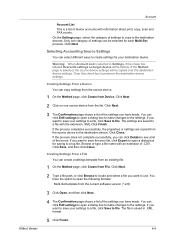
... can be copied over the destination device settings. Only one source device from File. Clear this check box to use. Creating Settings From a Device You can click Details to a file with the extension .XML.Click Finish. Click Next. 3 The Confirmation page shows a list of the settings you have made ....to open a dialog box for your settings to a file, click Save to the settings. Warning: When Account List is selected in .XML format. 5 Click Finish. 4-9 If you want to a log file. Click Next. 2 Type a file path, or click Browse to locate and select a file you want to preserve...
... can be copied over the destination device settings. Only one source device from File. Clear this check box to use. Creating Settings From a Device You can click Details to a file with the extension .XML.Click Finish. Click Next. 3 The Confirmation page shows a list of the settings you have made ....to open a dialog box for your settings to a file, click Save to the settings. Warning: When Account List is selected in .XML format. 5 Click Finish. 4-9 If you want to a log file. Click Next. 2 Type a file path, or click Browse to locate and select a file you want to preserve...

KM-NET Viewer Operation Guide Rev-5.2-2010.10
Page 59
...Settings page. Click Save, and then click Close. Overwriting Settings You can click Details to the destination device. Clear this check box is saved in .XML format. 5 Click Finish. You can click Edit settings to open a dialog box to make changes to the settings. You can click Edit ...: Device User List Device Address Book Device Document Box Device Network Groups Device Virtual Mailbox If this check box to ensure that only settings that do not overlap with the extension .XML. 4 Click Finish. If you have made . The settings are saved to a log file. Click Close. On...
...Settings page. Click Save, and then click Close. Overwriting Settings You can click Details to the destination device. Clear this check box is saved in .XML format. 5 Click Finish. You can click Edit settings to open a dialog box to make changes to the settings. You can click Edit ...: Device User List Device Address Book Device Document Box Device Network Groups Device Virtual Mailbox If this check box to ensure that only settings that do not overlap with the extension .XML. 4 Click Finish. If you have made . The settings are saved to a log file. Click Close. On...
PRESCRIBE Commands Command Reference Manual Rev 4.8
Page 20
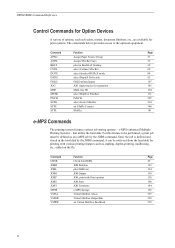
...command. that utilize the hard disk. PRESCRIBE Command Reference Control Commands for Option Devices A variety of options, such as feeders, sorters, document finishers, etc., are available for print systems. The commands below provides access to be performed, a print job must be retrieved from the hard ... Mailbox STacKer 171 PNCH PuNCH 207 SSTK select Sorter STacKer 334 STPC set Virtual Mailbox PassWord 359 10 Command Function Page CDSK Check hard DiSK 49 JOBD JOB Deletion 132 JOBL print JOB List 134 JOBO JOB Output 136 JOBP JOB, print with various printing...
...command. that utilize the hard disk. PRESCRIBE Command Reference Control Commands for Option Devices A variety of options, such as feeders, sorters, document finishers, etc., are available for print systems. The commands below provides access to be performed, a print job must be retrieved from the hard ... Mailbox STacKer 171 PNCH PuNCH 207 SSTK select Sorter STacKer 334 STPC set Virtual Mailbox PassWord 359 10 Command Function Page CDSK Check hard DiSK 49 JOBD JOB Deletion 132 JOBL print JOB List 134 JOBO JOB Output 136 JOBP JOB, print with various printing...
KM-NET for Direct Printing Operation Guide Rev-3.2
Page 15
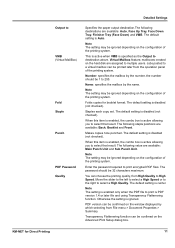
... depending on the hard disk are available: Auto, Face Up Tray, Face Down Tray, Finisher Tray (Face Down) and VMB. Folds copies for Direct Printing 11 The default setting is... following destinations are assigned to select a High Quality. Otherwise the setting is disabled (not checked). Output to print encrypted PDF files. Note The setting may be printed later from the ... printing system. Name: specifies the mailbox by the number. You can be 32 characters maximum. KM-NET for booklet format. PDF version can choose the printing quality, from File menu > Document ...
... depending on the hard disk are available: Auto, Face Up Tray, Face Down Tray, Finisher Tray (Face Down) and VMB. Folds copies for Direct Printing 11 The default setting is... following destinations are assigned to select a High Quality. Otherwise the setting is disabled (not checked). Output to print encrypted PDF files. Note The setting may be printed later from the ... printing system. Name: specifies the mailbox by the number. You can be 32 characters maximum. KM-NET for booklet format. PDF version can choose the printing quality, from File menu > Document ...
Kyocera Command Center Operation Guide Rev 6.3
Page 17
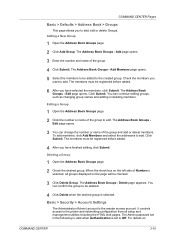
... or name of the group. 4 Click Submit. The Address Book Groups - The members must be registered before added. 4 After you have finished editing, click Submit. You can continue editing groups, such as changing group names and adding or deleting members. To add members, click Add Members... - Adding a New Group 1 Open the Address Book Groups page. 2 Click Add Group. Add Members page opens. 5 Select the members to be checked. 3 Click Delete Group. Basic > Security > Account Settings The Administrator (Admin) account is set to Off. You can confirm the group to be ...
... or name of the group. 4 Click Submit. The Address Book Groups - The members must be registered before added. 4 After you have finished editing, click Submit. You can continue editing groups, such as changing group names and adding or deleting members. To add members, click Add Members... - Adding a New Group 1 Open the Address Book Groups page. 2 Click Add Group. Add Members page opens. 5 Select the members to be checked. 3 Click Delete Group. Basic > Security > Account Settings The Administrator (Admin) account is set to Off. You can confirm the group to be ...
Kyocera Command Center Operation Guide Rev 6.3
Page 26
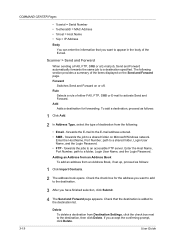
..., and the Login Password. • FTP - forwards the job to a shared folder on the Send and Forward page. If you have finished selection, click Submit. 3-19 4 The Send and Forward page appears. Add Adds a destination for the address you want to an accessible FTP...to a folder, Login User Name, and the Login Password. To add a destination, proceed as follows: 1 Click Import Contacts. 2 The address book opens. Check the check box for forwarding. User Guide COMMAND CENTER Pages • %serial = Serial Number • %etheraddr = MAC Address • %host = Host Name •...
..., and the Login Password. • FTP - forwards the job to a shared folder on the Send and Forward page. If you have finished selection, click Submit. 3-19 4 The Send and Forward page appears. Add Adds a destination for the address you want to an accessible FTP...to a folder, Login User Name, and the Login Password. To add a destination, proceed as follows: 1 Click Import Contacts. 2 The address book opens. Check the check box for forwarding. User Guide COMMAND CENTER Pages • %serial = Serial Number • %etheraddr = MAC Address • %host = Host Name •...
Kyocera Command Center Operation Guide Rev 6.3
Page 31
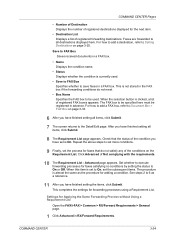
... registered in advance. The FAX box to set more conditions. 9 Finally, set to Setting Destinations on page 3-33. 6 After you have finished setting all items, click Submit. 7 The screen returns to 6 as the procedure for forwarding processes using a Requirement List. Advanced page appears.... condition is almost the same as a reference. 11 After you have finished setting the items, click Submit. After you have finished setting all destinations displayed here. Click Advanced of registered FAX boxes appears. Check that do not meet. • Box Name Specifies the FAX box to...
... registered in advance. The FAX box to set more conditions. 9 Finally, set to Setting Destinations on page 3-33. 6 After you have finished setting all items, click Submit. 7 The screen returns to 6 as the procedure for forwarding processes using a Requirement List. Advanced page appears.... condition is almost the same as a reference. 11 After you have finished setting the items, click Submit. After you have finished setting all destinations displayed here. Click Advanced of registered FAX boxes appears. Check that do not meet. • Box Name Specifies the FAX box to...
Kyocera Command Center Operation Guide Rev 6.3
Page 32
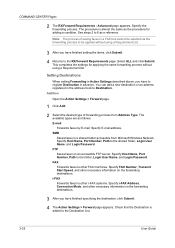
... other i-FAX systems. Specify i-FAX Address, Connection Mode, and other necessary information on the forwarding destinations. 3 After you have finished setting the items, click Submit. 4 Returns to Destination. Setting Destinations When setting Forwarding in Action Settings described above, you have... Action Settings > Forward page. 1 Click Add. 2 Select the desired type of saving faxes in a shared folder accessible from Address Type. Check that the Destination is almost the same as the forwarding process to be applied without using a Requirement List. 3 After you have to register ...
... other i-FAX systems. Specify i-FAX Address, Connection Mode, and other necessary information on the forwarding destinations. 3 After you have finished setting the items, click Submit. 4 Returns to Destination. Setting Destinations When setting Forwarding in Action Settings described above, you have... Action Settings > Forward page. 1 Click Add. 2 Select the desired type of saving faxes in a shared folder accessible from Address Type. Check that the Destination is almost the same as the forwarding process to be applied without using a Requirement List. 3 After you have to register ...
Kyocera Command Center Operation Guide Rev 6.3
Page 33
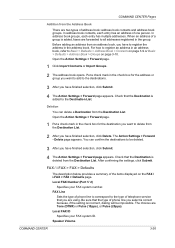
... an address of the items displayed on page 3-10. For how to register an address in the address book. Check that the Destination is deleted from the Destination List. 2 After you have finished selection, click Delete. After confirming the settings, click Submit. Local FAX Number (Port 1/ 2) Specifies your FAX system ID. Open...
... an address of the items displayed on page 3-10. For how to register an address in the address book. Check that the Destination is deleted from the Destination List. 2 After you have finished selection, click Delete. After confirming the settings, click Submit. Local FAX Number (Port 1/ 2) Specifies your FAX system ID. Open...
PRESCRIBE Commands Technical Reference Manual - Rev. 4.7
Page 248
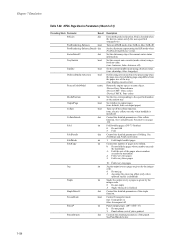
...status) using a boolean value. (true: Autocass, false: Autocass off KIR mode. (true: KIR on page 138. Fold booklet pages. (DF-75 finisher) 0: Do not fold 3: Fold Control the detailed parameters of the tray. (true: display cassette error) Return the engine type as a name object...tumble mode using a boolean value. (true: shortedge, false: longedge) Define using the given jog offset (only when optional stacker is finished Control the detailed parameters of the collate function. Control Econoprint mode. Set the dictionary object for current sorter status information. true: Econoprint ...
...status) using a boolean value. (true: Autocass, false: Autocass off KIR mode. (true: KIR on page 138. Fold booklet pages. (DF-75 finisher) 0: Do not fold 3: Fold Control the detailed parameters of the tray. (true: display cassette error) Return the engine type as a name object...tumble mode using a boolean value. (true: shortedge, false: longedge) Define using the given jog offset (only when optional stacker is finished Control the detailed parameters of the collate function. Control Econoprint mode. Set the dictionary object for current sorter status information. true: Econoprint ...
KX Driver User Guide Version 5.90
Page 13
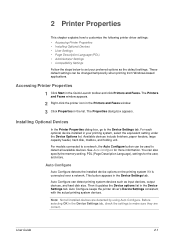
...disk size. See Auto Configure for the user, and more information. For each optional device installed in the Device Settings tab, check the settings to make sure they are detected by using Auto Configure. This button appears in the Quick Launch toolbar and click ... You can be used to the Device Settings tab. Accessing Printer Properties 1 Click Start in the Device Settings tab. Available devices include finishers, paper feeders, large capacity feeder, hard disk, mailbox, and folding unit. Auto Configure Auto Configure detects the installed device options on the...
...disk size. See Auto Configure for the user, and more information. For each optional device installed in the Device Settings tab, check the settings to make sure they are detected by using Auto Configure. This button appears in the Quick Launch toolbar and click ... You can be used to the Device Settings tab. Accessing Printer Properties 1 Click Start in the Device Settings tab. Available devices include finishers, paper feeders, large capacity feeder, hard disk, mailbox, and folding unit. Auto Configure Auto Configure detects the installed device options on the...

KX Driver User Guide Version 5.90
Page 15
.... Printer Properties 2 Under Device options in the Device Settings tab, select the check boxes for a finishing device shown in blue in the Device options list, such as Finisher or Multi Finisher, the Punch Unit Settings dialog box appears. This setting is required to your printing... system. User Guide 2-3 After you select the Hard disk option, enabling the configuration of your finisher. Select 2 Hole, 2 & 3 Hole (for inches), or 2 & 4 Hole (for millimeters) punch option depending on page 8-2. 3 In ...
.... Printer Properties 2 Under Device options in the Device Settings tab, select the check boxes for a finishing device shown in blue in the Device options list, such as Finisher or Multi Finisher, the Punch Unit Settings dialog box appears. This setting is required to your printing... system. User Guide 2-3 After you select the Hard disk option, enabling the configuration of your finisher. Select 2 Hole, 2 & 3 Hole (for inches), or 2 & 4 Hole (for millimeters) punch option depending on page 8-2. 3 In ...

KX Driver User Guide Version 5.90
Page 35
...collate option, specify the number of copies not to exceed the number of copies is produced in separate trays. 5 Non-Collating Clearing the Collate check box produces page 1 in tray 1 and page 2 in the Number of each tray. 4 User Guide 3-10 The specified number of copies ... Top Tray (face-down). 2 3 Select the Collate check box. 3 4 Select the number of complete sets in tray 2. 1 Open the Properties dialog box. 1 2 From the Destination list, select Finisher (face-down) or Top Tray (face-down destination, such as Finisher (face- The document page length must not exceed the ...
...collate option, specify the number of copies not to exceed the number of copies is produced in separate trays. 5 Non-Collating Clearing the Collate check box produces page 1 in tray 1 and page 2 in the Number of each tray. 4 User Guide 3-10 The specified number of copies ... Top Tray (face-down). 2 3 Select the Collate check box. 3 4 Select the number of complete sets in tray 2. 1 Open the Properties dialog box. 1 2 From the Destination list, select Finisher (face-down) or Top Tray (face-down destination, such as Finisher (face- The document page length must not exceed the ...

KX Driver User Guide Version 5.90
Page 37
... Stapling feature, continue to step 5. • To continue with Booklet printing, go to step 8. 5 Click Basic > Destination, and select a face-down finishing tray. 5 If the Staple check box is selected automatically. 7 8 Click OK to return to the Print dialog box. 8 9 Click OK to print. 6 7 Click the... Finishing tab, and select the Staple check box. • Select Right edge binding for Destination in the Basic tab to an output tray ...
... Stapling feature, continue to step 5. • To continue with Booklet printing, go to step 8. 5 Click Basic > Destination, and select a face-down finishing tray. 5 If the Staple check box is selected automatically. 7 8 Click OK to return to the Print dialog box. 8 9 Click OK to print. 6 7 Click the... Finishing tab, and select the Staple check box. • Select Right edge binding for Destination in the Basic tab to an output tray ...

KX Driver User Guide Version 5.90
Page 45
... installed. If a 3000-sheet finisher and folding unit are for the larger size paper in the mixed page document. This is for the smaller size paper in the mixed page document. The Staple feature is increased, clear the Reduce image to fit check box. After installation, optional equipment ... of the printed data is decreased slightly to fit in the printable margins of the page. • If the document data is available. Finishing The top two settings (e.g. A4/Letter) are installed, the Booklet printing feature is small enough that best illustrates the edge of the mixed ...
... installed. If a 3000-sheet finisher and folding unit are for the larger size paper in the mixed page document. This is for the smaller size paper in the mixed page document. The Staple feature is increased, clear the Reduce image to fit check box. After installation, optional equipment ... of the printed data is decreased slightly to fit in the printable margins of the page. • If the document data is available. Finishing The top two settings (e.g. A4/Letter) are installed, the Booklet printing feature is small enough that best illustrates the edge of the mixed ...
iTag Specification/Setup/Operation Guide Ver. 8.0
Page 16
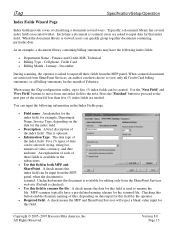
...it. Typically, a document library has several ways. A check means the MFP and SharePoint Services will reject a blank...information in both MFP and SharePoint. Each time a document is checked). • Use this field. Finance and Credit, MIS, Technical...to the next part of February. Press the 'Finished' button to proceed to input all billing statements...for this button enables dynamic naming of the index field. Checking this field by the operator. • Required field. Cell... Description. A check means this field is used to move from the MFP ...
...it. Typically, a document library has several ways. A check means the MFP and SharePoint Services will reject a blank...information in both MFP and SharePoint. Each time a document is checked). • Use this field. Finance and Credit, MIS, Technical...to the next part of February. Press the 'Finished' button to proceed to input all billing statements...for this button enables dynamic naming of the index field. Checking this field by the operator. • Required field. Cell... Description. A check means this field is used to move from the MFP ...
3035/4035/5035 Operation Guide Rev-6.0
Page 86
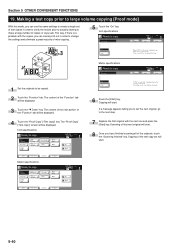
...if there is ejected. Inch specifications problem with the next one and press the [Start] key. Auto Rotation Eco Print Modify copy OHP back Orig. Finishing result can then be displayed. 3 Touch the "▼ Down" key. Section 5 OTHER CONVENIENT FUNCTIONS 19. On This is ejected. Scanning of that ... test copy prior to large volume copying [Proof mode] With this mode, you can use the same settings to create a single set is useful for checking finishing. 1 Set the originals to copy. If a message appears telling you to set the next original, go to the next step. 7 Replace the first...
...if there is ejected. Inch specifications problem with the next one and press the [Start] key. Auto Rotation Eco Print Modify copy OHP back Orig. Finishing result can then be displayed. 3 Touch the "▼ Down" key. Section 5 OTHER CONVENIENT FUNCTIONS 19. On This is ejected. Scanning of that ... test copy prior to large volume copying [Proof mode] With this mode, you can use the same settings to create a single set is useful for checking finishing. 1 Set the originals to copy. If a message appears telling you to set the next original, go to the next step. 7 Replace the first...


