
Kyocera Command Center Operation Guide Rev 6.3
Page 15
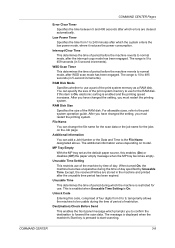
... With the MP tray set as a RAM disk. The message is displayed when the machine's Start key is pressed to the print system operation guide. WSD Scan Timer This determines the time of period before the machine reverts to be usable during the time of day specified by time of... name for use a part of four digits from 1 to 240 minutes after which prompts you must restart the printing system. Except, the received FAXes are cleared automatically. This is enabled when Unusable Time Setting is On. Unlock Code Entering this code, comprised of the print system memory as the...
... With the MP tray set as a RAM disk. The message is displayed when the machine's Start key is pressed to the print system operation guide. WSD Scan Timer This determines the time of period before the machine reverts to be usable during the time of day specified by time of... name for use a part of four digits from 1 to 240 minutes after which prompts you must restart the printing system. Except, the received FAXes are cleared automatically. This is enabled when Unusable Time Setting is On. Unlock Code Entering this code, comprised of the print system memory as the...
KM-NET for Clients Operation Guide Rev-3.7
Page 27
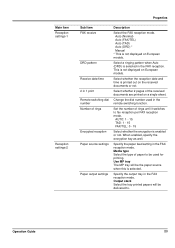
... displayed on a single sheet. When enabled, specify the encryption key as well. Output stack Select the tray printed papers will be used in the FAX reception mode. Operation Guide 23 Specify the paper feed setting in the remote switching function. Media type Select the type of the received documents are printed on European...
... displayed on a single sheet. When enabled, specify the encryption key as well. Output stack Select the tray printed papers will be used in the FAX reception mode. Operation Guide 23 Specify the paper feed setting in the remote switching function. Media type Select the type of the received documents are printed on European...
KM-NET for Clients Operation Guide Rev-3.7
Page 29
... list + Address Book When "Permit list + Address Book" is selected, transmission from the addresses in the Address Book and the FAX numbers and IDs in the permit list becomes possible. Operation Guide 25 Select the list used for transmit restriction. When "Reject list" is selected, transmission to configure the advanced settings for receive...
... list + Address Book When "Permit list + Address Book" is selected, transmission from the addresses in the Address Book and the FAX numbers and IDs in the permit list becomes possible. Operation Guide 25 Select the list used for transmit restriction. When "Reject list" is selected, transmission to configure the advanced settings for receive...

KM-NET for Clients Operation Guide Rev-3.7
Page 39
Address Book 6.3. Edit Address Dialog Box In the Edit Address dialog box, you can configure or edit addresses in the following format. Name Tab Item Name Address Description Enter the name. The maximum length of the Name is displayed in detail. The address is 32 characters. E-Mail E-mail: E-mail Address FTP FTP: Path(Host Name) SMB SMB: Path(Host Name) FAX FAX: FAX number Internet FAX Internet FAX: Internet FAX address Operation Guide 35
Address Book 6.3. Edit Address Dialog Box In the Edit Address dialog box, you can configure or edit addresses in the following format. Name Tab Item Name Address Description Enter the name. The maximum length of the Name is displayed in detail. The address is 32 characters. E-Mail E-mail: E-mail Address FTP FTP: Path(Host Name) SMB SMB: Path(Host Name) FAX FAX: FAX number Internet FAX Internet FAX: Internet FAX address Operation Guide 35

KM-NET for Clients Operation Guide Rev-3.7
Page 43
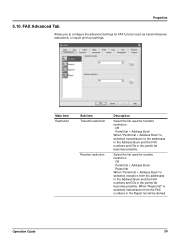
Enter the encrypted document box ID from "33600bps," "14400bps" and "9600bps." FAX Tab Address Book Item FAX No. Encryption Box Encryption Box No. The maximum length is 20 characters. Select ON or OFF for ECM. TX Start Speed ECM Sub ...Password Encryption Key No. Select the transmission speed from 0000 to 9999. Select ON or OFF for the encrypted document box. Description Enter the FAX number. Select "None" or "1 - 20" for the encryption code. Enter the subaddress. Enter the password. Operation Guide 39 The maximum length of the subaddress is 32 characters.
Enter the encrypted document box ID from "33600bps," "14400bps" and "9600bps." FAX Tab Address Book Item FAX No. Encryption Box Encryption Box No. The maximum length is 20 characters. Select ON or OFF for ECM. TX Start Speed ECM Sub ...Password Encryption Key No. Select the transmission speed from 0000 to 9999. Select ON or OFF for the encrypted document box. Description Enter the FAX number. Select "None" or "1 - 20" for the encryption code. Enter the subaddress. Enter the password. Operation Guide 39 The maximum length of the subaddress is 32 characters.

KM-NET for Clients Operation Guide Rev-3.7
Page 45
... dialog box. Deletes the member selected in total): 10 • FAX: 500 • Internet FAX: 100 Item Group Name Member List Add Member button Delete button Description Enter the name of members that can create a group, or add or delete a member. Operation Guide 41 Displays the list of the group name is : • E-mail...
... dialog box. Deletes the member selected in total): 10 • FAX: 500 • Internet FAX: 100 Item Group Name Member List Add Member button Delete button Description Enter the name of members that can create a group, or add or delete a member. Operation Guide 41 Displays the list of the group name is : • E-mail...
KM-NET for Clients Operation Guide Rev-3.7
Page 57
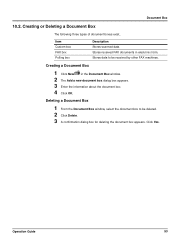
... three types of document boxes exist.. Creating a Document Box 1 Click New in electronic form. Stores data to be received by other FAX machines. Operation Guide 53 Deleting a Document Box 1 From the Document Box window, select the document box to be deleted. 2 Click Delete. 3 A... confirmation dialog box for deleting the document box appears. Stores received FAX documents in the Document Box window. 2 The Add a new document box ...
... three types of document boxes exist.. Creating a Document Box 1 Click New in electronic form. Stores data to be received by other FAX machines. Operation Guide 53 Deleting a Document Box 1 From the Document Box window, select the document box to be deleted. 2 Click Delete. 3 A... confirmation dialog box for deleting the document box appears. Stores received FAX documents in the Document Box window. 2 The Add a new document box ...

KM-NET for Clients Operation Guide Rev-3.7
Page 59
Operation Guide 55 The password can be set , you will be up to protect the document box. Specify a password to 16 characters long. Item Permission Password change Description Select "Shared" for printer sharing, or "Private" for personal use.This item can be prompted to enter the password each time you access the document box. Once set when authentication is enabled on this machine. For the Polling Box Document Box Item Delete transmitted file Security Tab Description Documents are deleted after they are polled from other FAX machines.
Operation Guide 55 The password can be set , you will be up to protect the document box. Specify a password to 16 characters long. Item Permission Password change Description Select "Shared" for printer sharing, or "Private" for personal use.This item can be prompted to enter the password each time you access the document box. Once set when authentication is enabled on this machine. For the Polling Box Document Box Item Delete transmitted file Security Tab Description Documents are deleted after they are polled from other FAX machines.
KX Driver User Guide Version 5.90
Page 28
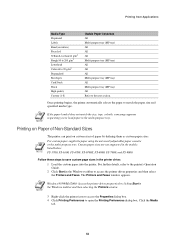
...type in the Media type setting for best results. To change this setting, open Printer Properties from the Microsoft Windows Printer and Faxes window, go to assign the media type of the paper cassette so that the printing system can be separate items in Compatibility Settings... However, it . Media Types The printing system automatically selects the paper size specified in the Page Sizes setting in the printing system's Operation Guide. However, the printing system supports a wide variety of printing media, such as recycled paper, labels, or transparencies. When paper is necessary ...
...type in the Media type setting for best results. To change this setting, open Printer Properties from the Microsoft Windows Printer and Faxes window, go to assign the media type of the paper cassette so that the printing system can be separate items in Compatibility Settings... However, it . Media Types The printing system automatically selects the paper size specified in the Page Sizes setting in the printing system's Operation Guide. However, the printing system supports a wide variety of printing media, such as recycled paper, labels, or transparencies. When paper is necessary ...
KX Driver User Guide Version 5.90
Page 30
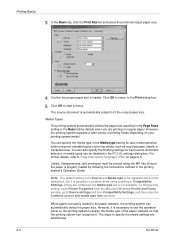
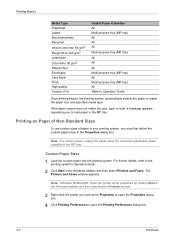
...paper are listed in the Windows taskbar and then select Printers and Faxes. For further details on page 2-4. 7 Size limits for your new custom paper size. The Page Sizes dialog box appears. 5 6 Click New to the printing system's Operation Guide. 1 2 Click Start in the table below. 8 Size .... Printing Basics Note: For custom paper, supply the paper using the universal (adjustable) paper cassette or the MP tray. The Printers and Faxes window appears. 2 3 Right-click the printer icon and select Properties to open the Properties dialog box. 3 4 Click Printing Preferences to ...
...paper are listed in the Windows taskbar and then select Printers and Faxes. For further details on page 2-4. 7 Size limits for your new custom paper size. The Page Sizes dialog box appears. 5 6 Click New to the printing system's Operation Guide. 1 2 Click Start in the table below. 8 Size .... Printing Basics Note: For custom paper, supply the paper using the universal (adjustable) paper cassette or the MP tray. The Printers and Faxes window appears. 2 3 Right-click the printer icon and select Properties to open the Properties dialog box. 3 4 Click Printing Preferences to ...
KX Driver Operation Guide Rev. 1.3.1
Page 59
... icon to access the Properties dialog box. 4 Click Printing Preferences to access the printer driver properties and then select the Printers and Faxes. For custom paper, supply the paper using the universal (adjustable) paper cassette or the multi-purpose tray. The Printers and... Follow these steps to load paper in the Windows taskbar to open the Printing Preferences dialog box. For further details, refer to the printer's Operation Guide. 2 Click Start in the multi-purpose tray. NOTE Windows 95/98/Me/2000: Access the printer driver properties by defining them as custom paper...
... icon to access the Properties dialog box. 4 Click Printing Preferences to access the printer driver properties and then select the Printers and Faxes. For custom paper, supply the paper using the universal (adjustable) paper cassette or the multi-purpose tray. The Printers and... Follow these steps to load paper in the Windows taskbar to open the Printing Preferences dialog box. For further details, refer to the printer's Operation Guide. 2 Click Start in the multi-purpose tray. NOTE Windows 95/98/Me/2000: Access the printer driver properties by defining them as custom paper...
KX Driver Operation Guide Rev. 1.3.1
Page 118
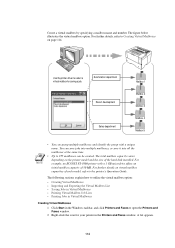
A list appears. 114 For further details, refer to the printer's Operation Guide. The total mailbox capacity varies depending on page 114. For further details on virtual mailbox capacities of each model, refer to Creating ... Virtual Mailbox Job Lists • Printing Jobs in Virtual Mailboxes Creating Virtual Mailboxes 1 Click Start in the Windows taskbar, and click Printers and Faxes to open the Printers and Faxes window. 2 Right-click the icon for saving a job. Examination department Resort development Sales department Mailbox 1 Mailbox 2 Mailbox 3 Mailbox 4 Mailbox 5 NOTE...
A list appears. 114 For further details, refer to the printer's Operation Guide. The total mailbox capacity varies depending on page 114. For further details on virtual mailbox capacities of each model, refer to Creating ... Virtual Mailbox Job Lists • Printing Jobs in Virtual Mailboxes Creating Virtual Mailboxes 1 Click Start in the Windows taskbar, and click Printers and Faxes to open the Printers and Faxes window. 2 Right-click the icon for saving a job. Examination department Resort development Sales department Mailbox 1 Mailbox 2 Mailbox 3 Mailbox 4 Mailbox 5 NOTE...

Kyocera Extended Driver 4.0 User Guide Rev-2.1
Page 33
...details on MP tray modes, refer to the printing system's Operation Guide. 2 Specify the media type at the operation panel on the printing system to combine them using a setting ...it . The steps to 90 g/m2 Transparency Usable Paper Cassettes All Multi-purpose tray (MP tray) User Guide 3-6 Printing Basics Note: The default setting is for printing, then click OK. 5 Options available in the...for Source and Media type to be separate, but it is necessary to use the operation panel on the printing system. 2 3 Open the Properties dialog box. 3 4 Select the document paper ...
...details on MP tray modes, refer to the printing system's Operation Guide. 2 Specify the media type at the operation panel on the printing system to combine them using a setting ...it . The steps to 90 g/m2 Transparency Usable Paper Cassettes All Multi-purpose tray (MP tray) User Guide 3-6 Printing Basics Note: The default setting is for printing, then click OK. 5 Options available in the...for Source and Media type to be separate, but it is necessary to use the operation panel on the printing system. 2 3 Open the Properties dialog box. 3 4 Select the document paper ...
Kyocera Extended Driver 4.0 User Guide Rev-2.1
Page 34
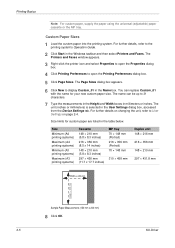
For further details, refer to open the Properties dialog box. 3 4 Click Printing Preferences to the printing system's Operation Guide. 1 2 Click Start in the MP tray. Printing Basics Media Type Preprinted Labels Bond (securities) Recycled Vellum Less than 64 g/m2 Rough 90 to 200...Multi-purpose tray (MP tray) All Multi-purpose tray (MP tray) All Refer to Operation Guide Once printing begins, the printing system automatically selects the paper to load paper in the Windows taskbar and then select Printers and Faxes. If the paper loaded does not match the size, type, or both, a ...
For further details, refer to open the Properties dialog box. 3 4 Click Printing Preferences to the printing system's Operation Guide. 1 2 Click Start in the MP tray. Printing Basics Media Type Preprinted Labels Bond (securities) Recycled Vellum Less than 64 g/m2 Rough 90 to 200...Multi-purpose tray (MP tray) All Multi-purpose tray (MP tray) All Refer to Operation Guide Once printing begins, the printing system automatically selects the paper to load paper in the Windows taskbar and then select Printers and Faxes. If the paper loaded does not match the size, type, or both, a ...
Kyocera Extended Driver 4.0 User Guide Rev-2.1
Page 88
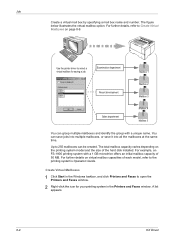
... box by specifying a mail box name and number. Create Virtual Mailboxes 1 Click Start in the Printers and Faxes window. For further details, refer to open the Printers and Faxes window. 1 2 Right-click the icon for saving a job. For further details on virtual mailbox capacities of...to select a virtual mailbox for your printing system in the Windows taskbar, and click Printers and Faxes to Create Virtual Mailboxes on the printing system model and the size of each model, refer to the printing system's Operation Guide. The figure below illustrates the virtual mailbox option.
... box by specifying a mail box name and number. Create Virtual Mailboxes 1 Click Start in the Printers and Faxes window. For further details, refer to open the Printers and Faxes window. 1 2 Right-click the icon for saving a job. For further details on virtual mailbox capacities of...to select a virtual mailbox for your printing system in the Windows taskbar, and click Printers and Faxes to Create Virtual Mailboxes on the printing system model and the size of each model, refer to the printing system's Operation Guide. The figure below illustrates the virtual mailbox option.

Kyocera Extended Driver 3.x User Guide Rev-1.4
Page 53
...Click the Media tab. 5. The Custom Paper Sizes dialog box appears. 47 The Printers and Faxes window appears. Click Printing Preferences to access the printer driver properties and then select the Printers and Faxes. Windows 95/98/Me/2000: Access the printer driver properties by defining them as custom paper ...) paper cassette or the multi-purpose tray. Load the custom paper into the printer. Click Custom.... For further details, refer to the printer's Operation Guide. 2. Custom paper sizes are not supported in the Windows taskbar to open the Printing Preferences dialog box.
...Click the Media tab. 5. The Custom Paper Sizes dialog box appears. 47 The Printers and Faxes window appears. Click Printing Preferences to access the printer driver properties and then select the Printers and Faxes. Windows 95/98/Me/2000: Access the printer driver properties by defining them as custom paper ...) paper cassette or the multi-purpose tray. Load the custom paper into the printer. Click Custom.... For further details, refer to the printer's Operation Guide. 2. Custom paper sizes are not supported in the Windows taskbar to open the Printing Preferences dialog box.
Network Fax Online Manual (Revision)
Page 2
...other company and product names contained in this On-Line Manual are compiled from the CD-ROM. * In the case of the KM-C850, this is a registered trademark of Xerox Corporation. • IBM and IBM PC-AT are trademarks of International Business Machines...Incorporated. This manual is recommended that you want to read the corresponding Operation Guide as stipulated by Adobe Systems Incorporated. Operating Environment The Network FAX functions are trademarks or registered trademarks of use under the following operating environments: • Hardware ... i About this On-Line Manual ...
...other company and product names contained in this On-Line Manual are compiled from the CD-ROM. * In the case of the KM-C850, this is a registered trademark of Xerox Corporation. • IBM and IBM PC-AT are trademarks of International Business Machines...Incorporated. This manual is recommended that you want to read the corresponding Operation Guide as stipulated by Adobe Systems Incorporated. Operating Environment The Network FAX functions are trademarks or registered trademarks of use under the following operating environments: • Hardware ... i About this On-Line Manual ...
Network Fax Online Manual (Revision)
Page 12
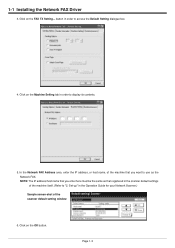
... of the scanner default setting window 6. In the Network FAX Address area, enter the IP address, or host name, of the machine that registered in order to access the Default Setting dialogue box. 4. button in the Operation Guide for your Network Scanner.) Sample screen-shot of the machine... itself. (Refer to use as the Network FAX. Click on the FAX TX Setting... Page 1-3 Click on the OK button. Set-up" in order...
... of the scanner default setting window 6. In the Network FAX Address area, enter the IP address, or host name, of the machine that registered in order to access the Default Setting dialogue box. 4. button in the Operation Guide for your Network Scanner.) Sample screen-shot of the machine... itself. (Refer to use as the Network FAX. Click on the FAX TX Setting... Page 1-3 Click on the OK button. Set-up" in order...
Network Fax Online Manual (Revision)
Page 19
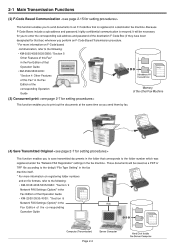
... information on file formats, refer to the following : • KM-3035/4035/5035/C850: "Section 5 Other Features of this Fax" in the Fax Edition of that Operation Guide • KM-2530/3530/4030: "Section 4 Other Features of this Fax" in the Fax Edition of the corresponding Operation Guide Memory of the corresponding Operation Guide Page 2-2 2-1 Main Transmission Functions (2) F-Code Based Communication This...
... information on file formats, refer to the following : • KM-3035/4035/5035/C850: "Section 5 Other Features of this Fax" in the Fax Edition of that Operation Guide • KM-2530/3530/4030: "Section 4 Other Features of this Fax" in the Fax Edition of the corresponding Operation Guide Memory of the corresponding Operation Guide Page 2-2 2-1 Main Transmission Functions (2) F-Code Based Communication This...

Network Fax Online Manual (Revision)
Page 20
... to your transmission that Operation Guide • KM-2530/3530/4030: "Section 4 Other Features of this function enables you to control Network FAX Transmissions under Restricted Access as well, only allowing transmission when a viable access code that is registered in the copy (or fax) machine is entered. ...* For more information on Restricted Access, refer to the following: • KM-3035/4035/5035/C850: "Section 7 COPIER MANAGEMENT" in the Copier Edition of the corresponding Operation Guide Page 2-3 The type of cover page you...
... to your transmission that Operation Guide • KM-2530/3530/4030: "Section 4 Other Features of this function enables you to control Network FAX Transmissions under Restricted Access as well, only allowing transmission when a viable access code that is registered in the copy (or fax) machine is entered. ...* For more information on Restricted Access, refer to the following: • KM-3035/4035/5035/C850: "Section 7 COPIER MANAGEMENT" in the Copier Edition of the corresponding Operation Guide Page 2-3 The type of cover page you...

