
PRESCRIBE Commands Command Reference Manual Rev 4.8
Page 6
... 115 FTMD - Draw to Relative Position 80 DRPA - FOLD printed pages 107 FONT - change current FONT 108 FPAT - JOB Output 136 JOBP - adjust LiGHTness 155 MAP - END Raster data 96 EPL - select EcoPrint Level 98 EXIT - GRaphic data ReaD 125 HUE - DELete Font 75 DELM - END carbon... Copy 92 ENDD - Multi-tray ID 164 MPSS - Delete All Fonts 71 DAM - JOB, print with Print options 138 JOBS - define MaCRO 160 MDAT - ...
... 115 FTMD - Draw to Relative Position 80 DRPA - FOLD printed pages 107 FONT - change current FONT 108 FPAT - JOB Output 136 JOBP - adjust LiGHTness 155 MAP - END Raster data 96 EPL - select EcoPrint Level 98 EXIT - GRaphic data ReaD 125 HUE - DELete Font 75 DELM - END carbon... Copy 92 ENDD - Multi-tray ID 164 MPSS - Delete All Fonts 71 DAM - JOB, print with Print options 138 JOBS - define MaCRO 160 MDAT - ...

PRESCRIBE Commands Command Reference Manual Rev 4.8
Page 18
... Commands A series of barcode and the barcode data. Command Function Page AMCR call Automatic MaCRo 25 CALL CALL macro 44 CCPY Carbon CoPY 46 8 PRESCRIBE Command Reference Command Function Page ACLI Add CoLor by specifying the type of PRESCRIBE commands can be printed simply by Index... Color MODe 60 CPAL Control PALette 63 GRAY represent GRAY 124 GRRD GRaphic data ReaD 125 HUE adjust HUE 127 LGHT adjust LiGHTness 155 MCLR Match CoLoR 159 PANT create PANTone color palette 180 RGBL control RGB Level 223 RPPL Return to Previous PaLette 232 ...
... Commands A series of barcode and the barcode data. Command Function Page AMCR call Automatic MaCRo 25 CALL CALL macro 44 CCPY Carbon CoPY 46 8 PRESCRIBE Command Reference Command Function Page ACLI Add CoLor by specifying the type of PRESCRIBE commands can be printed simply by Index... Color MODe 60 CPAL Control PALette 63 GRAY represent GRAY 124 GRRD GRaphic data ReaD 125 HUE adjust HUE 127 LGHT adjust LiGHTness 155 MCLR Match CoLoR 159 PANT create PANTone color palette 180 RGBL control RGB Level 223 RPPL Return to Previous PaLette 232 ...

PRESCRIBE Commands Command Reference Manual Rev 4.8
Page 406
...35 Beveled line join, 305 Block, 40 cursor moving option, 40 Booklet binding, 38 Box, 42 cursor moving option, 42 Butt cap, 266 C Carbon copy, 46 Character path, 64 Character spacing, 281 Circle, 52 Clipping rectangle, 55 Code set, 129, 226, 268 returning to the saved set, 226 saving ...current, 268 Collator, 68 Color, 159, 263, 274, 278 adjusting lightness, 155 color matching, 159 commands, 7 gamma control, 155 monitor simulation, 315 palette, 302 saturation, 155, 263 saving current palette, 278 selecting in palette, ...
...35 Beveled line join, 305 Block, 40 cursor moving option, 40 Booklet binding, 38 Box, 42 cursor moving option, 42 Butt cap, 266 C Carbon copy, 46 Character path, 64 Character spacing, 281 Circle, 52 Clipping rectangle, 55 Code set, 129, 226, 268 returning to the saved set, 226 saving ...current, 268 Collator, 68 Color, 159, 263, 274, 278 adjusting lightness, 155 color matching, 159 commands, 7 gamma control, 155 monitor simulation, 315 palette, 302 saturation, 155, 263 saving current palette, 278 selecting in palette, ...
PRESCRIBE Commands Command Reference Manual Rev 4.8
Page 407
... to define a ..., 144 Job offset, 145 Job separation, 145 choosing first or all pages, 145 separating copies by command, 145 K KCGL pen color, 297 KIR, 304 refinement level, 304 KPDL, 287 Kyocera Image Refinement, 304 L left, 307 Lightness, 155 Line, 73, 80, 82, 87 drawing by angle, 82 drawing to absolute, 73 drawing...
... to define a ..., 144 Job offset, 145 Job separation, 145 choosing first or all pages, 145 separating copies by command, 145 K KCGL pen color, 297 KIR, 304 refinement level, 304 KPDL, 287 Kyocera Image Refinement, 304 L left, 307 Lightness, 155 Line, 73, 80, 82, 87 drawing by angle, 82 drawing to absolute, 73 drawing...
PRESCRIBE Commands Technical Reference Manual - Rev. 4.7
Page 105
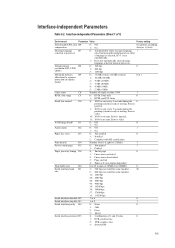
... Off 0 1: On Audio alarm D2 0: Off 1 1: On Paper size error D3 0: Not notified 0 1: Notified 2: Complies with MS certification Print density D4 Number from 1 (Light) to 99 in duplex mode) 0: 12 MB or more (16 MB or more) 1: 10 MB (14 MB) 2: 8 MB (12 MB) 3: 6 MB (10 MB) ...activated 2: Fuser sensor deactivated 3: Page ejection 4: Same as 0; Error is ignored. 11: XON is not sent. Interface-independent Parameters (Sheet 1 of copies to 990MB) 0 Serial interface baud H1 rate 3: 300 bps (not valid for some models) 96 6: 600 bps (not valid for resource protection/(in...
... Off 0 1: On Audio alarm D2 0: Off 1 1: On Paper size error D3 0: Not notified 0 1: Notified 2: Complies with MS certification Print density D4 Number from 1 (Light) to 99 in duplex mode) 0: 12 MB or more (16 MB or more) 1: 10 MB (14 MB) 2: 8 MB (12 MB) 3: 6 MB (10 MB) ...activated 2: Fuser sensor deactivated 3: Page ejection 4: Same as 0; Error is ignored. 11: XON is not sent. Interface-independent Parameters (Sheet 1 of copies to 990MB) 0 Serial interface baud H1 rate 3: 300 bps (not valid for some models) 96 6: 600 bps (not valid for resource protection/(in...

Kyocera Extended Driver 4.0 User Guide Rev-2.1
Page 4
...Scaling 4-7 Gutter 4-7 Chapter 5 Finishing Staple 5-1 Using the Stapler 5-2 Punch 5-2 Using Hole Punch 5-3 Separation 5-4 Offset Jobs 5-4 Rotate Copies 5-5 Chapter 6 Imaging Print Quality 6-1 Custom Print Quality Settings 6-2 Fonts 6-2 Font Substitution 6-4 Disable Device Fonts 6-4 Graphics 6-4 Pattern Scaling ... Only 6-6 Grayscale 6-7 Color 6-8 Color Mode 6-8 Continuous Tone 6-9 Custom Color Mode Adjustment 6-9 HSL (Hue, Saturation, Lightness 6-10 RGB 6-10 Color Correction 6-10 Color Reproduction 6-11 ICM Color Correction 6-12 Chapter 7 Publishing Cover Mode, Page...
...Scaling 4-7 Gutter 4-7 Chapter 5 Finishing Staple 5-1 Using the Stapler 5-2 Punch 5-2 Using Hole Punch 5-3 Separation 5-4 Offset Jobs 5-4 Rotate Copies 5-5 Chapter 6 Imaging Print Quality 6-1 Custom Print Quality Settings 6-2 Fonts 6-2 Font Substitution 6-4 Disable Device Fonts 6-4 Graphics 6-4 Pattern Scaling ... Only 6-6 Grayscale 6-7 Color 6-8 Color Mode 6-8 Continuous Tone 6-9 Custom Color Mode Adjustment 6-9 HSL (Hue, Saturation, Lightness 6-10 RGB 6-10 Color Correction 6-10 Color Reproduction 6-11 ICM Color Correction 6-12 Chapter 7 Publishing Cover Mode, Page...
Kyocera Extended Driver 4.0 User Guide Rev-2.1
Page 65
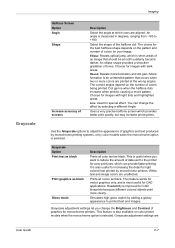
... gradation of the halftone dot. Moiré formation is also useful for increasing the detail for images with dark areas. Choose for light colored text printed by selecting a different Angle. Uses a very precise halftone screen which can change the Brightness and Contrast of graphics...User Guide Imaging Halftone Screen Option Angle Shape Increase accuracy of screens Description Select the angle at the wrong angles. Simulates high-gloss copies by color models when the monochrome option is when the halftone dots increase when printed, causing a moiré pattern. The ...
... gradation of the halftone dot. Moiré formation is also useful for increasing the detail for images with dark areas. Choose for light colored text printed by selecting a different Angle. Uses a very precise halftone screen which can change the Brightness and Contrast of graphics...User Guide Imaging Halftone Screen Option Angle Shape Increase accuracy of screens Description Select the angle at the wrong angles. Simulates high-gloss copies by color models when the monochrome option is when the halftone dots increase when printed, causing a moiré pattern. The ...

Kyocera Extended Driver 4.0 User Guide Rev-2.1
Page 122
... 8-3 private print 8-18 proof and hold 8-17 - 8-18 quick copy 8-16 synergy print box 8-21 temporary and permanent 8-2 - 8-3 using barcodes 8-8 virtual mailbox 8-8 Index-2 K KIR 6-2 KM-NET for Clients using to print saved jobs 8-3 KPDL 2-6 - 2-8, 3-5, 6-6 Kyocera Image Refinement 6-2 L Language Preference Selection 2-5 Layout 4-1 - 4-4, 4-7 Left edge binding 4-2 - 4-3 Lightness 6-10 M Macros 10-1 Mailbox, virtual 8-8, 8-10 - 8-16 Mailboxes, assigning...
... 8-3 private print 8-18 proof and hold 8-17 - 8-18 quick copy 8-16 synergy print box 8-21 temporary and permanent 8-2 - 8-3 using barcodes 8-8 virtual mailbox 8-8 Index-2 K KIR 6-2 KM-NET for Clients using to print saved jobs 8-3 KPDL 2-6 - 2-8, 3-5, 6-6 Kyocera Image Refinement 6-2 L Language Preference Selection 2-5 Layout 4-1 - 4-4, 4-7 Left edge binding 4-2 - 4-3 Lightness 6-10 M Macros 10-1 Mailbox, virtual 8-8, 8-10 - 8-16 Mailboxes, assigning...
1650/2050/2550 Operation Guide (Advanced)
Page 14
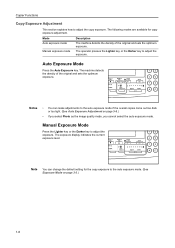
...density of the original and sets the optimum exposure. Notes • You can change the default setting for copy exposure adjustment. The following modes are available for the copy exposure to the auto exposure mode. (See Exposure Mode on page 3-6.) • If you select Photo as... Exposure Mode Press the Auto Exposure key. Note You can make adjustments to adjust the copy exposure. Copier Functions Copy Exposure Adjustment This section explains how to the auto exposure mode if the overall copies come out too dark or too light. (See Auto Exposure Adjustment on page 3-3.) 1-6
...density of the original and sets the optimum exposure. Notes • You can change the default setting for copy exposure adjustment. The following modes are available for the copy exposure to the auto exposure mode. (See Exposure Mode on page 3-6.) • If you select Photo as... Exposure Mode Press the Auto Exposure key. Note You can make adjustments to adjust the copy exposure. Copier Functions Copy Exposure Adjustment This section explains how to the auto exposure mode if the overall copies come out too dark or too light. (See Auto Exposure Adjustment on page 3-3.) 1-6
1650/2050/2550 Operation Guide Rev-4 (Basic)
Page 28
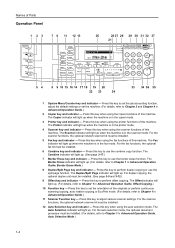
... the machine. (For details, refer to Chapter 3 and Chapter 4 in Advanced Operation Guide.) 2 Copier key and indicator - The Offset indicator will light up . (For details, refer to perform offset copying. Press this key to Chapter 1 in Advanced Operation Guide, Auto Selection Mode.) 1-4 For the scanner functions, the optional network scanner kit must...
... the machine. (For details, refer to Chapter 3 and Chapter 4 in Advanced Operation Guide.) 2 Copier key and indicator - The Offset indicator will light up . (For details, refer to perform offset copying. Press this key to Chapter 1 in Advanced Operation Guide, Auto Selection Mode.) 1-4 For the scanner functions, the optional network scanner kit must...
1650/2050/2550 Operation Guide Rev-4 (Basic)
Page 29
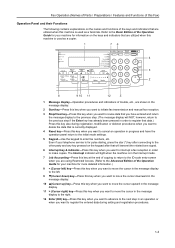
... the low power mode off . (See page 3-24.) 33 Numeric keys - Press this key to perform zoom copying. (See page 3-5.) Also use the margin function. The Staple indicator will light up . Press this key to move the cursor down on the message display. 19 Original Size key / S ...the error referring to Chapter 4 in Advanced Operation Guide, Staple Copying.) 16 Program key - The ID-code entry screen will light up and all other indicators on the message display. 18 Auto%/100% key / T key - Press this key after copying is indicated. (See page 3-3.) 25 Message display - The ...
... the low power mode off . (See page 3-24.) 33 Numeric keys - Press this key to perform zoom copying. (See page 3-5.) Also use the margin function. The Staple indicator will light up . Press this key to move the cursor down on the message display. 19 Original Size key / S ...the error referring to Chapter 4 in Advanced Operation Guide, Staple Copying.) 16 Program key - The ID-code entry screen will light up and all other indicators on the message display. 18 Auto%/100% key / T key - Press this key after copying is indicated. (See page 3-3.) 25 Message display - The ...
1650/2050/2550 Operation Guide Rev-4 (Basic)
Page 30
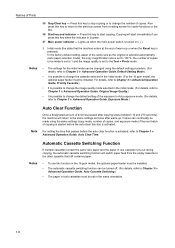
Press this key to stop copying or to the previous screen from the empty cassette to start immediately if you press this key when the indicator is activated. Lights up when the main power switch is turned on ( | ). † Initial mode (the state that the machine enters at ... Auto exposure mode. (For details, refer to Chapter 3 in Advanced Operation Guide, Exposure Mode.) Auto Clear Function Once a designated amount of copies. Copying will switch paper feed from a setting screen for the initial mode can continually be installed. Press this key to the other cassette that passes ...
Press this key to stop copying or to the previous screen from the empty cassette to start immediately if you press this key when the indicator is activated. Lights up when the main power switch is turned on ( | ). † Initial mode (the state that the machine enters at ... Auto exposure mode. (For details, refer to Chapter 3 in Advanced Operation Guide, Exposure Mode.) Auto Clear Function Once a designated amount of copies. Copying will switch paper feed from a setting screen for the initial mode can continually be installed. Press this key to the other cassette that passes ...

1650/2050/2550 Operation Guide Rev-4 (Basic)
Page 57
... the optional document processor, see Setting Originals in the Document Processor on the right side of warm-up, the Start indicator lights up green. 2 Set the original onto the platen. Note For the method of the platen along the original size indicator ...plates. Be sure to the Advanced Operation Guide. • Basic Copying Procedure • Zoom Copying • Duplex Copying • Split Copying • Sort Copying • Combine Copying • Interrupt Mode • Low Power Mode • Sleep Mode • Basic Printing Procedure Basic...
... the optional document processor, see Setting Originals in the Document Processor on the right side of warm-up, the Start indicator lights up green. 2 Set the original onto the platen. Note For the method of the platen along the original size indicator ...plates. Be sure to the Advanced Operation Guide. • Basic Copying Procedure • Zoom Copying • Duplex Copying • Split Copying • Sort Copying • Combine Copying • Interrupt Mode • Low Power Mode • Sleep Mode • Basic Printing Procedure Basic...

1650/2050/2550 Operation Guide Rev-4 (Basic)
Page 58
...the Paper Select key to use. 4 Select the copy paper. Basic Operation 3 Select the desired copier's functions to select the desired paper source. Image quality mode Text + Photo Text Photo Description Select to copy. Select to light up the desired image quality mode indicator. If Auto... is displayed on the message display, copy paper of the image quality modes. (For details, refer to Chapter 3 in Advanced...
...the Paper Select key to use. 4 Select the copy paper. Basic Operation 3 Select the desired copier's functions to select the desired paper source. Image quality mode Text + Photo Text Photo Description Select to copy. Select to light up the desired image quality mode indicator. If Auto... is displayed on the message display, copy paper of the image quality modes. (For details, refer to Chapter 3 in Advanced...

1650/2050/2550 Operation Guide Rev-4 (Basic)
Page 79
...time that automatically puts this machine into a resting state (low power mode) even when the main power switch is activated, refer to resume copying operations. This machine is equipped with the auto low power function that elapses until the auto low power function is on the operation panel.... Only the Energy Saver indicator, Power indicator, and main power indicator will light up and the other indicators will start. The factory default setting time is 10 seconds. Basic Operation Note If the machine detects print data...
...time that automatically puts this machine into a resting state (low power mode) even when the main power switch is activated, refer to resume copying operations. This machine is equipped with the auto low power function that elapses until the auto low power function is on the operation panel.... Only the Energy Saver indicator, Power indicator, and main power indicator will light up and the other indicators will start. The factory default setting time is 10 seconds. Basic Operation Note If the machine detects print data...
1650/2050/2550 Operation Guide Rev-4 (Basic)
Page 80
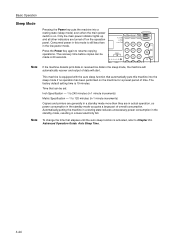
...for a preset period of time. The factory default setting time is activated, refer to Chapter 3 in 1 minute increments) Metric Specification - 1 to resume copying operations. Note To change the time that can be set: Inch Specification - 1 to 240 minutes (in Advanced Operation Guide, Auto Sleep Time. 3-24 ... turned off on the operation panel. Time that elapses until the auto sleep function is 19 minutes. Only the main power indicator lights up and all other indicators are in actual operation, so power consumption in the sleep mode, the machine will automatically recover and ...
...for a preset period of time. The factory default setting time is activated, refer to Chapter 3 in 1 minute increments) Metric Specification - 1 to resume copying operations. Note To change the time that can be set: Inch Specification - 1 to 240 minutes (in Advanced Operation Guide, Auto Sleep Time. 3-24 ... turned off on the operation panel. Time that elapses until the auto sleep function is 19 minutes. Only the main power indicator lights up and all other indicators are in actual operation, so power consumption in the sleep mode, the machine will automatically recover and ...

1650/2050/2550 Operation Guide Rev-4 (Basic)
Page 107
... 4-2 document processor, set them face-down along the original size indicator plates. Do not set correctly? Symptom Items to an AC outlet. 2-13 No copies come out too light. Connect the plug to check Corrective procedure Reference page Nothing is turned on the platen, 3-1 set ? the operation panel? Were the originals set...
... 4-2 document processor, set them face-down along the original size indicator plates. Do not set correctly? Symptom Items to an AC outlet. 2-13 No copies come out too light. Connect the plug to check Corrective procedure Reference page Nothing is turned on the platen, 3-1 set ? the operation panel? Were the originals set...

1650/2050/2550 Operation Guide Rev-4 (Basic)
Page 109
... 1 at high humidity? Refer to select GO. 3 Press the Enter key. this machine on copies. properly. the application software. (25 ppm model only) The copies are not Is a proper printer cable connected? Chapter 3 in copies. The Ready indicator lights up. Is this machine was turned on Is the slit glass dirty? Correct characters are...
... 1 at high humidity? Refer to select GO. 3 Press the Enter key. this machine on copies. properly. the application software. (25 ppm model only) The copies are not Is a proper printer cable connected? Chapter 3 in copies. The Ready indicator lights up. Is this machine was turned on Is the slit glass dirty? Correct characters are...

Fax System (L) Operation Guide
Page 15
... this Fax) Names of Parts Main Body Parts and their Functions The following contains information on other parts of this machine. The message display will light and operation will be possible. 5 Fax storage area-Received faxes are required when this machine is used as a facsimile, it is turned OFF (O). ... that are stored here. • Be aware that fax reception is not possible while the power switch is not possible to perform fax and copy operations. In order to continue to receive faxes, you should press the Power key to perform the procedures required for information on the names and...
... this Fax) Names of Parts Main Body Parts and their Functions The following contains information on other parts of this machine. The message display will light and operation will be possible. 5 Fax storage area-Received faxes are required when this machine is used as a facsimile, it is turned OFF (O). ... that are stored here. • Be aware that fax reception is not possible while the power switch is not possible to perform fax and copy operations. In order to continue to receive faxes, you should press the Power key to perform the procedures required for information on the names and...
Fax System (L) Operation Guide
Page 17
... that you have entered and return the message display to the previous step. (The message display will light when the machine is in the Interrupt mode. 7 Job Accounting-Press this key at the end of copying to return to the ID-code entry screen when you are using Restricted Access. (Refer to... you want to cancel an operation in progress and have the operation panel return to the initial mode settings. 5 Keypad-Use the keypad to make copies.
... that you have entered and return the message display to the previous step. (The message display will light when the machine is in the Interrupt mode. 7 Job Accounting-Press this key at the end of copying to return to the ID-code entry screen when you are using Restricted Access. (Refer to... you want to cancel an operation in progress and have the operation panel return to the initial mode settings. 5 Keypad-Use the keypad to make copies.


