bizhub 20P Quick Guide
Page 1
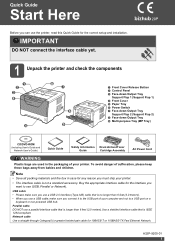
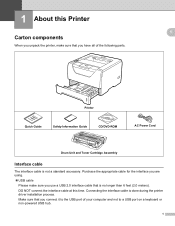
... 2 (Support Flap 2) h Face-down Output Tray i Multi-purpose Tray (MP Tray) CD/DVD-ROM (including User's Guide and Network User's Guide) Quick Guide Safety Information Drum Unit and Toner Guide Cartridge Assembly AC Power Cord WARNING Plastic bags are used in case for 10BASE-T or 100BASE-TX Fast Ethernet Network.
... 2 (Support Flap 2) h Face-down Output Tray i Multi-purpose Tray (MP Tray) CD/DVD-ROM (including User's Guide and Network User's Guide) Quick Guide Safety Information Drum Unit and Toner Guide Cartridge Assembly AC Power Cord WARNING Plastic bags are used in case for 10BASE-T or 100BASE-TX Fast Ethernet Network.
bizhub 20P Quick Guide
Page 3
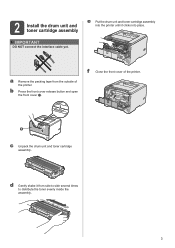
f Close the front cover of the printer. 2 Install the drum unit and toner cartridge assembly IMPORTANT DO NOT connect the interface cable yet. e Put the drum unit and toner cartridge assembly into the printer until it from the outside of the printer. 11 c Unpack the drum unit and toner cartridge assembly. b Press the front cover release button and open the front cover a. d Gently shake it clicks into place. a Remove the packing tape from side to side several times to distribute the toner evenly inside the assembly. 3
f Close the front cover of the printer. 2 Install the drum unit and toner cartridge assembly IMPORTANT DO NOT connect the interface cable yet. e Put the drum unit and toner cartridge assembly into the printer until it from the outside of the printer. 11 c Unpack the drum unit and toner cartridge assembly. b Press the front cover release button and open the front cover a. d Gently shake it clicks into place. a Remove the packing tape from side to side several times to distribute the toner evenly inside the assembly. 3
bizhub 20P Quick Guide
Page 28
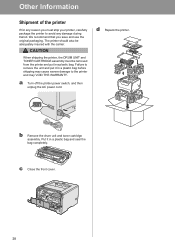
b Remove the drum unit and toner cartridge assembly. c Close the front cover. 28 We recommend that you must be adequately insured with the carrier. Failure to remove the ... should also be removed from the printer and put it in a plastic bag before shipping may VOID THE WARRANTY. CAUTION When shipping the printer, the DRUM UNIT and TONER CARTRIDGE assembly must ship your printer, carefully package the printer to the printer and may cause severe damage to avoid any reason...
b Remove the drum unit and toner cartridge assembly. c Close the front cover. 28 We recommend that you must be adequately insured with the carrier. Failure to remove the ... should also be removed from the printer and put it in a plastic bag before shipping may VOID THE WARRANTY. CAUTION When shipping the printer, the DRUM UNIT and TONER CARTRIDGE assembly must ship your printer, carefully package the printer to the printer and may cause severe damage to avoid any reason...

bizhub 20P Quick Guide
Page 29
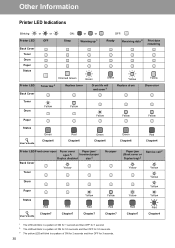
e Status LED The Status LED will end soon, the drum is at the end of its life or the corona wire needs cleaning. g Go button Wake-up / Error recovery / Form feed / Reprint For the details ... LED indicates when the toner is a paper jam. Other Information Control panel a Back Cover LED The Back Cover LED indicates when errors occur in progress. c Drum LED The Drum LED indicates when the drum life will be on/blink or change color depending on the CD/DVD-ROM. 29
e Status LED The Status LED will end soon, the drum is at the end of its life or the corona wire needs cleaning. g Go button Wake-up / Error recovery / Form feed / Reprint For the details ... LED indicates when the toner is a paper jam. Other Information Control panel a Back Cover LED The Back Cover LED indicates when errors occur in progress. c Drum LED The Drum LED indicates when the drum life will be on/blink or change color depending on the CD/DVD-ROM. 29
bizhub 20P Quick Guide
Page 30
...2 Print data remaining Printer LED Back Cover Dimmed Green Green Green Yellow Toner low 3 Replace toner Drum life will end soon 3 Replace drum Yellow Drum error Toner Drum Paper Yellow Yellow Yellow Yellow Yellow Status User's Guide Green Chapter6 Red Chapter6 Green Chapter6 Green Chapter6 ... Printer LED Front cover open Fuser cover Paper jam / open 2/ Incorrect paper Duplex disabled size 2 Back Cover Yellow Toner Drum Paper Status User's Guide Red Chapter7 Red Chapter7 Yellow Red Chapter7 No paper Yellow Red Chapter7 Paper jam (Back cover or Duplex...
...2 Print data remaining Printer LED Back Cover Dimmed Green Green Green Yellow Toner low 3 Replace toner Drum life will end soon 3 Replace drum Yellow Drum error Toner Drum Paper Yellow Yellow Yellow Yellow Yellow Status User's Guide Green Chapter6 Red Chapter6 Green Chapter6 Green Chapter6 ... Printer LED Front cover open Fuser cover Paper jam / open 2/ Incorrect paper Duplex disabled size 2 Back Cover Yellow Toner Drum Paper Status User's Guide Red Chapter7 Red Chapter7 Yellow Red Chapter7 No paper Yellow Red Chapter7 Paper jam (Back cover or Duplex...
bizhub 20P Quick Guide
Page 31
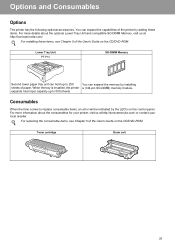
... installing these items. For more information about the optional Lower Tray Unit and compatible SO-DIMM Memory, visit us at http://konicaminolta.com/. Toner cartridge Drum unit 31 For replacing the consumable items, see Chapter 5 of the User's Guide on the CD/DVD-ROM. . Lower Tray Unit PF-P10 SO-DIMM...
... installing these items. For more information about the optional Lower Tray Unit and compatible SO-DIMM Memory, visit us at http://konicaminolta.com/. Toner cartridge Drum unit 31 For replacing the consumable items, see Chapter 5 of the User's Guide on the CD/DVD-ROM. . Lower Tray Unit PF-P10 SO-DIMM...
bizhub 20P User Guide
Page 9
...-DIMM (memory module)...85 SO-DIMM types ...85 Installing extra memory ...86 6 Routine Maintenance 88 Replacing the consumable items...88 Consumables...88 Toner cartridge ...89 Drum unit ...96 Cleaning ...101 Cleaning the outside of the printer 101 Cleaning the inside of the printer...103 Cleaning the paper pick-up roller...106...
...-DIMM (memory module)...85 SO-DIMM types ...85 Installing extra memory ...86 6 Routine Maintenance 88 Replacing the consumable items...88 Consumables...88 Toner cartridge ...89 Drum unit ...96 Cleaning ...101 Cleaning the outside of the printer 101 Cleaning the inside of the printer...103 Cleaning the paper pick-up roller...106...
bizhub 20P User Guide
Page 11
... non-powered USB hub. 1 DO NOT connect the interface cable at this Printer1 1 1 1 Printer Quick Guide Safety Information Guide CD/DVD-ROM AC Power Cord Drum Unit and Toner Cartridge Assembly Interface cable 1 The interface cable is not a standard accessory. Purchase the appropriate cable for the interface you are using. „...
... non-powered USB hub. 1 DO NOT connect the interface cable at this Printer1 1 1 1 Printer Quick Guide Safety Information Guide CD/DVD-ROM AC Power Cord Drum Unit and Toner Cartridge Assembly Interface cable 1 The interface cable is not a standard accessory. Purchase the appropriate cable for the interface you are using. „...
bizhub 20P User Guide
Page 81
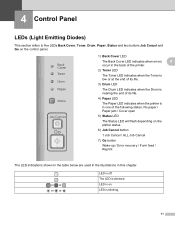
... in this chapter. LED is blinking. 71 Control Panel4 4 Control Panel 4 LEDs (Light Emitting Diodes) 4 This section refers to five LEDs Back Cover, Toner, Drum, Paper, Status and two buttons Job Cancel and Go on the control panel. 1) Back Cover LED The Back Cover LED indicates when errors 4 occur in...back of the printer. 2) Toner LED The Toner LED indicates when the Toner is low or at the end of its life. 3) Drum LED The Drum LED indicates when the Drum is nearing the end of the following states: No paper / Paper jam / Cover open 5) Status LED The Status LED will flash ...
... in this chapter. LED is blinking. 71 Control Panel4 4 Control Panel 4 LEDs (Light Emitting Diodes) 4 This section refers to five LEDs Back Cover, Toner, Drum, Paper, Status and two buttons Job Cancel and Go on the control panel. 1) Back Cover LED The Back Cover LED indicates when errors 4 occur in...back of the printer. 2) Toner LED The Toner LED indicates when the Toner is low or at the end of its life. 3) Drum LED The Drum LED indicates when the Drum is nearing the end of the following states: No paper / Paper jam / Cover open 5) Status LED The Status LED will flash ...
bizhub 20P User Guide
Page 83
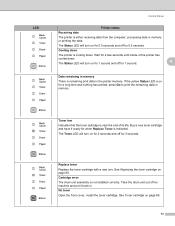
...printer memory. Wait for a few seconds until inside of the machine and put it ready for when Replace Toner is not installed correctly. Take the drum unit out of the printer has cooled down . Replace toner Replace the toner cartridge with a new one. Buy a new toner cartridge and have... it back in. The Status LED will turn on for 1 second and off for 3 seconds. Cartridge error The drum unit assembly is indicated. See Toner cartridge on page 90. The Toner LED will turn on for 0.5 seconds and off for 0.5 seconds. LED Control Panel...
...printer memory. Wait for a few seconds until inside of the machine and put it ready for when Replace Toner is not installed correctly. Take the drum unit out of the printer has cooled down . Replace toner Replace the toner cartridge with a new one. Buy a new toner cartridge and have... it back in. The Status LED will turn on for 1 second and off for 3 seconds. Cartridge error The drum unit assembly is indicated. See Toner cartridge on page 90. The Toner LED will turn on for 0.5 seconds and off for 0.5 seconds. LED Control Panel...
bizhub 20P User Guide
Page 84
... is near the end of its life. Then press Go. LED Control Panel Printer status Drum life will turn on page 97. No paper Put paper in the tray. See Printing on plain paper, bond paper and transparencies on page 11, ... thick paper, labels and envelopes on page 20 or Cleaning the paper pick-up roller on page 97. We recommend that you get a new drum unit to replace the current one . See Replacing the drum unit on page 106. 74 See Replacing the drum unit on for 2 seconds and off for 3 seconds. 4 Replace...
... is near the end of its life. Then press Go. LED Control Panel Printer status Drum life will turn on page 97. No paper Put paper in the tray. See Printing on plain paper, bond paper and transparencies on page 11, ... thick paper, labels and envelopes on page 20 or Cleaning the paper pick-up roller on page 97. We recommend that you get a new drum unit to replace the current one . See Replacing the drum unit on page 106. 74 See Replacing the drum unit on for 2 seconds and off for 3 seconds. 4 Replace...
bizhub 20P User Guide
Page 86
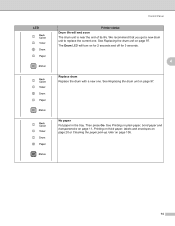
Add more memory to the printer. See Cleaning the corona wire on page 97. 76 Remove additional trays. See Replacing the drum unit on page 108. Too many trays Maximum number of optional trays is full and the printer cannot print full pages of the printer. Memory...extra memory on page 130. Buffer error Check the cable connection between the PC and printer. Delete fonts or add more memory to be cleaned. Drum error The corona wire needs to the printer. See Solving print problems on page 86. Print overrun A print overrun occurred and the printer cannot print...
Add more memory to the printer. See Cleaning the corona wire on page 97. 76 Remove additional trays. See Replacing the drum unit on page 108. Too many trays Maximum number of optional trays is full and the printer cannot print full pages of the printer. Memory...extra memory on page 130. Buffer error Check the cable connection between the PC and printer. Delete fonts or add more memory to be cleaned. Drum error The corona wire needs to the printer. See Solving print problems on page 86. Print overrun A print overrun occurred and the printer cannot print...
bizhub 20P User Guide
Page 87
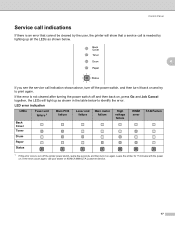
... error indication 4 LEDs Back Cover Toner Fuser unit failure 1 Main PCB failure Laser unit failure Main motor failure High voltage failure DIMM error FAN Failure Drum Paper Status 1 If this error occurs, turn off the printer power switch, wait a few seconds, and then turn it on . Control Panel Service call indications... the user, the printer will light up all the LEDs as shown in the table below . 4 If you see the service call your dealer or KONICA MINOLTA Customer Service. 77
... error indication 4 LEDs Back Cover Toner Fuser unit failure 1 Main PCB failure Laser unit failure Main motor failure High voltage failure DIMM error FAN Failure Drum Paper Status 1 If this error occurs, turn off the printer power switch, wait a few seconds, and then turn it on . Control Panel Service call indications... the user, the printer will light up all the LEDs as shown in the table below . 4 If you see the service call your dealer or KONICA MINOLTA Customer Service. 77

bizhub 20P User Guide
Page 90
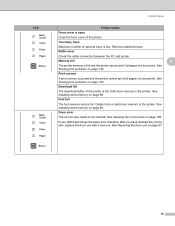
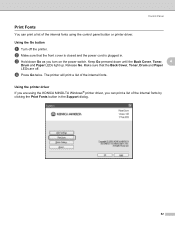
c Hold down until the Back Cover, Toner, 4 Drum and Paper LEDs light up. Release Go. d Press Go again. Keep Go pressed down Go as you are off the printer. The printer will print a .... 80 Using the printer driver 4 If you turn on the power switch. Using the Go button 4 a Turn off . b Make sure that the Back Cover, Toner, Drum and Paper LEDs are using the Windows® printer driver, click the Print Test Page button in .
c Hold down until the Back Cover, Toner, 4 Drum and Paper LEDs light up. Release Go. d Press Go again. Keep Go pressed down Go as you are off the printer. The printer will print a .... 80 Using the printer driver 4 If you turn on the power switch. Using the Go button 4 a Turn off . b Make sure that the Back Cover, Toner, Drum and Paper LEDs are using the Windows® printer driver, click the Print Test Page button in .
bizhub 20P User Guide
Page 92
b Make sure that the Back Cover, Toner, Drum and Paper LEDs are using the control panel button or printer driver. Keep Go pressed down Go as you can print a list of the internal fonts using the KONICA MINOLTA Windows® printer driver, you turn on the power switch. Release Go. d ...Press Go twice. The printer will print a list of the internal fonts. c Hold down until the Back Cover, Toner, 4 Drum and Paper LEDs light up. Make sure that...
b Make sure that the Back Cover, Toner, Drum and Paper LEDs are using the control panel button or printer driver. Keep Go pressed down Go as you can print a list of the internal fonts using the KONICA MINOLTA Windows® printer driver, you turn on the power switch. Release Go. d ...Press Go twice. The printer will print a list of the internal fonts. c Hold down until the Back Cover, Toner, 4 Drum and Paper LEDs light up. Make sure that...
bizhub 20P User Guide
Page 98
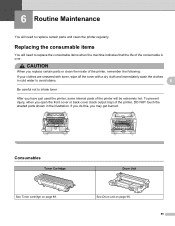
... shaded parts shown in cold water to avoid stains. 6 Be careful not to inhale toner. Consumables Toner Cartridge See Toner cartridge on page 89. 6 Drum Unit See Drum unit on page 96. 88 To prevent injury, when you may get burned. After you replace certain parts or clean the inside of the...
... shaded parts shown in cold water to avoid stains. 6 Be careful not to inhale toner. Consumables Toner Cartridge See Toner cartridge on page 89. 6 Drum Unit See Drum unit on page 96. 88 To prevent injury, when you may get burned. After you replace certain parts or clean the inside of the...

bizhub 20P User Guide
Page 101
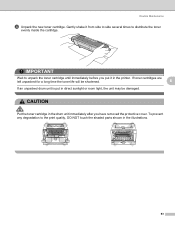
Routine Maintenance IMPORTANT We recommend that you put the drum unit and toner cartridge assembly on a piece of the drum unit. 91 c Push down the blue lock lever and take the toner cartridge out of disposable paper or cloth in case you accidentally spill or scatter toner. 6 To prevent damage to the printer caused by static electricity, DO NOT touch the electrodes shown in the illustration. b Take out the drum unit and toner cartridge assembly.
Routine Maintenance IMPORTANT We recommend that you put the drum unit and toner cartridge assembly on a piece of the drum unit. 91 c Push down the blue lock lever and take the toner cartridge out of disposable paper or cloth in case you accidentally spill or scatter toner. 6 To prevent damage to the printer caused by static electricity, DO NOT touch the electrodes shown in the illustration. b Take out the drum unit and toner cartridge assembly.
bizhub 20P User Guide
Page 103
... cartridge. IMPORTANT Wait to unpack the toner cartridge until immediately before you have removed the protective cover. CAUTION Put the toner cartridge in the drum unit immediately after you put in the illustrations. 93 Gently shake it in the printer. If toner cartridges are left unpacked for a long ...time the toner life will be shortened. 6 If an unpacked drum unit is put it from side to side several times to the print quality, DO NOT touch the shaded parts shown in direct sunlight or...
... cartridge. IMPORTANT Wait to unpack the toner cartridge until immediately before you have removed the protective cover. CAUTION Put the toner cartridge in the drum unit immediately after you put in the illustrations. 93 Gently shake it in the printer. If toner cartridges are left unpacked for a long ...time the toner life will be shortened. 6 If an unpacked drum unit is put it from side to side several times to the print quality, DO NOT touch the shaded parts shown in direct sunlight or...

bizhub 20P User Guide
Page 104
...94 Our warranty coverage does not apply to any problem that is caused to the drum unit or other part of this machine as a result of other countries KONICA MINOLTA machines are used with this machine. We also strongly recommend that you do not refill...toner and/or cartridges. Routine Maintenance IMPORTANT For USA and Canada KONICA MINOLTA strongly recommends that you continue to use only genuine KONICA MINOLTA brand replacement toner cartridges. If damage is caused by the warranty. KONICA MINOLTA does not therefore recommend the use of cartridges other manufacturer's ...
...94 Our warranty coverage does not apply to any problem that is caused to the drum unit or other part of this machine as a result of other countries KONICA MINOLTA machines are used with this machine. We also strongly recommend that you do not refill...toner and/or cartridges. Routine Maintenance IMPORTANT For USA and Canada KONICA MINOLTA strongly recommends that you continue to use only genuine KONICA MINOLTA brand replacement toner cartridges. If damage is caused by the warranty. KONICA MINOLTA does not therefore recommend the use of cartridges other manufacturer's ...
bizhub 20P User Guide
Page 105
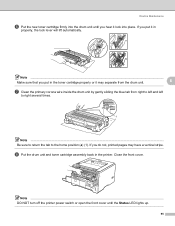
If you put it in properly, the lock lever will lift automatically. Close the front cover. h Put the drum unit and toner cartridge assembly back in the toner cartridge properly or it lock into the drum unit until the Status LED lights up. 95 Note Make sure that you do not, printed pages... may separate from the drum unit. 6 g Clean the primary corona wire inside the drum unit by gently sliding the blue tab from right to left and left to right several times. 1 Note Be sure to return...
If you put it in properly, the lock lever will lift automatically. Close the front cover. h Put the drum unit and toner cartridge assembly back in the toner cartridge properly or it lock into the drum unit until the Status LED lights up. 95 Note Make sure that you do not, printed pages... may separate from the drum unit. 6 g Clean the primary corona wire inside the drum unit by gently sliding the blue tab from right to left and left to right several times. 1 Note Be sure to return...


