User's Guide
Page 1
Kodak EasyShare photo printer 350 User's Guide www.kodak.com For interactive tutorials, www.kodak.com/go/howto
Kodak EasyShare photo printer 350 User's Guide www.kodak.com For interactive tutorials, www.kodak.com/go/howto
User's Guide
Page 5
...; wireless technology device 7 Printing from a Bluetooth wireless technology enabled device 7 3 Printing from a PictBridge enabled device 11 Printing from a PictBridge enabled camera 11 4 Installing the software 12 Installing the software 12 5 Printing from a computer 15 Connecting to a computer 15 Canceling printing 17 6 Care and maintenance 18 General care 18 Cleaning the paper-feed roller 19 Traveling with your photo printer 20 7 Troubleshooting 21 Printing problems 21 Status lights 28 Helpful links 33 Telephone customer support 34 www.kodak...
...; wireless technology device 7 Printing from a Bluetooth wireless technology enabled device 7 3 Printing from a PictBridge enabled device 11 Printing from a PictBridge enabled camera 11 4 Installing the software 12 Installing the software 12 5 Printing from a computer 15 Connecting to a computer 15 Canceling printing 17 6 Care and maintenance 18 General care 18 Cleaning the paper-feed roller 19 Traveling with your photo printer 20 7 Troubleshooting 21 Printing problems 21 Status lights 28 Helpful links 33 Telephone customer support 34 www.kodak...

User's Guide
Page 7
www.kodak.com/go/support 1 1 Getting started Finding a location for paper travel. ■ For proper ventilation, make sure the top and back of the photo printer are not blocked. ■ When connecting power or USB cables, keep the cables clear of the paper path to the front and rear of dust and debris. Airborne dirt particles can affect picture quality. ■ Allow enough space on a flat, clean, dust-free surface, in...
www.kodak.com/go/support 1 1 Getting started Finding a location for paper travel. ■ For proper ventilation, make sure the top and back of the photo printer are not blocked. ■ When connecting power or USB cables, keep the cables clear of the paper path to the front and rear of dust and debris. Airborne dirt particles can affect picture quality. ■ Allow enough space on a flat, clean, dust-free surface, in...

User's Guide
Page 10
... 4 Close the door. Cartridge light 2 Rotate the cartridge spool clockwise just enough to remove the ribbon slack. Clear the paper error (see Status lights, page 28). Getting started Loading and removing the cartridge IMPORTANT: Replace the cartridge when the Cartridge light glows red (see Printing problems, page 21) and make . • Replace the cartridge when the Cartridge light glows red. • To remove the cartridge, push up on the Cartridge-release tab. 4 www.kodak.com/go/support IMPORTANT: Too many rotations may lock if there...
... 4 Close the door. Cartridge light 2 Rotate the cartridge spool clockwise just enough to remove the ribbon slack. Clear the paper error (see Status lights, page 28). Getting started Loading and removing the cartridge IMPORTANT: Replace the cartridge when the Cartridge light glows red (see Printing problems, page 21) and make . • Replace the cartridge when the Cartridge light glows red. • To remove the cartridge, push up on the Cartridge-release tab. 4 www.kodak.com/go/support IMPORTANT: Too many rotations may lock if there...

User's Guide
Page 11
... load more than 25 sheets of the paper (page 2). 1 Slide the cover back until it "clicks" into the tray IMPORTANT: Use only the PH series Kodak color cartridge & photo paper kit for this printer. To avoid fingerprints, do not touch the glossy side of paper (see fill line, , inside tray). Do not use inkjet paper. www.kodak.com/go /accessories. Getting started Loading paper into place, about 1.25 in. (3 cm). 3 Load the paper, logo side down. Purchase Kodak photo paper...
... load more than 25 sheets of the paper (page 2). 1 Slide the cover back until it "clicks" into the tray IMPORTANT: Use only the PH series Kodak color cartridge & photo paper kit for this printer. To avoid fingerprints, do not touch the glossy side of paper (see fill line, , inside tray). Do not use inkjet paper. www.kodak.com/go /accessories. Getting started Loading paper into place, about 1.25 in. (3 cm). 3 Load the paper, logo side down. Purchase Kodak photo paper...
User's Guide
Page 14
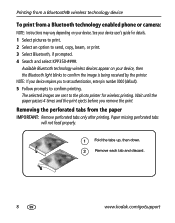
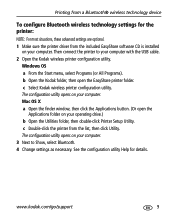
... after printing. The selected images are sent to send, copy, beam, or print. 3 Select Bluetooth, if prompted. 4 Search and select KPP350-####. Removing the perforated tabs from a Bluetooth technology enabled phone or camera: NOTE: Instructions may vary depending on your device user's guide for details. 1 Select pictures to print. 2 Select an option to the photo printer for wireless printing. Wait until the paper passes 4 times and the print ejects before you to set authentication, enter pin number 0000 (default...
... after printing. The selected images are sent to send, copy, beam, or print. 3 Select Bluetooth, if prompted. 4 Search and select KPP350-####. Removing the perforated tabs from a Bluetooth technology enabled phone or camera: NOTE: Instructions may vary depending on your device user's guide for details. 1 Select pictures to print. 2 Select an option to the photo printer for wireless printing. Wait until the paper passes 4 times and the print ejects before you to set authentication, enter pin number 0000 (default...
User's Guide
Page 15
...the USB cable. 2 Open the Kodak wireless printer configuration utility. c Select Kodak wireless printer configuration utility. The configuration utility opens on your operating drive.) b Open the Utilities folder, then double-click Printer Setup Utility. See the configuration utility Help for the printer: NOTE: For most situations, these advanced settings are optional. 1 Make sure the printer driver from the list, then click Utility. Mac OS X a Open the finder window, then click the Applications button. (Or open the EasyShare printer folder. www.kodak.com/go/support 9 Then...
...the USB cable. 2 Open the Kodak wireless printer configuration utility. c Select Kodak wireless printer configuration utility. The configuration utility opens on your operating drive.) b Open the Utilities folder, then double-click Printer Setup Utility. See the configuration utility Help for the printer: NOTE: For most situations, these advanced settings are optional. 1 Make sure the printer driver from the list, then click Utility. Mac OS X a Open the finder window, then click the Applications button. (Or open the EasyShare printer folder. www.kodak.com/go/support 9 Then...
User's Guide
Page 18
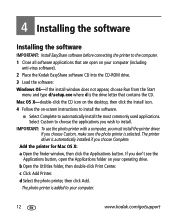
.... 4 Follow the on-screen instructions to install the software. ■ Select Complete to install. If you must install the printer driver. d Select the photo printer, then click Add. IMPORTANT: To use the photo printer with a computer, you choose Custom, make sure the photo printer is automatically installed if you don't see the Applications button, open on your computer. 12 www.kodak.com/go/support b Open the Utilities folder, then double-click Print Center. The printer driver is selected. If you choose...
.... 4 Follow the on-screen instructions to install the software. ■ Select Complete to install. If you must install the printer driver. d Select the photo printer, then click Add. IMPORTANT: To use the photo printer with a computer, you choose Custom, make sure the photo printer is automatically installed if you don't see the Applications button, open on your computer. 12 www.kodak.com/go/support b Open the Utilities folder, then double-click Print Center. The printer driver is selected. If you choose...

User's Guide
Page 19
... /support 13 See the anti-virus software manual for details. You must be found in the EasyShare software. If you turned off anti-virus software, turn it back on the Kodak EasyShare software CD, click the Help button in the Start menu.) 2 Double-click Add/Remove Programs. 3 Select Kodak EasyShare software, then click Remove. 4 Select Modify to uninstall single components, such as the printer driver, or select Remove to uninstall all components. 5 Follow the on the Kodak EasyShare software CD...
... /support 13 See the anti-virus software manual for details. You must be found in the EasyShare software. If you turned off anti-virus software, turn it back on the Kodak EasyShare software CD, click the Help button in the Start menu.) 2 Double-click Add/Remove Programs. 3 Select Kodak EasyShare software, then click Remove. 4 Select Modify to uninstall single components, such as the printer driver, or select Remove to uninstall all components. 5 Follow the on the Kodak EasyShare software CD...
User's Guide
Page 22
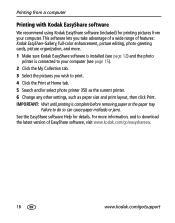
... select photo printer 350 as the current printer. 6 Change any other settings, such as paper size and print layout, then click Print. For more . 1 Make sure Kodak EasyShare software is installed (see page 12) and the photo printer is complete before removing paper or the paper tray. IMPORTANT: Wait until printing is connected to your computer. Failure to download the latest version of EasyShare software, visit www.kodak.com/go/easysharesw. 16 www.kodak.com/go/support Printing from a computer Printing with Kodak EasyShare software We recommend using Kodak EasyShare software...
... select photo printer 350 as the current printer. 6 Change any other settings, such as paper size and print layout, then click Print. For more . 1 Make sure Kodak EasyShare software is installed (see page 12) and the photo printer is complete before removing paper or the paper tray. IMPORTANT: Wait until printing is connected to your computer. Failure to download the latest version of EasyShare software, visit www.kodak.com/go/easysharesw. 16 www.kodak.com/go/support Printing from a computer Printing with Kodak EasyShare software We recommend using Kodak EasyShare software...
User's Guide
Page 23
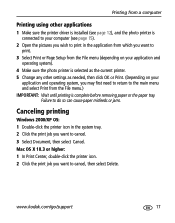
... menu.) IMPORTANT: Wait until printing is complete before removing paper or the paper tray. Printing from a computer Printing using other settings as needed, then click OK or Print. (Depending on your computer (see page 15). 2 Open the pictures you wish to print in the system tray. 2 Click the print job you want to cancel. 3 Select Document, then select Cancel. Failure to do so can cause paper misfeeds or jams. Canceling printing Windows 2000/XP OS: 1 Double...
... menu.) IMPORTANT: Wait until printing is complete before removing paper or the paper tray. Printing from a computer Printing using other settings as needed, then click OK or Print. (Depending on your computer (see page 15). 2 Open the pictures you wish to print in the system tray. 2 Click the print job you want to cancel. 3 Select Document, then select Cancel. Failure to do so can cause paper misfeeds or jams. Canceling printing Windows 2000/XP OS: 1 Double...
User's Guide
Page 27
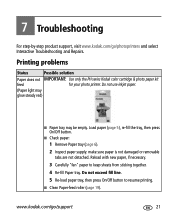
Printing problems Status Possible solution Paper does not IMPORTANT: Use only the PH series Kodak color cartridge & photo paper kit feed for your photo printer. Reload with new paper, if necessary. 3 Carefully "fan" paper to resume printing. ■ Clean Paper-feed roller (page 19). Do not use inkjet paper. (Paper light may glow steady red) ■ Paper tray may be empty. Do not exceed fill line. 5 Re-load paper tray, then press On/Off button to keep sheets from sticking together. 4 Re-fill Paper tray. www.kodak.com/go /photoprinters and select Interactive...
Printing problems Status Possible solution Paper does not IMPORTANT: Use only the PH series Kodak color cartridge & photo paper kit feed for your photo printer. Reload with new paper, if necessary. 3 Carefully "fan" paper to resume printing. ■ Clean Paper-feed roller (page 19). Do not use inkjet paper. (Paper light may glow steady red) ■ Paper tray may be empty. Do not exceed fill line. 5 Re-load paper tray, then press On/Off button to keep sheets from sticking together. 4 Re-fill Paper tray. www.kodak.com/go /photoprinters and select Interactive...

User's Guide
Page 29
... paper slot on the back of the photo printer for 5 seconds, then reconnect power. Do not exceed fill line. 5 Re-load Paper tray, then press On/Off button to resume printing. www.kodak.com/go/support 23 Cartridge light, and/or On/Off light may lock if there is off before attempting to keep sheets from ribbon, then reload cartridge (page 4). Clear the paper error and make sure the Paper light is a paper error. Carefully remove paper if it does not automatically eject. Remove cartridge, remove...
... paper slot on the back of the photo printer for 5 seconds, then reconnect power. Do not exceed fill line. 5 Re-load Paper tray, then press On/Off button to resume printing. www.kodak.com/go/support 23 Cartridge light, and/or On/Off light may lock if there is off before attempting to keep sheets from ribbon, then reload cartridge (page 4). Clear the paper error and make sure the Paper light is a paper error. Carefully remove paper if it does not automatically eject. Remove cartridge, remove...

User's Guide
Page 30
... "fan" paper to keep sheets from paper. Troubleshooting Status Possible solution Printing stops IMPORTANT: Use only the PH series Kodak color cartridge & photo paper kit during mid-print for dirty paper; Reload with dry, lint-free cloth to resume printing. ■ Clean Paper-feed roller (page 19). Print smudged ■ Fingerprints may blink) ■ Check paper: 1 Remove Paper tray (page 6). 2 Check paper slot on the paper or inside the photo printer (page 2). 24 www.kodak.com/go/support For excessive dirt or debris, thoroughly clean Paper tray and load new paper (page...
... "fan" paper to keep sheets from paper. Troubleshooting Status Possible solution Printing stops IMPORTANT: Use only the PH series Kodak color cartridge & photo paper kit during mid-print for dirty paper; Reload with dry, lint-free cloth to resume printing. ■ Clean Paper-feed roller (page 19). Print smudged ■ Fingerprints may blink) ■ Check paper: 1 Remove Paper tray (page 6). 2 Check paper slot on the paper or inside the photo printer (page 2). 24 www.kodak.com/go/support For excessive dirt or debris, thoroughly clean Paper tray and load new paper (page...

User's Guide
Page 31
... camera user's guide for details. ■ Edit picture using Kodak EasyShare software on camera. See camera user's guide for details. ■ Adjust exposure compensation on camera. See camera user's guide for overexposed, or details. Do not use inkjet paper. ■ Load paper with Kodak logo facing down (page 5). ■ Turn flash off. Troubleshooting Status Print too light or underexposed Possible solution IMPORTANT: Use only the PH series Kodak color cartridge & photo paper kit for your camera user's guide for details. ■ Turn flash on computer...
... camera user's guide for details. ■ Edit picture using Kodak EasyShare software on camera. See camera user's guide for details. ■ Adjust exposure compensation on camera. See camera user's guide for overexposed, or details. Do not use inkjet paper. ■ Load paper with Kodak logo facing down (page 5). ■ Turn flash off. Troubleshooting Status Print too light or underexposed Possible solution IMPORTANT: Use only the PH series Kodak color cartridge & photo paper kit for your camera user's guide for details. ■ Turn flash on computer...
User's Guide
Page 32
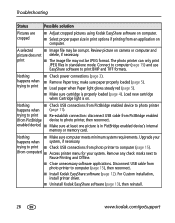
... and TIFF formats. Load new cartridge when Cartridge light is properly loaded (page 4). Nothing happens when trying to print ■ Check power connections (page 3). ■ Remove Paper tray; trying to print ■ Re-establish connection: disconnect USB cable from PictBridge enabled (from photo printer to computer (page 15), then reconnect. ■ Install Kodak EasyShare software (page 12). For Custom installation, install printer driver. ■ Uninstall Kodak EasyShare software (page 13), then reinstall. 26 www.kodak.com/go/support A selected ■ Image file may not...
... and TIFF formats. Load new cartridge when Cartridge light is properly loaded (page 4). Nothing happens when trying to print ■ Check power connections (page 3). ■ Remove Paper tray; trying to print ■ Re-establish connection: disconnect USB cable from PictBridge enabled (from photo printer to computer (page 15), then reconnect. ■ Install Kodak EasyShare software (page 12). For Custom installation, install printer driver. ■ Uninstall Kodak EasyShare software (page 13), then reinstall. 26 www.kodak.com/go/support A selected ■ Image file may not...

User's Guide
Page 33
... Status lights, light may include: -Scrapping of paper due to jams or other fully depleted. Troubleshooting Status Printing slow Possible solution NOTE: When printing a large number of photo printer. www.kodak.com/go/support 27 Upgrade system, if necessary. steady amber or blink) ■ Reload or fill Paper tray (page 5). ■ Clear paper jam (page 23). ■ Disconnect power, then reconnect (page 3). Keep cartridge and paper supply synchronized by discarding unused cartridge or paper when one or other errors -Gradual advancement of cartridge ribbon...
... Status lights, light may include: -Scrapping of paper due to jams or other fully depleted. Troubleshooting Status Printing slow Possible solution NOTE: When printing a large number of photo printer. www.kodak.com/go/support 27 Upgrade system, if necessary. steady amber or blink) ■ Reload or fill Paper tray (page 5). ■ Clear paper jam (page 23). ■ Disconnect power, then reconnect (page 3). Keep cartridge and paper supply synchronized by discarding unused cartridge or paper when one or other errors -Gradual advancement of cartridge ribbon...

User's Guide
Page 37
removable tabs may be missing or sheets may be stuck together. Reload with new paper, then press On/Off button. Clean roller. Load paper, then press On/Off button. Check paper supply. Remove Paper tray, check that paper is properly loaded, and re-load. Paper did not feed; www.kodak.com/go/support 31 Paper tray not loaded or improperly loaded. Paper-feed roller may be dirty. Press On/Off button to resume printing. Troubleshooting Paper light Light status Light glows steady Cause Action/solution Paper tray empty.
removable tabs may be missing or sheets may be stuck together. Reload with new paper, then press On/Off button. Clean roller. Load paper, then press On/Off button. Check paper supply. Remove Paper tray, check that paper is properly loaded, and re-load. Paper did not feed; www.kodak.com/go/support 31 Paper tray not loaded or improperly loaded. Paper-feed roller may be dirty. Press On/Off button to resume printing. Troubleshooting Paper light Light status Light glows steady Cause Action/solution Paper tray empty.
User's Guide
Page 44
.... ■ The photo printer and the AC power adapter contain a small amount of Kodak products for more disposal or recycling information, contact your local authorities. Disposal of the color cartridge is not regulated and should not be free from the date of this does not resolve the problem, contact customer support (see page 34). ■ Connect a tripod directly to the printer. ■ Service agreements are...
.... ■ The photo printer and the AC power adapter contain a small amount of Kodak products for more disposal or recycling information, contact your local authorities. Disposal of the color cartridge is not regulated and should not be free from the date of this does not resolve the problem, contact customer support (see page 34). ■ Connect a tripod directly to the printer. ■ Service agreements are...

User's Guide
Page 47
... equipment generates, uses, and can be used in accordance with the limits for a Class B digital device, pursuant to Part 15 of the product, they must be determined by the party responsible for additional suggestions. Regulatory compliance FCC compliance and advisory Kodak EasyShare photo printer 350 Appendix This equipment has been tested and found to comply with the instructions, may cause harmful...
... equipment generates, uses, and can be used in accordance with the limits for a Class B digital device, pursuant to Part 15 of the product, they must be determined by the party responsible for additional suggestions. Regulatory compliance FCC compliance and advisory Kodak EasyShare photo printer 350 Appendix This equipment has been tested and found to comply with the instructions, may cause harmful...


