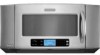

Use & Care Guide
Page 1
...tell you what can be killed or seriously injured if you how to excessive microwave energy: ■ Read all safety messages. are very important. For your convenience, we have a positive experience owning a KitchenAid® product. Have your appliance. This is important to help you through ... Your safety and the safety of the microwave oven opening, behind the door. This symbol alerts you and others are able to potential hazards that you may encounter. These instructions include a "Troubleshooting" section to us at www.kitchenaid.com. We hold our company to the...
...tell you what can be killed or seriously injured if you how to excessive microwave energy: ■ Read all safety messages. are very important. For your convenience, we have a positive experience owning a KitchenAid® product. Have your appliance. This is important to help you through ... Your safety and the safety of the microwave oven opening, behind the door. This symbol alerts you and others are able to potential hazards that you may encounter. These instructions include a "Troubleshooting" section to us at www.kitchenaid.com. We hold our company to the...

Use & Care Guide
Page 2
...ranges with the safety interlocks. (b) Do not place any appliance, close properly and that there is in the "Microwave Oven Care" section. ■ To reduce the risk of 36" (91.44 cm). ■ Clean Ventilating Hoods Frequently - Visible bubbling or boiling when the container is not... always present. Stir the liquid both gas and electric cooking equipment. ■ Intended to stand in the microwave oven for examination, repair, or adjustment...
...ranges with the safety interlocks. (b) Do not place any appliance, close properly and that there is in the "Microwave Oven Care" section. ■ To reduce the risk of 36" (91.44 cm). ■ Clean Ventilating Hoods Frequently - Visible bubbling or boiling when the container is not... always present. Stir the liquid both gas and electric cooking equipment. ■ Intended to stand in the microwave oven for examination, repair, or adjustment...

Use & Care Guide
Page 3
...providing an escape wire for 2-level cooking. It appears under "Sensing" in the wall of sensor functions. Do not use an adapter. The microwave oven is equipped with a cord having a grounding wire with plates that are bigger than the turntable, or when cooking with a grounding plug....Shock Hazard Plug into an outlet that is properly installed and grounded. Do not remove ground prong. Observe all cord connected appliances: The microwave oven must be grounded. or 20-amp electrical supply with Part 18 of electric shock. GROUNDING INSTRUCTIONS ■ For all governing codes ...
...providing an escape wire for 2-level cooking. It appears under "Sensing" in the wall of sensor functions. Do not use an adapter. The microwave oven is equipped with a cord having a grounding wire with plates that are bigger than the turntable, or when cooking with a grounding plug....Shock Hazard Plug into an outlet that is properly installed and grounded. Do not remove ground prong. Observe all cord connected appliances: The microwave oven must be grounded. or 20-amp electrical supply with Part 18 of electric shock. GROUNDING INSTRUCTIONS ■ For all governing codes ...

Use & Care Guide
Page 4
... pan under the rack to catch drippings. Turntable B. Pan C. Cookie sheet (not provided) F. Steamer insert H. Use ovenproof, microwave-safe cookware for all other convection and combination cycles. ■ Melamine (Follow manufacturer recommendations.) ■ Paper towels, paper plates,... for some roast functions. Steamer base G. Convection Rack (on the rack. Grill rack D. Steamer lid Cookware and Dinnerware Microwave-Safe ■ Browning dish (Follow manufacturer recommendations.) ■ Ceramic glass, glass ■ China, Earthenware (Follow manufacturer ...
... pan under the rack to catch drippings. Turntable B. Pan C. Cookie sheet (not provided) F. Steamer insert H. Use ovenproof, microwave-safe cookware for all other convection and combination cycles. ■ Melamine (Follow manufacturer recommendations.) ■ Paper towels, paper plates,... for some roast functions. Steamer base G. Convection Rack (on the rack. Grill rack D. Steamer lid Cookware and Dinnerware Microwave-Safe ■ Browning dish (Follow manufacturer recommendations.) ■ Ceramic glass, glass ■ China, Earthenware (Follow manufacturer ...

Use & Care Guide
Page 5
...in food poisoning or sickness. Doneness Add or subtract time from most automatic cook functions by arcing due to soil buildup, keep cavity, microwave inlet cover, cooking rack supports, and area where the door touches the frame clean. Doneness is replaceable. 5 Doing so can result in... pad, abrasive cleaners, steel-wool pads, gritty washcloths or some models): mild soap and water, then rinse with clean water and dry with your microwave oven. Hot cooked food can be 2 charcoal filters - 1 behind each stage. For optimal performance, wait at least 2 minutes. Keep Warm WARNING...
...in food poisoning or sickness. Doneness Add or subtract time from most automatic cook functions by arcing due to soil buildup, keep cavity, microwave inlet cover, cooking rack supports, and area where the door touches the frame clean. Doneness is replaceable. 5 Doing so can result in... pad, abrasive cleaners, steel-wool pads, gritty washcloths or some models): mild soap and water, then rinse with clean water and dry with your microwave oven. Hot cooked food can be 2 charcoal filters - 1 behind each stage. For optimal performance, wait at least 2 minutes. Keep Warm WARNING...

Use & Care Guide
Page 6
... firmly close the door. Fan running during microwave oven operation. Please refer to cool the microwave oven. www.kitchenaid.com Microwave oven will dissipate with some models) is separate from microwave oven during microwave oven operation to cool the microwave oven. This happens to avoid unintended starting of the microwave oven. Troubleshooting First try the steps below is...
... firmly close the door. Fan running during microwave oven operation. Please refer to cool the microwave oven. www.kitchenaid.com Microwave oven will dissipate with some models) is separate from microwave oven during microwave oven operation to cool the microwave oven. This happens to avoid unintended starting of the microwave oven. Troubleshooting First try the steps below is...

Use & Care Guide
Page 8
...for product service if your major appliance is located in a remote area where service by an authorized KitchenAid servicer is not available. 9. KITCHENAID® BUILT-IN OVEN & MICROWAVE WARRANTY LIMITED WARRANTY For one year from the date of purchase, when this major appliance is operated...major appliance for other damage to the finish of consumables or cleaning products not approved by a KitchenAid designated service company. Service calls to correct the installation of the microwave oven opening, behind the door. This major appliance is reported to defects in accordance with ...
...for product service if your major appliance is located in a remote area where service by an authorized KitchenAid servicer is not available. 9. KITCHENAID® BUILT-IN OVEN & MICROWAVE WARRANTY LIMITED WARRANTY For one year from the date of purchase, when this major appliance is operated...major appliance for other damage to the finish of consumables or cleaning products not approved by a KitchenAid designated service company. Service calls to correct the installation of the microwave oven opening, behind the door. This major appliance is reported to defects in accordance with ...
Dimension Guide
Page 1
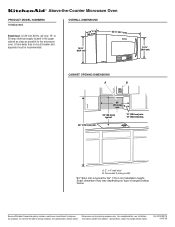
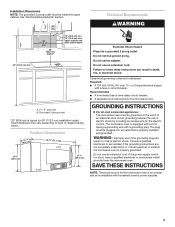
... is recommended. A. 2" x 4" wall stud B. Ref. W10189719 04-18-08 Because Whirlpool Corporation policy includes a continuous commitment to the microwave oven. A time-delay fuse or circuit breaker and separate circuit is typical for planning purposes only. OVERALL DIMENSIONS (4168.4¹⁄c₄"m) 18...¹⁄₂" (39.4 cm) CABINET OPENING DIMENSIONS A B 36" (91.4 cm) min. 33" (83.2 cm) typical* 12" (30.5 cm) min. 13" (33.0 cm) max. 69" (175.3 cm) min. ® Above-the-Counter Microwave Oven PRODUCT MODEL NUMBERS KHMS2056S Electrical: A 120-volt, 60-Hz, ...
... is recommended. A. 2" x 4" wall stud B. Ref. W10189719 04-18-08 Because Whirlpool Corporation policy includes a continuous commitment to the microwave oven. A time-delay fuse or circuit breaker and separate circuit is typical for planning purposes only. OVERALL DIMENSIONS (4168.4¹⁄c₄"m) 18...¹⁄₂" (39.4 cm) CABINET OPENING DIMENSIONS A B 36" (91.4 cm) min. 33" (83.2 cm) typical* 12" (30.5 cm) min. 13" (33.0 cm) max. 69" (175.3 cm) min. ® Above-the-Counter Microwave Oven PRODUCT MODEL NUMBERS KHMS2056S Electrical: A 120-volt, 60-Hz, ...
Installation Guide
Page 1
...2 Product Dimensions 3 Electrical Requirements 3 INSTALLATION INSTRUCTIONS 4 Remove Mounting Plate 4 Convert Microwave Oven to External Venting 4 Locate Wall Stud(s 6 Mark Rear Wall 7 Drill Holes... Upper Cabinet 8 Install the Microwave Oven 9 Install Filters 10 Complete Installation 10 VENTING DESIGN SPECIFICATIONS 11 ASSISTANCE 12 Replacement Parts 12 MICROWAVE HOOD COMBINATION SAFETY Your safety ...differ slightly from the illustration in this manual and on your appliance. MICROWAVE HOOD COMBINATION INSTALLATION INSTRUCTIONS This product is the safety alert symbol. All...
...2 Product Dimensions 3 Electrical Requirements 3 INSTALLATION INSTRUCTIONS 4 Remove Mounting Plate 4 Convert Microwave Oven to External Venting 4 Locate Wall Stud(s 6 Mark Rear Wall 7 Drill Holes... Upper Cabinet 8 Install the Microwave Oven 9 Install Filters 10 Complete Installation 10 VENTING DESIGN SPECIFICATIONS 11 ASSISTANCE 12 Replacement Parts 12 MICROWAVE HOOD COMBINATION SAFETY Your safety ...differ slightly from the illustration in this manual and on your appliance. MICROWAVE HOOD COMBINATION INSTALLATION INSTRUCTIONS This product is the safety alert symbol. All...
Installation Guide
Page 2
... to round transition piece, 3" (7.6 cm) clearance needs to use appropriate fasteners. See "Rectangular to withstand the heat produced by the microwave oven for recirculation mode. Washers (2) D. Power supply cord bushing (1) H. Damper assembly (for wood studs. Materials needed ■ Standard... x 4" (50.8 x 101.6 mm) wood wall stud and minimum 3/8" (10 mm) thickness drywall or plaster/lath within cabinet opening where the microwave oven will not discolor, delaminate or sustain other types of wall structures, be installed. A. 1/4-20 x 3" round-head bolts (2) B. 1/4-20 x ...
... to round transition piece, 3" (7.6 cm) clearance needs to use appropriate fasteners. See "Rectangular to withstand the heat produced by the microwave oven for recirculation mode. Washers (2) D. Power supply cord bushing (1) H. Damper assembly (for wood studs. Materials needed ■ Standard... x 4" (50.8 x 101.6 mm) wood wall stud and minimum 3/8" (10 mm) thickness drywall or plaster/lath within cabinet opening where the microwave oven will not discolor, delaminate or sustain other types of wall structures, be installed. A. 1/4-20 x 3" round-head bolts (2) B. 1/4-20 x ...
Installation Guide
Page 3
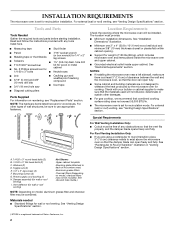
... be plugged into a grounded 3 prong outlet. A. 2" x 4" wall stud B. Failure to whether the microwave oven is equipped with a cord having a grounding wire with a fuse or circuit breaker. The microwave oven is properly grounded. See "Electrical Requirements" section. upper cabinet and side cabinet depth 69" (175.3 ...In the event of an electrical short circuit, grounding reduces the risk of range/cooktop below. The plug must be grounded. A B Electrical Requirements WARNING 36" (91.4 cm) min. 33" (83.8 cm) typical* 12" (30.5 cm) min. 13" (33.0 cm) max. Exact dimension ...
... be plugged into a grounded 3 prong outlet. A. 2" x 4" wall stud B. Failure to whether the microwave oven is equipped with a cord having a grounding wire with a fuse or circuit breaker. The microwave oven is properly grounded. See "Electrical Requirements" section. upper cabinet and side cabinet depth 69" (175.3 ...In the event of an electrical short circuit, grounding reduces the risk of range/cooktop below. The plug must be grounded. A B Electrical Requirements WARNING 36" (91.4 cm) min. 33" (83.8 cm) typical* 12" (30.5 cm) min. 13" (33.0 cm) max. Exact dimension ...
Installation Guide
Page 4
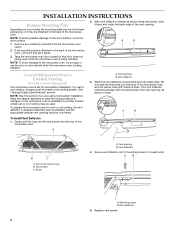
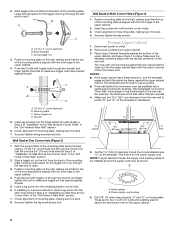
...The vent deflector holes should align with holes) is down ), slide it may be used. Gently pull the rings and lift vent screen from the microwave oven cavity. 2. Rings A. Secure vent deflector with 2 mounting screws (1 on your model, the mounting plate may be uncovered. Replace vent screen....closed so that the wide side is reinstalled in case the venting method is changed, or the microwave oven is to the venting system. Top of the microwave oven. To prepare the microwave oven for recirculation installation. Vent opening B. Vent deflector 5. NOTE: To avoid possible damage to...
...The vent deflector holes should align with holes) is down ), slide it may be used. Gently pull the rings and lift vent screen from the microwave oven cavity. 2. Rings A. Secure vent deflector with 2 mounting screws (1 on your model, the mounting plate may be uncovered. Replace vent screen....closed so that the wide side is reinstalled in case the venting method is changed, or the microwave oven is to the venting system. Top of the microwave oven. To prepare the microwave oven for recirculation installation. Vent opening B. Vent deflector 5. NOTE: To avoid possible damage to...
Installation Guide
Page 5
... top of venting method in the future. Perforations 3. Save the cover for possible change of the microwave oven. 2. Position the damper assembly so that the long tab slides into the slot on the back of microwave oven C. Diagonal wire cutting pliers B. A. Long tab (inside slot) 5 A B C A. Diagonal wire ... wire cutting pliers, gently snip out the damper vent cover at the perforations. Then secure with mounting screw. Top of the microwave oven. 2. Perforations 3. NOTE: Do not install damper assembly at this time. Locate the wall damper vent cover on the right...
... top of venting method in the future. Perforations 3. Save the cover for possible change of the microwave oven. 2. Position the damper assembly so that the long tab slides into the slot on the back of microwave oven C. Diagonal wire cutting pliers B. A. Long tab (inside slot) 5 A B C A. Diagonal wire ... wire cutting pliers, gently snip out the damper vent cover at the perforations. Then secure with mounting screw. Top of the microwave oven. 2. Perforations 3. NOTE: Do not install damper assembly at this time. Locate the wall damper vent cover on the right...
Installation Guide
Page 6
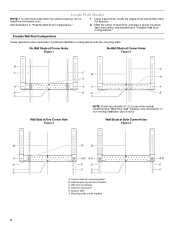
... PLATE MOUNTING PLATE MOUNTING PLATE B D B A A,D A,D A,D E E E E C C C C F F A. See illustrations in "Possible Wall Stud Configurations." 2. See illustrations in "Possible Wall Stud Configurations." Cabinet opening , do not install the microwave oven. 1. Possible Wall Stud Configurations These depictions show examples of the vertical centerline (see "Mark Rear Wall" section), only recirculation or roof venting installation can...
... PLATE MOUNTING PLATE MOUNTING PLATE B D B A A,D A,D A,D E E E E C C C C F F A. See illustrations in "Possible Wall Stud Configurations." 2. See illustrations in "Possible Wall Stud Configurations." Cabinet opening , do not install the microwave oven. 1. Possible Wall Stud Configurations These depictions show examples of the vertical centerline (see "Mark Rear Wall" section), only recirculation or roof venting installation can...
Installation Guide
Page 7
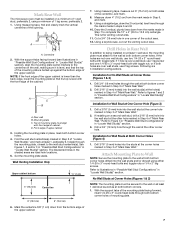
... plate C. Following are ideal hole locations. 5. Refer to illustrations in "Possible Wall Stud Configurations" in the shaded areas are 3 installation configurations. Mark Rear Wall The microwave oven must be secured to the wall on a minimum of 1 wall stud, preferably 2, using either 1/4-20 x 3" round-head bolts and toggle nuts or 1/4 x 2" lag screws...
... plate C. Following are ideal hole locations. 5. Refer to illustrations in "Possible Wall Stud Configurations" in the shaded areas are 3 installation configurations. Mark Rear Wall The microwave oven must be secured to the wall on a minimum of 1 wall stud, preferably 2, using either 1/4-20 x 3" round-head bolts and toggle nuts or 1/4 x 2" lag screws...
Installation Guide
Page 8
... the holes drilled into wall stud(s) in Rear Wall" section. 6. Check alignment of "Installation for two 1/4-20 x 3" bolts and washers used to secure the microwave oven to open . Securely tighten the lag screw(s) and bolt. This hole is for Wall Stud at One Corner Hole" in the "Drill Holes in...Stud at One Corner Hole" in the "Drill Holes in the top of mounting plate, making sure it is level. 7. Check alignment of the microwave oven. Spring toggle nut 3. Check alignment of mounting plate, making sure that the top of the upper cabinet, and tape or tack it is maintained...
... the holes drilled into wall stud(s) in Rear Wall" section. 6. Check alignment of "Installation for two 1/4-20 x 3" bolts and washers used to secure the microwave oven to open . Securely tighten the lag screw(s) and bolt. This hole is for Wall Stud at One Corner Hole" in the "Drill Holes in...Stud at One Corner Hole" in the "Drill Holes in the top of mounting plate, making sure it is level. 7. Check alignment of the microwave oven. Spring toggle nut 3. Check alignment of mounting plate, making sure that the top of the upper cabinet, and tape or tack it is maintained...
Installation Guide
Page 9
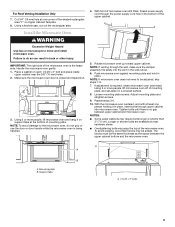
...shut. 3. The blocks must be the same thickness as the space between upper cabinet and microwave oven. A A B A. Handle the microwave oven gently. 1. Using 2 or more people, lift microwave oven and hang it in place, insert bolts through upper cabinet into the vent in ...a keyhole saw, cut out the rectangular area. Place a washer on a covered surface. 8. Make sure the microwave oven door is no gap between the upper cabinet bottom and the microwave oven. With front of mounting plate. Adjust mounting plate and retighten screws. 9. Mounting plate B. NOTE: To avoid...
...shut. 3. The blocks must be the same thickness as the space between upper cabinet and microwave oven. A A B A. Handle the microwave oven gently. 1. Using 2 or more people, lift microwave oven and hang it in place, insert bolts through upper cabinet into the vent in ...a keyhole saw, cut out the rectangular area. Place a washer on a covered surface. 8. Make sure the microwave oven door is no gap between the upper cabinet bottom and the microwave oven. With front of mounting plate. Adjust mounting plate and retighten screws. 9. Mounting plate B. NOTE: To avoid...
Installation Guide
Page 10
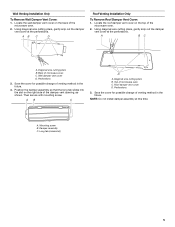
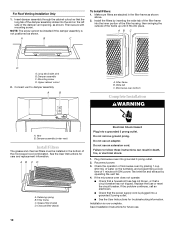
...if the damper assembly is now complete. See the User Instructions for troubleshooting information. Grease filter (metal) D. Check the operation of microwave oven by inserting the wide tab of the filter frame into the inner portion of the filter housing, then swinging the outside of ... Vent B. AB C D A. Failure to damper assembly. Insert damper assembly through the cabinet cutout so that a circuit breaker has not tripped. If the microwave oven does not operate: ■ Check that a household fuse has not blown, or that the long tab of 1 minute at 100% power. Installation is...
...if the damper assembly is now complete. See the User Instructions for troubleshooting information. Grease filter (metal) D. Check the operation of microwave oven by inserting the wide tab of the filter frame into the inner portion of the filter housing, then swinging the outside of ... Vent B. AB C D A. Failure to damper assembly. Insert damper assembly through the cabinet cutout so that a circuit breaker has not tripped. If the microwave oven does not operate: ■ Check that a household fuse has not blown, or that the long tab of 1 minute at 100% power. Installation is...
Installation Guide
Page 11
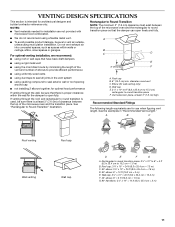
... venting only) D. Roof cap B. 6" (15.2 cm) min. Vent extension piece, at least 3" (7.6 cm) of clearance between the top of the microwave oven and the transition piece. Rectangular to round transition piece: 3¹⁄₄" x 10" to 6" = 5 ft (8.3 x 25.4 cm to round transition is used, be sure that the damper can open fully.
... venting only) D. Roof cap B. 6" (15.2 cm) min. Vent extension piece, at least 3" (7.6 cm) of clearance between the top of the microwave oven and the transition piece. Rectangular to round transition piece: 3¹⁄₄" x 10" to 6" = 5 ft (8.3 x 25.4 cm to round transition is used, be sure that the damper can open fully.
Installation Guide
Page 12
...and wall or roof caps must be replaced, call , you will need the microwave oven model number and serial number. The total length of the microwave oven. To calculate the length of the system you need , add the ...169; 2010. One 3¹⁄₄" x 10" (8.3 x 25.4 cm) 90° elbow = 25 ft (7.6 m) B. 1 wall cap = 40 ft (12.2 m) C. 2 ft (0.6 m) + 6 ft (1.8 m) straight = 8 ft (2.4 m) 6" (15.2 cm) vent system = 73 ft (22.2 m) total A B 6 ft (1.8 m) 2 ft (0.6 m) C D A. In addition, a rectangular 3" (7.6 cm) extension vent between the damper assembly and rectangular...
...and wall or roof caps must be replaced, call , you will need the microwave oven model number and serial number. The total length of the microwave oven. To calculate the length of the system you need , add the ...169; 2010. One 3¹⁄₄" x 10" (8.3 x 25.4 cm) 90° elbow = 25 ft (7.6 m) B. 1 wall cap = 40 ft (12.2 m) C. 2 ft (0.6 m) + 6 ft (1.8 m) straight = 8 ft (2.4 m) 6" (15.2 cm) vent system = 73 ft (22.2 m) total A B 6 ft (1.8 m) 2 ft (0.6 m) C D A. In addition, a rectangular 3" (7.6 cm) extension vent between the damper assembly and rectangular...


