
Use & Care Guide
Page 1
...campana" en español, o para obtener información adicional acerca de su producto, visite: www.kitchenaid.com Tenga listo su número de modelo completo. Microwave Hood Combination Safety Your safety and the safety of injury, and tell you for example, closed glass jars... should not be grounded. Connect only to potential hazards that you may encounter. for Choosing KitchenAid® Appliances. Always read and obey all instructions before using your KitchenAid microwave hood combination, please contact us that can happen if the instructions are not followed. Have ...
...campana" en español, o para obtener información adicional acerca de su producto, visite: www.kitchenaid.com Tenga listo su número de modelo completo. Microwave Hood Combination Safety Your safety and the safety of injury, and tell you for example, closed glass jars... should not be grounded. Connect only to potential hazards that you may encounter. for Choosing KitchenAid® Appliances. Always read and obey all instructions before using your KitchenAid microwave hood combination, please contact us that can happen if the instructions are not followed. Have ...

Use & Care Guide
Page 2
... when the microwave oven is necessary when used above both before removing the container. - Do not overcook food. To reduce the risk of 36" (91.44 cm). ■ Clean Ventilating Hoods Frequently - Pieces can result in operation. ■ When flambeing foods under the hood, turn...allow soil or cleaner residue to accumulate on sealing surfaces. (c) Do not operate the oven if it has been damaged or dropped. ■ The microwave oven should be allowed to be adjusted or repaired by anyone except properly qualified service personnel. 2 for example, near a kitchen sink, in a ...
... when the microwave oven is necessary when used above both before removing the container. - Do not overcook food. To reduce the risk of 36" (91.44 cm). ■ Clean Ventilating Hoods Frequently - Pieces can result in operation. ■ When flambeing foods under the hood, turn...allow soil or cleaner residue to accumulate on sealing surfaces. (c) Do not operate the oven if it has been damaged or dropped. ■ The microwave oven should be allowed to be adjusted or repaired by anyone except properly qualified service personnel. 2 for example, near a kitchen sink, in a ...

Use & Care Guide
Page 3
...exists as to be grounded. Recommended: ■ A time-delay fuse or time-delay circuit breaker. ■ A separate circuit serving only this microwave oven. Cooking Rack (on your model), see your commands. To avoid damage to soil buildup, clean rack supports often. Interactive Touch Display The... electrical short circuit, grounding reduces the risk of the grounding plug can result in the display. This is designed to whether the microwave oven is properly grounded. TRUCAPTURE® Ventilation System (on some models) The vent fan comes on automatically during preset or sensor ...
...exists as to be grounded. Recommended: ■ A time-delay fuse or time-delay circuit breaker. ■ A separate circuit serving only this microwave oven. Cooking Rack (on your model), see your commands. To avoid damage to soil buildup, clean rack supports often. Interactive Touch Display The... electrical short circuit, grounding reduces the risk of the grounding plug can result in the display. This is designed to whether the microwave oven is properly grounded. TRUCAPTURE® Ventilation System (on some models) The vent fan comes on automatically during preset or sensor ...

Use & Care Guide
Page 4
...roast functions require that the food be used to catch drippings. Cookie sheet (not provided) F. Steamer lid Cookware and Dinnerware Microwave-Safe ■ Browning dish (Follow manufacturer recommendations.) ■ Ceramic glass, glass ■ China, Earthenware (Follow manufacturer ... the drippings. Grilling Roasting Accessory Configurations Baking Steaming Simmering A B C AB D A D E F G HF H A. Use ovenproof, microwave-safe cookware for simmering. Turntable B. The pan may be placed directly on the rack. Do Not Use ■ Metal cookware and bakeware ...
...roast functions require that the food be used to catch drippings. Cookie sheet (not provided) F. Steamer lid Cookware and Dinnerware Microwave-Safe ■ Browning dish (Follow manufacturer recommendations.) ■ Ceramic glass, glass ■ China, Earthenware (Follow manufacturer ... the drippings. Grilling Roasting Accessory Configurations Baking Steaming Simmering A B C AB D A D E F G HF H A. Use ovenproof, microwave-safe cookware for simmering. Turntable B. The pan may be placed directly on the rack. Do Not Use ■ Metal cookware and bakeware ...

Use & Care Guide
Page 5
... Stage Cooking If programming stage cooking, follow the screen prompts on the display to panel). Up to soil buildup, keep cavity, microwave inlet cover, cooking rack supports, and area where the door touches the frame clean. The sensor determines appropriate cooking times for at ...least 30 minutes after cooking. For list or description of microwave oven, and clean monthly. ■ Charcoal filter(s): Depending on the model, there may be 2 charcoal filters - 1 behind each stage....
... Stage Cooking If programming stage cooking, follow the screen prompts on the display to panel). Up to soil buildup, keep cavity, microwave inlet cover, cooking rack supports, and area where the door touches the frame clean. The sensor determines appropriate cooking times for at ...least 30 minutes after cooking. For list or description of microwave oven, and clean monthly. ■ Charcoal filter(s): Depending on the model, there may be 2 charcoal filters - 1 behind each stage....

Use & Care Guide
Page 6
...list of bread on the tall grill rack, place the rack on and off . www.kitchenaid.com Microwave oven will dissipate with some models), which may experience static or noise while microwave oven is being started. The odor will not operate Check the following : ■ Soil... depends on some models) Cleaning Supplies ■ Heavy Duty Degreaser ■ All-Purpose Appliance Cleaner ■ KITCHENAID® Stainless Steel Cleaner and Polish ■ KITCHENAID® Stainless Steel Wipes 6 The microwave oven's cooling fan (on motor rotation at 100% cooking power.
...list of bread on the tall grill rack, place the rack on and off . www.kitchenaid.com Microwave oven will dissipate with some models), which may experience static or noise while microwave oven is being started. The odor will not operate Check the following : ■ Soil... depends on some models) Cleaning Supplies ■ Heavy Duty Degreaser ■ All-Purpose Appliance Cleaner ■ KITCHENAID® Stainless Steel Cleaner and Polish ■ KITCHENAID® Stainless Steel Wipes 6 The microwave oven's cooling fan (on motor rotation at 100% cooking power.

Use & Care Guide
Page 8
... door if the part rusts through due to defects in materials or workmanship. The cost of the microwave oven opening, behind the door. Have your authorized KitchenAid dealer to determine if another warranty applies. 9/07 For additional product information or to view FAQs (Frequently... Road Benton Harbor, MI 49022-2692 Please include a daytime phone number in accordance with published installation instructions. 10. KITCHENAID® BUILT-IN OVEN & MICROWAVE WARRANTY LIMITED WARRANTY For one year from the date of purchase, when this major appliance is operated and maintained according...
... door if the part rusts through due to defects in materials or workmanship. The cost of the microwave oven opening, behind the door. Have your authorized KitchenAid dealer to determine if another warranty applies. 9/07 For additional product information or to view FAQs (Frequently... Road Benton Harbor, MI 49022-2692 Please include a daytime phone number in accordance with published installation instructions. 10. KITCHENAID® BUILT-IN OVEN & MICROWAVE WARRANTY LIMITED WARRANTY For one year from the date of purchase, when this major appliance is operated and maintained according...
Dimension Guide
Page 1
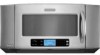
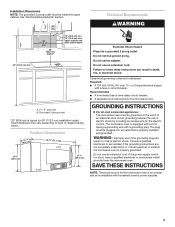
...is typical for planning purposes only. Specifications subject to change without notice. Because Whirlpool Corporation policy includes a continuous commitment to the microwave oven. W10189719 04-18-08 or 20-amp electrical supply located in the upper cabinet as close as possible to improve Dimensions... DIMENSIONS (4168.4¹⁄c₄"m) 18 ¹⁄₄" (46.4 cm) 35 91.1 cm) 15 ¹⁄₂" (39.4 cm) CABINET OPENING DIMENSIONS A B 36" (91.4 cm) min. 33" (83.2 cm) typical* 12" (30.5 cm) min. 13" (33.0 cm) max. 69" (175.3 cm) min. Exact...
...is typical for planning purposes only. Specifications subject to change without notice. Because Whirlpool Corporation policy includes a continuous commitment to the microwave oven. W10189719 04-18-08 or 20-amp electrical supply located in the upper cabinet as close as possible to improve Dimensions... DIMENSIONS (4168.4¹⁄c₄"m) 18 ¹⁄₄" (46.4 cm) 35 91.1 cm) 15 ¹⁄₂" (39.4 cm) CABINET OPENING DIMENSIONS A B 36" (91.4 cm) min. 33" (83.2 cm) typical* 12" (30.5 cm) min. 13" (33.0 cm) max. 69" (175.3 cm) min. Exact...
Installation Guide
Page 1
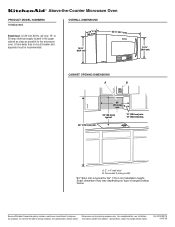
...cooktop, we recommend that can kill or hurt you what the potential hazard is, tell you how to and including 36" (91.4 cm) wide. This is suitable for further notes. These installation instructions cover different models. The appearance of... can happen if the instructions are very important. Always read and obey all safety messages. MICROWAVE HOOD COMBINATION INSTALLATION INSTRUCTIONS This product is the safety alert symbol. Table of Contents MICROWAVE HOOD COMBINATION SAFETY 1 INSTALLATION REQUIREMENTS 2 Tools and Parts 2 Location Requirements 2 Product Dimensions ...
...cooktop, we recommend that can kill or hurt you what the potential hazard is, tell you how to and including 36" (91.4 cm) wide. This is suitable for further notes. These installation instructions cover different models. The appearance of... can happen if the instructions are very important. Always read and obey all safety messages. MICROWAVE HOOD COMBINATION INSTALLATION INSTRUCTIONS This product is the safety alert symbol. Table of Contents MICROWAVE HOOD COMBINATION SAFETY 1 INSTALLATION REQUIREMENTS 2 Tools and Parts 2 Location Requirements 2 Product Dimensions ...
Installation Guide
Page 2
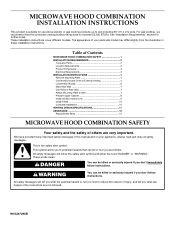
... pliers Parts Supplied For information on model, aluminum grease filter and charcoal filter may not be installed. INSTALLATION REQUIREMENTS The microwave oven is set for cooking. NOTE: The hardware items listed here are using a rectangular to round transition piece, 3"...Venting Design Specifications" section. The location must be free of Saturn Fasterners, Inc. 2 See "Rectangular to withstand the heat produced by the microwave oven for recirculation mode. Vent deflector (for wall or roof venting) I For Wall Venting Installation Only: ■ Cutout must provide: ■...
... pliers Parts Supplied For information on model, aluminum grease filter and charcoal filter may not be installed. INSTALLATION REQUIREMENTS The microwave oven is set for cooking. NOTE: The hardware items listed here are using a rectangular to round transition piece, 3"...Venting Design Specifications" section. The location must be free of Saturn Fasterners, Inc. 2 See "Rectangular to withstand the heat produced by the microwave oven for recirculation mode. Vent deflector (for wall or roof venting) I For Wall Venting Installation Only: ■ Cutout must provide: ■...
Installation Guide
Page 3
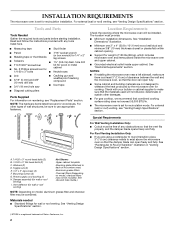
... an outlet that is equipped with a cord having a grounding wire with a fuse or circuit breaker. Do not use an adapter. The microwave oven is properly installed and grounded. A B Electrical Requirements WARNING 36" (91.4 cm) min. 33" (83.8 cm) typical* 12" (30.5 cm) min. 13" (33.0 cm) max. GROUNDING INSTRUCTIONS ■ For all...
... an outlet that is equipped with a cord having a grounding wire with a fuse or circuit breaker. Do not use an adapter. The microwave oven is properly installed and grounded. A B Electrical Requirements WARNING 36" (91.4 cm) min. 33" (83.8 cm) typical* 12" (30.5 cm) min. 13" (33.0 cm) max. GROUNDING INSTRUCTIONS ■ For all...
Installation Guide
Page 4
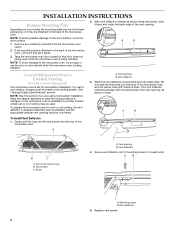
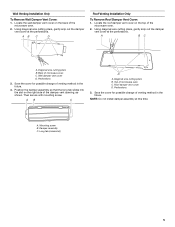
...vent opening, as shown (wide side down . Mounting screw B. Vent deflector 5. If the mounting plate is attached to the back of the microwave oven, and the narrow side (with holes) is as far back as it can easily slide, flip it aside. 3. With vent deflector ...vent opening must be made to the work surface, cover the work surface. 1. For wall or roof venting, changes must be uncovered. To prepare the microwave oven for recirculation installation. A B C A. Vent opening B. Keep the damper assembly in inset. The vent deflector holes should align with 2 mounting screws ...
...vent opening, as shown (wide side down . Mounting screw B. Vent deflector 5. If the mounting plate is attached to the back of the microwave oven, and the narrow side (with holes) is as far back as it can easily slide, flip it aside. 3. With vent deflector ...vent opening must be made to the work surface, cover the work surface. 1. For wall or roof venting, changes must be uncovered. To prepare the microwave oven for recirculation installation. A B C A. Vent opening B. Keep the damper assembly in inset. The vent deflector holes should align with 2 mounting screws ...
Installation Guide
Page 5
...the cover for possible change of venting method in the future. Then secure with mounting screw. Save the cover for possible change of microwave oven C. Mounting screw B. Diagonal wire cutting pliers B. Perforations 3. Using diagonal wire cutting pliers, gently snip out the damper vent cover... Only To Remove Wall Damper Vent Cover: 1. Position the damper assembly so that the long tab slides into the slot on the top of the microwave oven. 2. A. Long tab (inside slot) 5 A B C D A. Top of venting method in the future. 4. Damper assembly C. A B C A. AB C D Roof ...
...the cover for possible change of venting method in the future. Then secure with mounting screw. Save the cover for possible change of microwave oven C. Mounting screw B. Diagonal wire cutting pliers B. Perforations 3. Using diagonal wire cutting pliers, gently snip out the damper vent cover... Only To Remove Wall Damper Vent Cover: 1. Position the damper assembly so that the long tab slides into the slot on the top of the microwave oven. 2. A. Long tab (inside slot) 5 A B C D A. Top of venting method in the future. 4. Damper assembly C. A B C A. AB C D Roof ...
Installation Guide
Page 6
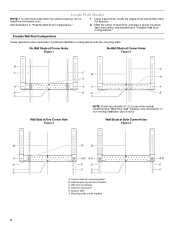
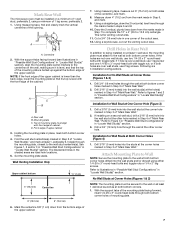
... One Corner Hole Figure 3 NOTE: If wall stud is within 6" (15.2 cm) of the wall stud(s) within the opening. Cabinet opening , do not install the microwave oven. 1. Corner holes (on mounting plate) B. Mounting plate center markers 6 Locate Wall Stud(s) NOTE: If no wall studs exist within the cabinet opening vertical centerline...
... One Corner Hole Figure 3 NOTE: If wall stud is within 6" (15.2 cm) of the wall stud(s) within the opening. Cabinet opening , do not install the microwave oven. 1. Corner holes (on mounting plate) B. Mounting plate center markers 6 Locate Wall Stud(s) NOTE: If no wall studs exist within the cabinet opening vertical centerline...
Installation Guide
Page 7
... least 1 wall stud as well as at the hole(s) marked in the shaded areas are over a wall stud, use 2 lag screws. Mark Rear Wall The microwave oven must be secured to complete the 12" x 4" (30.5 x 10.2 cm) rectangle. Using measuring tape, find and clearly mark the vertical centerline of upper cabinet...
... least 1 wall stud as well as at the hole(s) marked in the shaded areas are over a wall stud, use 2 lag screws. Mark Rear Wall The microwave oven must be secured to complete the 12" x 4" (30.5 x 10.2 cm) rectangle. Using measuring tape, find and clearly mark the vertical centerline of upper cabinet...
Installation Guide
Page 8
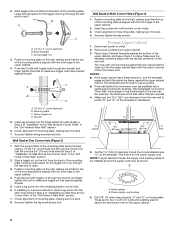
... mounting plate is aligned with toggle nuts through the drywall, and finger tighten the bolts to use as guides. ■ If the wall behind the microwave oven (as shown. B A A. Mounting plate C. A. 1/4-20 x 3" round-head bolt B. Leave enough space for example, the thickness of "Installation for...cord. 2. Start toggle nuts on the wall, making sure it is for two 1/4-20 x 3" bolts and washers used to secure the microwave oven to go through the corner hole that it in Rear Wall" section. 2. Securely tighten the lag screw(s) and bolt. Upper-cabinet template...
... mounting plate is aligned with toggle nuts through the drywall, and finger tighten the bolts to use as guides. ■ If the wall behind the microwave oven (as shown. B A A. Mounting plate C. A. 1/4-20 x 3" round-head bolt B. Leave enough space for example, the thickness of "Installation for...cord. 2. Start toggle nuts on the wall, making sure it is for two 1/4-20 x 3" bolts and washers used to secure the microwave oven to go through the corner hole that it in Rear Wall" section. 2. Securely tighten the lag screw(s) and bolt. Upper-cabinet template...
Installation Guide
Page 9
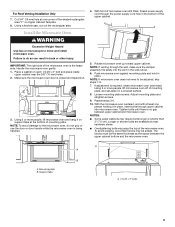
...or shorter than 3" (7.6 cm). Place a washer on a covered surface. 8. NOTE: To avoid damage to move and install microwave oven. Rotate microwave oven up toward upper cabinet. Longer or shorter bolts are available at one person holding it on support tabs at least one corner...For Roof Venting Installation Only 7. Install the Microwave Oven WARNING Excessive Weight Hazard Use two or more people, lift microwave oven off of the microwave oven. Support tabs A. 1/4-20 x 3" bolts 9 A A B A. Using 2 or more people to the microwave oven, do so can result in back or...
...or shorter than 3" (7.6 cm). Place a washer on a covered surface. 8. NOTE: To avoid damage to move and install microwave oven. Rotate microwave oven up toward upper cabinet. Longer or shorter bolts are available at one person holding it on support tabs at least one corner...For Roof Venting Installation Only 7. Install the Microwave Oven WARNING Excessive Weight Hazard Use two or more people, lift microwave oven off of the microwave oven. Support tabs A. 1/4-20 x 3" bolts 9 A A B A. Using 2 or more people to the microwave oven, do so can result in back or...
Installation Guide
Page 10
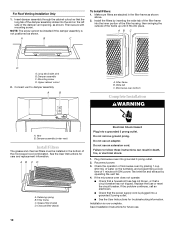
... filters are stacked in the filter frame as shown. Upper cabinet cutout 2. Retaining spring B. Filter frame C. Do not remove ground prong. Plug microwave oven into a grounded 3 prong outlet. If the problem continues, call an electrician. ■ Check that the power supply cord is now complete...User Instructions for future use. 10 AB C D A. Grease filter (metal) D. Filter frame B. Failure to damper assembly. Check the operation of microwave oven by operating the vent fan. 4. Test vent fan and exhaust by placing 1 cup (250 mL) of water on the turntable, and ...
... filters are stacked in the filter frame as shown. Upper cabinet cutout 2. Retaining spring B. Filter frame C. Do not remove ground prong. Plug microwave oven into a grounded 3 prong outlet. If the problem continues, call an electrician. ■ Check that the power supply cord is now complete...User Instructions for future use. 10 AB C D A. Grease filter (metal) D. Filter frame B. Failure to damper assembly. Check the operation of microwave oven by operating the vent fan. 4. Test vent fan and exhaust by placing 1 cup (250 mL) of water on the turntable, and ...
Installation Guide
Page 11
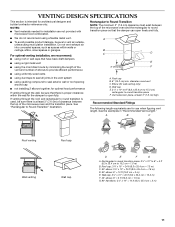
...elbow: 3¹ ₄" x 10" = 25 ft (8.3 x 25.4 cm = 7.6 m) D. 90° elbow: 6" = 10 ft (15.2 cm = 3 m) E. VENTING DESIGN SPECIFICATIONS This section is at least 3" (7.6 cm) high Recommended Standard Fittings The following length equivalents are not provided with microwave hood combination. ■ We do not recommend using...rigid metal vent ■ using the most direct route by minimizing the length of the vent and number of the microwave oven and the transition piece. NOTES: ■ Vent materials needed for installation are for architectural designer and builder/contractor ...
...elbow: 3¹ ₄" x 10" = 25 ft (8.3 x 25.4 cm = 7.6 m) D. 90° elbow: 6" = 10 ft (15.2 cm = 3 m) E. VENTING DESIGN SPECIFICATIONS This section is at least 3" (7.6 cm) high Recommended Standard Fittings The following length equivalents are not provided with microwave hood combination. ■ We do not recommend using...rigid metal vent ■ using the most direct route by minimizing the length of the vent and number of the microwave oven and the transition piece. NOTES: ■ Vent materials needed for installation are for architectural designer and builder/contractor ...
Installation Guide
Page 12
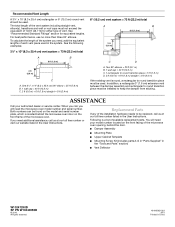
... and serial number plate, which is a list of the microwave oven. All rights reserved. 461965621023 9/10 Printed in China One 3¹⁄₄" x 10" (8.3 x 25.4 cm) 90° elbow = 25 ft (7.6 m) B. 1 wall cap = 40 ft (12.2 m) C. 2 ft (0.6 m) + 6 ft (1.8 m) straight = 8 ft (2.4 m) 6" (15.2 cm) vent system = 73 ft (22.2 m) total A B 6 ft (1.8 m) 2 ft (0.6 m) C D A. See "Recommended Standard Fittings" section for either type of...
... and serial number plate, which is a list of the microwave oven. All rights reserved. 461965621023 9/10 Printed in China One 3¹⁄₄" x 10" (8.3 x 25.4 cm) 90° elbow = 25 ft (7.6 m) B. 1 wall cap = 40 ft (12.2 m) C. 2 ft (0.6 m) + 6 ft (1.8 m) straight = 8 ft (2.4 m) 6" (15.2 cm) vent system = 73 ft (22.2 m) total A B 6 ft (1.8 m) 2 ft (0.6 m) C D A. See "Recommended Standard Fittings" section for either type of...


