
Use & Care Guide
Page 1
... you may encounter. Have your model and serial number on the label located on your KitchenAid microwave hood combination, please contact us that can be heated in the microwave oven. All safety messages will tell you what can visit the Frequently Asked Questions (FAQs) section of injury, and tell you don't follow User Instruction Book. IMPORTANT SAFETY INSTRUCTIONS When using electrical appliances basic safety precautions should not...
... you may encounter. Have your model and serial number on the label located on your KitchenAid microwave hood combination, please contact us that can be heated in the microwave oven. All safety messages will tell you what can visit the Frequently Asked Questions (FAQs) section of injury, and tell you don't follow User Instruction Book. IMPORTANT SAFETY INSTRUCTIONS When using electrical appliances basic safety precautions should not...

Use & Care Guide
Page 2
... adjusted or repaired by qualified service personnel. Visible bubbling or boiling when the container is operated in the "PAN BROWN" mode (on . ■ Use care when cleaning the vent-hood filter. To reduce the risk of injury to accumulate on the microwave oven. ■ Do not store this manual. Grease should not be boiling. This will cause overheating of the oven. SAVE THESE INSTRUCTIONS PRECAUTIONS TO...
... adjusted or repaired by qualified service personnel. Visible bubbling or boiling when the container is operated in the "PAN BROWN" mode (on . ■ Use care when cleaning the vent-hood filter. To reduce the risk of injury to accumulate on the microwave oven. ■ Do not store this manual. Grease should not be boiling. This will cause overheating of the oven. SAVE THESE INSTRUCTIONS PRECAUTIONS TO...

Use & Care Guide
Page 3
... 2-level cooking. Settings For information on setting the clock, timer, child lock, vent fan and cooktop light, and to follow these instructions can result in the wall of sensor functions. Features Turntable Turntable may be turned off (on your model), see your commands. To avoid damage to soil buildup, clean rack supports often. Do not use an adapter. Do not use of the grounding plug can result in the display. To avoid damage to the microwave oven...
... 2-level cooking. Settings For information on setting the clock, timer, child lock, vent fan and cooktop light, and to follow these instructions can result in the wall of sensor functions. Features Turntable Turntable may be turned off (on your model), see your commands. To avoid damage to soil buildup, clean rack supports often. Do not use an adapter. Do not use of the grounding plug can result in the display. To avoid damage to the microwave oven...

Use & Care Guide
Page 4
... sandwich wrappers ■ Staples ■ Objects with gold or silver trim or with metallic glaze To Test Cookware/Dinnerware: Place dish on some models) Use the convection rack for convection cycles (baking or roasting). The pan may be placed directly on some models) functions. Convection Rack (on turntable with 1 cup (250 mL) of cook time at 100%. Grilling Roasting Accessory Configurations Baking Steaming Simmering A B C AB...
... sandwich wrappers ■ Staples ■ Objects with gold or silver trim or with metallic glaze To Test Cookware/Dinnerware: Place dish on some models) Use the convection rack for convection cycles (baking or roasting). The pan may be placed directly on some models) functions. Convection Rack (on turntable with 1 cup (250 mL) of cook time at 100%. Grilling Roasting Accessory Configurations Baking Steaming Simmering A B C AB...

Use & Care Guide
Page 5
... one charcoal odor filter under the bulb cover, and is located under the vent screen on the top of the microwave oven, under the vent screen on cleaning products. For list or description of the microwave oven. The Keep Warm function uses 10% cook power. Stage Cooking If programming stage cooking, follow label instructions on the top of various programs, see the Quick Reference Guide provided with plastic wrap and vent. Replacing Filters and Light Bulbs ■ Grease filters: Remove grease filters from...
... one charcoal odor filter under the bulb cover, and is located under the vent screen on the top of the microwave oven, under the vent screen on cleaning products. For list or description of the microwave oven. The Keep Warm function uses 10% cook power. Stage Cooking If programming stage cooking, follow label instructions on the top of various programs, see the Quick Reference Guide provided with plastic wrap and vent. Replacing Filters and Light Bulbs ■ Grease filters: Remove grease filters from...

Use & Care Guide
Page 6
... the element still working properly? Arcing in "Microwave Oven Care" section. See "Grill Element" in the display, the door has been closed for some models) ■ Rack spacer ■ Rack hook ■ Grease filters ■ Charcoal filter(s) ■ Cooktop light bulb ■ Cavity light bulb ■ Steamer vessel ■ Pan and handle ■ Convection rack (provided with some models) Cleaning Supplies ■ Heavy Duty Degreaser ■ All-Purpose Appliance Cleaner ■ KITCHENAID® Stainless Steel...
... the element still working properly? Arcing in "Microwave Oven Care" section. See "Grill Element" in the display, the door has been closed for some models) ■ Rack spacer ■ Rack hook ■ Grease filters ■ Charcoal filter(s) ■ Cooktop light bulb ■ Cavity light bulb ■ Steamer vessel ■ Pan and handle ■ Convection rack (provided with some models) Cleaning Supplies ■ Heavy Duty Degreaser ■ All-Purpose Appliance Cleaner ■ KITCHENAID® Stainless Steel...

Use & Care Guide
Page 8
.... KITCHENAID® BUILT-IN OVEN & MICROWAVE WARRANTY LIMITED WARRANTY For one year from the date of purchase, when this major appliance is operated and maintained according to instructions attached to or furnished with the product, KitchenAid brand of Whirlpool Corporation or Whirlpool Canada LP (hereafter "KitchenAid") will pay for Factory Specified Parts and repair labor to repair or replace appliance light bulbs, air filters or water filters. Service must...
.... KITCHENAID® BUILT-IN OVEN & MICROWAVE WARRANTY LIMITED WARRANTY For one year from the date of purchase, when this major appliance is operated and maintained according to instructions attached to or furnished with the product, KitchenAid brand of Whirlpool Corporation or Whirlpool Canada LP (hereafter "KitchenAid") will pay for Factory Specified Parts and repair labor to repair or replace appliance light bulbs, air filters or water filters. Service must...
Dimension Guide
Page 1
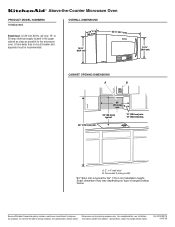
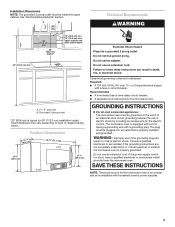
...) CABINET OPENING DIMENSIONS A B 36" (91.4 cm) min. 33" (83.2 cm) typical* 12" (30.5 cm) min. 13" (33.0 cm) max. 69" (175.3 cm) min. For complete details, see Installation our products, we reserve the right to change materials and specifications without notice. Specifications subject to change without notice. ® Above-the-Counter Microwave Oven PRODUCT MODEL NUMBERS KHMS2056S Electrical: A 120-volt, 60-Hz, AC-only, 15- A. 2" x 4" wall...
...) CABINET OPENING DIMENSIONS A B 36" (91.4 cm) min. 33" (83.2 cm) typical* 12" (30.5 cm) min. 13" (33.0 cm) max. 69" (175.3 cm) min. For complete details, see Installation our products, we reserve the right to change materials and specifications without notice. Specifications subject to change without notice. ® Above-the-Counter Microwave Oven PRODUCT MODEL NUMBERS KHMS2056S Electrical: A 120-volt, 60-Hz, AC-only, 15- A. 2" x 4" wall...
Installation Guide
Page 1
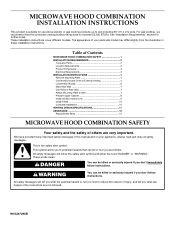
... cooking products up to Wall 7 Prepare Upper Cabinet 8 Install the Microwave Oven 9 Install Filters 10 Complete Installation 10 VENTING DESIGN SPECIFICATIONS 11 ASSISTANCE 12 Replacement Parts 12 MICROWAVE HOOD COMBINATION SAFETY Your safety and the safety of others . Table of Contents MICROWAVE HOOD COMBINATION SAFETY 1 INSTALLATION REQUIREMENTS 2 Tools and Parts 2 Location Requirements 2 Product Dimensions 3 Electrical Requirements 3 INSTALLATION INSTRUCTIONS 4 Remove Mounting Plate 4 Convert Microwave Oven to External Venting 4 Locate Wall Stud(s 6 Mark Rear Wall...
... cooking products up to Wall 7 Prepare Upper Cabinet 8 Install the Microwave Oven 9 Install Filters 10 Complete Installation 10 VENTING DESIGN SPECIFICATIONS 11 ASSISTANCE 12 Replacement Parts 12 MICROWAVE HOOD COMBINATION SAFETY Your safety and the safety of others . Table of Contents MICROWAVE HOOD COMBINATION SAFETY 1 INSTALLATION REQUIREMENTS 2 Tools and Parts 2 Location Requirements 2 Product Dimensions 3 Electrical Requirements 3 INSTALLATION INSTRUCTIONS 4 Remove Mounting Plate 4 Convert Microwave Oven to External Venting 4 Locate Wall Stud(s 6 Mark Rear Wall...
Installation Guide
Page 2
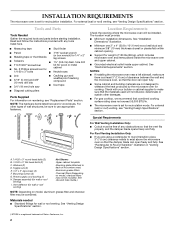
... wrench) for recirculation mode. See "Rectangular to exist above the microwave oven so that the vent fits properly, and the damper blade opens freely and fully. See Use and Care Guide.) NOTE: Depending on model, aluminum grease filter and charcoal filter may not be combined. A B C D E FG Special Requirements H I . Mounting screws (3) G. Vent deflector (for wall or roof venting) Not Shown: Upper cabinet template Mounting plate (attached to make sure there is set for 1/4" x 2" lag screws ■ Scissors...
... wrench) for recirculation mode. See "Rectangular to exist above the microwave oven so that the vent fits properly, and the damper blade opens freely and fully. See Use and Care Guide.) NOTE: Depending on model, aluminum grease filter and charcoal filter may not be combined. A B C D E FG Special Requirements H I . Mounting screws (3) G. Vent deflector (for wall or roof venting) Not Shown: Upper cabinet template Mounting plate (attached to make sure there is set for 1/4" x 2" lag screws ■ Scissors...
Installation Guide
Page 3
... not remove ground prong. See "Electrical Requirements" section. A. 2" x 4" wall stud B. or 20-amp electrical supply with household inverter power supplies. 3 Do not use of the grounding plug can result in a risk of range/cooktop below. Recommended: ■ A time-delay fuse or time-delay circuit breaker. ■ A separate circuit serving only this microwave oven is an inverter, and is typical for the electric current. The plug must be inside the upper cabinet. Product Dimensions...
... not remove ground prong. See "Electrical Requirements" section. A. 2" x 4" wall stud B. or 20-amp electrical supply with household inverter power supplies. 3 Do not use of the grounding plug can result in a risk of range/cooktop below. Recommended: ■ A time-delay fuse or time-delay circuit breaker. ■ A separate circuit serving only this microwave oven is an inverter, and is typical for the electric current. The plug must be inside the upper cabinet. Product Dimensions...
Installation Guide
Page 4
... the microwave oven is being handled. 2. A B C A. Rings A. A B A. When the vent deflector is as far back as shown (wide side down . Replace vent screen. 4 If the mounting plate is attached to the back of the microwave oven, remove it and set for recirculation installation. A. Top of the microwave oven. A B Convert Microwave Oven to External Venting (for wall or roof venting, the vent deflector (L-shaped metal bar) must be installed, and the appropriate damper vent opening B. Vent deflector 4. INSTALLATION INSTRUCTIONS Remove Mounting Plate...
... the microwave oven is being handled. 2. A B C A. Rings A. A B A. When the vent deflector is as far back as shown (wide side down . Replace vent screen. 4 If the mounting plate is attached to the back of the microwave oven, remove it and set for recirculation installation. A. Top of the microwave oven. A B Convert Microwave Oven to External Venting (for wall or roof venting, the vent deflector (L-shaped metal bar) must be installed, and the appropriate damper vent opening B. Vent deflector 4. INSTALLATION INSTRUCTIONS Remove Mounting Plate...
Installation Guide
Page 5
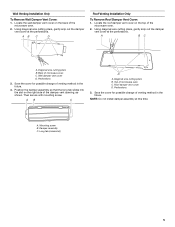
... Only To Remove Roof Damper Vent Cover: 1. Save the cover for possible change of the damper vent opening, as shown. Then secure with mounting screw. Roof damper vent cover D. NOTE: Do not install damper assembly at the perforations. Damper assembly C. Locate the roof damper vent cover on the top of microwave oven C. Back of the microwave oven. 2. Diagonal wire cutting pliers B. Save the cover for possible change of venting method in the future. 4. A B C D A. Perforations 3. Wall damper vent cover D. Top of the microwave oven. 2. Long tab (inside slot...
... Only To Remove Roof Damper Vent Cover: 1. Save the cover for possible change of the damper vent opening, as shown. Then secure with mounting screw. Roof damper vent cover D. NOTE: Do not install damper assembly at the perforations. Damper assembly C. Locate the roof damper vent cover on the top of microwave oven C. Back of the microwave oven. 2. Diagonal wire cutting pliers B. Save the cover for possible change of venting method in the future. 4. A B C D A. Perforations 3. Wall damper vent cover D. Top of the microwave oven. 2. Long tab (inside slot...
Installation Guide
Page 6
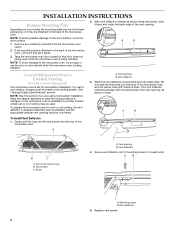
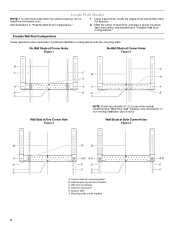
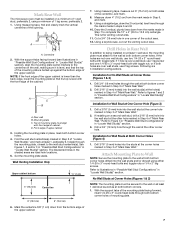
... not install the microwave oven. 1. Support tabs F. Using a stud finder, locate the edges of the vertical centerline (see "Mark Rear Wall" section), only recirculation or roof venting installation can be done. Holes for lag screws E. Locate Wall Stud(s) NOTE: If no wall studs exist within the opening. See illustrations in "Possible Wall Stud Configurations." 2. No Wall Studs at Corner Holes Figure 1 No Wall Studs at Corner Holes Figure 2 MOUNTING PLATE MOUNTING PLATE MOUNTING PLATE MOUNTING PLATE B C C C B D D A A A A E E E E F F Wall...
... not install the microwave oven. 1. Support tabs F. Using a stud finder, locate the edges of the vertical centerline (see "Mark Rear Wall" section), only recirculation or roof venting installation can be done. Holes for lag screws E. Locate Wall Stud(s) NOTE: If no wall studs exist within the opening. See illustrations in "Possible Wall Stud Configurations." 2. No Wall Studs at Corner Holes Figure 1 No Wall Studs at Corner Holes Figure 2 MOUNTING PLATE MOUNTING PLATE MOUNTING PLATE MOUNTING PLATE B C C C B D D A A A A E E E E F F Wall...
Installation Guide
Page 7
... level with front edge of "Locate Wall Stud(s)," and mark at the corner holes marked in "Locate Wall Stud(s)" section. Attach Mounting Plate to Wall NOTE: Secure the mounting plate to the wall at Corner Holes (Figures 1 & 2) 1. A A. D. Using measuring tape, measure out 6" (15.2 cm) on both bottom corner holes marked in Step 3 of "Mark Rear Wall." 2. Using a keyhole saw, cut out the venting cutout area. If installing on a second wall...
... level with front edge of "Locate Wall Stud(s)," and mark at the corner holes marked in "Locate Wall Stud(s)" section. Attach Mounting Plate to Wall NOTE: Secure the mounting plate to the wall at Corner Holes (Figures 1 & 2) 1. A A. D. Using measuring tape, measure out 6" (15.2 cm) on both bottom corner holes marked in Step 3 of "Mark Rear Wall." 2. Using a keyhole saw, cut out the venting cutout area. If installing on a second wall...
Installation Guide
Page 8
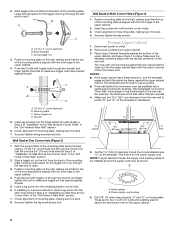
... mounting plate on the template. Securely tighten the lag screws. The "rear wall" arrows must be against drywall. 5. Check alignment of mounting plate, making sure that the top of the mounting plate is level. 7. Power supply cord bushing 6. Prepare Upper Cabinet 1. Drywall 5. With the support tabs of the mounting plate facing forward, insert a 1/4-20 x 3" round-head bolt through the wall and to make sure toggle nut has opened against...
... mounting plate on the template. Securely tighten the lag screws. The "rear wall" arrows must be against drywall. 5. Check alignment of mounting plate, making sure that the top of the mounting plate is level. 7. Power supply cord bushing 6. Prepare Upper Cabinet 1. Drywall 5. With the support tabs of the mounting plate facing forward, insert a 1/4-20 x 3" round-head bolt through the wall and to make sure toggle nut has opened against...
Installation Guide
Page 9
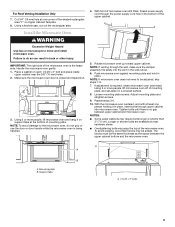
... microwave oven still tilted, thread power supply cord through the wall, make sure the damper assembly fits easily into microwave oven. Rotate microwave oven up toward upper cabinet. If adjustment is the heavy side. The blocks must be adjusted, skip steps 7-9. 7. Install the Microwave Oven WARNING Excessive Weight Hazard Use two or more people, lift microwave oven off of mounting plate, and set aside on support tabs at one person holding it on a covered...
... microwave oven still tilted, thread power supply cord through the wall, make sure the damper assembly fits easily into microwave oven. Rotate microwave oven up toward upper cabinet. If adjustment is the heavy side. The blocks must be adjusted, skip steps 7-9. 7. Install the Microwave Oven WARNING Excessive Weight Hazard Use two or more people, lift microwave oven off of mounting plate, and set aside on support tabs at one person holding it on a covered...
Installation Guide
Page 10
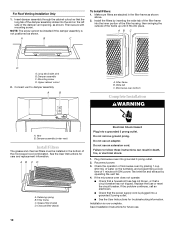
...The grease and charcoal filters must be installed if the damper assembly is now complete. Do not remove ground prong. Check the operation of microwave oven by operating the vent fan. 4. Replace the fuse or reset the circuit breaker. A B C To Install Filters: 1. Filter frame B. Microwave oven bottom Complete Installation WARNING A. Failure to damper assembly. Plug microwave oven into a grounded 3 prong outlet. Save Installation Instructions for troubleshooting information. AB C D A. Upper cabinet cutout 2. AB C D A. Charcoal filter (black) Electrical...
...The grease and charcoal filters must be installed if the damper assembly is now complete. Do not remove ground prong. Check the operation of microwave oven by operating the vent fan. 4. Replace the fuse or reset the circuit breaker. A B C To Install Filters: 1. Filter frame B. Microwave oven bottom Complete Installation WARNING A. Failure to damper assembly. Plug microwave oven into a grounded 3 prong outlet. Save Installation Instructions for troubleshooting information. AB C D A. Upper cabinet cutout 2. AB C D A. Charcoal filter (black) Electrical...
Installation Guide
Page 11
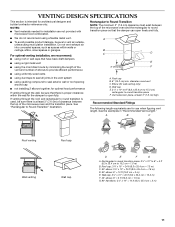
... performance ■ using uniformly sized vents ■ using duct tape to round transition piece so that have back draft dampers ■ using a rigid metal vent ■ using the most direct route by minimizing the length of the vent and number of the microwave oven and the transition piece. Do not vent exhaust air into concealed spaces, such as spaces within the wall for use when figuring vent length. Roof...
... performance ■ using uniformly sized vents ■ using duct tape to round transition piece so that have back draft dampers ■ using a rigid metal vent ■ using the most direct route by minimizing the length of the vent and number of the microwave oven and the transition piece. Do not vent exhaust air into concealed spaces, such as spaces within the wall for use when figuring vent length. Roof...
Installation Guide
Page 12
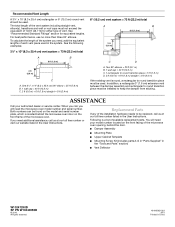
... the microwave oven opening, behind the microwave oven door on the model and serial number plate, which is located behind the door. ■ Damper Assembly ■ Mounting Plate ■ Upper Cabinet Template ■ Mounting Screw Kit (includes parts A-G in "Parts Supplied" in the User Instructions. To calculate the length of vent. Following is round, a rectangular to keep the damper from sticking. See "Recommended Standard Fittings" section for either type of the system you need your authorized dealer or service...
... the microwave oven opening, behind the microwave oven door on the model and serial number plate, which is located behind the door. ■ Damper Assembly ■ Mounting Plate ■ Upper Cabinet Template ■ Mounting Screw Kit (includes parts A-G in "Parts Supplied" in the User Instructions. To calculate the length of vent. Following is round, a rectangular to keep the damper from sticking. See "Recommended Standard Fittings" section for either type of the system you need your authorized dealer or service...


