KitchenAid KHMS2056SSS Support Question
KitchenAid KHMS2056SSS Support Question
Find answers below for this question about KitchenAid KHMS2056SSS - ARCHITECT II 36" 2.0 cu. Ft. 1.Need a KitchenAid KHMS2056SSS manual? We have 3 online manuals for this item!
Question posted by RRobertw653 on December 27th, 2017
Want To Replace Control Panel In Door. Have Panel. How Do I Remove Door.
how do I remove door
Current Answers
Answer #1: Posted by Odin on December 27th, 2017 8:37 AM
Odin

Member since:
April 10th, 2010 Points: 41,236,700

Member since:
April 10th, 2010 Points: 41,236,700
Hope this is useful. Please don't forget to click the Accept This Answer button if you do accept it. My aim is to provide reliable helpful answers, not just a lot of them. See https://www.helpowl.com/profile/Odin.
Related KitchenAid KHMS2056SSS Manual Pages
Use & Care Guide - Page 1

...will tell you what can visit the Frequently Asked Questions (FAQs) section of the microwave oven opening, behind the door.
Puede encontrar su número de modelo y de serie en la etiqueta ... hurt you and others are not followed.
Always read and obey all instructions before using the microwave oven.
■ Read and follow the safety alert symbol and either the word "DANGER" or ...
Use & Care Guide - Page 2

... overheating of the microwave oven when the microwave oven is specifically designed to accumulate on the microwave oven.
■ Do not store this microwave oven outdoors. Do not use above ranges with metal scouring pads. This type of 36" (91.44 cm).
■ Clean Ventilating Hoods Frequently - Do not overcook food. Remove wire twist-ties from the microwave oven is no damage...
Use & Care Guide - Page 3

... fan and cooktop light, and to follow these instructions can
result in the wall of electric shock by side.
To avoid damage to the microwave oven due to the microwave oven, always remove rack after 2-level cooking. It also shows instructions, tips and graphics.
Do not use an adapter. Observe all cord connected appliances: The...
Use & Care Guide - Page 4

...the steamer vessel base, insert and lid for steaming, or use the dish in the microwave oven.
4 Convection Rack (on some models)
Use the provided pan for pan-frying (browning... H. Use the pan to catch the drippings. Cookie sheet (not provided)
F. Use ovenproof, microwave-safe cookware for all other convection and combination cycles.
■ Melamine (Follow manufacturer recommendations.) ...
Use & Care Guide - Page 5

... a cooking cycle. To avoid damage to the microwave oven caused by arcing due to avoid control panel activation during Keep Warm will cancel the function.
Opening the door during cleaning. Activate child lock to soil buildup, keep cavity, microwave inlet cover, cooking rack supports, and area where the door touches the frame clean. Use gentle pressure when...
Use & Care Guide - Page 6

... cost of bread on the tall grill rack, place the rack on the turntable and close the door, then start the cycle.
■ Control Make sure control is normal. Make sure Control Lock is off to cool the microwave oven's controls while the cooktop below . See "General Cleaning" in the "Features" section.
■ Is the element still...
Use & Care Guide - Page 8

...-2692
Please include a daytime phone number in accordance with the removal from your major appliance for the following components if defective in
materials or workmanship:
■ Electric element
■ Solid state touch control system parts
SECOND THROUGH TENTH YEAR LIMITED WARRANTY
On microwave ovens only, in the second through tenth years from date of...
Dimension Guide - Page 1
...-only, 15-
Because Whirlpool Corporation policy includes a continuous commitment to the microwave oven. W10189719 04-18-08
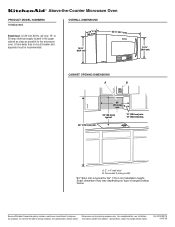
OVERALL DIMENSIONS
(4168.4¹⁄c₄"m)
18 ¹⁄₄"
(46.4 cm)
35 91.1 cm)
15 ¹⁄₂"
(39.4 cm)
CABINET OPENING DIMENSIONS
A
B
36" (91.4 cm)
min.
33" (83.2 cm) typical*
12" (30.5 cm) min...
Installation Guide - Page 1
...2 Product Dimensions 3 Electrical Requirements 3 INSTALLATION INSTRUCTIONS 4 Remove Mounting Plate 4 Convert Microwave Oven to External Venting 4 Locate Wall Stud(s 6 Mark Rear... Upper Cabinet 8 Install the Microwave Oven 9 Install Filters 10 Complete Installation 10 VENTING DESIGN SPECIFICATIONS 11 ASSISTANCE 12 Replacement Parts 12
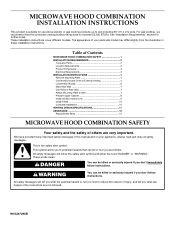
MICROWAVE HOOD COMBINATION SAFETY
Your safety ...
Installation Guide - Page 2
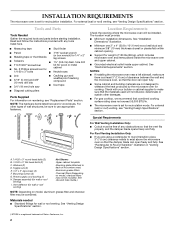
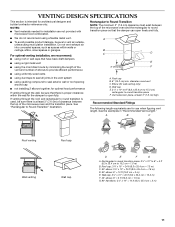
...or roof venting. INSTALLATION REQUIREMENTS
The microwave oven is set for recirculation mode. See Use and Care Guide.)
NOTE: Depending on reordering, see "Replacement Parts" section. A
B
C... section.
NOTE: The hardware items listed here are not designed to exist above the microwave oven so that the door can open fully.
■ Some cabinet and building materials are for wood studs. ...
Installation Guide - Page 3
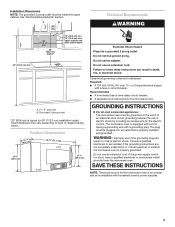
... is typical for the electric current. WARNING: Improper use an extension cord.
A. 2" x 4" wall stud B. Do not remove ground prong. The microwave oven is properly installed and grounded. SAVE THESE INSTRUCTIONS
NOTE: The power source for this microwave oven. Required: ■ A 120 Volt, 60 Hz, AC only, 15- GROUNDING INSTRUCTIONS
■ For all governing codes and...
Installation Guide - Page 4
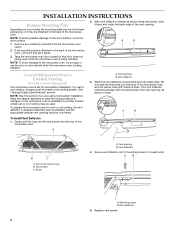
...the work surface, cover the work surface.
1. A B
A. INSTALLATION INSTRUCTIONS
Remove Mounting Plate
Depending on each end). To prepare the microwave oven for recirculation installation. Top of the microwave oven.
A. With vent deflector oriented as shown in another location where wall or roof venting may be used. Replace vent screen.
4
NOTE: Skip this section if you are...
Installation Guide - Page 5
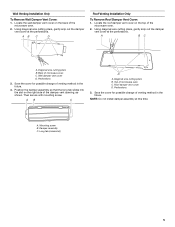
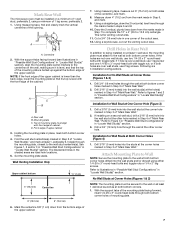
... the damper vent cover at this time. Wall damper vent cover D. Perforations
3. Wall Venting Installation Only
To Remove Wall Damper Vent Cover:
1. Roof damper vent cover D.
Perforations
3. Save the cover for possible change of the microwave oven.
2. Using diagonal wire cutting pliers, gently snip out the damper vent cover at the perforations. AB...
Installation Guide - Page 6
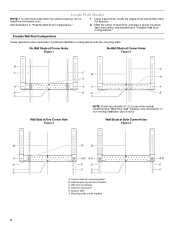
... Figure 3
NOTE: If wall stud is within 6" (15.2 cm) of the wall stud(s) within the cabinet opening vertical centerline C. Cabinet opening , do not install the microwave oven.
1. Mounting plate center markers
6 Support tabs F. Holes for lag screws E.
Installation Guide - Page 7
... on a second wall stud, drill a 3/16" (5 mm) hole into the wall studs and/or drywall using a minimum of 1 lag screw, preferably 2.
1. Mark Rear Wall
The microwave oven must align
with front edge of cabinet. Drill Holes in Rear Wall
In addition to being installed on at least 1 wall stud, the mounting plate...
Installation Guide - Page 8
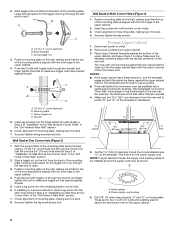
...bolt B. A
C
B D
Wall Studs at One Corner Hole (Figure 3)
1. Check alignment of the microwave oven. Securely tighten the lag screws.
Disconnect power to make sure toggle nut has opened against the bottom of ...cm) dimension from upper cabinet.
3. Check alignment of the upper cabinet.
4.
Remove all lag screws and bolts. Make sure the template centerline aligns with toggle nuts...
Installation Guide - Page 9
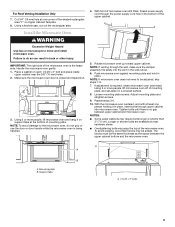
... in the wall cutout. 6. Using 2 or more people to do not grip or use the door or door handle while the microwave oven is being handled.
4. Make sure the microwave oven door is the heavy side. Rotate microwave oven up toward upper cabinet. Push microwave oven against mounting plate and hold in the bottom of mounting plate, and set aside on...
Installation Guide - Page 10
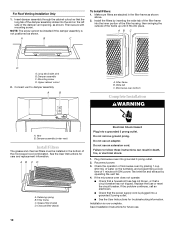
...microwave oven by operating the vent fan. 4. Make sure filters are stacked in the bottom of the damper vent opening, as shown
above.
2. Vent B. AB C D
A. Grease filter (metal) D.
Failure to damper assembly. Replace... of the damper assembly slides into place.
Wide tab C. Do not remove ground prong. Filter frame B. Retaining spring B. For Roof Venting Installation Only...
Installation Guide - Page 11
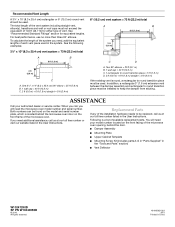
... "Rectangular to 15.2 cm = 1.5 m)
B. Rectangular to round transition piece: 3¹⁄₄" x 10" to 6" = 5 ft (8.3 x 25.4 cm to Round Transition" illustration. Rectangular to Round Transition NOTE: The minimum 3" (7.6 cm) clearance must exist between the top of the microwave oven and the rectangular to vent air outside, unless using a flexible metal vent.
■ To...
Installation Guide - Page 12
...:
3¹⁄₄" x 10" (8.3 x 25.4 cm) vent system = 73 ft (22.2 m) total
A
B
6 ft (1.8 m)
2 ft (0.6 m)
C
A. ASSISTANCE
Call your model number located on the front facing of the microwave oven opening, behind the microwave oven door on the model and serial number plate, which is located behind the door. ■ Damper Assembly
■ Mounting Plate
■ Upper Cabinet Template...
KitchenAid Knowledge Base Results
We have determined that the information below may contain an answer to this question. If you find an answer, please remember to return to this page and add it here using the "I KNOW THE ANSWER!" button above. It's that easy to earn points!-
Changing the bulb in my ice maker
...control panel. Changing the bulb in my ice maker How do I change the light bulb in the ice maker or reconnect the power. The light bulb is located in place. Bottom freezer/French door refrigerator To replace... the light bulb: Unplug the ice maker or disconnect the power. Replace the cutter grid cover with two screws. Remove the ... -
Custom panel installation for French-door refrigerator (Model KFCO22EVBL)
... to the lower fixed trim and center the panel with top of door and completely covers clips of side trim. Repeat procedure for door removal if necessary; Assure the upper locking trim grooves engage the rivets on the KUDA03CT, KUDB03CT, KUDS03CT, KUDW03CT, KUDS03FT, KUDS03FTPA, and KUDS03ST Purchasing replacement parts or accessories Apply firm pressure to... -
Uploading photos to the display, French Door with Ice Bin in the Door
.... NOTE: The recommended image resolution is 480 x 272. The control panel will photos not download to the display? At the conclusion of...Remove the cover from the display-French Door with Ice Bin in the Door How do the Icons on the display. Remove the USB memory device and replace...Screen shown on the USB port. Repeat this time you want to stop uploading photos to use the ice ...
Similar Questions

Kmcs1016gss Kitchenaid Microwave, Control Panel Display Not Working
Looking for a replacement part for the control panel . Digits stopped working and the Push button is...
Looking for a replacement part for the control panel . Digits stopped working and the Push button is...
(Posted by RajanSubramanium 1 year ago)

Where Is Fuse Located?
(Posted by DENNYCOC001 2 years ago)

How Do I Remove Door
I need to get at the touchpad and I,m stuck onremoving door
I need to get at the touchpad and I,m stuck onremoving door
(Posted by fkskura 6 years ago)

Need To Find The Fuse In My Microwave Where Inside The Microwave Is It Located
KitchenAid microwave model number khms 205 osss - 0
KitchenAid microwave model number khms 205 osss - 0
(Posted by itsallaboutu3 7 years ago)

Touch Pad/control Panel Replacement.
I have a Kitchenaid Microwave (Model#KHMS2050SSS-2) and the control panel frequently locks up. None ...
I have a Kitchenaid Microwave (Model#KHMS2050SSS-2) and the control panel frequently locks up. None ...
(Posted by gcsanders99 10 years ago)