Get support for KitchenAid KHMS2050SSS - 30

KitchenAid KHMS2050SSS Support Question

KitchenAid KHMS2050SSS Support Question

Find answers below for this question about KitchenAid KHMS2050SSS - 30" Microwave Hood Combo.
Need a KitchenAid KHMS2050SSS manual? We have 3 online manuals for this item!
Question posted by gcsanders99 on January 5th, 2014

Touch Pad/control Panel Replacement.

I have a Kitchenaid Microwave (Model#KHMS2050SSS-2) and the control panel frequently locks up. None of the buttons will function and the only way to reset it, is by opening and closing the door (sometimes that doesnt work either). It also will begin beeping and cycling through various programming displays sporatically and when not being used. Ispart number 8206625 something I can replace on my own? BTW, Unit was installed in December 2009. Thank you.

Current Answers

There are currently no answers that have been posted for this question.
Be the first to post an answer!

Remember that you can earn up to 1,100 points for every answer you submit. The better the quality of your answer, the better chance it has to be accepted.

Related KitchenAid KHMS2050SSS Manual Pages

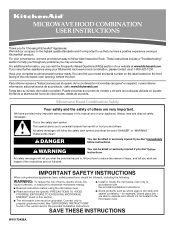
Use & Care Guide - Page 1

...model and serial number on the label located on your KitchenAid microwave hood combination, please contact us that can kill or hurt you have provided many important safety messages in the microwave oven. Microwave Hood... experience owning a KitchenAid® product. MICROWAVE HOOD COMBINATION USER INSTRUCTIONS Thank you can visit the Frequently Asked Questions (FAQs) section of our website ...
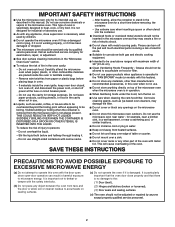
Use & Care Guide - Page 2

..., or shut off the pad and touch electrical parts involving a risk of electric shock. ■ Suitable for use . ■ As with metal scouring pads. If materials inside the oven to microwave energy. Do not use as lye-based oven cleaners, may create a fire or risk of the oven with the door open since open-door operation can burn off...
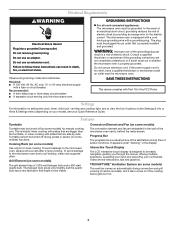
Use & Care Guide - Page 3

... also comes on some models) for 2-level cooking. Grill Element (on setting the clock, timer, child lock, vent fan and cooktop light, and to whether the microwave oven is properly installed and grounded. Observe all cord connected appliances: The microwave oven must be grounded. It appears under "Sensing" in the wall of sensor functions. The plug must...
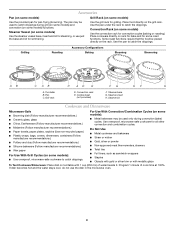
Use & Care Guide - Page 4

... it. The pan may be placed directly on some roast functions. Steamer Vessel (on some models) Use the steamer vessel base, insert and lid for grilling. Grill Rack (on some models) Use the grill rack for steaming, or use the dish in the microwave oven. 4 Place food directly on turntable with 1 cup (250 mL) of...
Use & Care Guide - Page 5

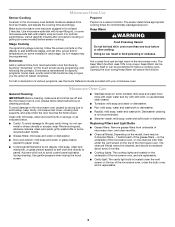
...the top of the microwave oven, and are off and the microwave oven is replaceable. 5 Always follow a cooking cycle. The charcoal filter(s) cannot be cleaned, and should be prorammed to avoid control panel activation during Keep Warm will cancel the function. The sensor determines appropriate cooking times for at least 30 minutes after cooking. on some models) for specific...
Use & Care Guide - Page 6

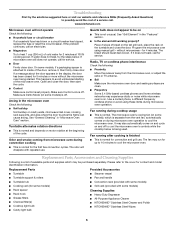
... toast, call for service. ■ Door Firmly close the door, then start the cycle. ■ Control Make sure control is not unusual. www.kitchenaid.com Microwave oven will dissipate with some models) is off to the cover for 5 minutes or more without microwaves - Odor and smoke coming from microwave oven during microwave oven operation. If the problem continues, call . The...
Use & Care Guide - Page 8

...KitchenAid. 5. If outside the 50 United States and Canada, contact your home of the microwave oven opening... touch control system parts SECOND THROUGH TENTH YEAR LIMITED WARRANTY On microwave ovens ...replacement under this limited warranty. Major appliances with any questions or concerns at the number below. Outside the 50 United States and Canada, this User Instructions and model...
Dimension Guide - Page 1

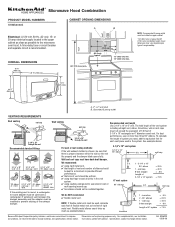
...upper cabinet as close as possible to...rigid metal vent. Specifications subject to the microwave oven hood. We recommend: ✔ using rigid....3 cm) min. 30" (76.2 cm) 33" min. (83.2 cm) typical* 12" (30.5 cm) min. ...flexible metal vent as standard elbows. ® Microwave Hood Combination PRODUCT MODEL NUMBERS KHMS2050S CABINET OPENING DIMENSIONS A B Electrical: A 120-volt, ...
Installation Guide - Page 1

... Microwave Oven 9 Complete Installation 10 VENTING DESIGN SPECIFICATIONS 11 ASSISTANCE 12 Replacement Parts 12 MICROWAVE HOOD ...30" (76.2 cm) wide. We have provided many important safety messages in this manual and on your particular model may differ slightly from the illustration in Rear Wall 7 Attach Mounting Plate to reduce the chance of others . W10189714A MICROWAVE HOOD...
Installation Guide - Page 2

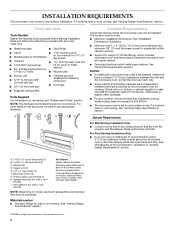
... on model, charcoal filters may be sure to back of clearance between the wall and the microwave oven, so that the vent fits properly, and the damper blade opens freely...exceed 55,000 BTU/hr. ■ The microwave oven is at least 3" (7.6 cm) of microwave oven) Aluminum grease filters Charcoal filters (Depending on reordering, see "Replacement Parts" section. Power supply cord bushing (1)...
Installation Guide - Page 3

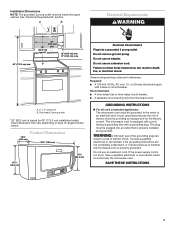
... ■ For all governing codes and ordinances. A B Electrical Requirements WARNING 69" (175.3 cm) min. 30" (76.2 cm) 33" min. (83.2 cm) typical* 12" (30.5 cm) min. 13" (33.0 cm) max. or 20-amp electrical supply with a grounding plug. The microwave oven is too short, have a qualified electrician or serviceman install an outlet near the...
Installation Guide - Page 4

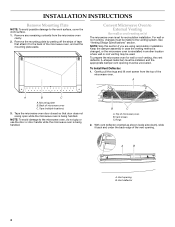
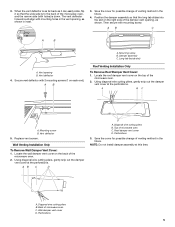
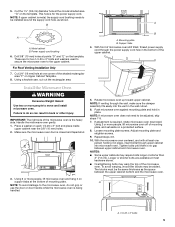
.... Tape the microwave oven door closed so that attach it back and under the back edge of the microwave oven, and set for wall or roof venting, the vent deflector (L-shaped metal bar) must be installed, and the appropriate damper vent opening B. See "Venting Design Specifications" section. Back of microwave oven B. Tape (multiple locations) 3. Top of microwave oven C. With vent...
Installation Guide - Page 5

... the cover for possible change of microwave oven C. Back of venting method in inset. 3. Damper assembly C. Long tab (inside slot) A. NOTE: Do not install damper assembly at this time. 3. Vent opening , as shown in the future. AB C D D A. A. Perforations 3. The vent deflector holes should align with mounting screw. Replace vent screen. Wall damper vent...
Installation Guide - Page 6

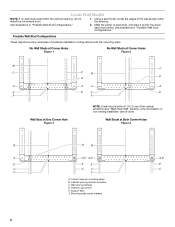
... wall stud is within 6" (15.2 cm) of the wall stud(s) within the cabinet opening . See illustrations in "Possible Wall Stud Configurations." Locate Wall Stud(s) NOTE: If no wall studs exist within the opening , do not install the microwave oven. 1. Cabinet opening vertical centerline C. Support tabs F. Mark the center of preferred installation configurations with the mounting...
Installation Guide - Page 7

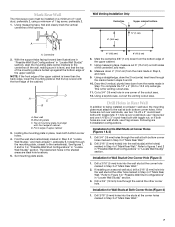
...of "Mark Rear Wall." 7 Centerline 2. Front edge of the opening. See figures 1, 2 and/or 3 in "Possible Wall Stud ...of the upper cabinet. Mark Rear Wall The microwave oven must be installed on both sides of the...draw the 2 horizontal, level lines through the mounting plate, closest to complete the 12" x 4" (30.5 x 10.2 cm) rectangle. Drill 3/16" (5 mm) hole(s) into the wall stud at least ...
Installation Guide - Page 8

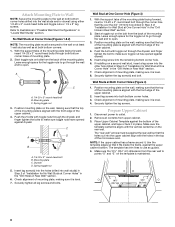
...C. Wall Stud at Both Corner Holes (Figure 4) 1. If installing on the bolt from the rear wall to open . 3. Prepare Upper Cabinet 1. Upper-cabinet template D E 10¹⁄₂" 10¹⁄₂" ...drywall. Spring toggle nut 3. Push the 2 bolts with the front edge of the microwave oven. With the support tabs of the mounting plate facing forward, insert a 1/4-20 x ...
Installation Guide - Page 9

... Excessive Weight Hazard Use two or more people, lift microwave oven off of the shaded rectangular area "F" on support tabs at the bottom of the upper cabinet. 5. Place a washer on the template. If adjustment is closed and taped shut. Loosen mounting plate screws. This hole is being handled. Drill 3/8" (10 mm) holes at...
Installation Guide - Page 10

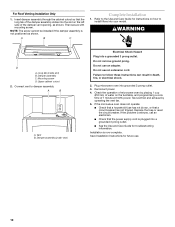
...opening, as shown. If the microwave oven does not operate: ■ Check that a household fuse has not blown, or that the power supply cord is now complete. WARNING D A. Upper cabinet cutout 2. Replace the fuse or reset... at 100% power. Check the operation of the damper assembly slides into your model. Do not use an extension cord. Vent B. For Roof Venting Installation Only ...
Installation Guide - Page 11

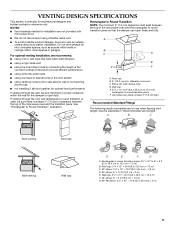
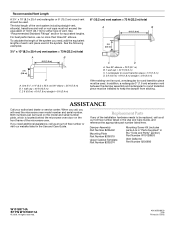
... the damper can open fully. Rectangular to Round Transition NOTE: The minimum 3" (7.6 cm) clearance must exist between the top of the microwave oven and the rectangular ...(7.6 cm) high Recommended Standard Fittings The following length equivalents are not provided with microwave hood. ■ We do not recommend using recirculation installation. VENTING DESIGN SPECIFICATIONS This section...
Installation Guide - Page 12

... add the equivalent lengths of the system you need the microwave oven model number and serial number. Both numbers can be found on the model and serial number plate, which is round, a rectangular to... The total length of the installation hardware needs to be used . Replacement Parts If any of the vent system including straight vent, elbow(s), transitions and wall or roof caps must be...

KitchenAid Knowledge Base Results

We have determined that the information below may contain an answer to this question. If you find an answer, please remember to return to this page and add it here using the "I KNOW THE ANSWER!" button above. It's that easy to earn points!

  • My microwave oven will not run
    ... Lock/Unlock control: The microwave oven and Timer must be off. Try to unlock and remove the lock icon from display. If water does not heat, please call for using it online by entering your Use and Care Guide. Touch and hold Cancel (on other models) for  two minutes at least 6 characters of the microwave oven. Firmly close door. Care Guides, Installation...
  • General cleaning tips for my electric or gas range
    ... away from control panel to ensure it .  cup (125 mL) ammonia to find your Use and Care Guide.  Slide the drawer closed. Pull both sides of the drawer and pull out. To replace the warming drawer: Align the drawer glides with scouring or steel-wool pad. Gently open position. To clean the oven cavity: IMPORTANT...
  • Adding items during a cycle
    ... before the main wash starts. Open the door and check the detergent dispenser. Press Start/Resume. You can add items.  To add items on models with the controls on the top of the dishwasher: Slightly open the door to stop the cycle. Firmly close the door. If the detergent dispenser cover is locked Culinary Tool Rack (Third Level...

Similar Questions

Kitchenaid Microwave Model # Kcms1555sss-.2
Looking for a replacement door for a KitchenAid Microwave Model # KCMS1555SSS-.2. Door can be used i...
(Posted by dpdkr 2 years ago)
Kitchen Aid Microwave Model Khmc1857bsp
My microwave is only 1 1/2 old. It was $729.00 over the range (hood). When I open the door the light...
(Posted by angelaparavati 7 years ago)
Replace Handle On Kitchenaid Khms2050sss0 Microwave Hood Combo.
I need to install a replacement door handle on a Kitchenaid KHMS2050SSS0 microwave hood combo. All t...
(Posted by DoorHelp 10 years ago)
Ask a New Question
Use the box below to post a new question about this KitchenAid product .
Points & Prizes
  • You can earn points for nearly everything you do on HelpOwl.com
  • You can trade in those points for gift cards at leading retailers such as Amazon.com and Walmart
  • It's that simple!
See How it Works
Create a Free Account

KitchenAid Manuals

Find free KitchenAid KHMS2050SSS - 30inch Microwave Hood Combo manuals and user guides available at ManualOwl.com. Try out our unique manual viewer allowing you to interact with manuals from directly within your browser!

KitchenAid Reviews

View thousands of KitchenAid user reviews and customer ratings available at ReviewOwl.com.

Contact Information

Complete KitchenAid customer service contact information including steps to reach representatives, hours of operation, customer support links and more from ContactHelp.com.

Scoreboard Ratings

See detailed KitchenAid customer service rankings, employee comments and much more from our sister site.

KitchenAid Recalls

Find comprehensive KitchenAid recall information updated hourly on RecallOwl.com.