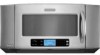
KitchenAid KHMS2056SSS Support Question
KitchenAid KHMS2056SSS Support Question
Find answers below for this question about KitchenAid KHMS2056SSS - ARCHITECT II 36" 2.0 cu. Ft. 1.Need a KitchenAid KHMS2056SSS manual? We have 3 online manuals for this item!
Question posted by itsallaboutu3 on February 4th, 2017
Need To Find The Fuse In My Microwave Where Inside The Microwave Is It Located
KitchenAid microwave model number khms 205 osss - 0
Current Answers
Answer #1: Posted by Troubleshooter101 on February 5th, 2017 12:13 AM
Troubleshooter101

Member since:
September 30th, 2015 Points: 2,927,040

Member since:
September 30th, 2015 Points: 2,927,040
The main fuse is in the control compartment on the right side of the unit .
1. Unplug microwave oven or disconnect
power.
2. Open the microwave oven door.
3. Pull the two tabs and remove the center air flow screen from the top of the cabinet.
4. Remove the four indicated screws from the right panel cover, then pull the cover
forward, and remove it.
5. Remove the screw from the right panel. one on top two on the left side of the right most panel and one screw on the bottom .
And the fuse and fuse block are right there.
Thanks
Please respond to my effort to provide you with the best possible solution by using the "Acceptable Solution" and/or the "Helpful" buttons when the answer has proven to be helpful. Please feel free to submit further info for your question, if a solution was not provided. I appreciate the opportunity to serve you!
Troublshooter101
Related KitchenAid KHMS2056SSS Manual Pages
Use & Care Guide - Page 1

If you don't immediately follow instructions. You can find your model and serial number on the label located on your KitchenAid microwave hood combination, please contact us that can kill or hurt you what the potential hazard is, tell you how to us at www.kitchenaid.com. Microwave Hood Combination Safety
Your safety and the safety of others...
Use & Care Guide - Page 2

...not cover or block any openings on the microwave oven.
■ Do not store this microwave oven outdoors. Do not overcook food. If materials inside the oven to heat, cook, or dry food. Visible...
Do not use the microwave oven near a swimming pool, or similar locations.
■ Do not immerse cord or plug in water.
■ Keep cord away from the microwave oven is no damage to persons...
Use & Care Guide - Page 3

...-watt quartz bulb. Failure to be plugged into a grounded 3 prong outlet. Recommended: ■ A time-delay fuse or time-delay circuit breaker. ■ A separate circuit serving only this microwave oven. WARNING: Improper use an adapter. Cooking Rack (on some models)
The convection element and fan are side by providing an escape wire for manual cooking...
Use & Care Guide - Page 4

... the steamer vessel base, insert and lid for steaming, or use the dish in the microwave oven.
4 Convection rack
E. Steamer insert H. Grill rack
D. Accessories
Pan (on some models)
Use the provided pan for all other convection and combination cycles.
■ Melamine (Follow manufacturer recommendations.) ■ Paper towels, paper plates, napkins (Use non-recycled...
Use & Care Guide - Page 5

... soap, water and washcloth. Stage Cooking
If programming stage cooking, follow label instructions on some models) for at least 30 minutes after cooking.
Clean with soft cloth, or use metal or...replaced about every 6 months.
■ Cooktop lights: The cooktop lights are located on the top of the microwave oven, under the vent screen on the underside of various programs, see the Quick...
Use & Care Guide - Page 6

... the fuse or reset the circuit breaker. Quartz bulb does not appear to avoid unintended starting of the door, remove it does not toast, call . Use a corded phone, a different frequency cordless phone or avoid using manual grill - The microwave oven's cooling fan (on some models, if a packaging spacer is attached to inside of the microwave oven. Replacement...
Use & Care Guide - Page 8

... area where service by this User Instructions and model number information for other damage to correct house wiring or plumbing.
2. KITCHENAID SHALL NOT BE LIABLE FOR INCIDENTAL OR CONSEQUENTIAL DAMAGES. Repairs when your major appliance, to replace or repair house fuses, or to the finish of the microwave oven opening, behind the door. Major appliances with...
Dimension Guide - Page 1
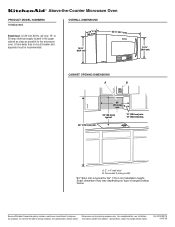
... B. A time-delay fuse or circuit breaker and separate circuit is typical for planning purposes only. Exact dimension may vary depending on type of range/cooktop below. Ref. or 20-amp electrical supply located in the upper cabinet as close as possible to change without notice. ® Above-the-Counter Microwave Oven
PRODUCT MODEL NUMBERS
KHMS2056S
Electrical...
Installation Guide - Page 1
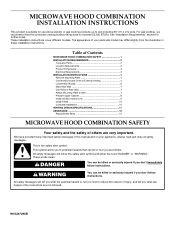
... Oven 9 Install Filters 10 Complete Installation 10 VENTING DESIGN SPECIFICATIONS 11 ASSISTANCE 12 Replacement Parts 12
MICROWAVE HOOD COMBINATION SAFETY
Your safety and the safety of others . See "Installation Requirements" section for use above electric or gas cooking products up to and including 36" (91.4 cm) wide. These installation instructions cover different models.
These...
Installation Guide - Page 2
...68 kg), which includes microwave oven and items placed inside the microwave oven and upper cabinet.
■ Grounded electrical outlet inside upper cabinet. NOTES:
■ If installing the microwave oven near a left sidewall... model, charcoal filters may be installed.
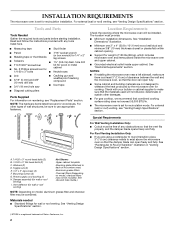
Materials needed
■ Standard fittings for recirculation installation. INSTALLATION REQUIREMENTS
The microwave oven ...
Installation Guide - Page 3
...adapter.
Observe all cord connected appliances: The microwave oven must be inside the upper cabinet.
Product Dimensions
(4168.4&#...fuse or time-delay circuit breaker. ■ A separate circuit serving only this microwave oven is an inverter, and is incompatible with a fuse.... A. 2" x 4" wall stud B. A
B
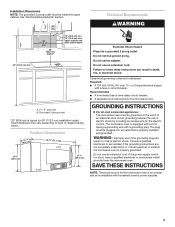
Electrical Requirements
WARNING
36" (91.4 cm)
min.
33" (83.8 cm) typical*
12...
Installation Guide - Page 4
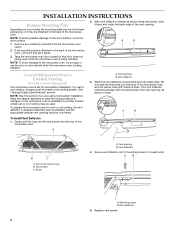
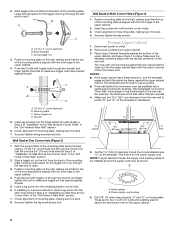
... Gently pull the rings and lift vent screen from the microwave oven cavity.
2. The vent deflector holes should align with 2 mounting screws (1 on your model, the mounting plate may be in the foam packaging, ...work surface.
1. Keep the damper assembly in another location where wall or roof venting may be attached to the back of the microwave oven, and the narrow side (with holes) is down...
Installation Guide - Page 5
... possible change of the damper vent opening, as shown. Then secure with mounting screw. Top of microwave oven C. A.
Long tab (inside slot)
5 Using diagonal wire cutting pliers, gently snip out the damper vent cover at this time. A B
C
D
A. Locate the roof damper vent cover on the top of venting method in the future.
4. Save the...
Installation Guide - Page 6
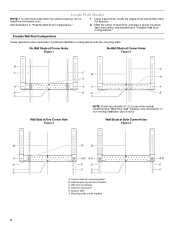
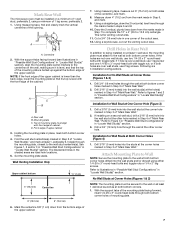
... cabinet opening vertical centerline C.
Corner holes (on mounting plate) B. Holes for lag screws E. Support tabs F.
Cabinet opening , do not install the microwave oven.
1. Mounting plate center markers
6 Using a stud finder, locate the edges of each stud, and draw a plumb line down each stud center. See illustrations in "Possible Wall Stud Configurations."
2. Wall stud...
Installation Guide - Page 7
... round-head bolt with the front edge of the cabinet.
Mark Rear Wall
The microwave oven must be secured to illustrations in "Possible Wall Stud Configurations" in Step 4 of... centerline of upper cabinet
3. A
A. Centerline
2. Mounting plate C. D. Holding the mounting plate in "Locate Wall Stud(s)" section. Find the wall stud centerline(s) marked in Step 3 of "Mark Rear Wall." See...
Installation Guide - Page 8
...the thickness of the rear wall (for two 1/4-20 x 3" bolts and washers used to secure the microwave oven to outlet.
2. Mounting plate C. Remove all lag screws and bolts. Place Upper Cabinet Template against ... wall so that it fits inside the frame, against drywall.
5.
This hole is level.
7.
NOTE: If upper cabinet is metal, the supply cord bushing needs to make sure toggle nut...
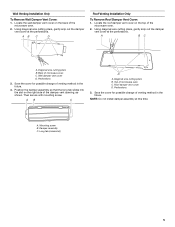
Installation Guide - Page 9
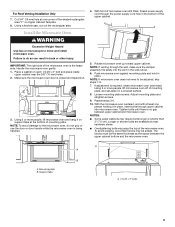
... more people, lift microwave oven off of the microwave oven is no gap between the upper cabinet bottom and the microwave oven. NOTE: If microwave oven does not need to the microwave oven, do so can ...microwave oven up toward upper cabinet. For Roof Venting Installation Only 7. With the microwave oven centered, and with at one person holding it on each 1/4-20 x 3" bolt and place inside...
Installation Guide - Page 10
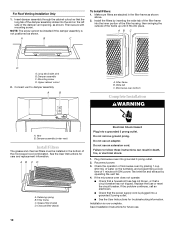
...Installation Instructions for care and replacement information. Do not remove ground prong.
Long tab (inside slot) B. Install the filters by inserting the wide tab of the filter frame into ...AB C D
A. Failure to damper assembly. Mounting screw D. If the microwave oven does not operate: ■ Check that a household fuse has not blown, or that the long tab of the damper assembly ...
Installation Guide - Page 11
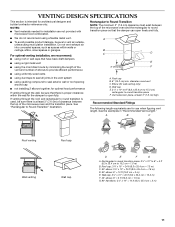
... by minimizing the length of the vent and number of elbows to provide efficient performance
■ ... 6" = 5 ft (8.3 x 25.4 cm to round transition piece F. NOTES: ■ Vent materials needed for installation are not provided with
microwave hood combination.
■...) clearance must exist between the top of the microwave oven and the rectangular to Round Transition" illustration. Rectangular...
Installation Guide - Page 12
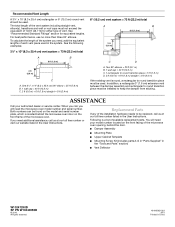
...73 ft (22.2 m) total
A
B
6 ft (1.8 m)
2 ft (0.6 m)
C
A. If you need the microwave oven model number and serial number. Replacement Parts
If any of the microwave oven. ...need , add the equivalent lengths of available replacement parts. ASSISTANCE
Call your model number located on the model and serial number plate, which is a list of each vent piece used . Following is located...
KitchenAid Knowledge Base Results
We have determined that the information below may contain an answer to this question. If you find an answer, please remember to return to this page and add it here using the "I KNOW THE ANSWER!" button above. It's that easy to earn points!-
My microwave oven will not run
... the door? See "Assistance or service" section below . Model Number | Help me locate my model number Please enter at 100% cooking power. Firmly close door. To Lock/Unlock control: The microwave oven and Timer must be off. Repeat to control unintended use aluminum foil in and microwave combination ovens Can I use of your Use and Care Guide... -
Will the Microban® Refrigerator Air Filter fit my refrigerator?
... odors, you may need to your Use and Care Guide by side refrigerator serial number does not begin with S or HR, the Microban Refrigerator Air Filter will fit only U.S. Refrigerator Air Filters Refrigerator/freezer odor removal Hard Water Filming in 22, 25, and 27 cu. capacities. Model Number | Help me locate my model number Please enter at... -
Will the Microban® Refrigerator Air Filter fit my refrigerator?
... answer needs updating and/or additional information The answer could be improved Thank you may need to Search Results Model Number | Help me locate my model number Please...number, review the labels on the inside of 3 Please tell us how we can make this answer more useful. capacities. To remove odors, you Not Helpful Helpful Answers others found helpful Cleaning your model number...
Similar Questions

Where Is Fuse Located?
(Posted by DENNYCOC001 2 years ago)

Kitchenaid Microwave Model # Kcms1555sss-.2
Looking for a replacement door for a KitchenAid Microwave Model # KCMS1555SSS-.2. Door can be used i...
Looking for a replacement door for a KitchenAid Microwave Model # KCMS1555SSS-.2. Door can be used i...
(Posted by dpdkr 2 years ago)
How Do You Repair Cook Top Bulbs On Kitchen Aid Microwave Model Khmc1857wss
How do I repair/replace oven top bulbs on my Kitchen Aid Microwave Model KHMC1857WSS?
How do I repair/replace oven top bulbs on my Kitchen Aid Microwave Model KHMC1857WSS?
(Posted by schirm43 9 years ago)

Kitchenaid Microwave Khms2056sss Series 2 Lost Power, Fuse Ok, Outlet Works. ?
(Posted by geraldatucker 10 years ago)

Microwave Lights
Why do my microwave lights stop working when boiling something on stove. This is the second time. Is...
Why do my microwave lights stop working when boiling something on stove. This is the second time. Is...
(Posted by RomaineGreen23 11 years ago)