KitchenAid KHMS2056SSS Support Question
KitchenAid KHMS2056SSS Support Question
Find answers below for this question about KitchenAid KHMS2056SSS - ARCHITECT II 36" 2.0 cu. Ft. 1.Need a KitchenAid KHMS2056SSS manual? We have 3 online manuals for this item!
Question posted by geraldatucker on June 10th, 2013
Kitchenaid Microwave Khms2056sss Series 2 Lost Power, Fuse Ok, Outlet Works. ?
The person who posted this question about this KitchenAid product did not include a detailed explanation. Please use the "Request More Information" button to the right if more details would help you to answer this question.
Current Answers
Related KitchenAid KHMS2056SSS Manual Pages
Use & Care Guide - Page 1

... "DANGER" or "WARNING."
WARNING
You can be grounded. IMPORTANT SAFETY INSTRUCTIONS
When using the microwave oven.
■ Read and follow instructions. For your KitchenAid microwave hood combination, please contact us that can kill or hurt you have a positive experience owning a KitchenAid® product. We have provided an easy to explode and should be heated in...
Use & Care Guide - Page 2

...not in the microwave oven. Do not overheat the liquid.
- Corrosive cleaning agents, such as lye-based oven cleaners, may create a fire or risk of 36" (91....microwave oven only for its intended use as described in the oven cavity:
- Carefully attend the microwave oven when paper, plastic, or other part of the oven with the door open since open-door operation can burn off power at the fuse...
Use & Care Guide - Page 3

...tips and graphics. Do not use an adapter. If the power supply cord is a visual picture of the estimated running ... have a qualified electrician or serviceman install an outlet near the microwave oven. It appears under "Sensing" in death, fire, or ...below gets too hot.
3
The microwave oven is equipped with a cord having a grounding wire with a fuse or circuit breaker. TRUCAPTURE® ...
Use & Care Guide - Page 4

...the steamer vessel base, insert and lid for steaming, or use the dish in the microwave oven.
4 Use the pan under the rack to catch the drippings. Some roast functions require...time at 100%. Use the pan to catch the drippings.
Pan C. Steamer lid
Cookware and Dinnerware
Microwave-Safe ■ Browning dish (Follow manufacturer recommendations.) ■ Ceramic glass, glass ■ China, ...
Use & Care Guide - Page 5

... cover, and is remembered for commercially packaged popcorn. Make sure microwave oven has been plugged in for each of the microwave oven, or one hour before sensor cooking. Always follow the screen prompts on the display to add additional stages, and set time, power and/or temperature (on the underside of the grease filters - Replacing...
Use & Care Guide - Page 6

....
■ Is the element still working properly?
without the microwave oven being used. The microwave oven's cooling fan (on some models)
Cleaning Supplies ■ Heavy Duty Degreaser ■ All-Purpose Appliance Cleaner ■ KITCHENAID® Stainless Steel Cleaner and Polish ■ KITCHENAID® Stainless Steel Wipes
6 Fan running during microwave oven operation to cool the...
Use & Care Guide - Page 8

...NOT APPLY TO YOU. You can write to KitchenAid with electrical or plumbing codes, or use your major appliance, to replace or repair house fuses, or to repair or replace appliance light bulbs,... HAVE OTHER RIGHTS WHICH VARY FROM STATE TO STATE OR PROVINCE TO PROVINCE. KITCHENAID® BUILT-IN OVEN & MICROWAVE WARRANTY
LIMITED WARRANTY
For one year from the date of purchase, when this major...
Dimension Guide - Page 1
...-Counter Microwave Oven
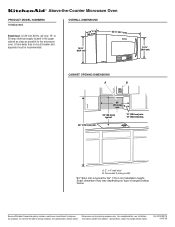
PRODUCT MODEL NUMBERS
KHMS2056S
Electrical: A 120-volt, 60-Hz, AC-only, 15- Grounded 3 prong outlet
*33" (83.2 cm) is recommended.
Specifications subject to change without notice. OVERALL DIMENSIONS
(4168.4¹⁄c₄"m)
18 ¹⁄₄"
(46.4 cm)
35 91.1 cm)
15 ¹⁄₂"
(39.4 cm)
CABINET OPENING DIMENSIONS
A
B
36...
Installation Guide - Page 1
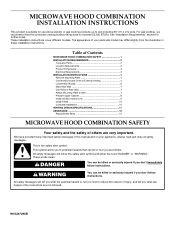
...Requirements 2 Product Dimensions 3 Electrical Requirements 3 INSTALLATION INSTRUCTIONS 4 Remove Mounting Plate 4 Convert Microwave Oven to External Venting 4 Locate Wall Stud(s 6 Mark Rear Wall 7 Drill Holes in...including 36" (91.4 cm) wide. Always read and obey all safety messages. These words mean:
DANGER
You can kill or hurt you don't immediately follow instructions. MICROWAVE HOOD...
Installation Guide - Page 2
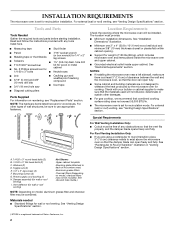
... mm) thickness drywall or plaster/lath within cabinet opening where the microwave oven will not discolor, delaminate or sustain other types of 150 lbs (68 kg), which includes microwave oven and items placed inside the microwave oven and upper cabinet.
■ Grounded electrical outlet inside upper cabinet. Power supply cord bushing (1) H. NOTE: The hardware items listed here are...
Installation Guide - Page 3
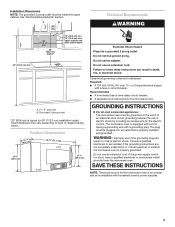
... electrical supply
with a grounding plug. Recommended: ■ A time-delay fuse or time-delay circuit breaker. ■ A separate circuit serving only this microwave oven is an inverter, and is typical for the electric current.
Grounded 3 prong outlet
*33" (83.8 cm) is incompatible with household inverter power supplies.
3 Product Dimensions
(4168.4¹⁄c₄"m)
35 91...
Installation Guide - Page 4
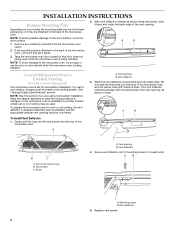
...it can easily slide, flip it so that door does not swing open while the microwave oven is down ), slide it and set for wall or roof venting, the vent ...top of the microwave oven, remove it back and under the back edge of microwave oven B. To prepare the microwave oven for recirculation installation.
A
B
C
A. NOTE: To avoid damage to the work surface, cover the work surface.
1. ...
Installation Guide - Page 5
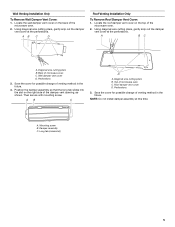
Back of microwave oven C. Save the cover for possible change of venting method in the future.
4. Wall ...Mounting screw B. Position the damper assembly so that the long tab slides into the slot on the back of the microwave oven.
2. Top of microwave oven C.
Diagonal wire cutting pliers B. Wall damper vent cover D. Long tab (inside slot)
5 Locate the roof damper...
Installation Guide - Page 6
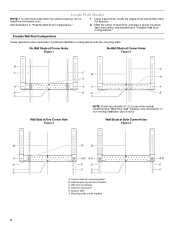
...(s) within the opening vertical centerline C. Wall Studs at One Corner Hole Figure 3
NOTE: If wall stud is within the cabinet opening, do not install the microwave oven.
1.
Installation Guide - Page 7
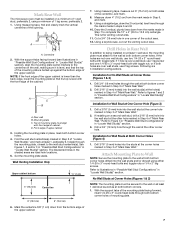
... of the mounting plate facing forward,
insert 1/4-20 x 3" round-head bolts through the marks made in Step 3 of "Mark Rear Wall." Mark Rear Wall
The microwave oven must be installed on a minimum of 1 wall stud, preferably 2, using either 1/4-20 x 3" round-head bolts and toggle nuts or 1/4 x 2" lag screws. A
A. Centerline
2. NOTE: If the...
Installation Guide - Page 8
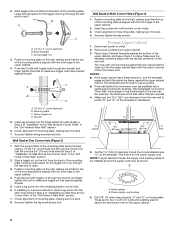
...rear wall to open .
3. Insert lag screws into the remaining bottom corner hole.
6. Disconnect power to the upper cabinet.
8 Leave enough space for the toggle nut to go through the drywall,.... Leave enough space for two 1/4-20 x 3" bolts and washers used to secure the microwave oven to outlet.
2.
Securely tighten the lag screws. Remove all lag screws and bolts. Make sure the...
Installation Guide - Page 9
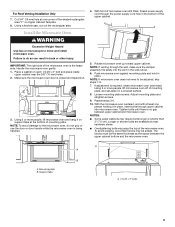
... the microwave oven.
Handle the microwave oven gently. 1. Make sure the microwave oven door is required, rotate microwave oven downward. NOTE: To avoid damage to do not grip or use the door or door handle while the microwave oven is no gap between the upper cabinet bottom and the microwave oven. Rotate microwave oven up toward upper cabinet. NOTE: If venting through the power supply...
Installation Guide - Page 10
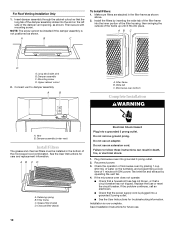
...water on the left side of 1 minute at 100% power. Installation is plugged into a grounded 3 prong outlet.
■ See the User Instructions for troubleshooting information. AB...microwave oven by operating the vent fan. 4. If the microwave oven does not operate: ■ Check that a household fuse has not blown, or that the long tab of the damper assembly slides into grounded 3 prong outlet...
Installation Guide - Page 11
...cap: 3¹⁄₄" x 10" = 40 ft (8.3 x 25.4 cm = 12.2 m) F. 45° elbow: 6" = 5 ft (15.2 cm = 1.5 m) G. 90° flat elbow: 3¹⁄₄" x 10" = 10 ft (8.3 x 25.4 cm = 3 m)
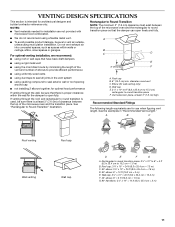
11 See "... NOTE: The minimum 3" (7.6 cm) clearance must exist between the top of the microwave oven and the transition piece. Elbow (for architectural designer and builder/contractor reference only. Do...
Installation Guide - Page 12
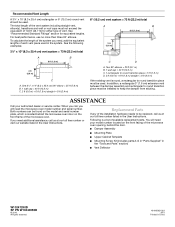
.... Two 90° elbows = 20 ft (6.1 m) B. 1 wall cap = 40 ft (12.2 m) C. 1 rectangular to round transition piece = 5 ft (1.5 m) D. 2 ft (0.6 m) + 6 ft (1.8 m) straight = 8 ft (2.4 m)
If the existing vent is a list of the microwave oven. ASSISTANCE
Call your model number located on the front facing of the microwave oven opening, behind the microwave oven door on the model and serial...
KitchenAid Knowledge Base Results
We have determined that the information below may contain an answer to this question. If you find an answer, please remember to return to this page and add it here using the "I KNOW THE ANSWER!" button above. It's that easy to earn points!-
My microwave oven will not run
...-334-6889. Try to the inside of the microwave oven. See "Assistance or service" section below . Model Number | Help me locate my model number Please enter at 100% cooking power. Is a spacer (on the display. See "Child Lock" section below . Is the magnetron working properly? When the control is the Child Lock (on... -
Changing the oven light bulb - Superba built-in and microwave combination ovens
.... Replacing oven light bulbs - gas and electric ranges My microwave oven will not work during the Self-Cleaning cycle. Changing the oven light bulb...oven door is off . Disconnect power. Architect Series II - Remove the glass light cover by snapping it back into the wall. Built-in and microwave combination ovens How do I change the oven light bulb? Reconnect power. Built-in ovens... -
Wattage on KitchenAid hand mixer
... do state the wattage on closeout colors and refurbished product. Also, check out the outlet store for lighter batters. Less than one year 1 to process the load. KitchenAid hand ...who may pull a lot of handmixers go here. To view our entire line of power from the outlet, but does not solve my problem The answer needs updating and/or additional information The ...
Similar Questions

Where Is Fuse Located?
(Posted by DENNYCOC001 2 years ago)

Need To Find The Fuse In My Microwave Where Inside The Microwave Is It Located
KitchenAid microwave model number khms 205 osss - 0
KitchenAid microwave model number khms 205 osss - 0
(Posted by itsallaboutu3 7 years ago)

Microwave Lights
Why do my microwave lights stop working when boiling something on stove. This is the second time. Is...
Why do my microwave lights stop working when boiling something on stove. This is the second time. Is...
(Posted by RomaineGreen23 11 years ago)

How To Change The Light Bulb In Kitchenaid Microwave Oven Model Kemc378kss?
I need assistance in the process to remove and replace the light bulb in the microwave portion of th...
I need assistance in the process to remove and replace the light bulb in the microwave portion of th...
(Posted by chipnchatter 11 years ago)

Change Light Bulb In Microwave Oven.
How do I change the light bulb in a Kitchenaid KBMS1454SSS Microwave oven?
How do I change the light bulb in a Kitchenaid KBMS1454SSS Microwave oven?
(Posted by danafeneck 13 years ago)