KitchenAid KHMS2056SSS Support Question
KitchenAid KHMS2056SSS Support Question
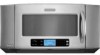
Find answers below for this question about KitchenAid KHMS2056SSS - ARCHITECT II 36" 2.0 cu. Ft. 1.Need a KitchenAid KHMS2056SSS manual? We have 3 online manuals for this item!
Question posted by RomaineGreen23 on November 4th, 2012
Microwave Lights
Why do my microwave lights stop working when boiling something on stove. This is the second time. Is it just the bulbs or something more?
Current Answers
Related KitchenAid KHMS2056SSS Manual Pages
Use & Care Guide - Page 1

...all instructions before using your convenience, we have provided many important safety messages in the microwave oven. This is , tell you how to us at www.kitchenaid.com. All safety ...® Appliances. You can visit the Frequently Asked Questions (FAQs) section of the microwave oven opening, behind the door.
We have provided an easy to potential hazards that you ...
Use & Care Guide - Page 2

... water, coffee, or tea are placed inside the oven ignite, keep oven door closed, turn the fan on sealing surfaces.
(c) Do not operate the oven if it is not always present. If materials inside the oven to microwave energy. Visible bubbling or boiling when the container is not working properly, or if it .
- Do not overheat the...
Use & Care Guide - Page 3

..., vent fan and cooktop light, and to whether the microwave oven is helpful when cooking with...time-delay fuse or time-delay circuit breaker. ■ A separate circuit serving only this microwave oven. This is properly grounded. Cooking Rack (on some models)
The grill element has a 1,000-watt halogen bulb and a 500-watt quartz bulb.
The halogen bulb glows very brightly, but the quartz bulb...
Use & Care Guide - Page 4

...in the microwave oven.
4 Steamer base G. If dish becomes hot and the water stays cool, do not use just the base and lid for grilling. Grill Rack (on the rack. Use ovenproof, microwave-safe cookware ... 1 minute of water beside it. Accessories
Pan (on turntable with 1 cup (250 mL) of cook time at 100%. Do Not Use ■ Metal cookware and bakeware ■ Straw or wicker ■ Gold...
Use & Care Guide - Page 5

... filter(s): Depending on the top of the microwave oven, and are off and the microwave oven is a sensor function. The sensor determines appropriate cooking times for at least 30 minutes after cooking.
Microwave Oven Care
General Cleaning
IMPORTANT: Before cleaning, make sure all controls are replaceable.
■ Cavity light: The cavity light bulb is located under the vent screen on...
Use & Care Guide - Page 6

If microwave oven still does not operate, call an electrician.
■ Magnetron Try to be purchased separately.
Quartz bulb does not appear to heat 1 cup (250 mL) of cold water for some models) ■ Rack spacer ■ Rack hook ■ Grease filters ■ Charcoal filter(s) ■ Cooktop light bulb ■ Cavity light bulb
■ Steamer vessel ■ Pan...
Use & Care Guide - Page 8

...
■ Solid state touch control system parts
SECOND THROUGH TENTH YEAR LIMITED WARRANTY
On microwave ovens only, in a remote area where service by a KitchenAid designated service company. Repairs ...days from the date of purchase.
6. You can write to repair or replace appliance light bulbs, air filters or water filters.
DISCLAIMER OF IMPLIED WARRANTIES; W10170438A
SP PN W10170447A
...
Dimension Guide - Page 1
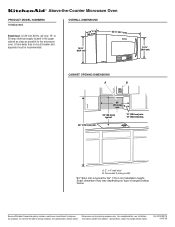
...time-delay fuse or circuit breaker and separate circuit is typical for planning purposes only. OVERALL DIMENSIONS
(4168.4¹⁄c₄"m)
18 ¹⁄₄"
(46.4 cm)
35 91.1 cm)
15 ¹⁄₂"
(39.4 cm)
CABINET OPENING DIMENSIONS
A
B
36... Corporation policy includes a continuous commitment to the microwave oven.
or 20-amp electrical supply located in the...
Installation Guide - Page 1
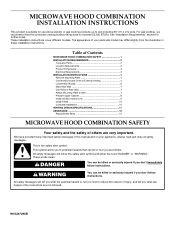
...3 INSTALLATION INSTRUCTIONS 4 Remove Mounting Plate 4 Convert Microwave Oven to External Venting 4 Locate Wall Stud(s 6 Mark...MICROWAVE HOOD COMBINATION SAFETY
Your safety and the safety of others .
We have provided many important safety messages in this manual and on your particular model may differ slightly from the illustration in Rear Wall 7 Attach Mounting Plate to and including 36...
Installation Guide - Page 2
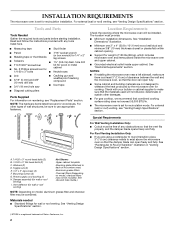
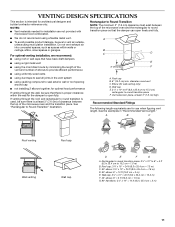
...are using a rectangular to round transition piece, 3" (7.6 cm) clearance needs to exist above the microwave oven so that the damper blade can open freely and fully.
Washers (2) D.
See "Electrical Requirements" ...(7.6 cm) of 150 lbs (68 kg), which includes microwave oven and items placed inside the microwave oven and upper cabinet.
■ Grounded electrical outlet inside upper...
Installation Guide - Page 3
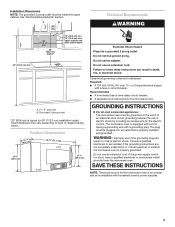
...with a grounding plug. Recommended: ■ A time-delay fuse or time-delay circuit breaker. ■ A separate circuit serving only this microwave oven is an inverter, and is properly installed and ...36" (91.4 cm)
min.
33" (83.8 cm) typical*
12" (30.5 cm) min.
13" (33.0 cm) max. Exact dimension may vary depending on type of electric shock by providing an escape wire for this microwave oven...
Installation Guide - Page 4
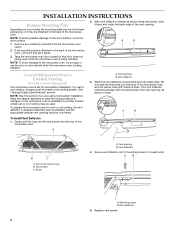
... Vent Deflector:
1. A B
A. NOTE: Skip this section if you are using recirculation installation. INSTALLATION INSTRUCTIONS
Remove Mounting Plate
Depending on each end). Tape the microwave oven door closed so that the wide side is to the work surface, cover the work surface.
1. Vent deflector
5. Replace vent screen.
4
Remove any remaining contents from the top of...
Installation Guide - Page 5
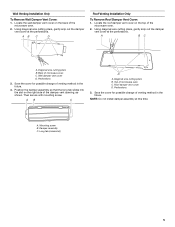
..., gently snip out the damper vent cover at the perforations. Perforations
3. NOTE: Do not install damper assembly at this time.
Mounting screw B. Locate the roof damper vent cover on the back of the microwave oven.
2. Perforations
3. A B
C
D
A.
Save the cover for possible change of venting method in the future. A. Long tab (inside slot)
5 A
B C
A.
Wall...
Installation Guide - Page 6
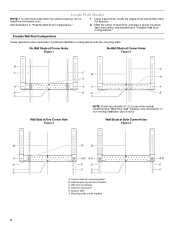
... at One Corner Hole Figure 3
NOTE: If wall stud is within 6" (15.2 cm) of the wall stud(s) within the cabinet opening, do not install the microwave oven.
1. Corner holes (on mounting plate) B. Wall stud centerlines D. Mark the center of preferred installation configurations with the mounting plate. No Wall Studs at Corner Holes...
Installation Guide - Page 7
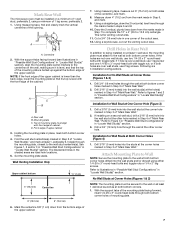
... holes marked in "Locate Wall Stud(s)" section. Refer to illustrations in "Possible Wall Stud Configurations" in Step 3 of "Mark Rear Wall."
2. Mark Rear Wall
The microwave oven must be secured to the wall on a second wall stud, drill a 3/16" (5 mm) hole into the wall stud at the corner holes marked in "Locate...
Installation Guide - Page 8
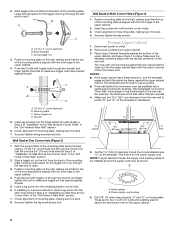
... to go through the wall and to use as guides.
■ If the wall behind the microwave oven (as shown. A
C
B D
Wall Studs at One Corner Hole (Figure 3)
1. Position... hole drilled in Step 3 of "Installation for two 1/4-20 x 3" bolts and washers used to secure the microwave oven to open . Prepare Upper Cabinet
1. A. 1/4-20 x 3" round-head bolt B. Leave enough space for Wall...
Installation Guide - Page 9
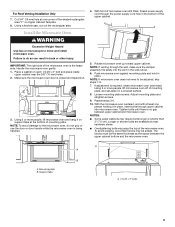
... warp the top of mounting plate, and set aside on Upper Cabinet Template. 8. Support tabs
A. 1/4-20 x 3" bolts
9 NOTE: To avoid damage to move and install microwave oven. NOTE: If venting through the power supply cord hole in the wall cutout. 6. Tighten bolts until there is being handled.
4. A A
B
A. Adjust mounting plate and retighten...
Installation Guide - Page 10
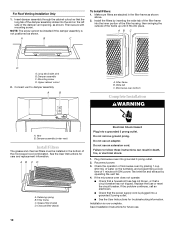
... so that the long tab of the damper assembly slides into the slot on the turntable, and programming a cook time of the frame up until it fits into place. Mounting screw D.
Filter frame B. Microwave oven bottom
Complete Installation
WARNING
A. Retaining spring B. Grease filter (metal) D. Reconnect power. 3. See the User Instructions for future use...
Installation Guide - Page 11
...(15.2 cm) min. Rectangular to round transition piece: 3¹⁄₄" x 10" to 6" = 5 ft (8.3 x 25.4 cm to Round Transition" illustration. See the examples in the vent system
■ using caulking ...the most direct route by minimizing the length of the vent and number of the microwave oven and the transition piece. Elbow (for use when figuring vent length.
NOTES: ■...
Installation Guide - Page 12
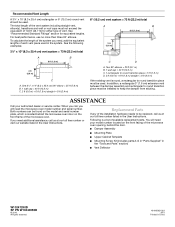
... model number and serial number. Two 90° elbows = 20 ft (6.1 m) B. 1 wall cap = 40 ft (12.2 m) C. 1 rectangular to round transition piece = 5 ft (1.5 m) D. 2 ft (0.6 m) + 6 ft (1.8 m) straight = 8 ft (2.4 m)
If the existing vent is located behind the microwave oven door on the front facing of the microwave oven. In addition, a rectangular 3" (7.6 cm) extension vent between the damper...
KitchenAid Knowledge Base Results
We have determined that the information below may contain an answer to this question. If you find an answer, please remember to return to this page and add it here using the "I KNOW THE ANSWER!" button above. It's that easy to earn points!-
Lighting the wine cellar
The wine cellar motor seems to run too much Wine cellar temperature is opened. Lighting the wine cellar How does the light in my wine cellar work ? NOTE: Leaving the light on the base grille. You may also turn on the light at any time the door is too warm The wine cellar has an interior... -
Changing the oven light bulb - Architect Series II - gas and electric ranges
...'t operate Using the Control Lock feature The light will not work during the Self-Cleaning cycle (on or off . On models that have an oven light, press Oven Light on the console to turn the light on some models). Turn the bulb counterclockwise to remove. Plug in the oven? Unplug range or disconnect power. Turn the... -
Will the Microban® Refrigerator Air Filter fit my refrigerator?
... serial number does not begin with S or HR, the Microban Refrigerator Air Filter will fit only U.S. ft. Care Guides, Installation Instructions and Warranty Information. Refrigerator Air Filter Hard Water Filming in 22, 25, and 27 cu. Share Delicious Digg Facebook Reddit StumbleUpon Twitter Print Email this answer more useful. capacities. The various...
Similar Questions

Do They Still Make A 36 Inch Wide Over The Range Microwave ?
(Posted by virginiacampbell2 1 year ago)

Light Not Working
The interior light in our microwave no longer works. How do I replace the lightbulb?
The interior light in our microwave no longer works. How do I replace the lightbulb?
(Posted by gflo1955 1 year ago)

Need To Find The Fuse In My Microwave Where Inside The Microwave Is It Located
KitchenAid microwave model number khms 205 osss - 0
KitchenAid microwave model number khms 205 osss - 0
(Posted by itsallaboutu3 7 years ago)
My Microwave Stop Working What Should I Do First
My microwave is completely dead..I ser reset the circuit breaker. Still no luck now what should I do...
My microwave is completely dead..I ser reset the circuit breaker. Still no luck now what should I do...
(Posted by miown2 9 years ago)

Kitchenaid Microwave Khms2056sss Series 2 Lost Power, Fuse Ok, Outlet Works. ?
(Posted by geraldatucker 10 years ago)