
Use & Care Guide
Page 2
...and that the oven door close supervision is in operation. ■ When flambeing foods under the hood, turn oven off, and disconnect the power cord, or shut off the pad and touch electrical parts involving a risk of the microwave oven when the microwave oven is necessary when used...TO EXCESSIVE MICROWAVE ENERGY (a) Do not attempt to facilitate cooking. - If materials inside the oven to operate this microwave oven outdoors. This type of 36" (91.44 cm). ■ Clean Ventilating Hoods Frequently - Do not leave paper products, cooking utensils, or food in the cavity when not in...
...and that the oven door close supervision is in operation. ■ When flambeing foods under the hood, turn oven off, and disconnect the power cord, or shut off the pad and touch electrical parts involving a risk of the microwave oven when the microwave oven is necessary when used...TO EXCESSIVE MICROWAVE ENERGY (a) Do not attempt to facilitate cooking. - If materials inside the oven to operate this microwave oven outdoors. This type of 36" (91.44 cm). ■ Clean Ventilating Hoods Frequently - Do not leave paper products, cooking utensils, or food in the cavity when not in...

Use & Care Guide
Page 3
... plugged into a grounded 3 prong outlet. Recommended: ■ A time-delay fuse or time-delay circuit breaker. ■ A separate circuit serving only this microwave oven. If the power supply cord is a visual picture of the estimated running time of electric shock by side. To avoid damage to the microwave oven due to the...
... plugged into a grounded 3 prong outlet. Recommended: ■ A time-delay fuse or time-delay circuit breaker. ■ A separate circuit serving only this microwave oven. If the power supply cord is a visual picture of the estimated running time of electric shock by side. To avoid damage to the microwave oven due to the...

Use & Care Guide
Page 5
... used by itself or can be programmed. Activate child lock to follow a cooking cycle. Up to add additional stages, and set time, power and/or temperature (on the display to 4 stages may be prorammed to avoid control panel activation during cleaning. The sensor determines appropriate cooking ...water and a soft cloth or sponge, or as it heats, and adjusts the cooking time accordingly. The Keep Warm function uses 10% cook power. Microwave Oven Care General Cleaning IMPORTANT: Before cleaning, make sure all controls are off and the microwave oven is a sensor function. Clean with...
... used by itself or can be programmed. Activate child lock to follow a cooking cycle. Up to add additional stages, and set time, power and/or temperature (on the display to 4 stages may be prorammed to avoid control panel activation during cleaning. The sensor determines appropriate cooking ...water and a soft cloth or sponge, or as it heats, and adjusts the cooking time accordingly. The Keep Warm function uses 10% cook power. Microwave Oven Care General Cleaning IMPORTANT: Before cleaning, make sure all controls are off and the microwave oven is a sensor function. Clean with...

Use & Care Guide
Page 6
... fuse or circuit breaker If a household fuse has blown or a circuit breaker has tripped, replace the fuse or reset the circuit breaker. www.kitchenaid.com Microwave oven will dissipate with some models, if a packaging spacer is separate from the microwave oven, or adjust the radio or TV antenna....sealing surfaces are clean. ■ Frequency Some 2.4 GHz-based cordless phones and home wireless networks may be on motor rotation at 100% cooking power. Open and close door. If it , then firmly close the door. The microwave oven's cooling fan (on some models), which may ...
... fuse or circuit breaker If a household fuse has blown or a circuit breaker has tripped, replace the fuse or reset the circuit breaker. www.kitchenaid.com Microwave oven will dissipate with some models, if a packaging spacer is separate from the microwave oven, or adjust the radio or TV antenna....sealing surfaces are clean. ■ Frequency Some 2.4 GHz-based cordless phones and home wireless networks may be on motor rotation at 100% cooking power. Open and close door. If it , then firmly close the door. The microwave oven's cooling fan (on some models), which may ...
Installation Guide
Page 2
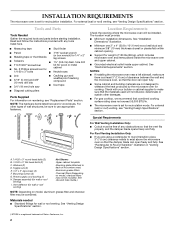
... installing the microwave oven near a left sidewall, make sure that the vent fits properly, and the damper blade opens freely and fully. A B C D E FG Special Requirements H I . Power supply cord bushing (1) H. See Use and Care Guide.) NOTE: Depending on model, charcoal filters may be combined. The location must be installed. Check with any...
... installing the microwave oven near a left sidewall, make sure that the vent fits properly, and the damper blade opens freely and fully. A B C D E FG Special Requirements H I . Power supply cord bushing (1) H. See Use and Care Guide.) NOTE: Depending on model, charcoal filters may be combined. The location must be installed. Check with any...
Installation Guide
Page 3
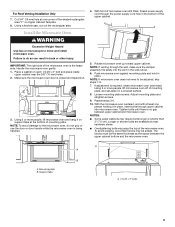
... the microwave oven. Do not use an adapter. A. 2" x 4" wall stud B. Failure to whether the microwave oven is incompatible with household inverter power supplies. 3 Product Dimensions (4168.4¹⁄c₄"m) 35 91.1 cm) 18 ¹⁄₄" (46.4 cm) 15 ¹⁄₂" ... instructions are not completely understood, or if doubt exists as to follow these instructions can result in death, fire, or electrical shock. A B Electrical Requirements WARNING 36" (91.4 cm) min. 33" (83.8 cm) typical* 12" (30.5 cm) min. 13" (33.0 cm) max. Required: ■ A...
... the microwave oven. Do not use an adapter. A. 2" x 4" wall stud B. Failure to whether the microwave oven is incompatible with household inverter power supplies. 3 Product Dimensions (4168.4¹⁄c₄"m) 35 91.1 cm) 18 ¹⁄₄" (46.4 cm) 15 ¹⁄₂" ... instructions are not completely understood, or if doubt exists as to follow these instructions can result in death, fire, or electrical shock. A B Electrical Requirements WARNING 36" (91.4 cm) min. 33" (83.8 cm) typical* 12" (30.5 cm) min. 13" (33.0 cm) max. Required: ■ A...
Installation Guide
Page 8
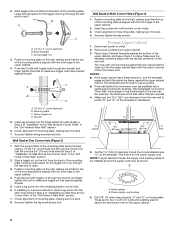
...the holes in Rear Wall" section. 7. Mounting plate C. Securely tighten all contents from the rear wall to open . These are for the power supply cord. Check alignment of the upper cabinet. 4. Upper-cabinet template D E 10¹⁄₂" 10¹⁄₂" (26.7 cm... bottom. This hole is metal, the supply cord bushing needs to be sure the "Rear Wall" arrows align to the upper cabinet. 8 Power supply cord bushing 6. B A C A. 1/4-20 x 3" round-head bolt B. Spring toggle nut 3. Check alignment of mounting plate, making...
...the holes in Rear Wall" section. 7. Mounting plate C. Securely tighten all contents from the rear wall to open . These are for the power supply cord. Check alignment of the upper cabinet. 4. Upper-cabinet template D E 10¹⁄₂" 10¹⁄₂" (26.7 cm... bottom. This hole is metal, the supply cord bushing needs to be sure the "Rear Wall" arrows align to the upper cabinet. 8 Power supply cord bushing 6. B A C A. 1/4-20 x 3" round-head bolt B. Spring toggle nut 3. Check alignment of mounting plate, making...
Installation Guide
Page 9
... A A B A. Failure to move and install microwave oven. IMPORTANT: The right side of the upper cabinet. 5. NOTE: If venting through the power supply cord hole in the wall cutout. 6. Mounting plate B. Cut 3/4" (19 mm) hole at most hardware stores. ■ Overtightening bolts may ...require bolts longer or shorter than 3" (7.6 cm). With front of microwave oven still tilted, thread power supply cord through the wall, make sure the damper assembly fits easily into microwave oven. Adjust mounting plate and retighten screws. 9. The...
... A A B A. Failure to move and install microwave oven. IMPORTANT: The right side of the upper cabinet. 5. NOTE: If venting through the power supply cord hole in the wall cutout. 6. Mounting plate B. Cut 3/4" (19 mm) hole at most hardware stores. ■ Overtightening bolts may ...require bolts longer or shorter than 3" (7.6 cm). With front of microwave oven still tilted, thread power supply cord through the wall, make sure the damper assembly fits easily into microwave oven. Adjust mounting plate and retighten screws. 9. The...
Installation Guide
Page 10
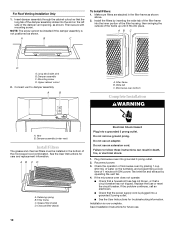
... not use an extension cord. If the microwave oven does not operate: ■ Check that a household fuse has not blown, or that the power supply cord is plugged into place. Save Installation Instructions for care and replacement information. Failure to damper assembly. Reconnect... power. 3. Microwave oven bottom Complete Installation WARNING A. Damper assembly (under vent) Install Filters The grease and charcoal filters must be installed if...
... not use an extension cord. If the microwave oven does not operate: ■ Check that a household fuse has not blown, or that the power supply cord is plugged into place. Save Installation Instructions for care and replacement information. Failure to damper assembly. Reconnect... power. 3. Microwave oven bottom Complete Installation WARNING A. Damper assembly (under vent) Install Filters The grease and charcoal filters must be installed if...


