
User Manual
Page 2
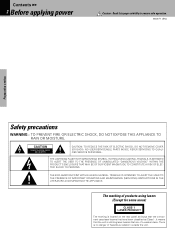
...rear panel and says that the component uses laser beams that are of hazardous radiation outside the unit. THE EXCLAMATION POINT WITHIN AN EQUILATERAL TRIANGLE IS INTENDED TO ALERT THE USER TO THE PRESENCE OF IMPORTANT OPERATING AND MAINTENANCE (SERVICING) INSTRUCTIONS IN THE LITERATURE ACCOMPANYING THE APPLIANCE. MDX-F1...RISK OF ELECTRIC SHOCK DO NOT OPEN CAUTION: TO REDUCE THE RISK OF ELECTRIC SHOCK, DO NOT REMOVE COVER (OR BACK). There is no danger of a weaker class. NO USER-SERVICEABLE PARTS INSIDE. Contents 2 Before applying power Caution : Read this page ...
...rear panel and says that the component uses laser beams that are of hazardous radiation outside the unit. THE EXCLAMATION POINT WITHIN AN EQUILATERAL TRIANGLE IS INTENDED TO ALERT THE USER TO THE PRESENCE OF IMPORTANT OPERATING AND MAINTENANCE (SERVICING) INSTRUCTIONS IN THE LITERATURE ACCOMPANYING THE APPLIANCE. MDX-F1...RISK OF ELECTRIC SHOCK DO NOT OPEN CAUTION: TO REDUCE THE RISK OF ELECTRIC SHOCK, DO NOT REMOVE COVER (OR BACK). There is no danger of a weaker class. NO USER-SERVICEABLE PARTS INSIDE. Contents 2 Before applying power Caution : Read this page ...
User Manual
Page 3
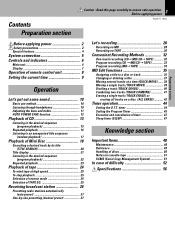
... (CD=MD/ CD=TAPE 32 Program recording (CD =MD/CD =TAPE 33 Program recording (MD=TAPE 34 MD Edit Functions 35 Assigning a title to ensure safe operation. Before applying power 3 MDX-F1 (EN) Preparation section Before applying power 2 Safety precautions 2 Special features 4 System connection 5 Controls and indicators 6 Main unit 6 Display 7 Operation of remote control unit 8 Setting the current time 9 Operation Let's put out some sound 10 Basic use method 10 Listening through headphones 10 Adjusting the bass and...
... (CD=MD/ CD=TAPE 32 Program recording (CD =MD/CD =TAPE 33 Program recording (MD=TAPE 34 MD Edit Functions 35 Assigning a title to ensure safe operation. Before applying power 3 MDX-F1 (EN) Preparation section Before applying power 2 Safety precautions 2 Special features 4 System connection 5 Controls and indicators 6 Main unit 6 Display 7 Operation of remote control unit 8 Setting the current time 9 Operation Let's put out some sound 10 Basic use method 10 Listening through headphones 10 Adjusting the bass and...
User Manual
Page 4
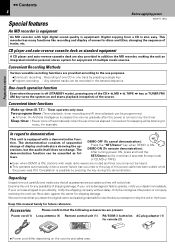
... equipment A CD player and auto-reverse cassette deck are present. Sleep timer : Power turns off (STANDBY mode), pressing any possibility of tracks, etc. If your dealer immediately. Keep this manual handy for discs and titles, changing the sequence of shipping damage. This recorder has many functions like recording and display of CD,MD or TAPE). ÷ Even when DEMO is ON, stations with weak radio waves are...
... equipment A CD player and auto-reverse cassette deck are present. Sleep timer : Power turns off (STANDBY mode), pressing any possibility of tracks, etc. If your dealer immediately. Keep this manual handy for discs and titles, changing the sequence of shipping damage. This recorder has many functions like recording and display of CD,MD or TAPE). ÷ Even when DEMO is ON, stations with weak radio waves are...
User Manual
Page 5
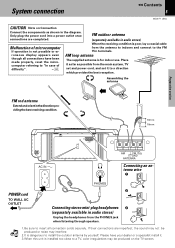
... connect to a direction which provides the best reception. Only plug the power cord into a power outlet once FM outdoor antenna connections are imperfect, the sound may interfere. 2.It is for indoor use. AM loop antenna The supplied antenna is dangerous to insert all connections have your dealer or a specialist install it to the FM 75Ω terminals. System connection Contents Controls and indicators 5 MDX-F1 (EN) CAUTION Note on the TV screen...
... connect to a direction which provides the best reception. Only plug the power cord into a power outlet once FM outdoor antenna connections are imperfect, the sound may interfere. 2.It is for indoor use. AM loop antenna The supplied antenna is dangerous to insert all connections have your dealer or a specialist install it to the FM 75Ω terminals. System connection Contents Controls and indicators 5 MDX-F1 (EN) CAUTION Note on the TV screen...

User Manual
Page 6
... Main unit Top panel 0 USH OPE Front panel PUSH OPEN button # 1 2 3 4 5 6 7 890 Controls and indicators MDX-F1 (EN) P P 0 USH OPEN 1 Cassette holder 2 (POWER) key 3 "STANDBY/TIMER" indicator ¢ 9 9u 4 Remote sensor 5 Display 6 (7) STOP key (CD/MD/TAPE/TUNING MODE) 9$(∞§ 7 4 / ¢ key (CD/MD/TAPE/tuner tuning) $(∞ 8 "SOUND" key 9 "MENU" key 0 "REPEAT" key ! 79 ^ ! With this function, pressing any key enclosed in (!~$) while the unit is in standby mode immediately start playback (or reception...
... Main unit Top panel 0 USH OPE Front panel PUSH OPEN button # 1 2 3 4 5 6 7 890 Controls and indicators MDX-F1 (EN) P P 0 USH OPEN 1 Cassette holder 2 (POWER) key 3 "STANDBY/TIMER" indicator ¢ 9 9u 4 Remote sensor 5 Display 6 (7) STOP key (CD/MD/TAPE/TUNING MODE) 9$(∞§ 7 4 / ¢ key (CD/MD/TAPE/tuner tuning) $(∞ 8 "SOUND" key 9 "MENU" key 0 "REPEAT" key ! 79 ^ ! With this function, pressing any key enclosed in (!~$) while the unit is in standby mode immediately start playback (or reception...
User Manual
Page 7
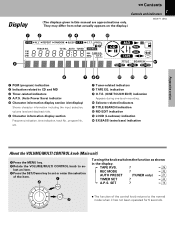
... the MENU key. 2 Rotate the VOLUME/MULTI CONTROL knob to set or enter the selection of the control knob returns to CD and MD 3 Timer-related indicators 4 A.P.S. (Auto Power Save) indicator 5 Character information display section (dot display) Shows character information including the input selection, volume level and disc/track title. 6 Character information display section Frequency indication, time indication, track No., program No., etc. 7 Tuner-related indicators 8 TAPE EQ. They...
... the MENU key. 2 Rotate the VOLUME/MULTI CONTROL knob to set or enter the selection of the control knob returns to CD and MD 3 Timer-related indicators 4 A.P.S. (Auto Power Save) indicator 5 Character information display section (dot display) Shows character information including the input selection, volume level and disc/track title. 6 Character information display section Frequency indication, time indication, track No., program No., etc. 7 Tuner-related indicators 8 TAPE EQ. They...
User Manual
Page 8
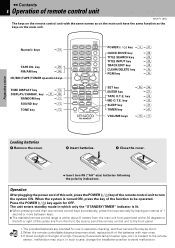
... left or right of the center line from the front. key FM/AM key ∞ § CD/MD/TAPE/TUNER operation keys TIME DISPLAY key $ DISPLAY/CHARAC. SET ENTER RANDOM TAPE O.T.E. Preparation section Contents 8 Operation of remote control unit Controls and indicators MDX-F1 (EN) The keys on the remote control unit with new ones. 3.If direct sunlight or the light of a high- When the system is incident to turn the system ON.
... left or right of the center line from the front. key FM/AM key ∞ § CD/MD/TAPE/TUNER operation keys TIME DISPLAY key $ DISPLAY/CHARAC. SET ENTER RANDOM TAPE O.T.E. Preparation section Contents 8 Operation of remote control unit Controls and indicators MDX-F1 (EN) The keys on the remote control unit with new ones. 3.If direct sunlight or the light of a high- When the system is incident to turn the system ON.
User Manual
Page 9
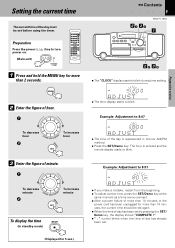
... power ( power on. (Main unit) ) key to turn STANDBY /TIMER 1 Press and hold the MENU key for 5 sec.) Contents Controls and indicators 9 MDX-F1 (EN) 21 31 1 0 22 32 Preparation section ÷ The "CLOCK" display starts to blink. The hour is represented in 12-hour AM/PM method. ÷ Press the SET/Demo key. S. REC STE AM 1200 REC ADJUST ÷ The time display starts to blink during time setting. Setting the current time...
... power ( power on. (Main unit) ) key to turn STANDBY /TIMER 1 Press and hold the MENU key for 5 sec.) Contents Controls and indicators 9 MDX-F1 (EN) 21 31 1 0 22 32 Preparation section ÷ The "CLOCK" display starts to blink. The hour is represented in 12-hour AM/PM method. ÷ Press the SET/Demo key. S. REC STE AM 1200 REC ADJUST ÷ The time display starts to blink during time setting. Setting the current time...

User Manual
Page 10
... 6, TAPE ` or TUNER FM/AM key also turns power on and starts playback (reception) of the corresponding input. (One-touch operation) 2 Selecting the desired output. Contents 10 Let's put out some sound Basic use method Let's put out some sound MDX-F1 (EN) Standby mode 12 3 While the standby indicator of the 1 unit is lit, a small amount of cur- 2 rent is flowing into the PHONES jack on the rear panel.
... 6, TAPE ` or TUNER FM/AM key also turns power on and starts playback (reception) of the corresponding input. (One-touch operation) 2 Selecting the desired output. Contents 10 Let's put out some sound Basic use method Let's put out some sound MDX-F1 (EN) Standby mode 12 3 While the standby indicator of the 1 unit is lit, a small amount of cur- 2 rent is flowing into the PHONES jack on the rear panel.
User Manual
Page 12
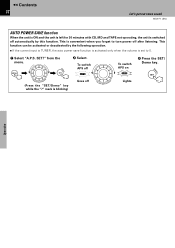
... some sound MDX-F1 (EN) AUTO POWER SAVE function When the unit is ON and the unit is left for 30 minutes with CD, MD and TAPE not operating, the unit is switched off automatically by the following operation. ÷ If the current input is TUNER, the auto power save function is activated only when the volume is set to turn power off after listening. mo mo V 1 Select "A.P.S. S. De SET Operation...
... some sound MDX-F1 (EN) AUTO POWER SAVE function When the unit is ON and the unit is left for 30 minutes with CD, MD and TAPE not operating, the unit is switched off automatically by the following operation. ÷ If the current input is TUNER, the auto power save function is activated only when the volume is set to turn power off after listening. mo mo V 1 Select "A.P.S. S. De SET Operation...

User Manual
Page 25
... fast wind in direction \ ¢ Contents Playback of tape 25 MDX-F1 (EN) If you want to interrupt recording (playback) in case you are played back endlessly. (The tape stops after recording onto both sides.) The tape stops after recording onto both sides. from the menu. MENU De SET OL 2 Select. mark is ON TAPE EQ. Tape counter display (Remote control unit only) Each press...
... fast wind in direction \ ¢ Contents Playback of tape 25 MDX-F1 (EN) If you want to interrupt recording (playback) in case you are played back endlessly. (The tape stops after recording onto both sides.) The tape stops after recording onto both sides. from the menu. MENU De SET OL 2 Select. mark is ON TAPE EQ. Tape counter display (Remote control unit only) Each press...

User Manual
Page 27
... the TIME DISPLAY key changes the displayed contents. 0 1 1 FM 2 AM 8 9 0 0 (Frequency display) MHz 8 4 5 (Time display) TUNER 0 FM/AM Contents Receiving broadcast station 27 MDX-F1 (EN) - - A.P.S. FM AUTO TUNED STEREO 8 9 0 0 MHz MEMORY 2 Select a preset number with numeric keys. FM AUTO TUNED STEREO 9 0 0 0 MHz TUNER 2 Select "AUTO PRESET". FM AUTO TUNED STEREO 9 0 0 0 MHz AUTO PRESET "AUTO PRESET" blinks in the display. One-by -one presetting (manual preset) (Remote control unit only) 1 Press the ENTER key during the auto preset operation. ÷ Presetting...
... the TIME DISPLAY key changes the displayed contents. 0 1 1 FM 2 AM 8 9 0 0 (Frequency display) MHz 8 4 5 (Time display) TUNER 0 FM/AM Contents Receiving broadcast station 27 MDX-F1 (EN) - - A.P.S. FM AUTO TUNED STEREO 8 9 0 0 MHz MEMORY 2 Select a preset number with numeric keys. FM AUTO TUNED STEREO 9 0 0 0 MHz TUNER 2 Select "AUTO PRESET". FM AUTO TUNED STEREO 9 0 0 0 MHz AUTO PRESET "AUTO PRESET" blinks in the display. One-by -one presetting (manual preset) (Remote control unit only) 1 Press the ENTER key during the auto preset operation. ÷ Presetting...

User Manual
Page 29
... 29 MDX-F1 (EN) Lights REC 0 1 TRACK NO. 130 001 R54:32 The recordable time for playback. \ Insert a recordable disc. Stop the recording STOP 0 7 In regard to track numbers at that the recorded and edited data are used at the time of playback to display messages Recording is not possible when one of recording When a part without sound continues for programming, etc...
... 29 MDX-F1 (EN) Lights REC 0 1 TRACK NO. 130 001 R54:32 The recordable time for playback. \ Insert a recordable disc. Stop the recording STOP 0 7 In regard to track numbers at that the recorded and edited data are used at the time of playback to display messages Recording is not possible when one of recording When a part without sound continues for programming, etc...
User Manual
Page 37
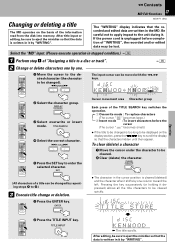
... to scroll the display so that the recorded and edited data are written in the cursor position is too long to be displayed on the basis of the TITLE SEARCH key switches the operation. 1 Overwrite mode : To replace characters (The cursor " " becomes large.) 2 Insert mode : To insert characters before completion of a title can be changed ). 1 TUNING 1 The input cursor can...
... to scroll the display so that the recorded and edited data are written in the cursor position is too long to be displayed on the basis of the TITLE SEARCH key switches the operation. 1 Overwrite mode : To replace characters (The cursor " " becomes large.) 2 Insert mode : To insert characters before completion of a title can be changed ). 1 TUNING 1 The input cursor can...

User Manual
Page 45
... to MD Load a disc. (Program playback is possible for recording. REC MODE ? mark is blinking.) 2 Select "PROG. 1 SET ?" OL L VOLUME/ MULTI CONTRO 3 Press the SET/Demo key. lights. (Press during display of PROG. 1 and PROG. 2 do not overlap. 2 Select a program No. 1Select "TIMER SET ?". Setting the Program Timer Contents Adjust the clock before setting the timer. SET ? Timer operation 45 MDX-F1 (EN) Two 24-hour timer systems (PROG.1, PROG.2) (which can be programmed and executed as shown...
... to MD Load a disc. (Program playback is possible for recording. REC MODE ? mark is blinking.) 2 Select "PROG. 1 SET ?" OL L VOLUME/ MULTI CONTRO 3 Press the SET/Demo key. lights. (Press during display of PROG. 1 and PROG. 2 do not overlap. 2 Select a program No. 1Select "TIMER SET ?". Setting the Program Timer Contents Adjust the clock before setting the timer. SET ? Timer operation 45 MDX-F1 (EN) Two 24-hour timer systems (PROG.1, PROG.2) (which can be programmed and executed as shown...

User Manual
Page 47
... and timer. 9 When timer operation is to be used. (Remote control unit only) Each press of program 1 only. 3PROG.2 ...... TIMER Indication with O.T.T. Operation ÷ If AI PLAY is selected, the volume is ON. lights. ÷ The timer will not function unless a program No. Set the time. SLEEP ÷ The unit is automatically switched on. 3 Enter STANDBY mode of program 2 only. 4PROG.1, 2 .. Execution of power (by 10 minutes. Sleep timer (SLEEP) Set the number of...
... and timer. 9 When timer operation is to be used. (Remote control unit only) Each press of program 1 only. 3PROG.2 ...... TIMER Indication with O.T.T. Operation ÷ If AI PLAY is selected, the volume is ON. lights. ÷ The timer will not function unless a program No. Set the time. SLEEP ÷ The unit is automatically switched on. 3 Enter STANDBY mode of program 2 only. 4PROG.1, 2 .. Execution of power (by 10 minutes. Sleep timer (SLEEP) Set the number of...

User Manual
Page 49
... against condensatin in a following operations. 1 Remove the CD or MD from power outlet Clock display MD recorder section Stored contents which are cleared in at least a day after the condensation has dride up. Reference Caution on /standby" status (ON or STANDBY) Input selection Volume control value Tone control levels Tuner section Receiving band Frequency Preset stations Auto tuning setting Cassette deck unit Transport direction DOLBY NR Reverse mode Timer setting contents Note related to...
... against condensatin in a following operations. 1 Remove the CD or MD from power outlet Clock display MD recorder section Stored contents which are cleared in at least a day after the condensation has dride up. Reference Caution on /standby" status (ON or STANDBY) Input selection Volume control value Tone control levels Tuner section Receiving band Frequency Preset stations Auto tuning setting Cassette deck unit Transport direction DOLBY NR Reverse mode Timer setting contents Note related to...

User Manual
Page 50
... paper or tape to direct sunlight). Knowledge section Handling of time, remove it from the player and store it in a place subject to either the playing side or the label side of discs Disc handling precautions Handling Hold the discs so that comply with the IEC standard, for a long period of Mini Disc As the Mini Disc is forced open while the disc is not...
... paper or tape to direct sunlight). Knowledge section Handling of time, remove it from the player and store it in a place subject to either the playing side or the label side of discs Disc handling precautions Handling Hold the discs so that comply with the IEC standard, for a long period of Mini Disc As the Mini Disc is forced open while the disc is not...

User Manual
Page 52
... set is installed near the system. ÷ Install the outdoor antenna in between them. Unplug the power cord from the system, the controlling angle is devi- Remedy ÷ Adjust to an external factor. mum position. 0 0 0 0 Tuner section Symptom Cause The clock display blinks with- ÷ There was unplugged from the outlet. A station has been preset but it cannot be played. 8 8 Cause ÷ The volume control is set to the mini- ÷ Adjust...
... set is installed near the system. ÷ Install the outdoor antenna in between them. Unplug the power cord from the system, the controlling angle is devi- Remedy ÷ Adjust to an external factor. mum position. 0 0 0 0 Tuner section Symptom Cause The clock display blinks with- ÷ There was unplugged from the outlet. A station has been preset but it cannot be played. 8 8 Cause ÷ The volume control is set to the mini- ÷ Adjust...

User Manual
Page 53
...; Use a recordable disc. ÷ Use another disc. ÷ Set the input selector to the source to MD standard MDX-F1 (EN) Symptom Cause "DISC FULL" is executed with nothing recorded) is not a malfunction. Contents In case of the entire disc is less than 12 sec, the remaining time indication on the display becomes "0:00". The time which recording is impossible while the track number is...
...; Use a recordable disc. ÷ Use another disc. ÷ Set the input selector to the source to MD standard MDX-F1 (EN) Symptom Cause "DISC FULL" is executed with nothing recorded) is not a malfunction. Contents In case of the entire disc is less than 12 sec, the remaining time indication on the display becomes "0:00". The time which recording is impossible while the track number is...


