Instruction Manual
Page 2
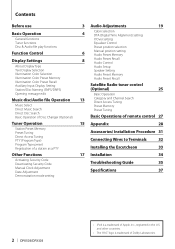
... Security Code Manual Clock Adjustment Date Adjustment Demonstration mode setting 3 Audio Adjustments 19 4 Cabin selection DTA (Digital Time Alignment) setting X'Over setting Equalizer Control Preset position selection 6 Manual position setting Audio Preset Memory 8 Audio Preset Recall Audio Control Audio Setup Speaker Setting Audio Preset Memory Audio Preset Recall Satellite Radio tuner control (Optional...
... Security Code Manual Clock Adjustment Date Adjustment Demonstration mode setting 3 Audio Adjustments 19 4 Cabin selection DTA (Digital Time Alignment) setting X'Over setting Equalizer Control Preset position selection 6 Manual position setting Audio Preset Memory 8 Audio Preset Recall Audio Control Audio Setup Speaker Setting Audio Preset Memory Audio Preset Recall Satellite Radio tuner control (Optional...
Instruction Manual
Page 6
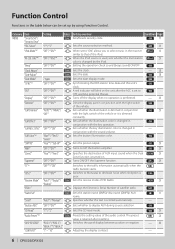
...HD Radio. 29 "Analog" "ESN=" Displays the Electronic Serial Number of the vehicle or it is dimmed in amplifier. 29 "Zone2" "Rear"*/ "Front" Specifies the destination of the iPod. Sets/Resets security code ...Sets the source selection method. Sets whether the illumination is dimmed constantly. Sets the date display mode. Synchronizing the RDS station time data and this unit's clock. "POSI 1"/ "POSI 2"/ "NEGA 1"*/ "NEGA 2" "1" - The preset value is retained after the ACC is scrolled automatically. 11 - Adjusting the display contrast. 24 - 30 - 6 | DPX503...
...HD Radio. 29 "Analog" "ESN=" Displays the Electronic Serial Number of the vehicle or it is dimmed in amplifier. 29 "Zone2" "Rear"*/ "Front" Specifies the destination of the iPod. Sets/Resets security code ...Sets the source selection method. Sets whether the illumination is dimmed constantly. Sets the date display mode. Synchronizing the RDS station time data and this unit's clock. "POSI 1"/ "POSI 2"/ "NEGA 1"*/ "NEGA 2" "1" - The preset value is retained after the ACC is scrolled automatically. 11 - Adjusting the display contrast. 24 - 30 - 6 | DPX503...
Instruction Manual
Page 17
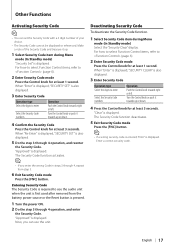
... the Control knob towards up . 1 Select Security Code item during Menu mode (In Standby mode) Select the "Security Clear" display. Deactivating Security Code To deactivate the Security Code function. 1 Select Security Code item during Menu mode (In Standby mode) "Security Set" is also displayed. 3 Enter Security Code Operation type Select the digits to (page 6). 2 Enter Security Code mode Press the Control knob for at...
... the Control knob towards up . 1 Select Security Code item during Menu mode (In Standby mode) Select the "Security Clear" display. Deactivating Security Code To deactivate the Security Code function. 1 Select Security Code item during Menu mode (In Standby mode) "Security Set" is also displayed. 3 Enter Security Code Operation type Select the digits to (page 6). 2 Enter Security Code mode Press the Control knob for at...
Instruction Manual
Page 35
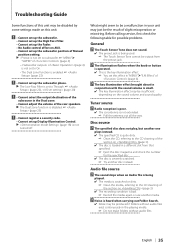
Troubleshooting Guide Some functions of this unit may be disabled by some settings made on this unit. ! • Cannot set up the subwoofer. • Cannot set up the High Pass Filter. • Cannot set up the Fader. • No Audio control effect on AUX. • Cannot set up the subwoofer position of Manual position setting. ▲ • Preout is not set to subwoofer. ☞ "MENU" > "SWPRE" of (page 6) • of (page 4) is not set to On. • The Dual zone function is enabled. ☞ (page 23) ! • Cannot set up the subwoofer phase. ▲ The Low Pass Filter is set ...
Troubleshooting Guide Some functions of this unit may be disabled by some settings made on this unit. ! • Cannot set up the subwoofer. • Cannot set up the High Pass Filter. • Cannot set up the Fader. • No Audio control effect on AUX. • Cannot set up the subwoofer position of Manual position setting. ▲ • Preout is not set to subwoofer. ☞ "MENU" > "SWPRE" of (page 6) • of (page 4) is not set to On. • The Dual zone function is enabled. ☞ (page 23) ! • Cannot set up the subwoofer phase. ▲ The Low Pass Filter is set ...


