Instruction Manual
Page 2
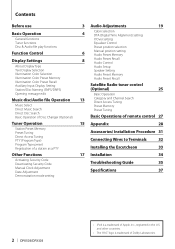
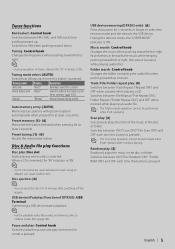
...Input Display Setting Station/Disc Naming (SNPS/DNPS) Opening message edit Music disc/Audio file Operation Music Select Direct Music Search Direct Disc Search Basic Operation of Disc Changer (Optional) Tuner Operation Station Preset Memory Preset Tuning Direct Access Tuning PTY (Program Type) Program Type preset Registration of a station as a PTY Other Functions Activating Security Code Deactivating Security Code Manual Clock Adjustment Date Adjustment Demonstration mode setting 3 Audio Adjustments 19 4 Cabin selection DTA (Digital Time Alignment) setting X'Over setting Equalizer Control...
...Input Display Setting Station/Disc Naming (SNPS/DNPS) Opening message edit Music disc/Audio file Operation Music Select Direct Music Search Direct Disc Search Basic Operation of Disc Changer (Optional) Tuner Operation Station Preset Memory Preset Tuning Direct Access Tuning PTY (Program Type) Program Type preset Registration of a station as a PTY Other Functions Activating Security Code Deactivating Security Code Manual Clock Adjustment Date Adjustment Demonstration mode setting 3 Audio Adjustments 19 4 Cabin selection DTA (Digital Time Alignment) setting X'Over setting Equalizer Control...
Instruction Manual
Page 3
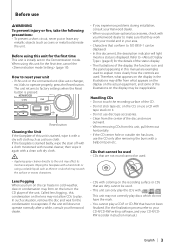
... using this unit or the connected unit (disc auto changer, etc.) fails to ISO 8859-1 can only play a CD-R or CD-RW that they work with a hard cloth or using a volatile liquid such as coins or metal tools) inside the unit. When using this manual are examples used to explain more clearly how the controls are used • CDs that conform to operate properly, press the Reset button. Refer...
... using this unit or the connected unit (disc auto changer, etc.) fails to ISO 8859-1 can only play a CD-R or CD-RW that they work with a hard cloth or using a volatile liquid such as coins or metal tools) inside the unit. When using this manual are examples used to explain more clearly how the controls are used • CDs that conform to operate properly, press the Reset button. Refer...
Instruction Manual
Page 4
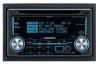
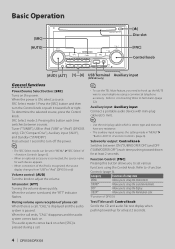
...up the sound environment. SRC Select mode 2: Pressing this button allows you to set various functions using a commercial telephone accessory. Auxiliary input: Auxiliary input Connect a portable audio device with mini-plug cable (ø3.5 mm). ⁄ • Use the mini-plug cable which is reduced, the "ATT" indicator flashes. COLOR* Allows you to adjust the volume. Attenuator: [ATT] Turning the volume down for each device appears. • When connection of the iPod is recognized, the source display changes from "USB" to "iPod". (DPX503 only) Volume control: [AUD] Turn the...
...up the sound environment. SRC Select mode 2: Pressing this button allows you to set various functions using a commercial telephone accessory. Auxiliary input: Auxiliary input Connect a portable audio device with mini-plug cable (ø3.5 mm). ⁄ • Use the mini-plug cable which is reduced, the "ATT" indicator flashes. COLOR* Allows you to adjust the volume. Attenuator: [ATT] Turning the volume down for each device appears. • When connection of the iPod is recognized, the source display changes from "USB" to "iPod". (DPX503 only) Volume control: [AUD] Turn the...
Instruction Manual
Page 5
... operation cannot be used. Random play : Disc slot Starts playing when a disc is ON. Tuning mode Display Operation Auto seek "Auto1" Automatic search for 2 seconds or longer to AM when pushing toward down . During the remove mode, the "USB REMOVE" indicator is inserted. Preset station seek "Auto2" Search in order of stereo stations the "ST" indicator is playing. Disc & Audio file play functions Disc play : [3] Randomly plays the music in the Preset memory. (page 5/15) Manual "Manual" Normal manual tuning control. Preset memory: [1] - [6] Memorize the station selected...
... operation cannot be used. Random play : Disc slot Starts playing when a disc is ON. Tuning mode Display Operation Auto seek "Auto1" Automatic search for 2 seconds or longer to AM when pushing toward down . During the remove mode, the "USB REMOVE" indicator is inserted. Preset station seek "Auto2" Search in order of stereo stations the "ST" indicator is playing. Disc & Audio file play functions Disc play : [3] Randomly plays the music in the Preset memory. (page 5/15) Manual "Manual" Normal manual tuning control. Preset memory: [1] - [6] Memorize the station selected...
Instruction Manual
Page 6
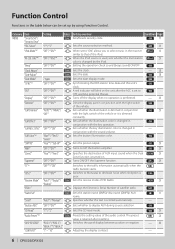
..."* Setting the operation check sound (beep sound) ON/OFF. A red indicator will blink on the unit after resetting. "Auto"*/ "Manual" Specifies whether the text is dimmed constantly. "10" Presets the setting value of satellite radio. Adjusting the display contrast. 24 - 30 - 6 | DPX503/DPX303 Category Item MENU "Security Set"/ "Security Clear" "SRC Select" Setting "1"*/ "2" Entry Setting overview 1 sec. Sets the clock. 1 sec. Sets the date display mode. Synchronizing the RDS station time data and this unit's clock. "CD Read" "1"*/ "2" Sets the...
..."* Setting the operation check sound (beep sound) ON/OFF. A red indicator will blink on the unit after resetting. "Auto"*/ "Manual" Specifies whether the text is dimmed constantly. "10" Presets the setting value of satellite radio. Adjusting the display contrast. 24 - 30 - 6 | DPX503/DPX303 Category Item MENU "Security Set"/ "Security Clear" "SRC Select" Setting "1"*/ "2" Entry Setting overview 1 sec. Sets the clock. 1 sec. Sets the date display mode. Synchronizing the RDS station time data and this unit's clock. "CD Read" "1"*/ "2" Sets the...
Instruction Manual
Page 7
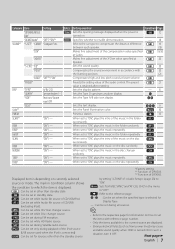
... Radio source. : Can be set during Satellite radio source. : Can be set only during all sources. ⁄ • Refer to the respective page for sources other than the standby source *Factory setting *1 Function of DPX503. *2 Function of the iPod source. (USB source used when the iPod is turned on currently selected source or mode. When set to compensate the distance difference between each speaker. "ON"/ - Makes fine adjustment of the music on the disc repeatedly. Sets the sound quality. Presets a station. Selects the car type to "ON", plays...
... Radio source. : Can be set during Satellite radio source. : Can be set only during all sources. ⁄ • Refer to the respective page for sources other than the standby source *Factory setting *1 Function of DPX503. *2 Function of the iPod source. (USB source used when the iPod is turned on currently selected source or mode. When set to compensate the distance difference between each speaker. "ON"/ - Makes fine adjustment of the music on the disc repeatedly. Sets the sound quality. Presets a station. Selects the car type to "ON", plays...
Instruction Manual
Page 10
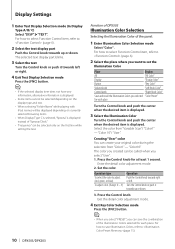
... text. 10 | DPX503/DPX303 Function of DPX503 Illumination Color Selection Selecting the Illumination Color of the Illumination Colors selected for at least 1 second. Set the color. Exit the detail color adjustment mode. 4 Exit Key Color Selection mode Press the [FNC] button. ⁄ • When you select "PRESET", you selected "Color Preset" for each place. Press the Control knob. Display Settings 1 Enter Text Display Selection mode (In Display Type A/ B/ C) Select "DISP" > "TEXT". Select the color from "Color1" - "Color 10"/ "User". Turn the Control knob or...
... text. 10 | DPX503/DPX303 Function of DPX503 Illumination Color Selection Selecting the Illumination Color of the Illumination Colors selected for at least 1 second. Set the color. Exit the detail color adjustment mode. 4 Exit Key Color Selection mode Press the [FNC] button. ⁄ • When you select "PRESET", you selected "Color Preset" for each place. Press the Control knob. Display Settings 1 Enter Text Display Selection mode (In Display Type A/ B/ C) Select "DISP" > "TEXT". Select the color from "Color1" - "Color 10"/ "User". Turn the Control knob or...
Instruction Manual
Page 11
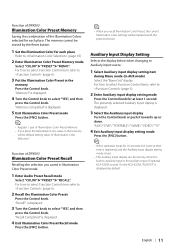
... at that time is displayed. 4 Exit Illumination Color Preset Recall mode Press the [FNC] button. ⁄ • When you press the Reset button, the value in the memory Press the Control knob. "AUX"/ "DVD"/ "PORTABLE"/ "GAME"/ "VIDEO"/ "TV" 4 Exit Auxiliary input display setting mode Press the [FNC] button. ⁄ • When operation stops for each place Refer to select "YES", and then press the Control knob. "Recall?" Auxiliary Input Display Setting Selects the display below when changing to (page...
... at that time is displayed. 4 Exit Illumination Color Preset Recall mode Press the [FNC] button. ⁄ • When you press the Reset button, the value in the memory Press the Control knob. "AUX"/ "DVD"/ "PORTABLE"/ "GAME"/ "VIDEO"/ "TV" 4 Exit Auxiliary input display setting mode Press the [FNC] button. ⁄ • When operation stops for each place Refer to select "YES", and then press the Control knob. "Recall?" Auxiliary Input Display Setting Selects the display below when changing to (page...

Instruction Manual
Page 18
...Other Functions Manual Clock Adjustment 1 Select Clock Adjustment item during Menu mode Select the "DEMO Mode" display. Date Adjustment 1 Select Date Adjustment item during Menu mode Select the "Date Adjust" display. The date display blinks. 3 Adjusting Date Operation type Operation Selecting the item (month, day, Push the Control knob towards up or down . 4 Exit Clock adjustment mode Press the [FNC] button. ⁄ • You can do this button for at least 1 second. For how to select Function Control items, refer to "OFF". (DPX503 only) Demonstration mode setting Turning...
...Other Functions Manual Clock Adjustment 1 Select Clock Adjustment item during Menu mode Select the "DEMO Mode" display. Date Adjustment 1 Select Date Adjustment item during Menu mode Select the "Date Adjust" display. The date display blinks. 3 Adjusting Date Operation type Operation Selecting the item (month, day, Push the Control knob towards up or down . 4 Exit Clock adjustment mode Press the [FNC] button. ⁄ • You can do this button for at least 1 second. For how to select Function Control items, refer to "OFF". (DPX503 only) Demonstration mode setting Turning...

Instruction Manual
Page 19
... select mode Select "SOUND" > "S-SET" > "CABIN". Car type (rear speaker position) Not compensating. For how to select Function Control item, refer to (page 6). 2 Select the speaker you want to set Setting speaker Front speaker Rear speaker Subwoofer Display "DTA-Front" "DTA-Rear" "DTA-Sub" Turn the Control knob and push the center when the desired item is caused by the installation position of the speakers, by selecting your environment from the following car types; Function of DPX503 DTA (Digital Time Alignment) setting Adjusting fine tuning...
... select mode Select "SOUND" > "S-SET" > "CABIN". Car type (rear speaker position) Not compensating. For how to select Function Control item, refer to (page 6). 2 Select the speaker you want to set Setting speaker Front speaker Rear speaker Subwoofer Display "DTA-Front" "DTA-Rear" "DTA-Sub" Turn the Control knob and push the center when the desired item is caused by the installation position of the speakers, by selecting your environment from the following car types; Function of DPX503 DTA (Digital Time Alignment) setting Adjusting fine tuning...

Instruction Manual
Page 20
.../Through Hz "SUB-W LEVEL" -15 - +15 "SW PHASE" Reverse (180°)/ Normal (0°) 1 Enter X'Over setting mode Select "SOUND" > "S-SET" > "XOVER". Adjustment Item Display System Q "Preset EQ" Bass level* Middle level* Treble level* "Bass" "Middle" "Treble" Range "NATURAL" (Natural)/ "USER" (User setting)/ "ROCK" (Rock)/ "POPS" (Pops)/ "EASY" (Easy)/ "TOP40"(Top 40)/"JAZZ" (Jazz)/ "GAME" (Game) -8 - +8 -8 - +8 -8 - +8 * Source tone memory: Puts the set up value in accordance with the selected position; For how to select Function Control item, refer...
.../Through Hz "SUB-W LEVEL" -15 - +15 "SW PHASE" Reverse (180°)/ Normal (0°) 1 Enter X'Over setting mode Select "SOUND" > "S-SET" > "XOVER". Adjustment Item Display System Q "Preset EQ" Bass level* Middle level* Treble level* "Bass" "Middle" "Treble" Range "NATURAL" (Natural)/ "USER" (User setting)/ "ROCK" (Rock)/ "POPS" (Pops)/ "EASY" (Easy)/ "TOP40"(Top 40)/"JAZZ" (Jazz)/ "GAME" (Game) -8 - +8 -8 - +8 -8 - +8 * Source tone memory: Puts the set up value in accordance with the selected position; For how to select Function Control item, refer...
Instruction Manual
Page 21
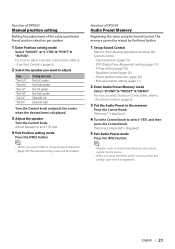
... 2 Select the speaker you select "USER" at Preset position selection per speaker. 1 Enter Position setting mode Select "SOUND" > "S-CTRL" > "POSIT" > "M-POSI". The memory cannot be the setting value which is displayed. 3 Adjust the speaker Turn the Control knob. Cabin selection (page 19) - is displayed. 5 Exit Audio Preset mode Press the [FNC] button. ⁄ • Register 1 pair of DPX503 Audio Preset Memory Registering the value setup by the source. • When you press the Reset, all the sources will be recalled. "Memory?" Preset position selection (page 20) - Manual...
... 2 Select the speaker you select "USER" at Preset position selection per speaker. 1 Enter Position setting mode Select "SOUND" > "S-CTRL" > "POSIT" > "M-POSI". The memory cannot be the setting value which is displayed. 3 Adjust the speaker Turn the Control knob. Cabin selection (page 19) - is displayed. 5 Exit Audio Preset mode Press the [FNC] button. ⁄ • Register 1 pair of DPX503 Audio Preset Memory Registering the value setup by the source. • When you press the Reset, all the sources will be recalled. "Memory?" Preset position selection (page 20) - Manual...
Instruction Manual
Page 22
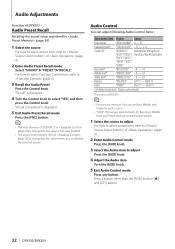
... the Audio Preset Press the Control knob. Adjustment Item Display Range Rear volume "REAR VOLUME" 0 - 35 Subwoofer level* "SUB-W LEVEL" -15 - +15 System Q* "NATURAL"/ Natural/User setting/Rock/ "USER"/"ROCK"/ Pops/Easy/Top 40/Jazz/Game "POPS"/"EASY"/ "TOP40"/"JAZZ"/ "GAME" Bass level* "BASS LEVEL" -8 - +8 Middle level* "MIDDLE LEVEL" -8 - +8 Treble level* "TREBLE LEVEL" -8 - +8 Balance "BALANCE" Left 15 - Press a button other than the [AUD] knob or [0] and [ATT] button. 22 | DPX503/DPX303 Audio Adjustments Function of DPX503 Audio Preset Recall Recalling the sound setup...
... the Audio Preset Press the Control knob. Adjustment Item Display Range Rear volume "REAR VOLUME" 0 - 35 Subwoofer level* "SUB-W LEVEL" -15 - +15 System Q* "NATURAL"/ Natural/User setting/Rock/ "USER"/"ROCK"/ Pops/Easy/Top 40/Jazz/Game "POPS"/"EASY"/ "TOP40"/"JAZZ"/ "GAME" Bass level* "BASS LEVEL" -8 - +8 Middle level* "MIDDLE LEVEL" -8 - +8 Treble level* "TREBLE LEVEL" -8 - +8 Balance "BALANCE" Left 15 - Press a button other than the [AUD] knob or [0] and [ATT] button. 22 | DPX503/DPX303 Audio Adjustments Function of DPX503 Audio Preset Recall Recalling the sound setup...

Instruction Manual
Page 23
.... 4 Adjust the Audio setup item Turn the [AUD] knob. 5 Exit Audio Setup mode Press the [AUD] knob for when the tuner is optimal when setting the speaker type as a source.) • Dual Zone System Main source and sub source (Auxiliary input) output Front channel and Rear channel separately. - Select Main source by (page 22) or [5]/[∞] button on sub source. 1 Select the source to adjust For how to select source item, refer to of DPX303. ⁄ • Volume offset: Sets each source's volume as...
.... 4 Adjust the Audio setup item Turn the [AUD] knob. 5 Exit Audio Setup mode Press the [AUD] knob for when the tuner is optimal when setting the speaker type as a source.) • Dual Zone System Main source and sub source (Auxiliary input) output Front channel and Rear channel separately. - Select Main source by (page 22) or [5]/[∞] button on sub source. 1 Select the source to adjust For how to select source item, refer to of DPX303. ⁄ • Volume offset: Sets each source's volume as...
Instruction Manual
Page 24
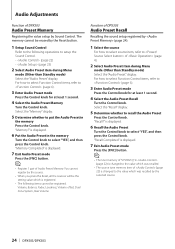
... 1 pair of Audio Preset Memory. is displayed. 6 Put the Audio Preset in (page 22) is changed to select "YES", and then press the Control knob. Audio Adjustments Function of DPX303 Audio Preset Memory Registering the value setup by (page 24). 1 Select the source For how to select source item, refer to of (page 4). 2 Select Audio Preset item during Menu mode (Other than Standby mode) Select the "Audio Preset" display. "Recall?" Volume, Balance, Fader, Loudness, Volume offset, Dual Zone System, Rear Volume Function of DPX303 Audio Preset Recall Recalling the sound setup...
... 1 pair of Audio Preset Memory. is displayed. 6 Put the Audio Preset in (page 22) is changed to select "YES", and then press the Control knob. Audio Adjustments Function of DPX303 Audio Preset Memory Registering the value setup by (page 24). 1 Select the source For how to select source item, refer to of (page 4). 2 Select Audio Preset item during Menu mode (Other than Standby mode) Select the "Audio Preset" display. "Recall?" Volume, Balance, Fader, Loudness, Volume offset, Dual Zone System, Rear Volume Function of DPX303 Audio Preset Recall Recalling the sound setup...
Instruction Manual
Page 27
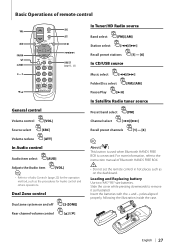
...preset stations [1] - [6] In CD/USB source Music select [4]/[¢] Folder/Disc select [FM]/[AM] Pause/Play [38] In Satellite Radio tuner source Preset band select [FM] Channel select [4]/[¢] Recall preset channels [1] - [6] ⁄ About [ ] This button is used when Bluetooth HANDS FREE BOX is connected. Loading and Replacing battery Use two "AA"/ "R6"-size batteries. For more information, refer to the instruction manual of remote control VOL AUD FM/AM 2-ZONE 0 - 9 SRC ATT VOL AUD SRC ATT DIRECT (page 15, 2 5) General control Volume control [VOL] Source select...
...preset stations [1] - [6] In CD/USB source Music select [4]/[¢] Folder/Disc select [FM]/[AM] Pause/Play [38] In Satellite Radio tuner source Preset band select [FM] Channel select [4]/[¢] Recall preset channels [1] - [6] ⁄ About [ ] This button is used when Bluetooth HANDS FREE BOX is connected. Loading and Replacing battery Use two "AA"/ "R6"-size batteries. For more information, refer to the instruction manual of remote control VOL AUD FM/AM 2-ZONE 0 - 9 SRC ATT VOL AUD SRC ATT DIRECT (page 15, 2 5) General control Volume control [VOL] Source select...
Instruction Manual
Page 28
...; Playable disc file format ISO 9660 Level 1/2, Joliet, Romeo, Long file name. • USB device Playable Model DPX503 • Playable USB device USB mass storage class • Playable USB device file system FAT16, FAT32 Although the audio files are complied with the standards listed above, the play maybe impossible depending on the types or conditions of media or device. • Playing order of the Audio file...
...; Playable disc file format ISO 9660 Level 1/2, Joliet, Romeo, Long file name. • USB device Playable Model DPX503 • Playable USB device USB mass storage class • Playable USB device file system FAT16, FAT32 Although the audio files are complied with the standards listed above, the play maybe impossible depending on the types or conditions of media or device. • Playing order of the Audio file...
Instruction Manual
Page 29
... display of this unit is connected to force playing. Function Control Glossary • SRC Select Setting up the Source Select mode. 1 : Displays source icons for this function to "2" to this instruction manual. When unable to play special format CD, set this unit may be unplayable even when set to extrapolate and supplement with video) • SWPRE (Switching Preout) Switches the preout between audio file disc and music CD when playing disc. 2 : Forces playing as music CD. Compatible iPod models: iPod (5th generation), iPod classic, iPod touch, iPod...
... display of this unit is connected to force playing. Function Control Glossary • SRC Select Setting up the Source Select mode. 1 : Displays source icons for this function to "2" to this instruction manual. When unable to play special format CD, set this unit may be unplayable even when set to extrapolate and supplement with video) • SWPRE (Switching Preout) Switches the preout between audio file disc and music CD when playing disc. 2 : Forces playing as music CD. Compatible iPod models: iPod (5th generation), iPod classic, iPod touch, iPod...
Instruction Manual
Page 31
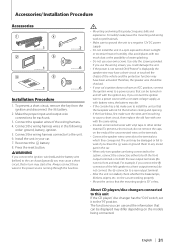
...; If your car's ignition does not have been activated. Use only the screws provided. Therefore, the speaker wire should be turned on the models being connected to the system, connect the connectors either to both the rear output terminals (do not connect the - Connect the wiring harness connector to direct sunlight or excessive heat or humidity. battery. 8. For safety's sake, leave the mounting and wiring work if you connect the ignition wire to a power source with...
...; If your car's ignition does not have been activated. Use only the screws provided. Therefore, the speaker wire should be turned on the models being connected to the system, connect the connectors either to both the rear output terminals (do not connect the - Connect the wiring harness connector to direct sunlight or excessive heat or humidity. battery. 8. For safety's sake, leave the mounting and wiring work if you connect the ignition wire to a power source with...
Instruction Manual
Page 35
Troubleshooting Guide Some functions of this unit may be disabled by some settings made on this unit. ! • Cannot set up the subwoofer. • Cannot set up the High Pass Filter. • Cannot set up the Fader. • No Audio control effect on AUX. • Cannot set up the subwoofer position of Manual position setting. ▲ • Preout is not set to subwoofer. ☞ "MENU" > "SWPRE" of (page 6) • of (page...
Troubleshooting Guide Some functions of this unit may be disabled by some settings made on this unit. ! • Cannot set up the subwoofer. • Cannot set up the High Pass Filter. • Cannot set up the Fader. • No Audio control effect on AUX. • Cannot set up the subwoofer position of Manual position setting. ▲ • Preout is not set to subwoofer. ☞ "MENU" > "SWPRE" of (page 6) • of (page...


