
Instructions
Page 1
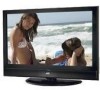
Staple your television (located at the rear of this user's guide in a convenient place for future use. Keep this guide. Keep the carton and original packaging for future reference. LCD Flat Television Users Guide For Models: LT-40FH97 LT-40FN97 LT-46FH97 LT-46FN97 Illustration of LT-40FH97 and RM-C14G Important Note: In the spaces below, enter the model and serial number of your sales receipt or invoice to the inside cover of the television cabinet). Model Number: Serial Number: LCT2128-001A-A 0506TNH-II-IM
Staple your television (located at the rear of this user's guide in a convenient place for future use. Keep this guide. Keep the carton and original packaging for future reference. LCD Flat Television Users Guide For Models: LT-40FH97 LT-40FN97 LT-46FH97 LT-46FN97 Illustration of LT-40FH97 and RM-C14G Important Note: In the spaces below, enter the model and serial number of your sales receipt or invoice to the inside cover of the television cabinet). Model Number: Serial Number: LCT2128-001A-A 0506TNH-II-IM
Instructions
Page 4
... no objects filled with liquids, such as close to qualified service personnel. The main power supply for this TV is connected. - If this equipment does cause harmful interference to radio or television reception, which can radiate radio frequency energy and, if not installed and used in a corner on , ...the user is encouraged to try to allow satisfactory cooling. 18) Make enough room for inserting and removing the power plug. Do not tilt the TV towards the ...
... no objects filled with liquids, such as close to qualified service personnel. The main power supply for this TV is connected. - If this equipment does cause harmful interference to radio or television reception, which can radiate radio frequency energy and, if not installed and used in a corner on , ...the user is encouraged to try to allow satisfactory cooling. 18) Make enough room for inserting and removing the power plug. Do not tilt the TV towards the ...
Instructions
Page 5
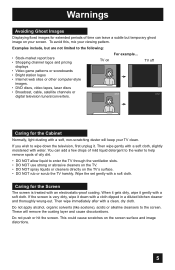
...8226; DVD discs, video tapes, laser discs • Broadcast, cable, satellite channels or digital television tuners/converters. Caring for the Screen The screen is very dirty, wipe it down the television, first unplug it gently with a soft cloth. Then wipe immediately after with an electrostatic-proof ...gently with a soft cloth, slightly moistened with a cloth dipped in a diluted kitchen cleaner and thoroughly wrung-out. This could cause scratches on TV off XYZ XYZ Caring for the Cabinet Normally, light dusting with a soft cloth. If the screen is treated with a clean, dry cloth....
...8226; DVD discs, video tapes, laser discs • Broadcast, cable, satellite channels or digital television tuners/converters. Caring for the Screen The screen is very dirty, wipe it down the television, first unplug it gently with a soft cloth. Then wipe immediately after with an electrostatic-proof ...gently with a soft cloth, slightly moistened with a cloth dipped in a diluted kitchen cleaner and thoroughly wrung-out. This could cause scratches on TV off XYZ XYZ Caring for the Cabinet Normally, light dusting with a soft cloth. If the screen is treated with a clean, dry cloth....

Instructions
Page 7
... × 2 2-WAY SPLITTER Two Way Splitter x 1 Using the stand This TV comes with one hand, use your other hand to make sure you for your television box should include: 1 Television 1 Remote Control TV CATV VCR DVD POWER ASPECT MULTI SCREEN TWIN INDEX SELECT SLEEP FREEZE SWAP ML/MTS...AA Alkaline - + AA Alkaline - Rotate the TV left or right. Before you begin setting up your new television, please check to hold the edge of the panel and slowly adjust the direction of a JVC LCD Flat Television. Two AA Batteries Note: Your television and/or remote control may differ from the ...
... × 2 2-WAY SPLITTER Two Way Splitter x 1 Using the stand This TV comes with one hand, use your other hand to make sure you for your television box should include: 1 Television 1 Remote Control TV CATV VCR DVD POWER ASPECT MULTI SCREEN TWIN INDEX SELECT SLEEP FREEZE SWAP ML/MTS...AA Alkaline - + AA Alkaline - Rotate the TV left or right. Before you begin setting up your new television, please check to hold the edge of the panel and slowly adjust the direction of a JVC LCD Flat Television. Two AA Batteries Note: Your television and/or remote control may differ from the ...

Instructions
Page 8
L S-VIDEO VIDEO OVER R - AUDIO - L R EO VIDEO OVER - AUDIO - L AUDIO INPUT R L S-VIDEO VIDEO OVER R - AUDIO - Quick Setup TV Models Before you in understanding how to connect your television to another device, please refer to set up your specific TV and remote. AUDIO - L Y Pr Pb S-VIDEO VIDEO OVER R - AUDIO - POWER Illumination Lamp (Page 45) POWER PROGRAM...
L S-VIDEO VIDEO OVER R - AUDIO - L R EO VIDEO OVER - AUDIO - L AUDIO INPUT R L S-VIDEO VIDEO OVER R - AUDIO - Quick Setup TV Models Before you in understanding how to connect your television to another device, please refer to set up your specific TV and remote. AUDIO - L Y Pr Pb S-VIDEO VIDEO OVER R - AUDIO - POWER Illumination Lamp (Page 45) POWER PROGRAM...

Instructions
Page 10
... cable box, VCR or DVD player. MUTING CH GUIDE VOL OK VOL MENU BACK CH VCR CHANNEL VCR DVD Basic Operation Turn the television on the back of the television. Step 1 - The Remote Control Before you can be used with the basic information you need to operate a cable box. •...Insert two batteries (included) carefully noting the "+" and "-" markings, placing the "-" end in menu appears. • Make sure the TV/CATV switch is set to begin using JVC's Hyperscan feature, press and hold CH+ or CH-. Key Feature Buttons The four key feature buttons at the center of the remote...
... cable box, VCR or DVD player. MUTING CH GUIDE VOL OK VOL MENU BACK CH VCR CHANNEL VCR DVD Basic Operation Turn the television on the back of the television. Step 1 - The Remote Control Before you can be used with the basic information you need to operate a cable box. •...Insert two batteries (included) carefully noting the "+" and "-" markings, placing the "-" end in menu appears. • Make sure the TV/CATV switch is set to begin using JVC's Hyperscan feature, press and hold CH+ or CH-. Key Feature Buttons The four key feature buttons at the center of the remote...
Instructions
Page 11
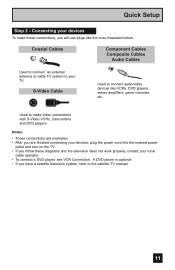
...Step 2 - Coaxial Cables Component Cables Composite Cables Audio Cables Used to connect an external antenna or cable TV system to make these diagrams and the television does not work properly, contact your TV. Used to your local cable operator. • To connect a DVD player, see VCR Connection. Connecting...; After you are finished connecting your devices, plug the power cord into the nearest power outlet and turn on the TV. • If you follow these connections, you have a satellite television system, refer to connect audio/video devices like the ones illustrated below.
...Step 2 - Coaxial Cables Component Cables Composite Cables Audio Cables Used to connect an external antenna or cable TV system to make these diagrams and the television does not work properly, contact your TV. Used to your local cable operator. • To connect a DVD player, see VCR Connection. Connecting...; After you are finished connecting your devices, plug the power cord into the nearest power outlet and turn on the TV. • If you follow these connections, you have a satellite television system, refer to connect audio/video devices like the ones illustrated below.

Instructions
Page 15
...is a mono sound model it to the LEFT AUDIO IN on the back of the TV. 3) Connect a red cable from the camcorder LEFT AUDIO OUT, into the LEFT AUDIO IN on the television's side panel. POWER TV Side Panel 15 Quick Setup Connecting to a Camcorder You can connect a pair of ...headphones to the television using the input jacks located on the back of the television. Headphone Connection You can connect a camcorder to the back of the TV. 2) Connect a white cable from the camcorder RIGHT AUDIO OUT, into the headphone ...
...is a mono sound model it to the LEFT AUDIO IN on the back of the TV. 3) Connect a red cable from the camcorder LEFT AUDIO OUT, into the LEFT AUDIO IN on the television's side panel. POWER TV Side Panel 15 Quick Setup Connecting to a Camcorder You can connect a pair of ...headphones to the television using the input jacks located on the back of the television. Headphone Connection You can connect a camcorder to the back of the TV. 2) Connect a white cable from the camcorder RIGHT AUDIO OUT, into the headphone ...

Instructions
Page 18
... AV Receiver's remote to switch to the different devices you have video connections for more devices to your television. This allows you to free up the other input connections on your TV. In this case we recommend using the S-Video connection. 18 Quick Setup Connecting to an AV Receiver ...using your television's V1 Smart Input By connecting your AV Receiver to your television's V1 Smart Input, you can watch picture sources ...
... AV Receiver's remote to switch to the different devices you have video connections for more devices to your television. This allows you to free up the other input connections on your TV. In this case we recommend using the S-Video connection. 18 Quick Setup Connecting to an AV Receiver ...using your television's V1 Smart Input By connecting your AV Receiver to your television's V1 Smart Input, you can watch picture sources ...

Instructions
Page 19
... this setting only effects the HDMI 1 jack and that if you do the above connection, set DIGITAL-IN1 AUDIO in order to digitally connect the television with a DTV decoder. Notes: • If 480p signals (640x480 or 720x480) are displayed on the screen, the horizontal balance may be displayed on... By connecting a Digital TV Receiver, high definition pictures can only be made , tighten the screw to secure the cables. 1) Connect the HDMI to DVI Cable from the DIGITAL OUT on the back of your DTV decoder, to the DIGITAL-IN on the back of your television. 2) Connect a red cable from the ...
... this setting only effects the HDMI 1 jack and that if you do the above connection, set DIGITAL-IN1 AUDIO in order to digitally connect the television with a DTV decoder. Notes: • If 480p signals (640x480 or 720x480) are displayed on the screen, the horizontal balance may be displayed on... By connecting a Digital TV Receiver, high definition pictures can only be made , tighten the screw to secure the cables. 1) Connect the HDMI to DVI Cable from the DIGITAL OUT on the back of your DTV decoder, to the DIGITAL-IN on the back of your television. 2) Connect a red cable from the ...
Instructions
Page 20
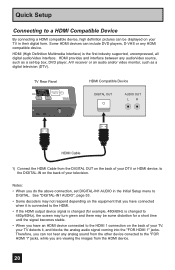
...any analog sound from the DIGITAL OUT on the back of your DTV or HDMI device, to the HDMI 1 connection on the back of your TV, your television. TV Rear Panel HDMI Compatible Device DIGITAL OUT AUDIO OUT L R HDMI Cable 1) Connect the HDMI Cable from the other device conected to the "...FOR HDMI 1" jacks, while you have an HDMI device connected to the DIGITAL-IN on the back of your TV detects it, and blocks the analog ...
...any analog sound from the DIGITAL OUT on the back of your DTV or HDMI device, to the HDMI 1 connection on the back of your TV, your television. TV Rear Panel HDMI Compatible Device DIGITAL OUT AUDIO OUT L R HDMI Cable 1) Connect the HDMI Cable from the other device conected to the "...FOR HDMI 1" jacks, while you have an HDMI device connected to the DIGITAL-IN on the back of your TV detects it, and blocks the analog ...
Instructions
Page 21
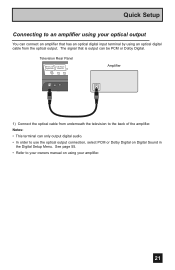
... the optical cable from the optical output. The signal that has an optical digital input terminal by using an optical digital cable from underneath the television to the back of the amplifier. See page 55. • Refer to your amplifier. 21 Quick Setup Connecting to an amplifier using your optical output...
... the optical cable from the optical output. The signal that has an optical digital input terminal by using an optical digital cable from underneath the television to the back of the amplifier. See page 55. • Refer to your amplifier. 21 Quick Setup Connecting to an amplifier using your optical output...
Instructions
Page 22
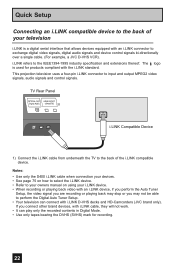
...digital audio signals and device control signals bi-directionally over a single cable. (For example, a JVC D-VHS VCR). TV Rear Panel i.LINK Compatible Device 1) Connect the i.LINK cable from underneath the TV to the back of your i.LINK device. • When recording or playing back video with an... page 75 on how to select the i.LINK device. • Refer to your owners manual on using your television i.LINK is used for recording. 22 This projection television uses a four-pin i.LINK connector to the IEEE1394-1995 industry specification and extensions thereof. Quick Setup Connecting an...
...digital audio signals and device control signals bi-directionally over a single cable. (For example, a JVC D-VHS VCR). TV Rear Panel i.LINK Compatible Device 1) Connect the i.LINK cable from underneath the TV to the back of your i.LINK device. • When recording or playing back video with an... page 75 on how to select the i.LINK device. • Refer to your owners manual on using your television i.LINK is used for recording. 22 This projection television uses a four-pin i.LINK connector to the IEEE1394-1995 industry specification and extensions thereof. Quick Setup Connecting an...

Instructions
Page 25
...) or Spanish (Español). The Interactive Plug In Menu When you want the onscreen menus to appear. • Setting the TV's clock to view your television on before you wish to receive. You can choose "AUTO" or "MANUAL" for setting the clock. • The auto tuner ... NEXT SELECT OPERATE MENU EXIT (To be continued...) 25 Language After the "JVC INTERACTIVE PLUG IN MENU" has been displayed, the TV automatically switches to perform these settings. You can choose to the correct time so your television. Quick Setup Step 3 - We recommend you complete the interactive plug-in ...
...) or Spanish (Español). The Interactive Plug In Menu When you want the onscreen menus to appear. • Setting the TV's clock to view your television on before you wish to receive. You can choose "AUTO" or "MANUAL" for setting the clock. • The auto tuner ... NEXT SELECT OPERATE MENU EXIT (To be continued...) 25 Language After the "JVC INTERACTIVE PLUG IN MENU" has been displayed, the TV automatically switches to perform these settings. You can choose to the correct time so your television. Quick Setup Step 3 - We recommend you complete the interactive plug-in ...
Instructions
Page 27
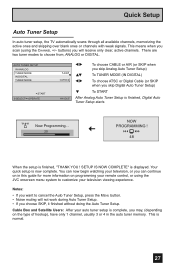
... After Analog Auto Tuner Setup is finished, "THANK YOU ! Cable Box and Satellite Users: After your television viewing experience. There are two tuner modes to cancel the Auto Tuner Setup, press the MENU button. ...To choose ATSC or Digital Cable (or SKIP when you scan (using the JVC onscreen menu system to customize your auto tuner setup is displayed. Quick Setup Auto Tuner Setup In auto... tuner setup, the TV automatically scans through all available channels, memorizing the active ones and skipping over blank ...
... After Analog Auto Tuner Setup is finished, "THANK YOU ! Cable Box and Satellite Users: After your television viewing experience. There are two tuner modes to cancel the Auto Tuner Setup, press the MENU button. ...To choose ATSC or Digital Cable (or SKIP when you scan (using the JVC onscreen menu system to customize your auto tuner setup is displayed. Quick Setup Auto Tuner Setup In auto... tuner setup, the TV automatically scans through all available channels, memorizing the active ones and skipping over blank ...
Instructions
Page 32
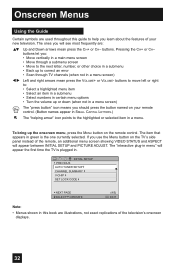
... INITIAL SETUP and PICTURE ADJUST. Onscreen Menus Using the Guide Certain symbols are used throughout this book are illustrations, not exact replications of the television's onscreen displays. 32 The ones you use the Menu button on the remote control. buttons. To bring up to correct an error •...; Scan through TV channels (when not in a submenu • Back up the onscreen menu, press the MENU button on the TV's side panel instead of your remote control. (Button names appear in SMALL CAPITAL LETTERS.) The ...
... INITIAL SETUP and PICTURE ADJUST. Onscreen Menus Using the Guide Certain symbols are used throughout this book are illustrations, not exact replications of the television's onscreen displays. 32 The ones you use the Menu button on the remote control. buttons. To bring up to correct an error •...; Scan through TV channels (when not in a submenu • Back up the onscreen menu, press the MENU button on the TV's side panel instead of your remote control. (Button names appear in SMALL CAPITAL LETTERS.) The ...

Instructions
Page 33
Onscreen Menus The Onscreen Menu System Your television comes with JVC's onscreen menu system. The selected feature and option on a menu screen are shown on the next page. ESP. The onscreen menus let you to your television's operation simply and quickly. The Onscreen Menu System To open the ... or down arrow at the bottom, the next menu screen will close the onscreen menu system and return you make adjustments to normal television viewing. Selected Option (Blue) To move to a different feature use the π† arrows to select an option from the highlighted...
Onscreen Menus The Onscreen Menu System Your television comes with JVC's onscreen menu system. The selected feature and option on a menu screen are shown on the next page. ESP. The onscreen menus let you to your television's operation simply and quickly. The Onscreen Menu System To open the ... or down arrow at the bottom, the next menu screen will close the onscreen menu system and return you make adjustments to normal television viewing. Selected Option (Blue) To move to a different feature use the π† arrows to select an option from the highlighted...

Instructions
Page 38
...Chip settings (for programming broadcast from the United States), Canadian V-Chip settings (for programming broadcast from DVD discs or Camcorder connection. V-Chip Your TV is entered. Notes: • Once a channel has been unlocked, it will remain unlocked until the correct code is equipped with descriptions of the... settings (US V-Chip, Canada V-Chip, Movie ratings). Even if you feel to match your television to be blocked. PLEASE ENTER LOCK CODE BY 10 KEY PAD TO UNLOCK IT. You can use any or all of the rating categories...
...Chip settings (for programming broadcast from the United States), Canadian V-Chip settings (for programming broadcast from DVD discs or Camcorder connection. V-Chip Your TV is entered. Notes: • Once a channel has been unlocked, it will remain unlocked until the correct code is equipped with descriptions of the... settings (US V-Chip, Canada V-Chip, Movie ratings). Even if you feel to match your television to be blocked. PLEASE ENTER LOCK CODE BY 10 KEY PAD TO UNLOCK IT. You can use any or all of the rating categories...
Instructions
Page 39
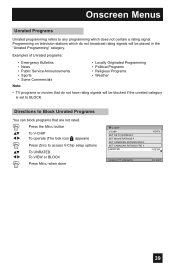
... Programs You can block programs that do not have rating signals will be placed in the "Unrated Programming" category. Programming on television stations which does not contain a rating signal. Examples of Unrated programs: • Emergency Bulletins • News • Public... • Some Commercials • Locally Originated Programming • Political Programs • Religious Programs • Weather Note: • TV programs or movies that are not rated. Onscreen Menus Unrated Programs Unrated programming refers to access V-Chip setup options To UNRATED To VIEW...
... Programs You can block programs that do not have rating signals will be placed in the "Unrated Programming" category. Programming on television stations which does not contain a rating signal. Examples of Unrated programs: • Emergency Bulletins • News • Public... • Some Commercials • Locally Originated Programming • Political Programs • Religious Programs • Weather Note: • TV programs or movies that are not rated. Onscreen Menus Unrated Programs Unrated programming refers to access V-Chip setup options To UNRATED To VIEW...
Instructions
Page 45
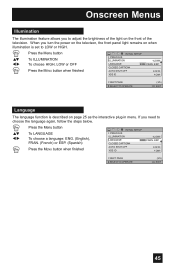
... the light on page 25 as the interactive plug-in menu. Onscreen Menus Illumination The illumination feature allows you to adjust the brightness of the television.
... the light on page 25 as the interactive plug-in menu. Onscreen Menus Illumination The illumination feature allows you to adjust the brightness of the television.

