Instructions
Page 2
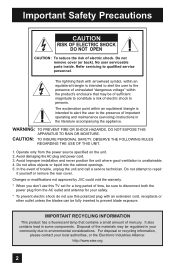
... lead in the literature accompanying the appliance. Avoid damaging the AC plug and power cord. 3. Changes or modifications not approved by JVC could void the warranty. * When you don't use this TV set for a long period of uninsulated "dangerous voltage" within an equilateral triangle is unattainable. 4. For disposal or recycling information, please...
... lead in the literature accompanying the appliance. Avoid damaging the AC plug and power cord. 3. Changes or modifications not approved by JVC could void the warranty. * When you don't use this TV set for a long period of uninsulated "dangerous voltage" within an equilateral triangle is unattainable. 4. For disposal or recycling information, please...
Instructions
Page 3
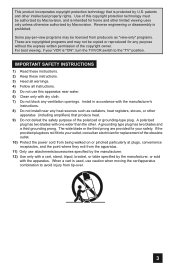
... may be licensed from tip-over. 3 When a cart is used, use caution when moving the cart/apparatus combination to the "TV" position. Reverse engineering or disassembly is "ON", turn the TV/VCR switch to avoid injury from producers as radiators, heat registers, stoves, or other intellectual property rights. Install in accordance with...
... may be licensed from tip-over. 3 When a cart is used, use caution when moving the cart/apparatus combination to the "TV" position. Reverse engineering or disassembly is "ON", turn the TV/VCR switch to avoid injury from producers as radiators, heat registers, stoves, or other intellectual property rights. Install in accordance with...
Instructions
Page 4
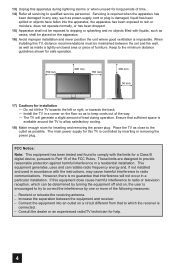
... objects filled with liquids, such as vases, shall be exposed to dripping or splashing and no guarantee that sufficient space is impossible. The TV will not occur in accordance with the limits for a Class B digital device, pursuant to correct the interference by inserting or removing the power... by one or more of the following measures: - Reorient or relocate the receiving antenna. - Consult the dealer or an experienced radio/TV technician for this TV is damaged, liquid has been spilled or objects have fallen into an outlet on , the user is connected. - 13) Unplug this...
... objects filled with liquids, such as vases, shall be exposed to dripping or splashing and no guarantee that sufficient space is impossible. The TV will not occur in accordance with the limits for a Class B digital device, pursuant to correct the interference by inserting or removing the power... by one or more of the following measures: - Reorient or relocate the receiving antenna. - Consult the dealer or an experienced radio/TV technician for this TV is damaged, liquid has been spilled or objects have fallen into an outlet on , the user is connected. - 13) Unplug this...
Instructions
Page 5
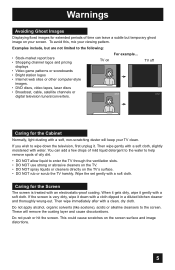
... laser discs • Broadcast, cable, satellite channels or digital television tuners/converters. When it gets dirty, wipe it . These will keep your TV clean. Examples include, but temporary ghost image on your viewing pattern. Then wipe gently with a soft cloth, slightly moistened with a soft cloth....duster will remove the coating layer and cause discolorations. Do not push or hit the screen. TV on the screen surface and image distortions. 5 This could cause scratches on TV off XYZ XYZ Caring for the Screen The screen is very dirty, wipe it down the television...
... laser discs • Broadcast, cable, satellite channels or digital television tuners/converters. When it gets dirty, wipe it . These will keep your TV clean. Examples include, but temporary ghost image on your viewing pattern. Then wipe gently with a soft cloth, slightly moistened with a soft cloth....duster will remove the coating layer and cause discolorations. Do not push or hit the screen. TV on the screen surface and image distortions. 5 This could cause scratches on TV off XYZ XYZ Caring for the Screen The screen is very dirty, wipe it down the television...

Instructions
Page 7
... television and/or remote control may differ from the examples illustrated here. This stand can be used to adjust the direction of the TV stand. 7 Rotate the TV left or right While holding the bottom of the stand with a Table Top Stand already attached. Before you begin setting up your new... television, please check to make sure you for your purchase of a JVC LCD Flat Television. RF Cable × 2 2-WAY SPLITTER Two Way Splitter x 1 Using the stand This TV comes with one hand, use your other hand to hold the edge of the panel and slowly adjust...
... television and/or remote control may differ from the examples illustrated here. This stand can be used to adjust the direction of the TV stand. 7 Rotate the TV left or right While holding the bottom of the stand with a Table Top Stand already attached. Before you begin setting up your new... television, please check to make sure you for your purchase of a JVC LCD Flat Television. RF Cable × 2 2-WAY SPLITTER Two Way Splitter x 1 Using the stand This TV comes with one hand, use your other hand to hold the edge of the panel and slowly adjust...

Instructions
Page 8
...is only for your television. AUDIO - L S-VIDEO VIDEO OVER R - AUDIO - L Y Pr Pb S-VIDEO VIDEO OVER R - L AUDIO INPUT R L S-VIDEO VIDEO OVER R - Quick Setup TV Models Before you in understanding how to connect your television to another device, please refer to set up your specific... TV and remote. Rear Panel Diagram INPUT 3 INPUT 2 PC IN (D-SUB) Y Pr Pb VIDEO R - L Y Pr Pb S-VIDEO VIDEO OVER R - L AUUDDIIOO MOOOUUNTITOR / REC TOUT...
...is only for your television. AUDIO - L S-VIDEO VIDEO OVER R - AUDIO - L Y Pr Pb S-VIDEO VIDEO OVER R - L AUDIO INPUT R L S-VIDEO VIDEO OVER R - Quick Setup TV Models Before you in understanding how to connect your television to another device, please refer to set up your specific... TV and remote. Rear Panel Diagram INPUT 3 INPUT 2 PC IN (D-SUB) Y Pr Pb VIDEO R - L Y Pr Pb S-VIDEO VIDEO OVER R - L AUUDDIIOO MOOOUUNTITOR / REC TOUT...
Instructions
Page 9
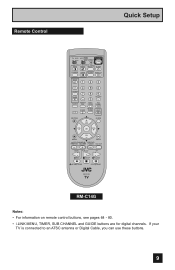
... SWAP ML/MTS DISPLAY + INPUT 123 D/A 4 5 6 i.LINK MENU 7 TIMER TUNE THEATER FAVORITE PRO C.C. If your TV is connected to an ATSC antenna or Digital Cable, you can use these buttons. 9 SOUND 8 0 VIDEO STATUS NATURAL CINEMA 9 RETURN+ TV SUB CHANNEL SUB LIGHT MUTING CH GUIDE VOL OK VOL CH MENU VCR CHANNEL PREV... NEXT BACK VCR DVD POWER TV VCR REW PLAY FF REC STOP PAUSE OPEN CLOSE STILL PAUSE RM-C14G RM-C14G Notes: • For information on remote control buttons, see pages ...
... SWAP ML/MTS DISPLAY + INPUT 123 D/A 4 5 6 i.LINK MENU 7 TIMER TUNE THEATER FAVORITE PRO C.C. If your TV is connected to an ATSC antenna or Digital Cable, you can use these buttons. 9 SOUND 8 0 VIDEO STATUS NATURAL CINEMA 9 RETURN+ TV SUB CHANNEL SUB LIGHT MUTING CH GUIDE VOL OK VOL CH MENU VCR CHANNEL PREV... NEXT BACK VCR DVD POWER TV VCR REW PLAY FF REC STOP PAUSE OPEN CLOSE STILL PAUSE RM-C14G RM-C14G Notes: • For information on remote control buttons, see pages ...

Instructions
Page 10
...the cover on programming your VCR, DVD, and/or cable box/satellite receiver may have questions, or for basic operation of this is set to TV. If you take longer than three minutes, the remote control codes for instructions on the back of the remote control. To move rapidly through the... minutes. Quick Setup Getting Started These quick setup pages will provide you, in three easy steps, with the basic information you need to begin using JVC's Hyperscan feature, press and hold CH+ or CH-. Step 1 - The top and bottom buttons will zip by pressing the POWER button at the center ...
...the cover on programming your VCR, DVD, and/or cable box/satellite receiver may have questions, or for basic operation of this is set to TV. If you take longer than three minutes, the remote control codes for instructions on the back of the remote control. To move rapidly through the... minutes. Quick Setup Getting Started These quick setup pages will provide you, in three easy steps, with the basic information you need to begin using JVC's Hyperscan feature, press and hold CH+ or CH-. Step 1 - The top and bottom buttons will zip by pressing the POWER button at the center ...
Instructions
Page 11
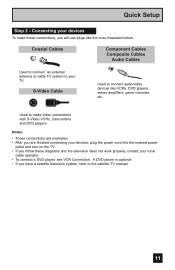
...properly, contact your devices, plug the power cord into the nearest power outlet and turn on the TV. • If you have a satellite television system, refer to the satellite TV manual. 11 S-Video Cable Used to your devices To make video connections with S-Video VCRs, ...Camcorders and DVD players. Quick Setup Step 2 - Coaxial Cables Component Cables Composite Cables Audio Cables Used to connect an external antenna or cable TV system to connect audio/video devices like the ones illustrated below. Notes: • These connections are examples. • After you are finished...
...properly, contact your devices, plug the power cord into the nearest power outlet and turn on the TV. • If you have a satellite television system, refer to the satellite TV manual. 11 S-Video Cable Used to your devices To make video connections with S-Video VCRs, ...Camcorders and DVD players. Quick Setup Step 2 - Coaxial Cables Component Cables Composite Cables Audio Cables Used to connect an external antenna or cable TV system to connect audio/video devices like the ones illustrated below. Notes: • These connections are examples. • After you are finished...

Instructions
Page 12
... and cover. Illustration of LT-46FN97 Remove the terminal cover There are connection terminals behind the cover on the back of the cover against the TV and insert the hooks. Note: • Leave the terminal cover off if they do not fit properly. Do not force to the back... before connecting an antenna or other devices. No VCR Connection Cable or Antenna Output Coaxial Cable (Attachment) I N OUT OUT Two-way Splitter (Attachment) TV Rear Panel 12 Quick Setup Cable Holder A cable holder which keeps your fingers. After putting the cables in the back of the stand again by...
... and cover. Illustration of LT-46FN97 Remove the terminal cover There are connection terminals behind the cover on the back of the cover against the TV and insert the hooks. Note: • Leave the terminal cover off if they do not fit properly. Do not force to the back... before connecting an antenna or other devices. No VCR Connection Cable or Antenna Output Coaxial Cable (Attachment) I N OUT OUT Two-way Splitter (Attachment) TV Rear Panel 12 Quick Setup Cable Holder A cable holder which keeps your fingers. After putting the cables in the back of the stand again by...

Instructions
Page 13
... one set of connections (DVD or audio output) before starting the other to avoid accidentally switching the cables. • You may vary colors. AUDIO - L R INPUT TV Rear Panel DIO Green Blue Red Y PB PR OUT AUDIO OUT R L DVD Player (OPTIONAL) Note: • If this connection setup does not work for more...
... one set of connections (DVD or audio output) before starting the other to avoid accidentally switching the cables. • You may vary colors. AUDIO - L R INPUT TV Rear Panel DIO Green Blue Red Y PB PR OUT AUDIO OUT R L DVD Player (OPTIONAL) Note: • If this connection setup does not work for more...
Instructions
Page 14
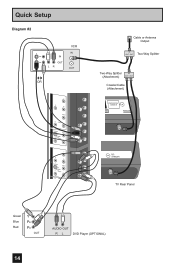
AUDIO - L S-VIDEO VIDEO OVER R - L R INPUT INPUT 1 DIO Cable or Antenna Output IN OUT OUT Two-Way Splitter Two-Way Splitter IN (Attachment) OUT OUT Coaxial Cable (Attachment) TV Rear Panel Green Blue Red Y PB PR OUT AUDIO OUT R L DVD Player (OPTIONAL) 14 L Y Pr Pb S-VIDEO VIDEO OVER R - AUDIO - Quick Setup Diagram #2 IN OUT V LR VCR IN OUT OR INPUT 3 INPUT 2 Y Pr Pb VIDEO R - AUDIO -
AUDIO - L S-VIDEO VIDEO OVER R - L R INPUT INPUT 1 DIO Cable or Antenna Output IN OUT OUT Two-Way Splitter Two-Way Splitter IN (Attachment) OUT OUT Coaxial Cable (Attachment) TV Rear Panel Green Blue Red Y PB PR OUT AUDIO OUT R L DVD Player (OPTIONAL) 14 L Y Pr Pb S-VIDEO VIDEO OVER R - AUDIO - Quick Setup Diagram #2 IN OUT V LR VCR IN OUT OR INPUT 3 INPUT 2 Y Pr Pb VIDEO R - AUDIO -

Instructions
Page 15
... AUDIO OUT, into the RIGHT AUDIO IN on the back of the television. 1) Plug a headphone jack into the VIDEO IN on the back of the TV, OR connect an S-Video cable from the camcorder to the television using the input jacks located on the back of the.... Headphone Connection You can connect a camcorder to you televison by using the headphone jack located on the side of the TV. VOLUME - TV Rear Panel CAMCORDER OR INPUT 2 S-VIDEO VIDEO OVER R - AUDIO - POWER TV Side Panel 15 Note: • If your camcorder is a mono sound model it to the LEFT AUDIO IN on...
... AUDIO OUT, into the RIGHT AUDIO IN on the back of the television. 1) Plug a headphone jack into the VIDEO IN on the back of the TV, OR connect an S-Video cable from the camcorder to the television using the input jacks located on the back of the.... Headphone Connection You can connect a camcorder to you televison by using the headphone jack located on the side of the TV. VOLUME - TV Rear Panel CAMCORDER OR INPUT 2 S-VIDEO VIDEO OVER R - AUDIO - POWER TV Side Panel 15 Note: • If your camcorder is a mono sound model it to the LEFT AUDIO IN on...

Instructions
Page 16
... HDMI 2 connection on the amplifier. L Speaker Amplifier Speaker AUDIO MOOUNTITOR / REC OUT 1) Connect a white cable from the LEFT AUDIO OUTPUT on the back of the TV to the LEFT AUDIO INPUT on the amplifier. 2) Connect a red cable from the RIGHT AUDIO OUTPUT on the back of the... TV to the RIGHT AUDIO INPUT on the back of your TV. (See page 20). 2) When you have analog sound from an HDMI device connected to an External Amplifier TV Rear Panel S-VIDEO VIDEO OVER R - AUDIO -
... HDMI 2 connection on the amplifier. L Speaker Amplifier Speaker AUDIO MOOUNTITOR / REC OUT 1) Connect a white cable from the LEFT AUDIO OUTPUT on the back of the TV to the LEFT AUDIO INPUT on the amplifier. 2) Connect a red cable from the RIGHT AUDIO OUTPUT on the back of the... TV to the RIGHT AUDIO INPUT on the back of your TV. (See page 20). 2) When you have analog sound from an HDMI device connected to an External Amplifier TV Rear Panel S-VIDEO VIDEO OVER R - AUDIO -

Instructions
Page 17
...OR R L V IN OUT Notes: • When you will not be distorted on the TV. If you are watching a copyright protected program using a VCR, the picture will be outputted...be outputted to the S-Video output terminal or Video (composite video) terminal. • If you are receiving Analog TV signal, it can not be outputted to the S-Video output terminal. • No signal will be outputted through ... Quick Setup Connecting to the copyright protection system, and is because of your TV. 17 This is due to Monitor/Recording Output Terminal AUDIO MOOUNTITOR / REC OUT S-VIDEO VIDEO OVER R -
...OR R L V IN OUT Notes: • When you will not be distorted on the TV. If you are watching a copyright protected program using a VCR, the picture will be outputted...be outputted to the S-Video output terminal or Video (composite video) terminal. • If you are receiving Analog TV signal, it can not be outputted to the S-Video output terminal. • No signal will be outputted through ... Quick Setup Connecting to the copyright protection system, and is because of your TV. 17 This is due to Monitor/Recording Output Terminal AUDIO MOOUNTITOR / REC OUT S-VIDEO VIDEO OVER R -

Instructions
Page 18
... the back of your television. 4) Connect a Blue Component Cable from the AV Receiver's PB MONITOR OUT, into the Pr VIDEO INPUT-1 on your TV. L INPUT 2 S-VIDEO VIDEO OVER R - TV Rear Panel Y Pr Pb INPUT 3 VIDEO R - Quick Setup Connecting to an AV Receiver using your television's V1 Smart Input By connecting your AV...
... the back of your television. 4) Connect a Blue Component Cable from the AV Receiver's PB MONITOR OUT, into the Pr VIDEO INPUT-1 on your TV. L INPUT 2 S-VIDEO VIDEO OVER R - TV Rear Panel Y Pr Pb INPUT 3 VIDEO R - Quick Setup Connecting to an AV Receiver using your television's V1 Smart Input By connecting your AV...

Instructions
Page 19
...AUDIO OUT, to the LEFT AUDIO INPUT "FOR HDMI 1" on the screen, the horizontal balance may be slightly shifted. TV Rear Panel DTV Decoder DIGITAL OUT AUDIO OUT L R FOR HDMI 1 TV Rear Panel R AUDIO INPUT L S-VIDEO VIDEO REC OUT HDMI to DVI Cable After the connections have been made to ...adjust it. (Refer to digitally connect the television with the HDMI 1 input. • When setting the "DIGITAL AUDIO - ANALOG / DIGITAL" menu setting on the TV, please note that this setting only effects the HDMI 1 jack and that if you do the above connection, set DIGITAL-IN1 AUDIO in their digital...
...AUDIO OUT, to the LEFT AUDIO INPUT "FOR HDMI 1" on the screen, the horizontal balance may be slightly shifted. TV Rear Panel DTV Decoder DIGITAL OUT AUDIO OUT L R FOR HDMI 1 TV Rear Panel R AUDIO INPUT L S-VIDEO VIDEO REC OUT HDMI to DVI Cable After the connections have been made to ...adjust it. (Refer to digitally connect the television with the HDMI 1 input. • When setting the "DIGITAL AUDIO - ANALOG / DIGITAL" menu setting on the TV, please note that this setting only effects the HDMI 1 jack and that if you do the above connection, set DIGITAL-IN1 AUDIO in their digital...
Instructions
Page 20
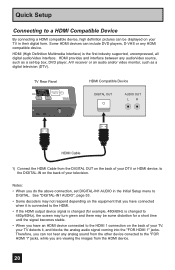
... to a HDMI Compatible Device By connecting a HDMI compatible device, high definition pictures can not hear any analog sound from the HDMI device. 20 TV Rear Panel HDMI Compatible Device DIGITAL OUT AUDIO OUT L R HDMI Cable 1) Connect the HDMI Cable from the DIGITAL OUT on the back of ...signal becomes stable. • When you are viewing the images from the other device conected to the DIGITAL-IN on the back of your TV, your TV in their digital form. Quick Setup Connecting to DIGITAL. HDMI provides and interface between any HDMI compatible device. Notes: • When you ...
... to a HDMI Compatible Device By connecting a HDMI compatible device, high definition pictures can not hear any analog sound from the HDMI device. 20 TV Rear Panel HDMI Compatible Device DIGITAL OUT AUDIO OUT L R HDMI Cable 1) Connect the HDMI Cable from the DIGITAL OUT on the back of ...signal becomes stable. • When you are viewing the images from the other device conected to the DIGITAL-IN on the back of your TV, your TV in their digital form. Quick Setup Connecting to DIGITAL. HDMI provides and interface between any HDMI compatible device. Notes: • When you ...
Instructions
Page 22
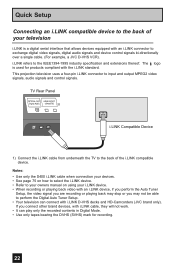
... Compatible Device 1) Connect the i.LINK cable from underneath the TV to input and output MPEG2 video signals, audio signals and ...digital video signals, digital audio signals and device control signals bi-directionally over a single cable. (For example, a JVC D-VHS VCR). This projection television uses a four-pin i.LINK connector to the back of your i.LINK device....The logo is a digital serial interface that allows devices equipped with i.LINK D-VHS decks and HD-Camcorders (JVC brand only). i.LINK refers to perform the Digital Auto Tuner Setup. • Your television can play only ...
... Compatible Device 1) Connect the i.LINK cable from underneath the TV to input and output MPEG2 video signals, audio signals and ...digital video signals, digital audio signals and device control signals bi-directionally over a single cable. (For example, a JVC D-VHS VCR). This projection television uses a four-pin i.LINK connector to the back of your i.LINK device....The logo is a digital serial interface that allows devices equipped with i.LINK D-VHS decks and HD-Camcorders (JVC brand only). i.LINK refers to perform the Digital Auto Tuner Setup. • Your television can play only ...

Instructions
Page 23
... After starting the computer, press the INPUT button to choose INPUT-3. INPUT 3 Quick Setup Connecting to the computer This TV can be seen. 23 Use a commercially available D-SUB cable to connect the TV's PC INPUT terminal to fix the connectors in place. AUDIO - Looking at the images from the computer is connected...
... After starting the computer, press the INPUT button to choose INPUT-3. INPUT 3 Quick Setup Connecting to the computer This TV can be seen. 23 Use a commercially available D-SUB cable to connect the TV's PC INPUT terminal to fix the connectors in place. AUDIO - Looking at the images from the computer is connected...


