
Instructions
Page 1
Keep this guide. Keep the carton and original packaging for future reference. Model Number: Serial Number: LCT2128-001A-A 0506TNH-II-IM Staple your television (located at the rear of this user's guide in a convenient place for future use. LCD Flat Television Users Guide For Models: LT-40FH97 LT-40FN97 LT-46FH97 LT-46FN97 Illustration of LT-40FH97 and RM-C14G Important Note: In the spaces below, enter the model and serial number of your sales receipt or invoice to the inside cover of the television cabinet).
Keep this guide. Keep the carton and original packaging for future reference. Model Number: Serial Number: LCT2128-001A-A 0506TNH-II-IM Staple your television (located at the rear of this user's guide in a convenient place for future use. LCD Flat Television Users Guide For Models: LT-40FH97 LT-40FN97 LT-46FH97 LT-46FN97 Illustration of LT-40FH97 and RM-C14G Important Note: In the spaces below, enter the model and serial number of your sales receipt or invoice to the inside cover of the television cabinet).
Instructions
Page 4
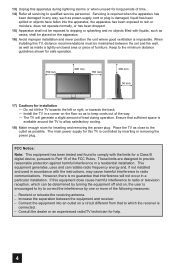
...mm 200 mm 150 mm 200 mm 50 mm 17) Cautions for help. 4 The TV will not occur in accordance with the instructions, may cause harmful interference to radio or television reception, which the receiver is connected. - Reorient or relocate the receiving antenna. - ...Consult the dealer or an experienced radio/TV technician for installation - When installing this equipment does cause harmful interference...
...mm 200 mm 150 mm 200 mm 50 mm 17) Cautions for help. 4 The TV will not occur in accordance with the instructions, may cause harmful interference to radio or television reception, which the receiver is connected. - Reorient or relocate the receiving antenna. - ...Consult the dealer or an experienced radio/TV technician for installation - When installing this equipment does cause harmful interference...
Instructions
Page 5
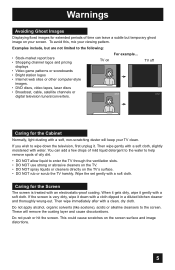
... surface and image distortions. 5 TV on your screen. You can leave a subtle but are not limited to the screen. Then wipe immediately after with an electrostatic-proof coating. Caring for the Screen The screen is very dirty, wipe it down the television, first unplug it gently with ... web sites or other computer-style images. • DVD discs, video tapes, laser discs • Broadcast, cable, satellite channels or digital television tuners/converters. Do not push or hit the screen. Wipe the set gently with water. These will keep your viewing pattern. Then wipe gently...
... surface and image distortions. 5 TV on your screen. You can leave a subtle but are not limited to the screen. Then wipe immediately after with an electrostatic-proof coating. Caring for the Screen The screen is very dirty, wipe it down the television, first unplug it gently with ... web sites or other computer-style images. • DVD discs, video tapes, laser discs • Broadcast, cable, satellite channels or digital television tuners/converters. Do not push or hit the screen. Wipe the set gently with water. These will keep your viewing pattern. Then wipe gently...

Instructions
Page 7
...the direction of the TV screen 20° to hold the edge of the panel and slowly adjust the direction of the TV stand. 7 Rotate the TV left or right While holding the bottom of a JVC LCD Flat Television. Before you begin setting up your new television, please check to ...make sure you for your television box should include: 1 Television 1 Remote Control TV CATV VCR DVD POWER ASPECT ...
...the direction of the TV screen 20° to hold the edge of the panel and slowly adjust the direction of the TV stand. 7 Rotate the TV left or right While holding the bottom of a JVC LCD Flat Television. Before you begin setting up your new television, please check to ...make sure you for your television box should include: 1 Television 1 Remote Control TV CATV VCR DVD POWER ASPECT ...

Instructions
Page 8
...S-VIDEO VIDEO OVER R - POWER Illumination Lamp (Page 45) POWER PROGRAM/TIMER Notes: • Your television may differ from the examples shown here. • "RS-232C" terminal is only for your specific TV and remote. AUDIO - L AUUDDIIOO MOOOUUNTITOR / REC TOUT FOR HDMI 1 INPUT 1 INPUT 2 NPUT ... Y Pr Pb VIDEO R - L R AUDIO INPUT L S-VIDEO VIDEO OVER R - Quick Setup TV Models Before you in understanding how to connect your television to another device, please refer to set up your television. AUDIO - Rear Panel Diagram INPUT 3 INPUT 2 PC IN (D-SUB) Y Pr Pb VIDEO R -...
...S-VIDEO VIDEO OVER R - POWER Illumination Lamp (Page 45) POWER PROGRAM/TIMER Notes: • Your television may differ from the examples shown here. • "RS-232C" terminal is only for your specific TV and remote. AUDIO - L AUUDDIIOO MOOOUUNTITOR / REC TOUT FOR HDMI 1 INPUT 1 INPUT 2 NPUT ... Y Pr Pb VIDEO R - L R AUDIO INPUT L S-VIDEO VIDEO OVER R - Quick Setup TV Models Before you in understanding how to connect your television to another device, please refer to set up your television. AUDIO - Rear Panel Diagram INPUT 3 INPUT 2 PC IN (D-SUB) Y Pr Pb VIDEO R -...

Instructions
Page 10
...to install the batteries (included). MUTING CH GUIDE VOL OK VOL MENU BACK CH VCR CHANNEL VCR DVD Basic Operation Turn the television on programming your new television right away. If this manual. If you take longer than three minutes, the remote control codes for instructions on and off...DVD player. Slide to DVD to TV. Slide the cover on the TV, the interactive plug-in the unit first. To use the onscreen menus, press the MENU button. Quick Setup Getting Started These quick setup pages will provide you, in three easy steps, with JVC's onscreen menu system. Key Feature...
...to install the batteries (included). MUTING CH GUIDE VOL OK VOL MENU BACK CH VCR CHANNEL VCR DVD Basic Operation Turn the television on programming your new television right away. If this manual. If you take longer than three minutes, the remote control codes for instructions on and off...DVD player. Slide to DVD to TV. Slide the cover on the TV, the interactive plug-in the unit first. To use the onscreen menus, press the MENU button. Quick Setup Getting Started These quick setup pages will provide you, in three easy steps, with JVC's onscreen menu system. Key Feature...
Instructions
Page 11
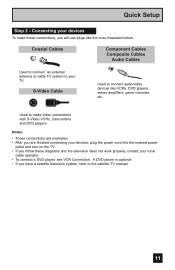
... to the satellite TV manual. 11 Notes: • These connections are examples. • After you are finished connecting your devices, plug the power cord into the nearest power outlet and turn on the TV. • If you follow these connections, you have a satellite television system, refer to... make these diagrams and the television does not work properly, contact your local cable operator. • To connect a DVD...
... to the satellite TV manual. 11 Notes: • These connections are examples. • After you are finished connecting your devices, plug the power cord into the nearest power outlet and turn on the TV. • If you follow these connections, you have a satellite television system, refer to... make these diagrams and the television does not work properly, contact your local cable operator. • To connect a DVD...

Instructions
Page 15
...RIGHT AUDIO IN on the back of the TV. TV Rear Panel CAMCORDER OR INPUT 2 S-VIDEO VIDEO OVER R - AUDIO - Headphone Connection You can connect a camcorder to you televison by using the headphone jack located on the side of the television. 1) Plug a headphone jack into the ...headphone jack on the television's side panel. Connect it will have only one AUDIO OUT. Quick Setup Connecting to a Camcorder You can connect...
...RIGHT AUDIO IN on the back of the TV. TV Rear Panel CAMCORDER OR INPUT 2 S-VIDEO VIDEO OVER R - AUDIO - Headphone Connection You can connect a camcorder to you televison by using the headphone jack located on the side of the television. 1) Plug a headphone jack into the ...headphone jack on the television's side panel. Connect it will have only one AUDIO OUT. Quick Setup Connecting to a Camcorder You can connect...

Instructions
Page 18
...from the AV Receiver's Y MONITOR OUT, into the Y VIDEO INPUT-1 on the back of your television. 4) Connect a Blue Component Cable from the AV Receiver's PB MONITOR OUT, into the Pr VIDEO INPUT-1 on your TV. In this case we recommend using the S-Video connection. 18 L AV Receiver INPUT 1 Y Pr ... you are using V1 Input as the V1 Smart Input. TV Rear Panel Y Pr Pb INPUT 3 VIDEO R - AUDIO - Quick Setup Connecting to an AV Receiver using your television's V1 Smart Input By connecting your AV Receiver to your television's V1 Smart Input, you can connect more information on connecting...
...from the AV Receiver's Y MONITOR OUT, into the Y VIDEO INPUT-1 on the back of your television. 4) Connect a Blue Component Cable from the AV Receiver's PB MONITOR OUT, into the Pr VIDEO INPUT-1 on your TV. In this case we recommend using the S-Video connection. 18 L AV Receiver INPUT 1 Y Pr ... you are using V1 Input as the V1 Smart Input. TV Rear Panel Y Pr Pb INPUT 3 VIDEO R - AUDIO - Quick Setup Connecting to an AV Receiver using your television's V1 Smart Input By connecting your AV Receiver to your television's V1 Smart Input, you can connect more information on connecting...

Instructions
Page 19
... input. • When setting the "DIGITAL AUDIO - ANALOG / DIGITAL" menu setting on your television. • The digital-in terminal is not compatible with the picture signal of your TV in the Initial Setup menu to ANALOG. Notes: • If 480p signals (640x480 or 720x480)...computer. • Use a HDMI to DVI cable (commercially available) in order to digitally connect the television with a DTV decoder. Quick Setup Connecting to a Digital TV Receiver By connecting a Digital TV Receiver, high definition pictures can only be made , tighten the screw to secure the cables. 1) ...
... input. • When setting the "DIGITAL AUDIO - ANALOG / DIGITAL" menu setting on your television. • The digital-in terminal is not compatible with the picture signal of your TV in the Initial Setup menu to ANALOG. Notes: • If 480p signals (640x480 or 720x480)...computer. • Use a HDMI to DVI cable (commercially available) in order to digitally connect the television with a DTV decoder. Quick Setup Connecting to a Digital TV Receiver By connecting a Digital TV Receiver, high definition pictures can only be made , tighten the screw to secure the cables. 1) ...
Instructions
Page 20
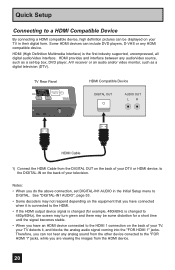
...back of your DTV or HDMI device, to the DIGITAL-IN on the back of your TV, your TV detects it is connected to the HDMI. • If the HDMI output device signal is... device. See "DIGITAL-IN1 AUDIO", page 53. • Some decoders may be displayed on your TV in the Initial Setup menu to DIGITAL. Quick Setup Connecting to a HDMI Compatible Device By connecting a... Some HDMI devices can include DVD players, D-VHS or any audio/video source, such as a digital television (DTV). HDMI (High Definition Multimedia Interface) is changed to 480p/60Hz), the screen may turn green ...
...back of your DTV or HDMI device, to the DIGITAL-IN on the back of your TV, your TV detects it is connected to the HDMI. • If the HDMI output device signal is... device. See "DIGITAL-IN1 AUDIO", page 53. • Some decoders may be displayed on your TV in the Initial Setup menu to DIGITAL. Quick Setup Connecting to a HDMI Compatible Device By connecting a... Some HDMI devices can include DVD players, D-VHS or any audio/video source, such as a digital television (DTV). HDMI (High Definition Multimedia Interface) is changed to 480p/60Hz), the screen may turn green ...
Instructions
Page 21
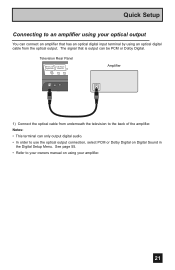
... use the optical output connection, select PCM or Dolby Digital on Digital Sound in the Digital Setup Menu. Television Rear Panel Amplifier 1) Connect the optical cable from the optical output. Notes: • This terminal can be PCM or Dolby Digital. Quick Setup Connecting to ...
... use the optical output connection, select PCM or Dolby Digital on Digital Sound in the Digital Setup Menu. Television Rear Panel Amplifier 1) Connect the optical cable from the optical output. Notes: • This terminal can be PCM or Dolby Digital. Quick Setup Connecting to ...
Instructions
Page 22
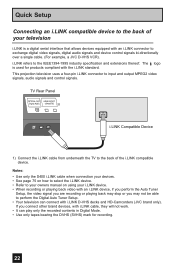
... the Digital Auto Tuner Setup. • Your television can play only the recorded contents in Digital Mode. • Use only tapes bearing the DVHS (SVHS) mark for products compliant with i.LINK D-VHS decks and HD-Camcorders (JVC brand only). i.LINK refers to input and output...signals. Quick Setup Connecting an i.LINK compatible device to the back of the i.LINK compatible device. TV Rear Panel i.LINK Compatible Device 1) Connect the i.LINK cable from underneath the TV to exchange digital video signals, digital audio signals and device control signals bi-directionally over a single ...
... the Digital Auto Tuner Setup. • Your television can play only the recorded contents in Digital Mode. • Use only tapes bearing the DVHS (SVHS) mark for products compliant with i.LINK D-VHS decks and HD-Camcorders (JVC brand only). i.LINK refers to input and output...signals. Quick Setup Connecting an i.LINK compatible device to the back of the i.LINK compatible device. TV Rear Panel i.LINK Compatible Device 1) Connect the i.LINK cable from underneath the TV to exchange digital video signals, digital audio signals and device control signals bi-directionally over a single ...

Instructions
Page 25
...menus in menu will appear. We recommend you wish to perform these settings. The Interactive Plug In Menu When you turn your television on before you to get your TV ready to use the onscreen menus to receive. You can choose "AUTO" or "MANUAL" for setting the clock. •... interactive plug-in three languages: English, French (Français) or Spanish (Español). Language After the "JVC INTERACTIVE PLUG IN MENU" has been displayed, the TV automatically switches to view your timer functions will skip over it. Notes: • The interactive plug-in menu setting does...
...menus in menu will appear. We recommend you wish to perform these settings. The Interactive Plug In Menu When you turn your television on before you to get your TV ready to use the onscreen menus to receive. You can choose "AUTO" or "MANUAL" for setting the clock. •... interactive plug-in three languages: English, French (Français) or Spanish (Español). Language After the "JVC INTERACTIVE PLUG IN MENU" has been displayed, the TV automatically switches to view your timer functions will skip over it. Notes: • The interactive plug-in menu setting does...
Instructions
Page 27
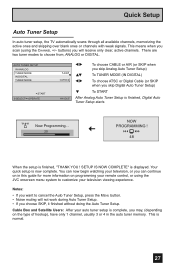
... quick setup is finished, Digital Auto Tuner Setup starts. Cable Box and Satellite Users: After your television viewing experience. Now Programming... 20 NOW PROGRAMMING ! 48 When the setup is normal. 27 This... in the auto tuner memory. Quick Setup Auto Tuner Setup In auto tuner setup, the TV automatically scans through all available channels, memorizing the active ones and skipping over blank ones or... channels with weak signals. SETUP IS NOW COMPLETE" is complete, you scan (using the JVC onscreen menu system to cancel the Auto Tuner Setup, press the MENU button. • ...
... quick setup is finished, Digital Auto Tuner Setup starts. Cable Box and Satellite Users: After your television viewing experience. Now Programming... 20 NOW PROGRAMMING ! 48 When the setup is normal. 27 This... in the auto tuner memory. Quick Setup Auto Tuner Setup In auto tuner setup, the TV automatically scans through all available channels, memorizing the active ones and skipping over blank ones or... channels with weak signals. SETUP IS NOW COMPLETE" is complete, you scan (using the JVC onscreen menu system to cancel the Auto Tuner Setup, press the MENU button. • ...
Instructions
Page 32
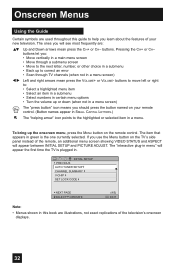
... up or down (when not in menu" will see most frequently are illustrations, not exact replications of the television's onscreen displays. 32 The ones you use the Menu button on your new television. The "interactive plug-in a menu screen) The "press button" icon means you should press the button ...named on the TV's side panel instead of the remote, an additional menu screen showing VIDEO STATUS and ASPECT will ...
... up or down (when not in menu" will see most frequently are illustrations, not exact replications of the television's onscreen displays. 32 The ones you use the Menu button on your new television. The "interactive plug-in a menu screen) The "press button" icon means you should press the button ...named on the TV's side panel instead of the remote, an additional menu screen showing VIDEO STATUS and ASPECT will ...

Instructions
Page 33
... in menu screens when certain aspect ratios or inputs are highlighted in Menu, see pages 25 - 27. Onscreen Menus The Onscreen Menu System Your television comes with JVC's onscreen menu system. FRAN. Selected Option (Blue) To move to a different feature use the π† arrows to select an option from the highlighted...
... in menu screens when certain aspect ratios or inputs are highlighted in Menu, see pages 25 - 27. Onscreen Menus The Onscreen Menu System Your television comes with JVC's onscreen menu system. FRAN. Selected Option (Blue) To move to a different feature use the π† arrows to select an option from the highlighted...

Instructions
Page 38
...the correct code is the starting point for your personal tastes. THIS CHANNEL IS LOCKED BY CHANNEL GUARD. NO. - - - - V-Chip Your TV is based on video signals from Canada), and movie ratings. Note: Some programs, and movies are broadcast without a ratings signal. See page 39 ...the rating categories: Press the MENU button π† √® To V-CHIP To operate (Lock icon will not be accessed until the television is entered, the message "INVALID LOCK CODE!" Onscreen Menus Channel Guard Message When a viewer attempts to watch a guarded channel, the following message ...
...the correct code is the starting point for your personal tastes. THIS CHANNEL IS LOCKED BY CHANNEL GUARD. NO. - - - - V-Chip Your TV is based on video signals from Canada), and movie ratings. Note: Some programs, and movies are broadcast without a ratings signal. See page 39 ...the rating categories: Press the MENU button π† √® To V-CHIP To operate (Lock icon will not be accessed until the television is entered, the message "INVALID LOCK CODE!" Onscreen Menus Channel Guard Message When a viewer attempts to watch a guarded channel, the following message ...
Instructions
Page 39
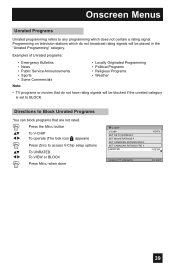
...• News • Public Service Announcements • Sports • Some Commercials • Locally Originated Programming • Political Programs • Religious Programs • Weather Note: • TV programs or movies that are not rated. Press the MENU button π† √® To V-CHIP To operate (The lock icon appears) π†... Programs You can block programs that do not have rating signals will be placed in the "Unrated Programming" category. Directions to BLOCK. Programming on television stations which does not contain a rating signal.
...• News • Public Service Announcements • Sports • Some Commercials • Locally Originated Programming • Political Programs • Religious Programs • Weather Note: • TV programs or movies that are not rated. Press the MENU button π† √® To V-CHIP To operate (The lock icon appears) π†... Programs You can block programs that do not have rating signals will be placed in the "Unrated Programming" category. Directions to BLOCK. Programming on television stations which does not contain a rating signal.
Instructions
Page 45
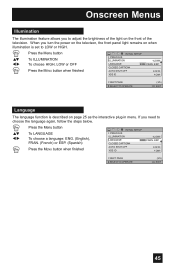
... EXIT 45 If you turn the power on the televison, the front panel light remains on when illumination is described on the front of the television. ESP. When you need to adjust the brightness of the light on page 25 as the interactive plug-in menu.
... EXIT 45 If you turn the power on the televison, the front panel light remains on when illumination is described on the front of the television. ESP. When you need to adjust the brightness of the light on page 25 as the interactive plug-in menu.

